Optex 2020PLMK-1 Bedienungsanleitung
Optex
Nicht kategorisiert
2020PLMK-1
Lies die bedienungsanleitung für Optex 2020PLMK-1 (2 Seiten) kostenlos online; sie gehört zur Kategorie Nicht kategorisiert. Dieses Handbuch wurde von 6 Personen als hilfreich bewertet und erhielt im Schnitt 4.6 Sterne aus 3.5 Bewertungen. Hast du eine Frage zu Optex 2020PLMK-1 oder möchtest du andere Nutzer dieses Produkts befragen? Stelle eine Frage
Seite 1/2

Page of 1 2
Mount
racket
Wall Mount
Ada
Conduit Plugs
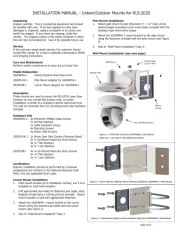
Figure 1 OPTEX RLS-2020 with 2020WMA-1 Wall Mount –
(Overview see Figure 5 for additional details) –
Figure 2 Corner Mount (right) w/ Mount Bracket (left) from 2020WMA-1 Wall Mount –
Figure 3 Pole Mount (right) w/ Mount Bracket (left) from 2020WMA-1 Wall Mount –
INSTALLATION MANUAL Indoor/Outdoor Mounts for RLS-2020 –
Unpacking
Unpack carefully. This is mechanical equipment and should
be handled with care. If an item appears to have been
damaged in shipment, replace it properly in its carton and
notify the shipper. If any items are missing, notify the
vendor. The shipping carton is the safest container in which
the unit may be transported. Save it for possible future use.
Service
If the unit ever needs repair service, the customer should
contact the vendor for a return materials authorization (RMA)
and shipping instructions.
Care and Maintenance
Perform routine maintenance to keep the unit dust free.
Model Designation
2020WMA-1 Indoor/Outdoor Wall Mount Arm
2020PLMK-1 Pole Mount Adapter for 2020WMA-1
2020CMB-1 Corner Mount Adapter for 2020WMA-1
Description
These mounts are used to mount the RLS-2020 Laser Scan
Detector on any vertical flat surface, pole, or corner.
Installation is similar to a standard camera wall mount arm.
The wall arm provides four (4) mounting points and hardware
included.
Hardware Kits
2020WMA-1 2x M4x10mm Phillips Head Screws :
2x M4 Flat Washers
1x Cable Grommet (Gray)
4x Mounting Screws
4x Plastic Wall Anchors
2020PLMK-1: 2x Worm Gear Pipe Clamps (Stainless Steel)
4x ¼-20 Round Head Hex Drive Screws
4x ¼” Flat Washers
4x ¼” Lock Washers
2020CMB-1 4x ¼-20 Round Head Hex Drive Screws
4x ¼” Flat Washers
4x ¼” Lock Washers
Certification
Scanner installation should be performed by a licensed
professional and conform to the National Electrical Code
(NEC) and any applicable local codes.
Corner Mount Installation
1. Hold mount bracket up to installation surface; use it as a
template to mark hole locations.
2. Drill appropriate size holes for fasteners and cable; each
fastener should have a 150-lbs pull-out strength. Attach
mount bracket to wall with appropriate fasteners.
3. Attach the 2020WMA-1 mount bracket to the corner
mount using the fasteners provided with the corner
mount (see Figure 2).
4. Sk ip to “Wall Mount Installation” Step 3.
Pole Mount Installation
1. Attach pole mount to pole ( at the Diameter 3” ~ 12” max)
desired height according to the instructions included with the
stainless steel worm-drive straps.
2. Attach the 2020WMA-1 mount bracket to the pole mount
using the fasteners included with the pole mount (see Figure
3)
3. Skip to “Wall Mount Installation” Step 3.
Wall Mount Installation (see next page)

Page of 2 2
Wall Mount Installation
1. Hold mount bracket up to installation surface; use it as a template to mark
hole locations.
2. Drill appropriate size holes for fasteners and cable. Each fastener should be
appropriate for the installation surface and have a 150-lbs pull-out strength.
3. Attach mount bracket to wall with appropriate fasteners.
IMPORTANT NOTE:
The Mount Flange Gasket requires a flat, smooth
surface to function properly. When installing this mount on a rough surface
(e.g. brick wall), apply a bead of RTV around the perimeter of the mount
bracket.
4. (
Optional)
Remove conduit plug from wall mount and run conduit to the
installation site. Attach conduit to the top or bottom of the mount with a 3/4"
conduit fitting.
5. Run cable through mount bracket leaving enough slack to run cable through
mount to RLS- 2020
6. Attach gasket around mount flange.
7. Route cable through wall mount. Remove adapter plate if needed to route
cables; re-attach once cables are routed through hole in plate.
8. Two recessed screws in the top of the mount flange (see Figure 4) can be
used to hang the wall mount on the wall bracket. Ensure the screws do not
protrude past the mount flange which could prevent a good seal
9. Align the holes and install screws in the wall mount to attach it to the wall
bracket. Ensure the gasket is being compressed by the installation surface.
10. Make wiring connections to the RLS-2020 per “Wiring Cable Entry” section of
instructions included with that unit.
IMPORTANT NOTE
: If removing the knockout in the base of the RLS-2020
for cable entry in outdoor environments install the gray grommet from the ,
2020WMA-1 hardware kit into the knockout hole and run the cable through the
grommet. Deburr the knockout hole with a 20mm drill to ensure a good s l ea
(see Figure 6a-6d).
11. Attach RLS-2020 to adapter plate per instructions included with that unit.
RLS-2020
Mounting
RLS-2020 Redscan Mini
4x Screws w/
Rubber Washers
Gasket (Mount
Flange)
Mount
bracket
2x Phillips Head Screws
(Kit)
Wall Mount
Adapter Plate
Conduit Plugs w/ O-
rings (2x 3/4" NPT)
Figure 5 OPTEX RLS-2020 with –
2020WMA-1 Wall Mount Detail
Figure 4 Rear flange of 2020WMA- –1
(right) and Mount Bracket (left)
Figure 6a Use a –
20mm drill or step
drill to deburr the
knockout
Figure 6b Chamfer –
both sides lightly
Figure 6c Ready to install grommet –
Figure 6d Grommet installed –
Left = Outside, Right = Inside
Produktspezifikationen
| Marke: | Optex |
| Kategorie: | Nicht kategorisiert |
| Modell: | 2020PLMK-1 |
Brauchst du Hilfe?
Wenn Sie Hilfe mit Optex 2020PLMK-1 benötigen, stellen Sie unten eine Frage und andere Benutzer werden Ihnen antworten
Bedienungsanleitung Nicht kategorisiert Optex
3 August 2025

8 Juli 2025
5 Juli 2025
13 Juni 2025

13 Juni 2025
12 Juni 2025

24 September 2024
5 September 2024
3 September 2024
3 September 2024
Bedienungsanleitung Nicht kategorisiert
- Joseph Joseph
- SMC
- Kyoritsu
- Hooker
- Huzaro
- Orava
- Grundfos
- Cadel
- Alfresco
- Car Keys Express
- West Elm
- OBSBOT
- Trio Lighting
- Atlantis Land
- Cardiostrong
Neueste Bedienungsanleitung für -Kategorien-

7 August 2025

7 August 2025
7 August 2025
7 August 2025

7 August 2025
7 August 2025
7 August 2025

7 August 2025
7 August 2025

7 August 2025