Panasonic ER-CKL2 Bedienungsanleitung
Panasonic Körperpfleger ER-CKL2
Lies die bedienungsanleitung für Panasonic ER-CKL2 (4 Seiten) kostenlos online; sie gehört zur Kategorie Körperpfleger. Dieses Handbuch wurde von 17 Personen als hilfreich bewertet und erhielt im Schnitt 4.7 Sterne aus 6 Bewertungen. Hast du eine Frage zu Panasonic ER-CKL2 oder möchtest du andere Nutzer dieses Produkts befragen? Stelle eine Frage
Seite 1/4
GB
English
•Before operating this unit, please read
these instructions completely and save
them for future use.
•Please read the code on the cover for the
detailed operating instructions.
Important information
•Apply the lubrication oil to the blade
before and after each use.
Failure to apply the lubrication oil may
cause the following problems.
- The appliance has become blunt.
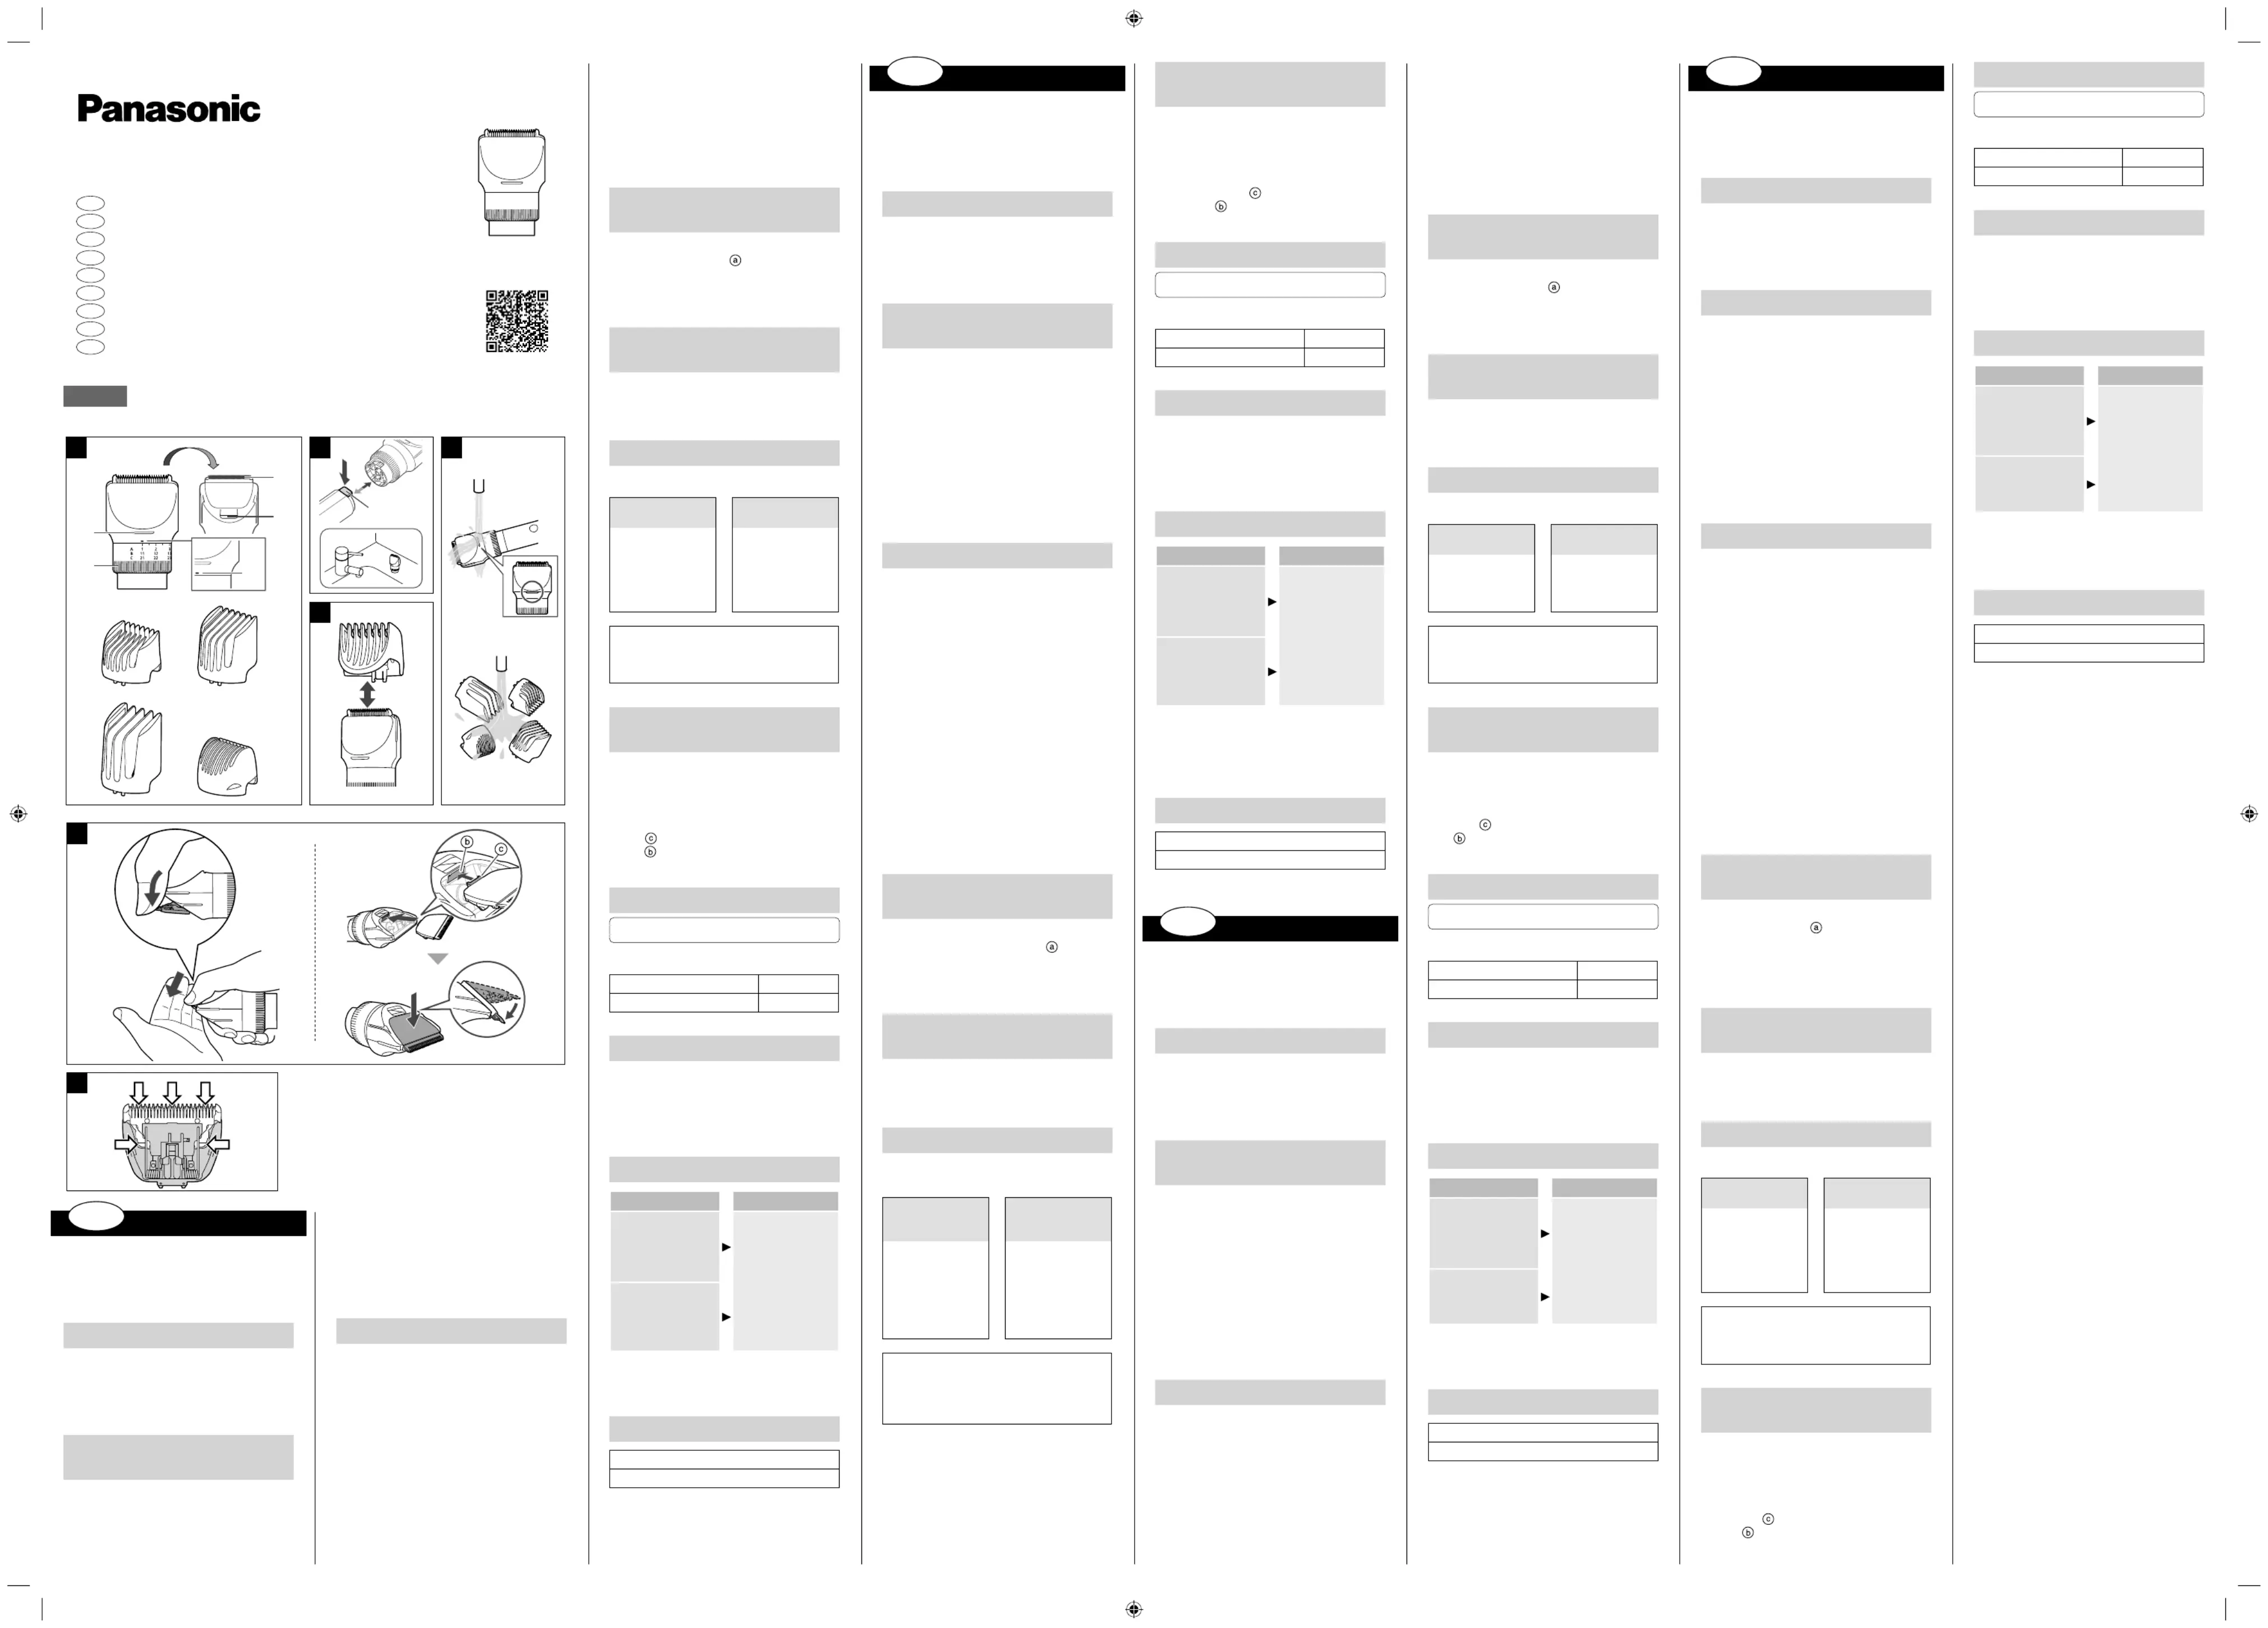
Parts identification
(Fig. 1)
AHead
Water inlet
Trimming height indication mark
Dial (Height adjustment control)
Water outlet
Blade
Note
•
The use time after a full charge is as follows.
ER-CBL1: 70 minutes
ER-CBN1: 40 minutes
(Based on dry using at 20 °C – 30 °C)
The operating time may diff er depending on
the frequency of use and the operating
method.
Removing and mounting
the head (Fig. 2)
Remove the head while pushing the
head release button ().
▪
Stand the head when it is removed.
Mount the head to the main body until it
clicks.
Removing and mounting
the comb attachment (Fig. 3)
Remove the comb attachment from the head.
Mount the comb attachment to the head
until it clicks.
How to clean
•Make sure that the main body is turned off .
•Lubricate after cleaning.
To remove
light dirt
To remove
heavy dirt
1.
Remove the
comb attachment,
run water down
the water inlet.
(Fig. 4)
1. Remove the
head, comb
attachment and
blade and rinse
them with
running water.
▼▼
2. Shake up and down several times to
remove the water.
3.
Wipe off the water with a dry cloth and dry
it well.
Removing and mounting
the blade
To remove the blade, hold the head,
place your thumb against the blades and
then push them away from the head.
(Fig. 5-
1
)
To mount the blade, fi t the mounting
hook () into the blade mounting on the
head () and then push in until you
hear a click. (Fig. 5-)2
Replacement parts
Blade: once every three years
Replacement part is available at your
dealer or Service Centre.
BladeWER9605
Lubrication oilWES003P
Lubrication (Fig. 6)
1
Apply a drop of the lubrication oil to
each indicated point.
2
Attach the blade to the head, turn on
the power and allow it to run for
approximately 5 seconds.
Troubleshooting
ProblemAction
The appliance has
become blunt.
Until problems are
solved, please
follow each
procedure as
follows;
1. Clean the blade
and apply
lubrication oil.
2. Replace the
blade.
Makes a loud sound.
If the problems still cannot be solved,
contact your dealer or a service centre
authorized by Panasonic for repair.
Specifications
Airborne Acoustical Noise
66 (dB (A) re 1 pW)
This product is intended for household use only.
Model No. ER-CTW1
GB
Operating Instructions
D
Betriebsanleitung
F
Mode d’emploi
I
Istruzioni d’uso
NL
Gebruiksaanwijzing
E
Instrucciones de funcionamiento
DK
Brugsanvisning
P
Instruções de Funcionamento
N
Brukerinstruksjoner
BComb attachment [A]
(1 mm to 10 mm)
CComb attachment [B]
(11 mm to 20 mm)
DComb attachment [C]
(21 mm to 30 mm)
EComb attachment for body hair [D]
How to use
•Clean the appliance after use.
1
Mount the head to the main body until
it clicks.
2
Mount the desired comb attachment and
adjust the trimming height as needed.
▪It can also be used without the comb
attachment.
(Trimming height: approx. 0.5 mm)
3
Turn on the power.
D
Deutsch
•Bevor Sie dieses Gerät in Betrieb nehmen,
lesen Sie sich bitte diese Anleitung vollständig
durch und bewahren Sie sie für ein späteres
Nachschlagen auf.
•Bitte lesen Sie den Code auf dem Deckblatt
für die detaillierte Bedienungsanleitung.
Wichtige Information
•Tragen Sie das Schmieröl vor und nach jedem
Gebrauch auf die Klinge auf.
Wird kein Schmieröl aufgetragen, können
folgende Probleme entstehen.
-
Das Gerät ist stumpf geworden.
Bezeichnung der Teile
(Abb. 1)
A
Aufsatz
Wassereingang
Schnitthöhe-Anzeigemarkierung
Wahlschalter (Schnittlänge)
Wasserausgang
Klinge
B
Kammaufsatz [A]
(1 mm bis 10 mm)
C
Kammaufsatz [B]
(11 mm bis 20 mm)
D
Kammaufsatz [C]
(21 mm bis 30 mm)
E
Kammaufsatz für Körperhaar [D]
Verwendungsweise
•Reinigen Sie das Gerät nach der Verwendung.
1
Montieren Sie den Aufsatz am Gehäuse,
bis er klickt.
2
Montieren Sie den gewünschten
Kammaufsatz und stellen Sie die
Schnitthöhe je nach Bedarf ein.
▪
Es kann auch ohne Kammaufsatz
verwendet werden.
(Schnitthöhe: etwa 0,5 mm)
3
Schalten Sie das Gerät ein.
Hinweis
•
Die Nutzungszeit nach einer vollen Ladung ist
wie folgt.
ER-CBL1: 70 Minuten
ER-CBN1: 40 Minuten
(Basierend auf trockener Verwendung bei
20 °C – 30 °C.)
Die Betriebszeit kann unterschiedlich sein und
hängt von der Häufi gkeit des Gebrauchs und
der Betriebsmethode ab.
Entfernen und Anbringen
des Aufsatzes (Abb. 2)
Entfernen Sie den Aufsatz, während Sie die
Aufsatz-Freigabetaste drücken ().
▪
Stellen Sie den Aufsatz auf, wenn er entfernt ist.
Montieren Sie den Aufsatz am Gehäuse, bis
er klickt.
Entfernen und Anbringen
des Kammaufsatzes (Abb. 3)
Entfernen Sie den Kammaufsatz vom Aufsatz.
Montieren Sie den Kammaufsatz auf den
Aufsatz, bis es klickt.
Reinigen
•Achten Sie darauf, dass das Handstück
ausgeschaltet ist.
•Nach der Reinigung schmieren.
Um leichte
Verschmutzung zu
entfernen
Um schwere
Verschmutzung zu
entfernen
1.
Entfernen Sie den
Kammaufsatz und
lassen Sie Wasser
den Wassereingang
herunter laufen.
(Abb. 4)
1.
Entfernen Sie den
Aufsatz, den
Kammaufsatz und
die Klinge und
spülen Sie sie mit
fließendem
Wasser ab.
▼▼
2.
Schütteln Sie ihn mehrmals auf und ab, um
das Wasser zu entfernen.
3.
Wischen Sie das Wasser mit einem
trockenen Tuch usw. ab und trocknen Sie
das Gerät.
Entfernen und Anbringen
der Klinge
Zum Entfernen der Klinge halten Sie den
Aufsatz fest, setzen Sie Ihren Daumen gegen
die Klingen und schieben Sie sie dann vom
Hauptgehäuse ab. (Abb. 5-
1
)
Zum Anbringen der Klinge stecken Sie die
Hakenbefestigung (
) in die Klingenhalterung
am Aufsatz (), und dann drücken Sie sie
hinein, bis Sie ein Klicken hören. (Abb. 5-
2
)
Ersatzteile
Klinge: einmal alle drei Jahre
Ersatzteile, die bei Ihrem Händler oder im
Panasonic Kundendienstzentrum erhältlich sind.
KlingeWER9605
SchmierölWES003P
Schmierung (Abb. 6)
1
Bringen Sie einen Tropfen Schmieröl auf
jeden angezeigten Punkt auf.
2
Bringen Sie die Klinge am Aufsatz an,
schalten Sie das Gerät ein und lassen Sie
das Gerät etwa 5 Sekunden laufen.
Fehlersuche
ProblemHandlung
Das Gerät ist stumpf
geworden.
Bis die Probleme
gelöst sind, folgen
Sie bitte jedem
Vorgang wie folgt;
1.
Reinigen Sie die
Klinge und
bringen Sie
Schmieröl auf.
2.
Ersetzen Sie die
Klinge.
Macht ein lautes
Geräusch.
Wenn die Probleme immer noch nicht gelöst
werden können, wenden Sie sich an Ihren
Fachhändler oder an ein Kundendienstzentrum,
das von Panasonic zur Reparatur autorisiert
wurde.
Spezifikationen
Durch die Luft übertragener akustischer Schall
66 (dB (A) bei 1 pW)
Dieses Produkt ist ausschließlich für
Haushaltsverwendung vorgesehen.
F
Français
•Avant de faire fonctionner cet appareil, veuillez
lire toutes les instructions et les conserver
pour une utilisation ultérieure.
•Veuillez lire le code inscrit sur la couverture
pour accéder au mode d’emploi détaillé.
Informations importantes
•Appliquez l’huile de lubrifi cation sur la lame
avant et après chaque utilisation.
Ne pas appliquer d’huile de lubrification peut
provoquer les problèmes suivants.
-
L’appareil est émoussé.
Identification des
composants (Fig. 1)
A
Tête
Entrée d’eau
Repère d’indication de hauteur de coupe
Molette (commande de réglage de hauteur)
Sortie d’eau
Lame
B
Sabot [A]
(1 mm à 10 mm)
C
Sabot [B]
(11 mm à 20 mm)
D
Sabot [C]
(21 mm à 30 mm)
E
Sabot pour les poils du corps [D]
Instructions d’utilisation
•Nettoyer l’appareil après usage.
1
Monter la tête sur le corps principal de
l’appareil jusqu’à ce qu’il se clipse.
2
Installer le sabot souhaité et régler la
hauteur de coupe au besoin.
▪
Il peut également être utilisé sans le sabot.
(Hauteur de coupe : environ 0,5 mm)
3
Mettre l’appareil sous tension.
Remarque
•
La durée d’utilisation après une recharge
complète est la suivante.
ER-CBL1 : 70 minutes
ER-CBN1 : 40 minutes
(Basée sur un usage à sec entre 20 °C et
30 °C)
La durée de fonctionnement peut diff érer en
fonction de la fréquence d’utilisation et du
mode opératoire.
Démontage et montage de
la tête (Fig. 2)
Retirer la tête tout en appuyant sur le bouton
de libération de la tête ().
▪
Poser la tête lorsqu’elle est retirée.
Monter la tête sur le corps principal de
l’appareil jusqu’à ce qu’il se clipse.
Démontage et montage du
sabot (Fig. 3)
Retirer le sabot de la tête.
Monter le sabot sur la tête jusqu’à ce qu’il se
clipse.
Comment nettoyer
•Vérifi er que la tondeuse est éteinte.
•Lubrifi er après le nettoyage.
Pour enlever les
petites impuretés
Pour enlever les
grosses impuretés
1.
Retirer le sabot et
faire couler de
l’eau vers l’entrée
d’eau. (Fig. 4)
1.
Retirer la tête, le
sabot et la lame et
les rincer à l’eau
courante.
▼▼
2.
Secouer plusieurs fois de haut en bas pour
éliminer l’eau.
3.
Essuyer l’eau à l’aide d’un chiff on sec et
bien faire sécher l’appareil.
Démontage et montage de
la lame
Pour retirer la lame, maintenir la tête, placer
le pouce contre les lames puis pousser pour
l’éloigner de la tête. (Fig. 5-
1
)
Pour monter la lame, fi xer le crochet de
montage (
) dans le montage de lame sur la
tête () et le pousser jusqu’à ce qu’il
s’enclenche. (Fig. 5-
2
)
Pièces de rechange
Lame : une fois tous les trois ans
Les pièces de rechange sont disponibles auprès
de votre vendeur ou votre centre de service.
LameWER9605
Huile de lubrificationWES003P
Lubrification (Fig. 6)
1
Appliquer une goutte d’huile de
lubrifi cation à chaque endroit indiqué.
2
Fixer la lame sur la tête, mettre l’appareil
sous tension et le laisser fonctionner
pendant environ 5 secondes.
Dépannage
ProblèmeAction
L’appareil est émoussé.
Veuillez suivre les
procédures
suivantes jusqu’à ce
que les problèmes
soient réglés :
1.
Nettoyer la lame et
appliquer de l’huile
de lubrification.
2.
Remplacer la lame.
Émet un bruit fort.
Si les problèmes ne sont toujours pas résolus,
contacter votre concessionnaire ou un centre de
service agréé par Panasonic pour la réparation.
Caractéristiques
Perturbation acoustique
66 (dB (A) re 1 pW)
Ce produit est destiné uniquement à l’usage
domestique.
I
Italiano
•Prima di utilizzare questa unità, leggere le
presenti istruzioni per intero e conservarle per
eventuale consultazione futura.
•Si prega di leggere il codice sul coperchio per
le istruzioni d’uso dettagliate.
Informazioni importanti
•Applicare l’olio lubrifi cante alla lama prima e
dopo ogni uso.
La mancata applicazione dell’olio lubrificante
può causare i seguenti problemi.
-
L’apparecchio non taglia più.
Identificazione parti (Fig. 1)
A
Testina
Ingresso acqua
Segno di indicazione altezza di taglio
Quadrante (Controllo di regolazione
dell’altezza)
Scarico acqua
Lama
B
Accessorio pettine [A]
(da 1 mm a 10 mm)
C
Accessorio pettine [B]
(da 11 mm a 20 mm)
D
Accessorio pettine [C]
(da 21 mm a 30 mm)
E
Accessorio pettine per i peli del corpo [D]
Come usare
•Pulire l’apparecchio dopo l’uso.
1
Montare la testina sul corpo principale
fi nché non emette un clic.
2
Montare l’accessorio pettine desiderato e
regolare l’altezza di taglio secondo le
necessità.
▪
Si può utilizzare anche senza l’accessorio
pettine.
(Altezza di taglio:0,5 mm circa)
3
Attivare l’alimentazione.
Nota
•
Il tempo di utilizzo dopo una ricarica completa
è il seguente.
ER-CBL1: 70 minuti
ER-CBN1: 40 minuti
(Calcolo basato su un utilizzo a secco a 20 °C
– 30 °C)
Il tempo di funzionamento può variare a
seconda della frequenza di utilizzo e del
metodo di utilizzo.
Rimozione e montaggio
della testina (Fig. 2)
Rimuovere la testina premendo il tasto di
rilascio della testina ().
▪
Riporre la testina in posizione eretta dopo
averla rimossa.
Montare la testina sul corpo principale
fi nché non emette un clic.
Rimozione e montaggio
dell’accessorio pettine (Fig. 3)
Rimuovere l’accessorio pettine dalla testina.
Montare l’accessorio pettine sulla testina
fi nché non emette un clic.
Come pulire
•Assicurarsi che il corpo principale sia spento.
•Lubrifi care dopo la pulizia.
Per rimuovere lo
sporco leggero
Per rimuovere lo
sporco consistente
1.
Rimuovere
l’accessorio
pettine e far
scorrere l’acqua
nell’ingresso
acqua. (Fig. 4)
1.
Rimuovere la
testina,
l'accessorio
pettine e la lama e
sciacquarli con
acqua corrente.
▼▼
2.
Scuotere ripetutamente per eliminare
eventuali gocce.
3.
Eliminare l’acqua con un panno asciutto e
asciugare bene.
Rimozione e montaggio
della lama
Per rimuovere la lama, aff errare la testina,
posizionare il pollice vicino alle lame e
spingerle in direzione opposta rispetto alla
testina. (Fig. 5-
1
)
Per montare la testina, inserire il gancio di
montaggio (
) nell’attacco della lama sulla
testina () e premerlo fi no a quando si
avvertirà uno scatto. (Fig. 5-
2
)
Parti di ricambio
Lama: una volta ogni tre anni
Le parti di ricambio sono disponibili presso il
vostro rivenditore o Centro di Manutenzione.
LamaWER9605
Olio lubrificanteWES003P
Lubrificazione (Fig. 6)
1
Applicare una goccia di olio lubrificante in
ogni punto indicato.
2
Fissare la lama alla testina, attivare
l’alimentazione e lasciare in funzione per
circa 5 secondi.
Risoluzione dei problemi
ProblemaAzione
L’apparecchio non
taglia più.
Fino a quando i
problemi non sono
risolti, seguire
ciascuna procedura
come segue:
1.
Pulire la lama e
applicare dell’olio
lubrificante.
2.
Sostituire la lama.
Emette un forte
rumore.
Se non è possibile risolvere i problemi
precedenti tramite le azioni indicate, contattare il
proprio rivenditore o un centro di servizi
autorizzato da Panasonic per la riparazione.
Specifiche
Rumore acustico nell’aria
66 (dB (A) re 1 pW)
Il prodotto è progettato solo per uso domestico.
Learn more
2
12
3
4
5
6
ER-CTW1_EU_Head PRINT.indb 1
ER-CTW1_EU_Head PRINT.indb 1
ER-CTW1_EU_Head PRINT.indb 1
ER-CTW1_EU_Head PRINT.indb 1ER-CTW1_EU_Head PRINT.indb 12/3/2565 11:57:41
2/3/2565 11:57:41
2/3/2565 11:57:41
2/3/2565 11:57:412/3/2565 11:57:41
Produktspezifikationen
| Marke: | Panasonic |
| Kategorie: | Körperpfleger |
| Modell: | ER-CKL2 |
Brauchst du Hilfe?
Wenn Sie Hilfe mit Panasonic ER-CKL2 benötigen, stellen Sie unten eine Frage und andere Benutzer werden Ihnen antworten
Bedienungsanleitung Körperpfleger Panasonic

10 August 2025
Bedienungsanleitung Körperpfleger
Neueste Bedienungsanleitung für -Kategorien-
24 Januar 2026
23 Dezember 2025
16 September 2025
3 September 2025
13 August 2025
20 August 2024
28 Juni 2024
20 Juni 2024
13 Juni 2024
29 Mai 2024