Philips DCB3270W Bedienungsanleitung
Philips KFZ-Halterung DCB3270W
Lies die bedienungsanleitung für Philips DCB3270W (2 Seiten) kostenlos online; sie gehört zur Kategorie KFZ-Halterung. Dieses Handbuch wurde von 37 Personen als hilfreich bewertet und erhielt im Schnitt 4.1 Sterne aus 6 Bewertungen. Hast du eine Frage zu Philips DCB3270W oder möchtest du andere Nutzer dieses Produkts befragen? Stelle eine Frage
Seite 1/2
Short User Manual
www.philips.com/welcome
Always there to help you
Register your product and get support at
Question?
Contact
Philips
Wall Mounting
Instructions
www.philips.com/welcome
Always there to help you
Register your product and get support at
Question?
Contact
Philips
DCB3270
Always there to help you
Register your product and get support at
www.philips.com/welcome
iPod nano 7th generation
iPod touch 5th generation
iPhone 5
iPad mini
iPad 4th generation
iPod classic
iPod nano 2nd / 3rd / 4th / 5th / 6th generation
iPod touch 1st / 2nd / 3rd / 4th generation
iPhone, iPhone 3G, iPhone 3GS
iPhone 4, iPhone 4S
iPad
iPad 2
iPad 3rd generation
2
AUDIO
IN
AUDIO IN
DCB3270_10_SUM_V1.0
5V
0.5 A
FM
DC IN
2013 © WOOX Innovations Limited. All rights reserved.
Philips and the Philips’ Shield Emblem are registered trademarks
of Koninklijke Philips N.V. and are used by WOOX Innovations
Limited under license from Koninklijke Philips N.V.
Specifications are subject to change without notice. WOOX
reserves the right to change products at any time without being
obliged to adjust earlier supplies accordingly.
Short User Manual
Kurzanleitung
Manual de usuario corto
Lyhyt käyttöopas
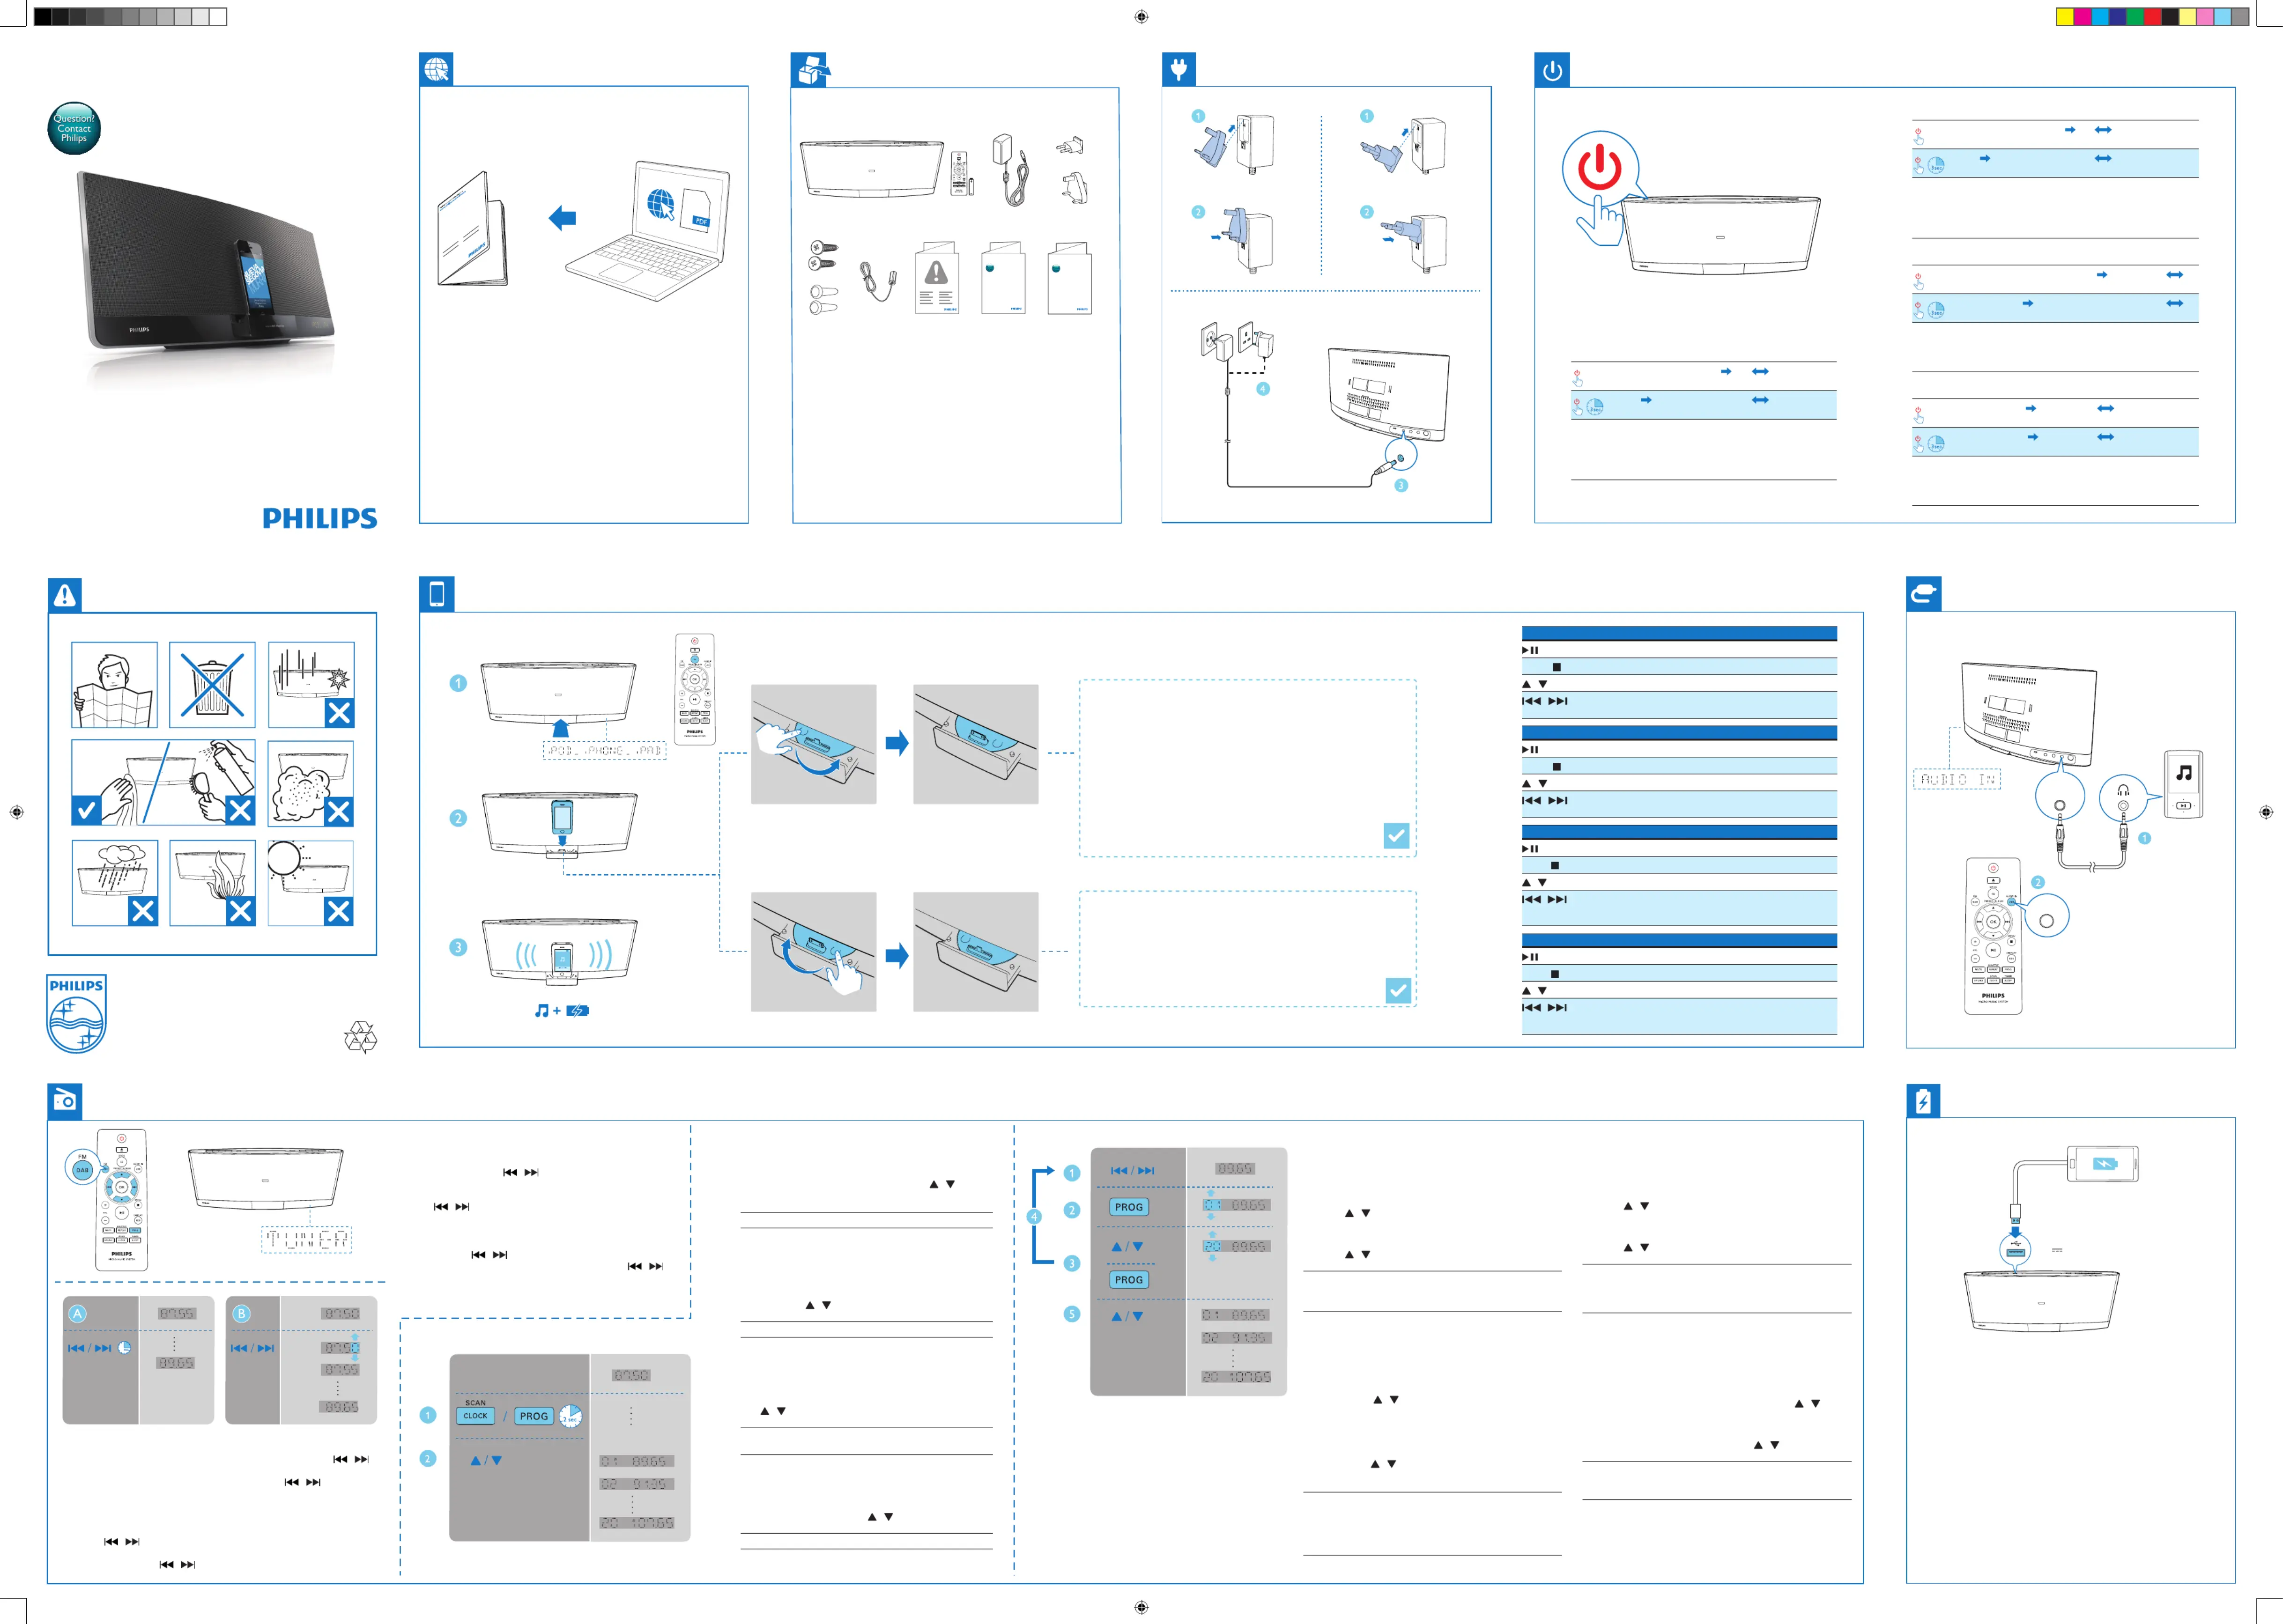
ENBefore using your product, read all accompanying safety information.
DELesen Sie vor der ersten Verwendung Ihres Produktes alle
beiliegenden Sicherheitsinformationen.
ESAntes de utilizar el producto, lea toda la información de seguridad
que se adjunta.
FILue kaikki mukana toimitetut turvallisuustiedot ennen tuotteen
käyttöä.
EN
Eco power standby mode ON Standby mode
ON Eco power standby mode Standby mode
Note:After this product stays inactive for 15 minutes, it
automatically switches to the normal standby mode.
After this product stays in the normal standby mode for
15 minutes, it automatically switches to the eco power
standby mode.
DE
Eco Power-Standby-Modus EIN Standby-Modus
EIN Eco Power-Standby-Modus Standby-Modus
Hinweis:Wenn das Gerät 15 Minuten lang inaktiv ist, schaltet es sich
danach automatisch in den normalen Standby-Modus.
Wenn sich das Gerät 15 Minuten lang im normalen Standby-
Modus bendet, schaltet es automatisch in den Eco Power-
Standby-Modus.
ES
Modo de espera de bajo consumo ENCENDIDO
Modo de espera
ENCENDIDO Modo de espera de bajo consumo
Modo de espera
Nota:Si el producto permanece inactivo durante 15 minutos, se
activa automáticamente el modo de espera normal.
Tras 15 minutos en el modo de espera normal, la unidad pasa
automáticamente al modo de espera de bajo consumo.
FI
Eco-valmiustila ON [PÄÄLLÄ] Valmiustila
ON [PÄÄLLÄ] Eco-valmiustila Valmiustila
Huomautus:Kun laitetta ei käytetä 15 minuuttiin, se siirtyy automaattisesti
normaaliin valmiustilaan.
Kun laite on ollut normaalissa valmiustilassa 15 minuuttia, se
siirtyy automaattisesti Eco-valmiustilaan.
ENTo download the full user manual, visit www.philips.com/support.
DEUm das vollständige Benutzerhandbuch herunterzuladen,
besuchen Sie www.philips.com/support
ESPara descargar el manual de usuario completo, visite www.philips.
com/support.
FIVoit ladata käyttöoppaan osoitteessa www.philips.com/support.
ButtonsFunctions
Start, pause, or resume play.
MENU/
Access the playlist of iPod/iPhone.
/
Navigate through the playlist of iPod/iPhone.
/
Skip to the previous/next track.
Press and hold to rewind a track or search forward fast.
TastenFunktionen
Starten, Anhalten, Fortsetzen der Wiedergabe
MENU/
Zugreifen auf die Wiedergabeliste des iPod/iPhone
/
Navigieren durch die Wiedergabeliste des iPod/iPhone
/
Springen zum vorherigen/nächsten Titel
Gedrückt halten, um einen Titel zurück- oder vorzuspulen
BotonesFunciones
Iniciar, hacer una pausa o reanudar la reproducción.
MENU/
Accede a la lista de reproducción del iPod/iPhone.
/
Navega por la lista de reproducción del iPod/iPhone.
/
Salta a la pista anterior o siguiente.
Mantenga pulsado para rebobinar la pista o hacer una búsqueda rápida
hacia delante.
PainikkeetToiminnot
Levyn toiston aloittaminen, keskeyttäminen ja jatkaminen.
MENU/
Avaa iPodin/iPhonen soittolista.
/
iPodin/iPhonen soittolistan selaaminen.
/
Siirtyminen edelliseen tai seuraavaan kappaleeseen
Kelaa raitaa taaksepäin tai tee pikahaku eteenpäin painamalla painiketta
pitkään.
EN
DE
ES
FI
EN
Connect your USB device to this product with USB cable
for charging.
DEVerbinden Sie Ihr USB-Gerät zum Auaden über das
USB-Kabel mit diesem Produkt.
ESConecte su dispositivo USB al producto mediante un
cable USB para cargarlo.
FILiitä USB-laite tähän laitteeseen USB-latauskaapelilla.
Store radio stations automatically
1 Press and hold / SCAN PROG until the frequency starts to
change.
2 After available radio stations are stored, press / to tune
to one of them.
Note:This product can store a maximum of 20 radio stations.
Automatisches Speichern von Radiosendern
1 Halten Sie / SCAN PROG gedrückt, bis sich die Frequenz
ändert.
2 Nachdem verfügbare Radiosender gespeichert wurden,
drücken Sie
/ , um zu einem der Sender zu wechseln.
Hinweis:Sie können maximal 20 Radiosender programmieren.
Almacenamiento automático de las emisoras de radio
1 Mantenga pulsado / SCAN PROG hasta que la frecuencia
comience a cargar.
2 Después de almacenar las emisoras de radio disponibles, pulse
/ para sintonizar una de ellas.
Nota:Este producto puede almacenar un máximo de
20 emisoras de radio.
Tallenna radioasemat automaattisesti
1 Paina / SCAN PROG -painiketta, kunnes taajuus alkaa muuttua.
2 Kun käytettävissä olevat radioasemat on tallennettu, viritä
haluamasi asema painikkeella
/ .
Huomautus:Laitteeseen voi tallentaa enintään 20 radioasemaa.
EN
Store radio stations manually
1 Tune to a radio station.
2 Press PROG to activate programming.
3 Press / to allocate a sequence number from 1 to 20 to this
radio station, and then press PROG to conrm.
4 Repeat steps 1-3 to program more stations.
5 Press / to tune to a stored radio station.
Note:You can program a maximum of 20 preset radio stations.
To overwrite a programmed radio station, store another
one with its sequence number.
DE
Manuelles Speichern von Radiosendern
1 Stellen Sie einen Radiosender ein.
2 Drücken Sie PROG, um den Programmiervorgang zu aktivieren.
3 Drücken Sie / , um diesem Radiosender eine
Folgenummer zwischen 1 und 20 zuzuweisen, und bestätigen Sie
dies mit PROG.
4 Wiederholen Sie Schritte 1 bis 3, um mehr Sender zu
programmieren.
5 Drücken Sie / , um einen programmierten Radiosender
einzustellen
Hinweis:Sie können maximal 20 voreingestellte Radiosender
programmieren.
Um einen programmierten Radiosender zu
überschreiben, speichern Sie einen anderen Sender mit
seiner Folgenummer.
ES
Almacenamiento manual de las emisoras de radio
1 Sintoniza una emisora de radio.
2 Pulse PROG para activar la programación.
3 Pulse / para asignar un número de secuencia del 1 al 20 a
esta emisora de radio y, a continuación, pulse PROG para conrmar.
4 Repita del paso 1 al 3 para programar más emisoras.
5 Pulse / para sintonizar una emisora de radio almacenada.
Nota:Puede programar un máximo de 20 emisoras de radio
presintonizadas.
Para sobrescribir una emisora de radio programada, almacene
otra emisora con su número de secuencia.
FI
Radioasemien tallentaminen manuaalisesti
1 Radioaseman virittäminen.
2 Ota ohjelmointi käyttöön painamalla PROG-painiketta.
3 Valitse radioaseman järjestysluku (1–20) painikkeella / ja
vahvista valinta painikkeella PROG.
4 Voit ohjelmoida lisää asemia toistamalla vaiheita 1-3.
5 Viritä tallennettu radioasema painikkeella / .
Huomautus:Voit ohjelmoida enintään 20 pikavalinta-asemaa.
Korvaa ohjelmoitu radioasema tallentamalla toinen
kanava sen järjestysluvulle.
Tune to an FM radio station
• To tune to the previous or next strong station, press and hold /
until the frequency starts to change.
• To tune to a station at a specic frequency, press
/ repeatedly until
its frequency is displayed.
Auswählen eines UKW-Radiosenders
• Um zum vorherigen oder nächsten starken Sender zu wechseln, halten Sie
/ gedrückt, bis sich die Frequenz ändert.
• Um zu einem Sender mit einer bestimmten Frequenz zu wechseln, drücken
Sie wiederholt
/ , bis die gewünschte Frequenz angezeigt wird.
EN
EN
DE
ES
FI
DE
ES
FI
Sintonización de una emisora de radio FM
• Para sintonizar la emisora con señal fuerte anterior o siguiente,
mantenga pulsado
/ hasta que la frecuencia empiece a
cambiar.
• Para sintonizar una emisora con una frecuencia especíca, pulse
/ varias veces hasta se muestre su frecuencia.
M-radioaseman virittäminen
• Viritä edellinen tai seuraava hyvin kuuluva asema pitämällä
painiketta
/ painettuna, kunnes taajuus muuttuu.
• Viritä tietyn aseman taajuuteen painamalla painiketta
/
toistuvasti, kunnes aseman taajuus tulee näkyviin.
DCB3270_10_IFU_SUM_V1.0.indd 19/16/2013 4:56:54 PM
Produktspezifikationen
| Marke: | Philips |
| Kategorie: | KFZ-Halterung |
| Modell: | DCB3270W |
| Eingebaute Lautsprecher: | Ja |
| FM-Radio: | Ja |
| Wecker: | Ja |
| WLAN: | Nein |
| Bluetooth: | Nein |
| Kopfhörer-Anschluss: | 3,5 mm |
| Breite: | 420 mm |
| Tiefe: | 99 mm |
| AC-Netzadapter: | Ja |
| Produktfarbe: | Weiß |
| Energiequelle: | AC |
| Unterstützte Bänder: | DAB, DAB+ |
| Radio Data System (RDS): | Ja |
| RMS-Leistung: | 40 W |
| Sleep-Timer: | Ja |
| Playback MP3: | Ja |
| Lautstärkeregler: | Digital |
| Verpackungsbreite: | 460 mm |
| Verpackungstiefe: | 265 mm |
| Verpackungshöhe: | 142 mm |
| Fernbedienung enthalten: | Ja |
| Display: | LED |
| Betriebsanleitung: | Ja |
| Audio Kanäle: | - Kanäle |
| USB-unmittelbare Wiedergabe: | Ja |
| CD-R-Wiedergabe: | Ja |
| CD-RW-Wiedergabe: | Ja |
| Lightning-Anschluss: | Ja |
| Apple-Docking-Kompatibilität: | iPad, iPad 2, iPad mini, iPhone, iPhone 3G, iPhone 3GS, iPhone 4, iPhone 4S, iPhone 5, iPod Nano 4, iPod Nano 5, iPod Nano 6, iPod Nano 7, iPod Touch 2, iPod Touch 3, iPod Touch 4, iPod Touch 5 |
| CD-Spieler: | Ja |
| Lademechanismus: | Slot-In Laufwerk |
| Bass-Reflex: | Ja |
| Uhr/Datum display: | Ja |
| Docking-Station enthalten: | Ja |
| Verbesserung des Tuners: | Auto scan, Auto tuning |
| Apple Lightning Dockinganschluss: | Ja |
| Apple 30-Pin-Dockinganschluss: | Ja |
Brauchst du Hilfe?
Wenn Sie Hilfe mit Philips DCB3270W benötigen, stellen Sie unten eine Frage und andere Benutzer werden Ihnen antworten
Bedienungsanleitung KFZ-Halterung Philips

20 Juli 2025
20 Juli 2025
20 Juli 2025
20 Juli 2025
19 Juli 2025
19 Juli 2025
19 Juli 2025
19 Juli 2025
7 Juli 2025
10 Februar 2024
Bedienungsanleitung KFZ-Halterung
Neueste Bedienungsanleitung für -Kategorien-
28 März 2026
14 März 2026
23 Februar 2026
9 Februar 2026
4 Februar 2026
28 Januar 2026
23 Januar 2026
16 Januar 2026
15 Januar 2026
7 Januar 2026