Pixel King Pro For Canon Bedienungsanleitung
Pixel Sonstiges – Verschiedenes King Pro For Canon
Lies die bedienungsanleitung für Pixel King Pro For Canon (64 Seiten) kostenlos online; sie gehört zur Kategorie Sonstiges – Verschiedenes. Dieses Handbuch wurde von 51 Personen als hilfreich bewertet und erhielt im Schnitt 4.4 Sterne aus 4 Bewertungen. Hast du eine Frage zu Pixel King Pro For Canon oder möchtest du andere Nutzer dieses Produkts befragen? Stelle eine Frage
Seite 1/64
2
36
3
OverviewOverview
1
Thank you for purchasing high-performance Pixel product.
King PRO SET
After unpacking (full set), please check if the below items are included
in the package. If there is any item missing, please contact your dealer.
KingPROSET
Items IncludedItems Included
PrecautionsPrecautions
01
02
03
04
05
07
06
08
09
10
Hot Shoe Protector
Universal Flash
Holder SF-18Optional Accessories
Name of Each PartName of Each Part
King PRO Transceiver
King X Receiver
789
31
2
4
56
3
1
2
5
8
9
4
7
6
3
1
2
5
8
9
10
11
12
13
4
7
6
12
3
4
5
67
8
12
11
10
9
5
Specification
Function
Installation InstructionsInstallation Instructions
Mode: FSK2.4GHz
Distance: 300m or Above
Channel: Transceiver – 1 Auto Channel and 15 Fixed Channels Receiver – 1 Auto Channel and 3 Fixed Channels.
Antenna: Internal Antenna
Power Supply: 2.2-3.3V (AA x 2)
Sync Speed: 1/8000s (According to Different Models of Camera and Flash)
Shutter: Support Camera Control Camera Single Shooting
Group: 3 Groups (A/B/C)
Interface: USB2.0, SYNC Interface
Flash Test: Support
Function: Support EOS's E-TTL II Flash Mode, Manual Output M Mode
Installing the Receiver:
1234
Installing the Transceiver:
1
2
2
2
1
1
1
1
1
3
1
2
2
3
3
4
4
4
1234
A. Please ensure camera and device are turned off, fix the hot shoe on transceiver on the screw nut
loosen the nut clockwise. As shown in ( ), fully install the transceiver into the camera hot shoe.
Rotate the hot shoe fixed screw nut anti-clockwise to lock tightly as shown in( ).
TestFlash
7
8
4
Through continuously pressing [A:B] button on LCD panel twice, immediately enter A:B C light
ratio setting screen (as shown in ), press SET immediately can base on the “+, -” button on the
screen to set up the output of the light ratio and exposure compensation (as shown in ), press
“OK” button to confirm. After finish setting, press [A:B] button, you can immediately exit to main
panel.
Light Ratio Setting
After turned on, press [A:B] button to enter into light ratio setting screen.
1、
1、
1、
1、
2、
2、
2、
2、
Separately buy Pixel's USB shutter connecting cable, you can use wired or wireless shutter
remote control (as shown below).
1、
RemoteCameraShooting
PSM108 V30.02
Wireless Flash E-TTL Trigger
For Canon
Instruction Manual
First, thank you for purchasing high-performance Pixel product - King PRO, it achieves high sync
shooting with Canon cameras and flashes, and its various flash mode functions, including ETTL
II, FP, etc., the maximum shutter sync speed up to 1/8000s.
Also, it has grouping function. It has three groups in total. Each group can control output
different mode through the device. When you use EOS EXII or 600EX-RT compatible flash, you
can directly control the flash mode or output ratio of the flash through the transmitter. No need to
adjust flashandyoucangetdifferentflashmode.
Before using, you mustreadthroughandtotallyunderstandthisinstructionmanual, yourcamera
andflash, to ensure you are familiar with the operation and can use correctly. By this manual,
youcan use this product easily with precautions.
Before installing makesureyourcameraandflasharepoweredoff.
This product is an electronic device, it may be affected by external environmental factors and
cause the camera cannot operate or malfunction. Nevertheless, this possibility is very small.
Do not let the components sufferedfromstrongvibration, otherwise it may cause the product
failure.
When not in use for long durations, please turn off the power of the transceiver and the receiver
and remove the batteries.
The batteries should be installed correctly. Reverse polarity may cause batteries to leak
corrosive liquids, heat or explosion.
When connecting the cable to the device, do not pull the wires directly.
Do not store in ahightemperature, suchasaclosed car under direct sunlight, the
dashboard and other high-temperature areas.
Keep dry, do not touch the product with wet hands. Do not immerse in water or exposed to rain
as this may lead to device failure.
Do not use near flammable gases. Failure to follow this warning may cause explosion or fire.
This product involves batteries, please strictly follow the instruction for proper operation.
Failure to follow this may cause explosions, fire or personal injury.
King PRO Transceiver 1 pc
King X Receiver1 pc
USB 2.0 cable 1 pc
Hot Shoe Protector 2 pcs
Universal Flash Holder SF-181 pc
Instruction Manual 1 pc
Installation Drawings for
Optional Accessories
Hot Shoe:Connect with flash for communication.This connect flash function is not controlled by the
transceiver, flash output function set on the flash directly.
Light Indicator: Blue light blinks indicates normal communication with camera. Red light blinks
indicates sending of flash signal.
Test Flash / Shutter Button: This button is used to test whether the device is connected successfully.
Press the button connected to the device flash indicates a successful connection. If you use together
with the shutter connecting cable, this button isused as the shutter button.
Test Flash / Shutter Button: This button is used to test whether the device is connected successfully.
Press the button connected to the device flash indicates a successful connection. If you use together
with the shutter connecting cable, this button isused as the shutter button.
Group Settings: Group settings on/off. When the group is opened, the light indicator of the
corresponding group will on. When the group isoff, the light indicator of the corresponding group
will off. When the transceiver is under standby condition, press the corresponding group key, you
can directly set the group's function mode.
USB Interface: Update the interface of the device, power input, shutter signal output (using shutter
function need to purchase USBshutterconnectingcablefromPixel).
SYNC: Trigger signal output interface, used to trigger studio lights.
CustomKey:According to the icon illustrated on the screen as the corresponding function key.
Hot Shoe Foot: Connect with camera for communication.
Device Working Mode Button: Set the device as Master or Slave.
Channel Setting Key: Can set 1-15 fixed channels and 1 automatic channel.
Sync Switch Key: Hi-speed sync, 1stcurtainsync, 2ndcurtainsyncswitch button.
On/Off Key: Power switch, ON and OFF.
Mounting Bracket Nut: When transceiverisusedastheslave modeandinstall the flash is fixed,
youcanbuyanduseinconjunctionwithourcompany's special bracket.
Hot Shoe:Connect with flash for communication.
Light Indicator: Blue light blinks indicates normal communication with camera. Red light blinks
indicates sending of flash signal. Whenthebatterypowerislow, thered light will blink twice every
second.
Group Settings: Group settings on/off. When the group is opened, the light indicator of the
corresponding group will on. When the group is off, the light indicator of the corresponding
group will off.
USB Interface: Update the interface of the device, power input, shutter signal output (using shutter
function need to purchase shutter connecting cable from Pixel).
SYNC: Trigger signal output interface, used to trigger studio lights.
Mounting Bracket
ON/OFF Key: Power switch, ON and OFF.
Channel Setting Key: Can set 1-3 fixed channels and 1 automatic channel.
Remark: All functions of Receiver King X are used with the Transmitter King PRO.
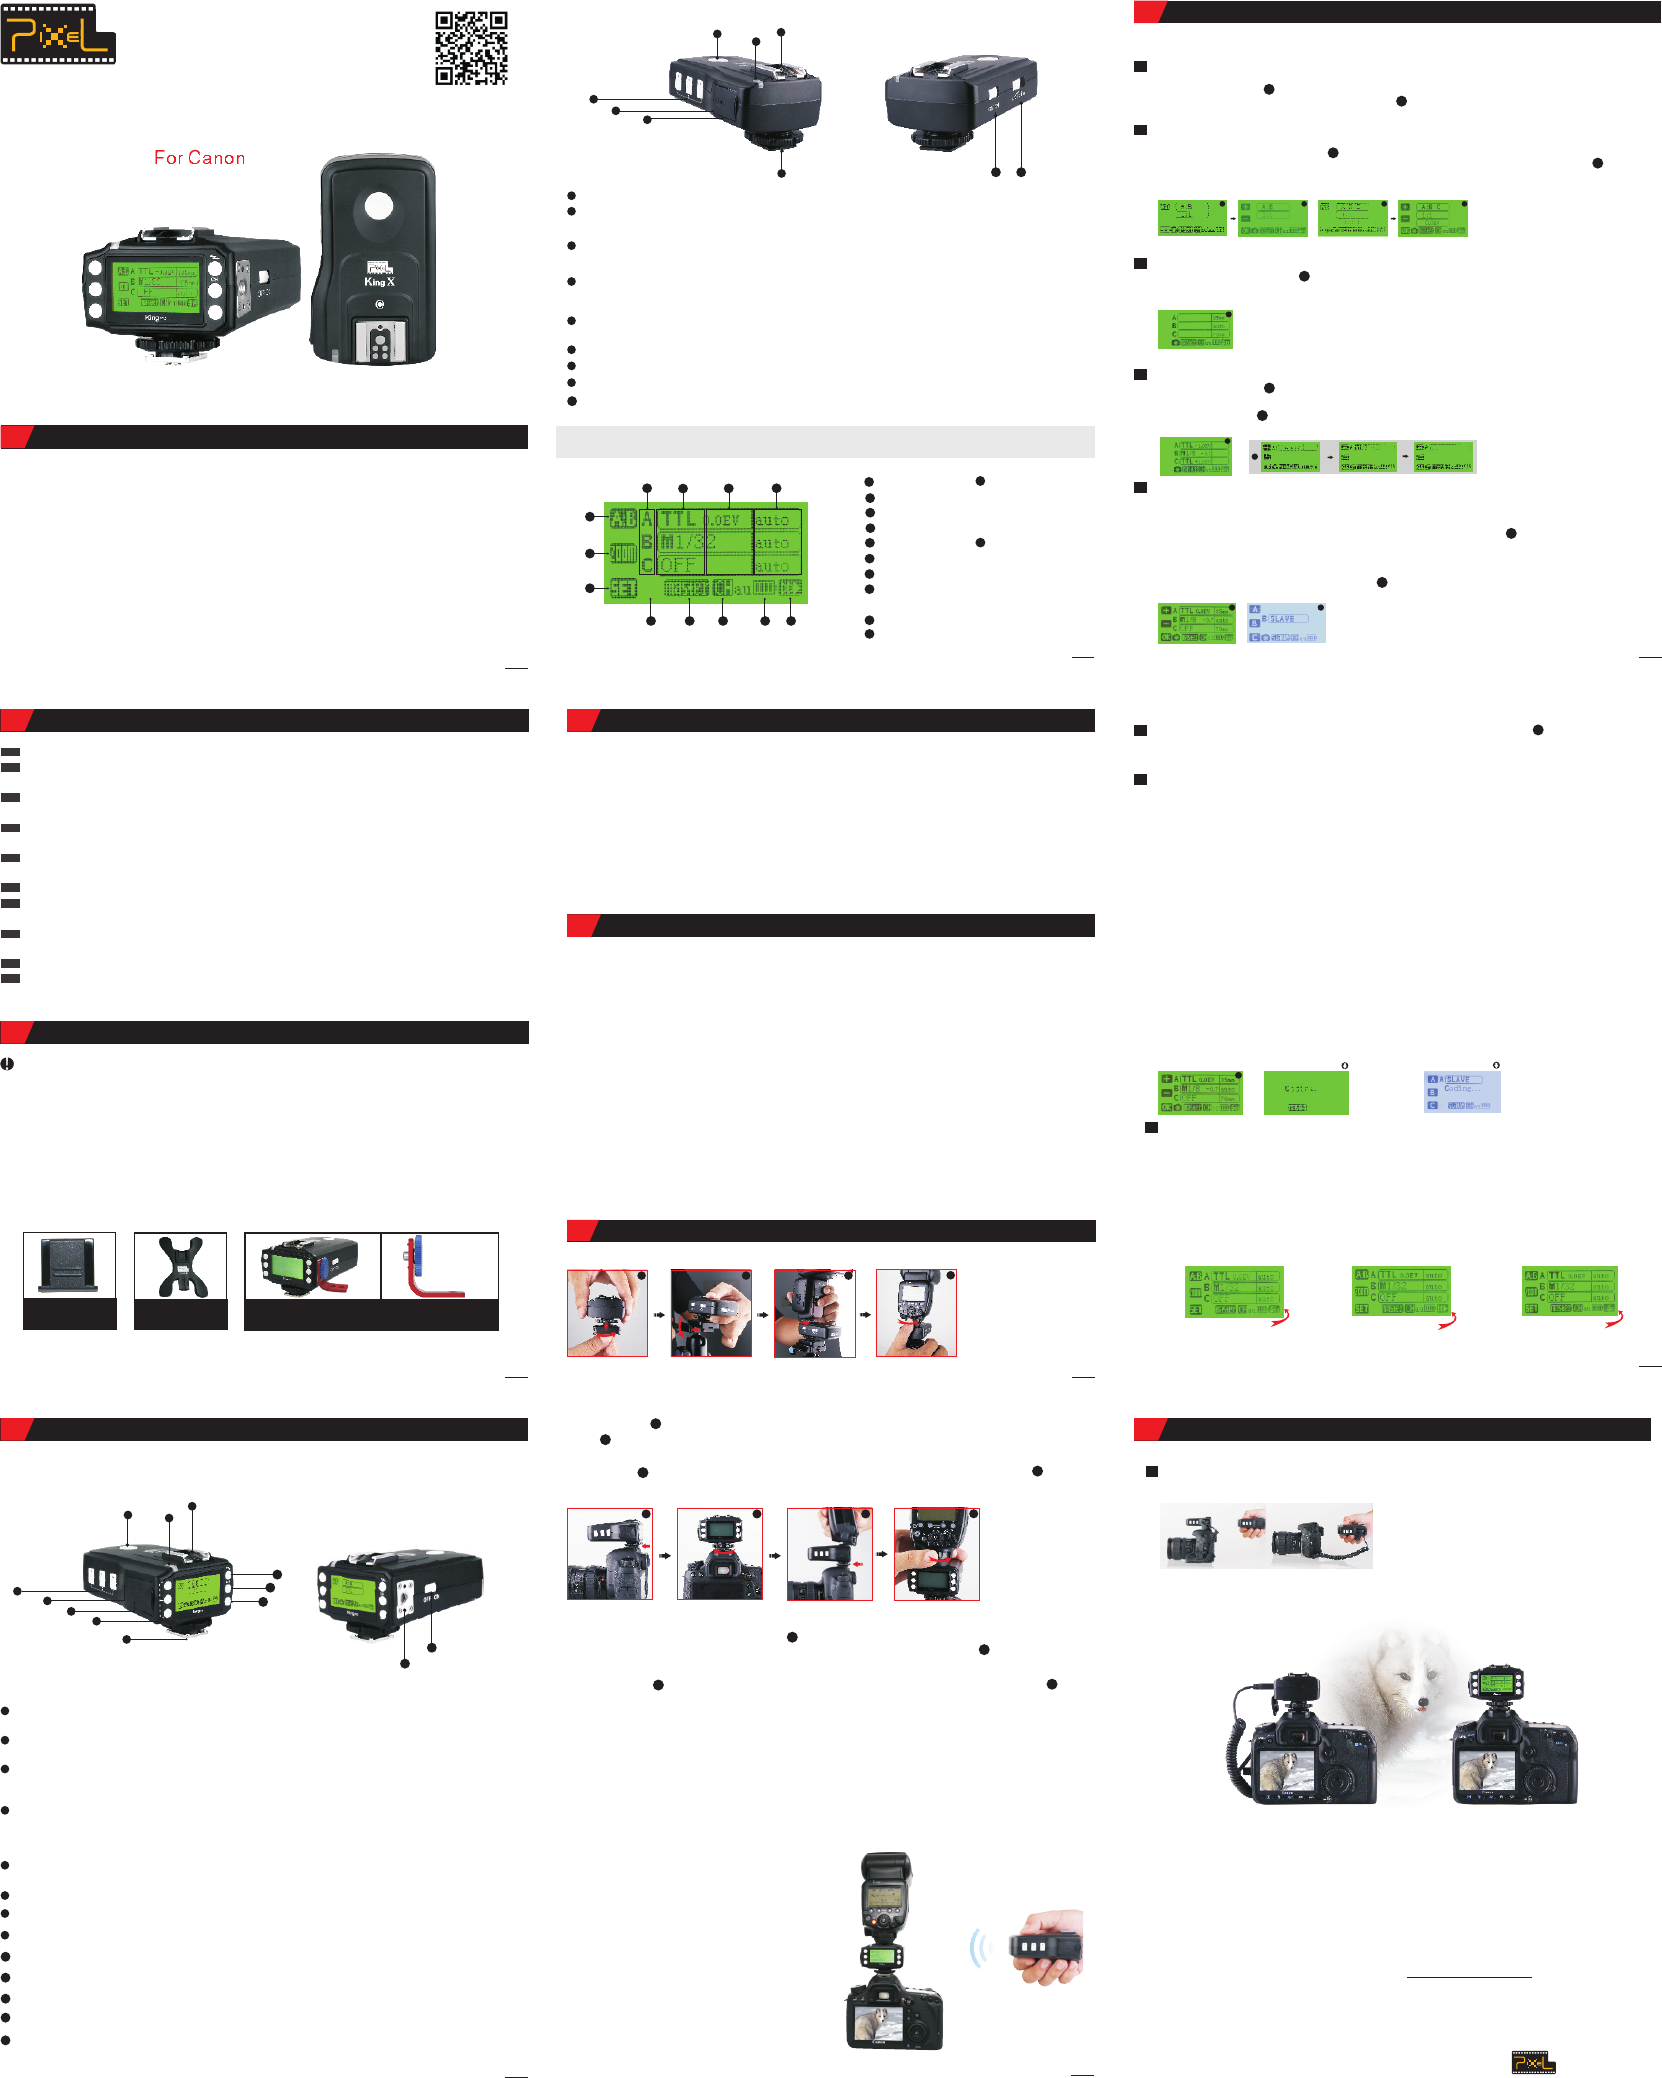
Transceiver King PRO Icon Introduction
Light Ratio Icon
Group Setting Function Icon
Camera Connection Icon
Device Operation Mode Icon
Channel Icon
Sync Mode Icon
Focal Length Area
Exposure Compensation/Manual Output
Display Area
Group Function Mode Display Area
Group Icon
Focus Icon
Power Icon
Easy and Convenient, Smart and Powerful
01. LCD DisplayOutputataglance.
02. Multi-keys Settings. Each feature has individual buttons, simple and easy to use.
03. Support more operation system to upgrade devicefirmwareonline, suchasWindows, MacOSX.
04. More stable and reliable hardware and software for the new upgrade.
05. Farther remote distance, control distance of above 300m.
06. More output mode combinations, you can always set each group to different flash output ratio.
07. More energy-saving design, and the use of more reliable gold-plated metal battery clip as well as
anti-lost battery compartment cover design.
08. King Pro uses a full metal structure design, more solid, hard as stone chime; externalmetal
mounting bracket nuts, same as the design of flash bracket.
09. King Pro uses 15 fixed channels and 1 automatic channel mode, allow thousand sets of products to
be used in the same areawithoutinterference.
10. King Pro uses two-colour LED backlight, more easy to distinguish Master or Slave Mode.
11. More scalability SYNC output socket, camera can control camera shooting. Also, can control
outdoor lights and studio lights.
12. More humane test flash for brightness output.
13. Support group to control the focal length of the flash.
A.
inmountthequickboardonthemountingbracket.
As shown in( ),putthequickboardscrewsintothereceiver's quick board fixing screws. As shown
( ).
B. Ensure the flashgun is turned off, install the hot shoe foot of the flash on the receiver's hot shoe as
shown in ( ).According to the locking method of the flash to lock the flash as shown in( ).
B.
as shown in According to the locking method of the flash to lock the flash as shown in
Ensure the flash is turned off, install the hot shoe foot of the flash into the transmitter's hot shoe
( ),( ).
1. Check that the power is turned on.
2. Press the test flashbutton, checkthetransceiverand receiver are set to the samechanneland
grouporif the connection is successful. Youcanonlysuccessfullytesttheflashwhenthe
channel andgroupare consistent.
a.TestFlashforTransceiver, when the flash is set to E-TTLmode, the test flash output ispre-flash.
When the flash is set to manual M mode, test flash output is the current output ratio.
b. Whentransceiveris the master, press the test flash button, it corresponds the valid flash toflash,
including the flash of this device.
c. Whentransceiveristhe slave, pressthetest flash
button, theflashof this device flashes.
d. Whenyoupressthetestflashtestbuttonof the
receiver, theflash of this device will testflash.
Operation Introduction
A:B Light Ratio Setting
Through pressing [A:B] button on LCD panel once, immediately enter A:B light ratio setting
screen (as shown in ), press SET immediately can base on the “+, -” button on the screen to
set up the output of the light ratio (as shown in ), press “OK” to finish setting. Press again [A:B]
key twice continuously, exit to main panel.
A:B C Light Ratio Setting
Flash Focal Length Setting
Group Function Mode Setting
After turned on, through pressing function mode to set (asshown in ), thesetoptionflashes,
baseon “+, -“ buttononthescreentochooseMasteror Slave. After choosing Master mode,
press “OK” keytoconfirmandexitthesettingpanel. AfterchoosingSlavemode, press “OK” key
toentergroupslavemode, directlypressA, BorCkeyonthescreenorpressGroupA, BorC
buttontochooseslavegroup (asshownin ). Whenyouareinslavemode, thelightshownon
thepaneliswhite.
Master and Slave Setting
After turned on, through pressing [ZOOM] button on LCD panel to enter group focal length
setting screen (asshownin ),pressagainGroupA, BorCbuttontochoosethegroupyou
needtosetthefocallength. Accordingtothe “+, -” buttononthescreentosetthefocallength
from “24mm – 105mm”, autoisautofocus, press “OK” keytofinishsetting.
Channel Setting
After turned on, through pressing the channel setting button (asshown in ), thesetoption
flashes, baseon “+, -“ buttononthescreentochoosechannel. Youcanchoosechannel “CH1-
CH15” for 15 channelsandoneautomaticchannel, press “OK” buttononthescreentoconfirm
andexit.
CH au of Transmitter and Auto of Receiver are automatic channels, itsoperationisasfollows:
When the device is under off condition:
Check Channel when King PROisaMaster: HolddowntheGroupC keyandswitchonthepower
keyuntilthescreenturnsasshown in Figure 2. Release the GroupC key, thepower indicator
shows blue light blinks, thedeviceimmediatelyenters into the checking condition. Ifitisin
improper operation, itwill enterintothe normaluser screen. After all receiverssuccessfully
checkthechannels, turnoffandyou can use after re-open it.
Check Channel when King PROisaSlave: HolddowntheGroupC keyand switch on the power
key until the screen has the word Coding as showninFigure3, thenreleaseGroupCkey, the
power indicator shows blue light blinks. Ifcheckingchannelissuccessfulwiththereceiver, the
indicatorshowsredlightblinks. Turnitoffandyoucanuseafterre-openit. Ifitisinimproper
operation, itwillenterintothenormaluserscreen
Check Channel for King X: HolddownGroupCkey and switch on the power on/off keyatthe
sametime. Theindicatorshowsbluelightblinkswillimmediatelyenterintocheckingcondition.
Ifcheckingchannelis successful with the receiver, the indicator will have red light blinks. Turn it
offandyoucanuseitafterre-openit.
a、
b、
c、
After finish checking the channel, the device will not be interfered by any other channels, the
same product can be used with an unlimited quantity without interruption.
* Channel checking will first adjust King PRO Master to the channel checking condition, and then
adjust Slave or Receiver and the setting is complete.
3 When you use with King Pro, you can only use the same channel setting.
When you use with King, L1=CH01, L2=CH02, L3=CH03, L2+L3=CH04, L1+L2=CH05, L1+L3=CH06,
L1+L2+L3=CH07.
When you use with King X, CH1=CH01, CH2=CH02, CH3=CH03, Auto-CH au.
Flash Mode Setting
After turned on, through pressing the switch button of the LCD frequency sync mode to enter
between high-speed sync, 1stcurtainsyncand 2ndcurtainsynctochoose. (repeatedlypressthis
button).
Hi-speed Sync2ndCurtainSync 1stCurtainSync
Youmustsetthefocusfunctionofthecamera
lensto “MF” totestshooting, otherwise, you
mightnotshootasyoucannotfindthefocuspoint.
Through Master Camera to Control Other Cameras to Shoot Simultaneously
When you use with the shutter connecting cable, you can use camera to control camera to shoot
(as below).
Receiver Transceiver
Slave CameraMaster Camera
* Since the response time of different cameras differs, shooting time may have small differences.
* When some cameras cannot find the focus point, though receive the shooting signal, it may not
shoot. Please set the focus mode of your camera lens to manual “MF”.
* If you are using non-dedicated transceiver, then slave camera cannot focus.
Thank you for purchasing Pixel product and read this instruction manual. If you have any
question, please contact your local dealer or visit http://www.pixelhk.com
This information of this instruction manual is updated as of 15thJuly, 2013. Forinformationon
theuseofthecombinationofproductmarketedafterthisdate, pleasecontractPixel's dealer
for advice.
Checking Channel for MasterChecking Channel for Slave
1234
1
1
2
1
2
3
4567 8
12
11
10
9
2
1
12
13
31
2
5
8
9
11
10
4
7
6
1
When using the shutter release; as the shutter
button is 1 step, the focus mode might not very
clear
After turned on, through pressing [SET] button on LCD panel to enter group function mode setting
screen (as shown in ), press again the left side Group A, B or C button to choose the group you
need to set up. Continuously press the select key (group key) to switch between “TTL, M, OFF”
mode (asshownin ). After choosing mode, you can base on “+, -” buttononthescreentoselect
output, press “OK” keytoconfirmandexitthesettingpanel.
Afterturnedon, youcandirectlypressleftsideGroupA, BorCbuttontochoosethefunctionmode
ofA, B
*
*
Shutter FunctionShutter Function
Produktspezifikationen
| Marke: | Pixel |
| Kategorie: | Sonstiges – Verschiedenes |
| Modell: | King Pro For Canon |
Brauchst du Hilfe?
Wenn Sie Hilfe mit Pixel King Pro For Canon benötigen, stellen Sie unten eine Frage und andere Benutzer werden Ihnen antworten
Bedienungsanleitung Sonstiges – Verschiedenes Pixel

25 August 2024
23 August 2024
22 August 2024
22 August 2024
22 August 2024
12 August 2024
9 August 2024
Bedienungsanleitung Sonstiges – Verschiedenes
Neueste Bedienungsanleitung für -Kategorien-
27 August 2024
27 August 2024
27 August 2024
27 August 2024
27 August 2024
27 August 2024
27 August 2024
27 August 2024
27 August 2024