ProFlo PF9002SWH Bedienungsanleitung
Lies die bedienungsanleitung für ProFlo PF9002SWH (12 Seiten) kostenlos online; sie gehört zur Kategorie Toilette. Dieses Handbuch wurde von 31 Personen als hilfreich bewertet und erhielt im Schnitt 4.2 Sterne aus 7 Bewertungen. Hast du eine Frage zu ProFlo PF9002SWH oder möchtest du andere Nutzer dieses Produkts befragen? Stelle eine Frage
Seite 1/12
InstallatIon InstructIons
skIrted het two pIece toIlet
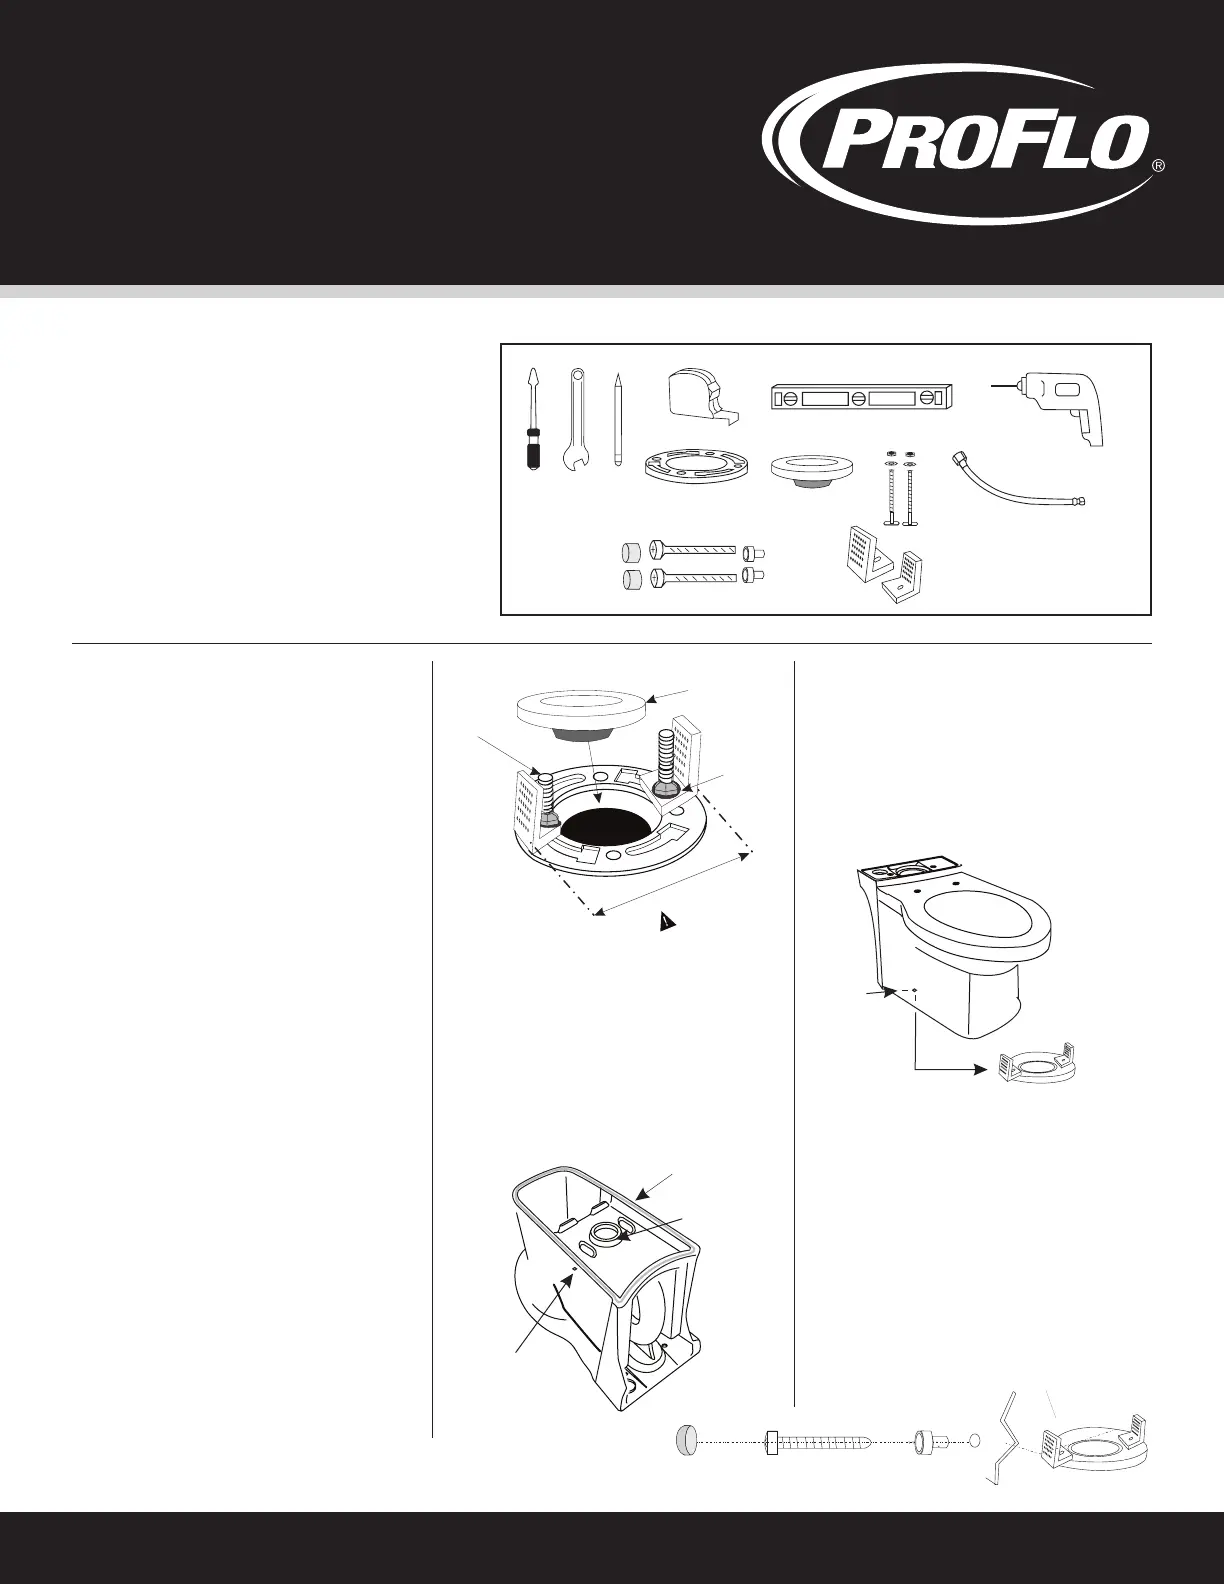
Tools Needed
A. Screw Driver
B. Adjustable Wrench
C. Marker
D. Tape Measure
E. Level
F. Drill
G. Toilet Flange
H. Wax Ring
I. T-bolts (2), Nuts (2),
Washers (2)
J. Flexible Supply Tube
Items Included
K. Fixing Screws (2),
Decorative Caps (2),
Cap Base (2)
L. Flange Connecting
“L” Brackets (2)
Note:Views in this illustrations are for general representation and may not necessarily define the exact contours of the product.
Remove Old Toilet
Shut off water supply line to toilet. Flush toilet
and remove all water from the bowl and tank
using a sponge. Disconnect the water supply
from the tank. Remove the tank from bowl,
use a screw driver and adjustable wrench or
socket wrench. Loosen toilet bowl flange nuts
under bolt caps. Remove old bowl by carefully
lifting it off the floor. Clean flange and plug
drain with a rag to prevent sewer gas from
escaping. Replace or repair if required.
Install Connecting “L” Brackets and
the Wax Ring Seal
1. Check the rough-in dimension, this is the
distance from wall to center of outlet.
2. Place two new T-connection bolts into the
slot on the toilet flange.
3. Install the connecting “L” brackets onto
the T-bolts with the flat side toward the
outside of the flange, adjust the spacing
on the outside of the bracket to be 8-1/4"
(210mm), now attach the washers and nuts
to the T-connection bolts and tighten the “L”
brackets snug and direct to the floor flange.
4. Set the wax ring into the outlet between the
T-connection bolts.
Install Water Closet Base
1. Place toilet bowl upside down on clean
surface.
2. Install a bead of sealant or plumbers putty
around the outside foot base on 3 sides.
3. Now lift the bowl over the flange and
lower the bowl into place allowing the “L”
Brackets to align with the holes on the skirt
of the toilet bowl.
4. Firmly push the toilet down seating the bowl
horn into the wax ring seal.
5. Set the bowl in place by gently rocking back
and forth on the bowl rim. The “L” brackets
should extend up through the slots on both
sides of the outlet horn.
6. With bowl firmly set, insert fixing screws
into the seat base, slide the connection
screw and base into the flange
connection holes and tighten on both sides
of the bowl evenly until snug.
7. Snap decorative cap over connection
screw head.
A. B. C.
D.
E.
F.
G.H.I.
J.
K.
L.
Flange
Connection
Holes
Sealant or
Plumber Putty
Outlet Horn
Decorative CapConnection ScrewBase
Floor
Outlet
Flange
8-1/4" (210mm)
Important
T-Bolts
T-Bolt,
Nuts &
Washer
Wax Ring
NOTE: If installing the PF9002SWH please disregard the installation instructions included with the tank and use this set of installation instructions
Produktspezifikationen
| Marke: | ProFlo |
| Kategorie: | Toilette |
| Modell: | PF9002SWH |
Brauchst du Hilfe?
Wenn Sie Hilfe mit ProFlo PF9002SWH benötigen, stellen Sie unten eine Frage und andere Benutzer werden Ihnen antworten
Bedienungsanleitung Toilette ProFlo

7 Januar 2026
30 Dezember 2026
30 Dezember 2026
29 Dezember 2026
29 Dezember 2026
28 Dezember 2025
27 Dezember 2025
27 Dezember 2025
25 Dezember 2025
25 Dezember 2025
Bedienungsanleitung Toilette
Neueste Bedienungsanleitung für -Kategorien-
25 März 2026
23 März 2026
17 März 2026
10 März 2026
4 März 2026
25 Februar 2026
25 Februar 2026