Pryme BT-PTT-ZU-FOB Bedienungsanleitung

Pryme Walkie-Talkie BT-PTT-ZU-FOB

Lies die bedienungsanleitung für Pryme BT-PTT-ZU-FOB (2 Seiten) kostenlos online; sie gehört zur Kategorie Walkie-Talkie. Dieses Handbuch wurde von 5 Personen als hilfreich bewertet und erhielt im Schnitt 3.7 Sterne aus 3 Bewertungen. Hast du eine Frage zu Pryme BT-PTT-ZU-FOB oder möchtest du andere Nutzer dieses Produkts befragen? Stelle eine Frage

Seite 1/2
To get the Zello app on your phone, install Zello from your Zello@Work networks,
or download the app from the Google Play store or Apple App Store.
Setting Up Zello (Android)
NOTE: The PTT-ZU uses a special version of BT called BT Low Energy (BLE).
This product can only be used with Android handsets that have hardware support for BLE
and are using Android version 5.0 (Lollipop) or newer.
1. Make sure that your phone's BT radio is enabled.
2. Open Zello and tap on the more options symbol " " in
the top right hand corner of the app.
4. Tap on the "+ADD BUTTON" option.
5. The app will now attempt to detect the PTT button press.
Press and release the PTT button of the PTT-Z one or more
times until detected by the phone.
6. PTT-Z will now be shown on the list of available
BT PTT buttons.
7. Open the Talk screen in Zello (the screen with a big round
button). Pressing the PTT button the PTT-Z device should
now cause Zello to transmit.
Setting Up Zello (iOS)
1. Make sure that your phone's BT is enabled.
2. Open Zello and go to: Settings > PTT Button > Wireless Zello Button.
3. Make sure that the “Wireless Button Service” is turned on by sliding the button to the right.
4. Press and hold the PTT button on the BT-PTT-Z.
5. Select “PTT-Z” from the list of PTT devices shown on the screen.
6. Open the Talk screen in Zello (the screen with a big round button).
Pressing the PTT button the Push-to-Talk device should now cause Zello to transmit.
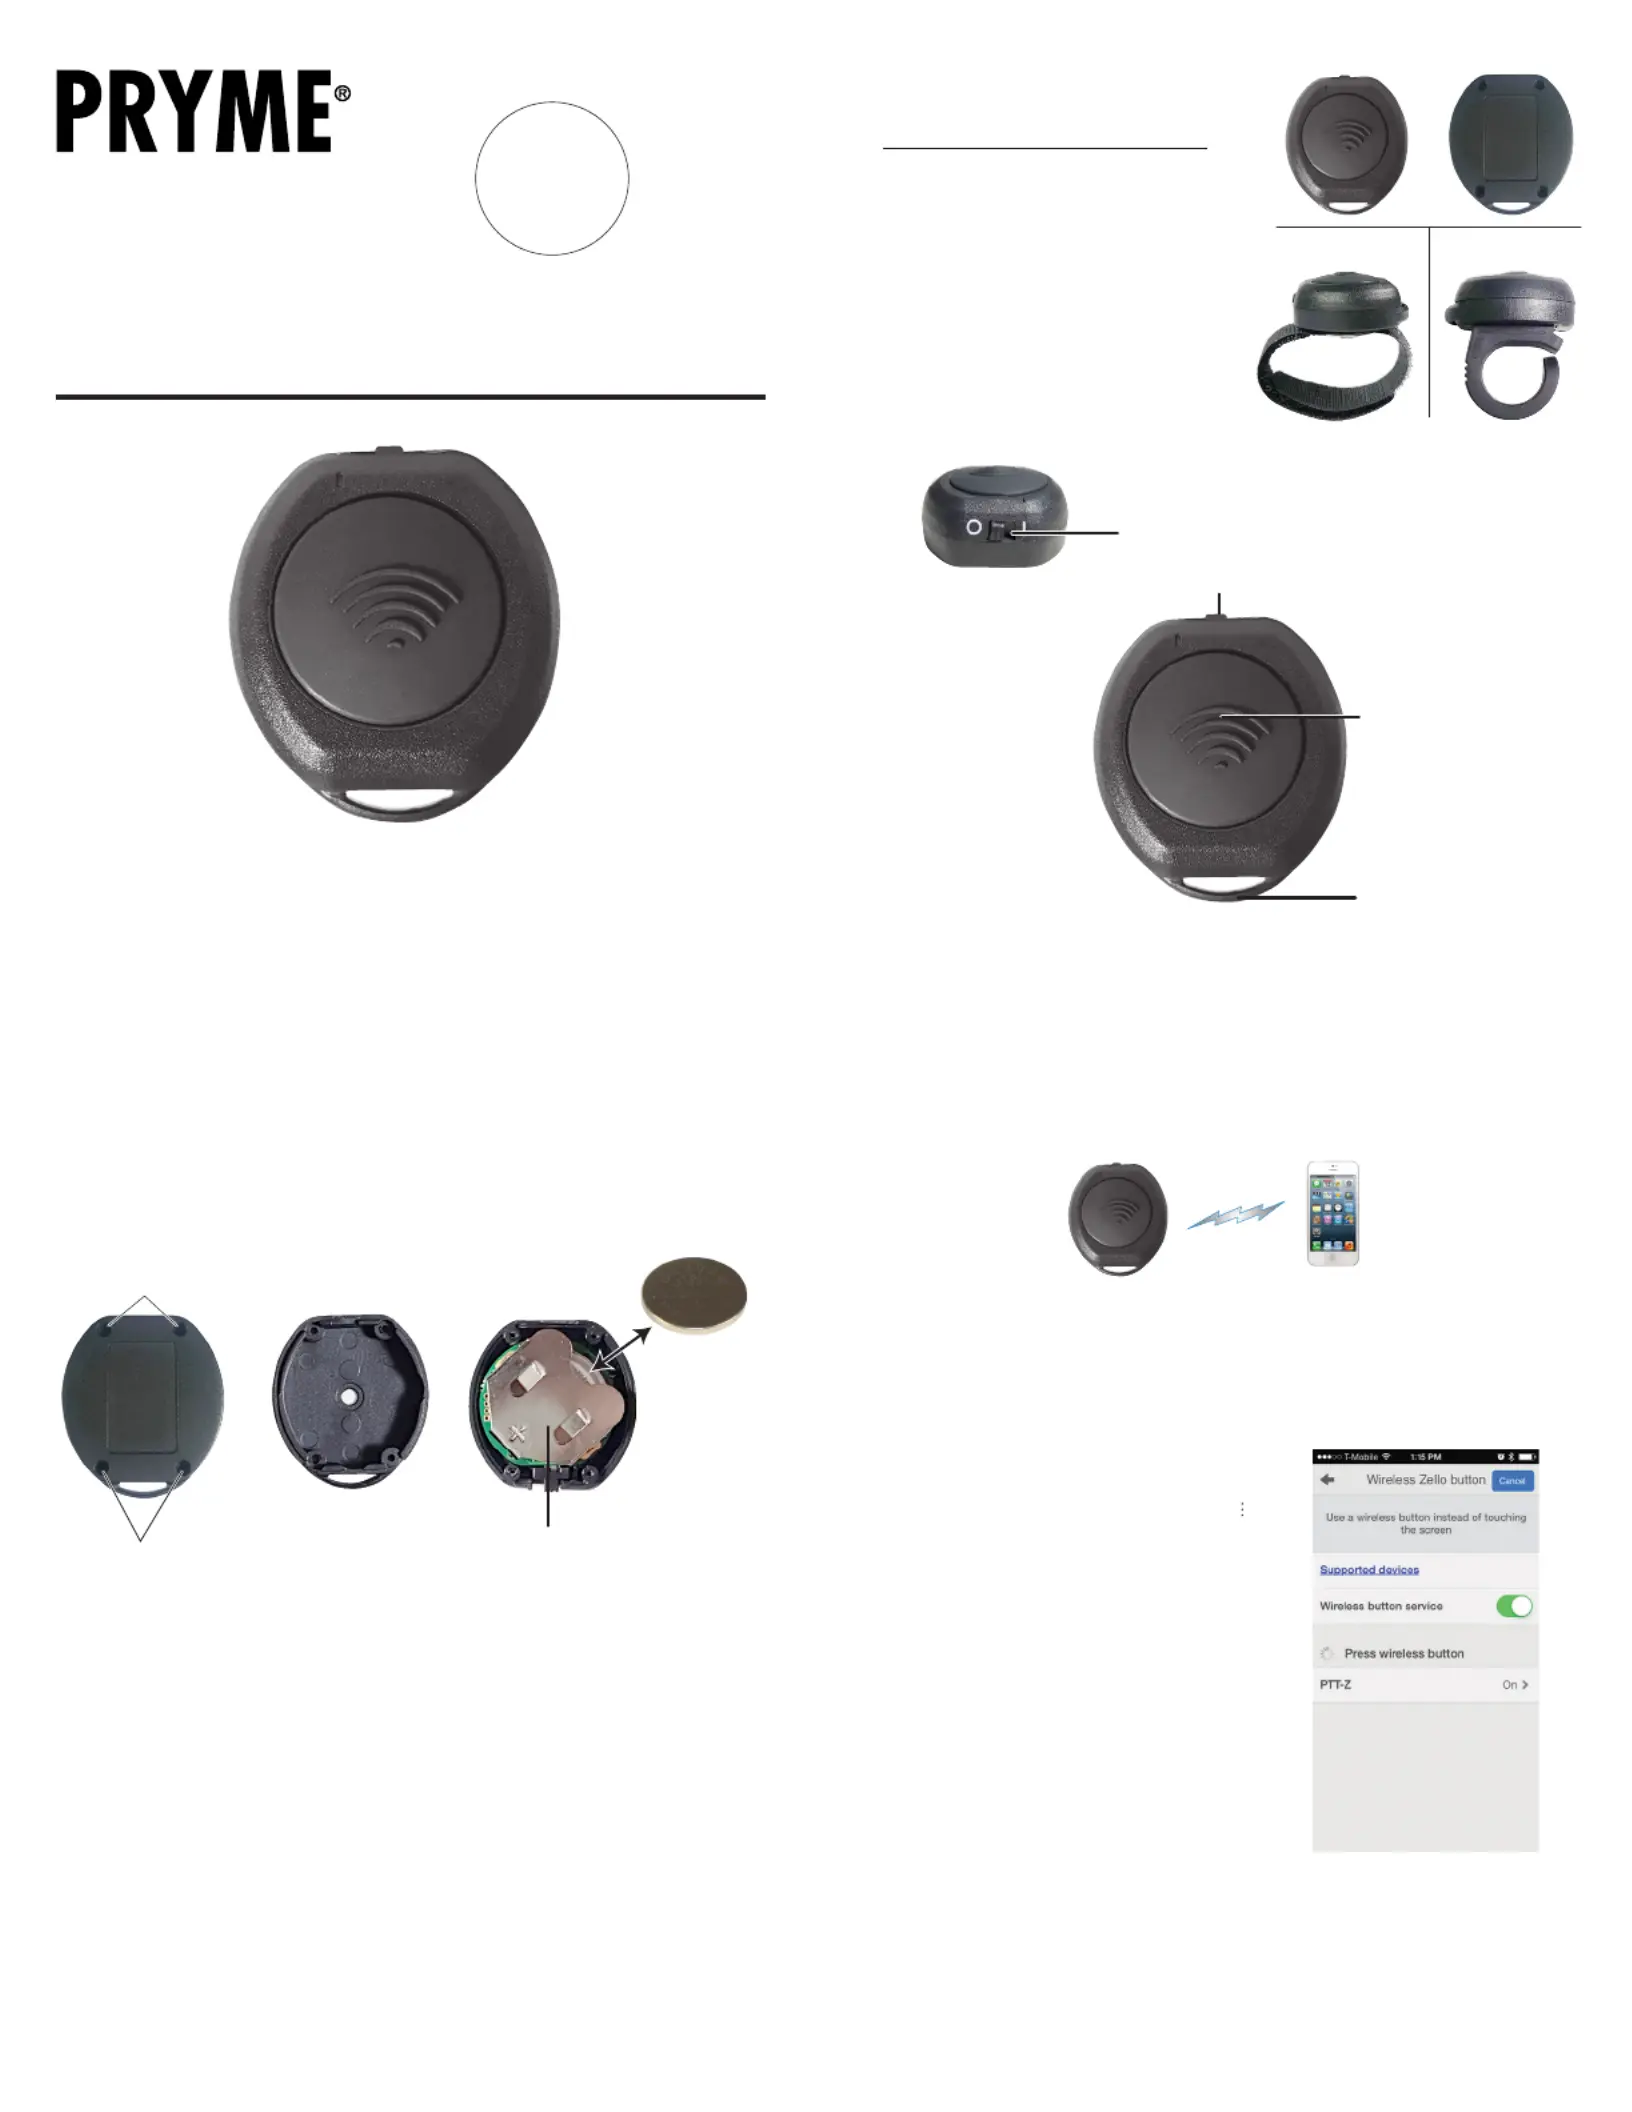
The BT-PTT-ZU uses one replaceable CR2032 coin cell type battery. A single battery can provide up
to two full years or more of operating time. However, operating time can vary depending on the
usage cycle and the age and condition of the battery. At the end of the battery's lifetime, it is
necessary to replace the battery with a new one.
To change the battery:
1. Remove the 4 small Phillips head screws on the rear of the BT-PTT-ZU using a jeweler's/eyeglass
screwdriver. Separate the two halves of the BT-PTT-ZU housing.
2. Locate the battery holder inside of the device. Remove the old battery from the battery holder
if one is installed. A ball point pen can be used to push the battery out of the holder if needed.
3. Insert a new CR2032 3-volt coin cell battery into the battery holder, observing proper polarity.
The positive side of the battery (marked with a “+” sign) should face away from the circuit board.
4. Reseat the two halves of the housing and reinstall the 4 screws to secure it in place.
NOTE: If you are unable to perform the battery replacement yourself, battery replacement
service is available from PRYME for a flat fee. Contact PRYME Support for further details.
It is also possible to change the rear housing of the BT-PTT-ZU to switch from one mounting type to
another. Replacement backs are available by contacting PRYME's sales and support departments.
PRYMEBL BT-PTT-ZU
Push-to-Talk User’s Guide
ZU version for use with Zello and Wave Communicator
(on both Apple iOS and Android smartphones) push-to-talk apps.
PRYME® and PRYME BLU® are trademarks owned by PRYME Radio Products, Brea CA.
All other product or service names are the property of their respective owners.
© 2021 PRYME Radio Products, Brea CA. All Rights Reserved
Model No. BT-PTT
Made in Taiwan
Controls and Connection
Replacing the Battery App Setup (Zello)
PTT Button
Press this button to activate
the Push-to-Talk function of
the PTT Over Cellular
(POC) app.
Lanyard Eyelet
You can use this eyelet to attach
a lanyard, wrist strap, chain,
or key chain split-ring to the
BT-PTT-ZU (not included).
The BT-PTT-ZU is available in three different
versions with different mounting configurations.
BT-PTT-FOB: This version has a flat back and
can be mounted to any flat surface using adhesive
Velcro or double-sided tape. The eyelet can also
be used to attach the PTT to a lanyard, chain,
or key ring (not included).
BT-PTT-STRAP: Has a ring of Velcro attached
to the rear of the PTT and can be mounted to a
steering wheel, gear shift, or other knob/handle.
BT-PTT-RING: Uses a rubber ring which can
be worn on the user's finger.
Power Switch
This slide switch is used to turn the BT-PTT-ZU on and off.
When the switch is in the *I* position, the device is powered on.
Set to the switch to the *O* position to save battery life when
the switch is not being used.
NOTE: The BT-PTT-ZU has a sleep
mode which is used to preserve
battery life. This sleep mode will
engage When the power switch is
turned to the "ON" position and four
minutes elapse where the BT-PTT-ZU is not
connected to a phone or tablet via BT.
While sleeping, the power consumption of the BT-PTT-ZU is greatly reduced.
To wake the device from a sleep state, simply press the PTT button.
NOTE:
BT-PTT-FOB model shown.
Appearance and mounting
mechanism may be different.
See Page 2 for details.
2
3 4
Battery Holder
Located inside the housing
of the Push-to-Talk, the battery
slot holds one coin cell battery
which power the device.
BT-PTT-FOB
SCREWS
SCREWS
BT-PTT-RINGBT-PTT-STRAP
ZU
Federal Communication Commission Interference Statement
This equipment has been tested and found to comply with the limits for a Class B digital device,
pursuant to Part 15 of the FCC Rules. These limits are designed to provide reasonable protection
against harmful interference in a residential installation. This equipment generates uses and can
radiate radio frequency energy and, if not installed and used in accordance with the instructions,
may cause harmful interference to radio communications. However, there is no guarantee that
interference will not occur in a particular installation. If this equipment does cause harmful
interference to radio or television reception, which can be determined by turning the equipment
off and on, the user is encouraged to try to correct the interference by one of the following
measures:
-Reorient or relocate the receiving antenna.
-Increase the separation between the equipment and receiver.
-Connect the equipment into an outlet on a circuit different from that to which the receiver is
connected.
-Consult the dealer or an experienced radio/TV technician for help.
FCC Caution: Any changes or modifications not expressly approved by the party responsible
for compliance could void the user's authority to operate this equipment.
This device complies with Part 15 of the FCC Rules. Operation is subject to the following two
conditions: (1) This device may not cause harmful interference, and (2) this device must accept
any interference received, including interference that may cause undesired operation.
This equipment complies with FCC RF radiation exposure limits set forth for an uncontrolled
environment. To maintain compliance with FCC RF exposure compliance requirements, please
avoid direct contact to the transmitting antenna during transmitting.
RF Exposure Warning!
This device contains transmitters and receivers which emit Radio Frequency (RF) energy. The device
is designed to comply with the limits for exposure to RF energy set by the Federal Communications
Commission (FCC) of the United States, Industry Canada (IC), and the regulating entities of other
countries.
If you are still concerned about exposure to RF energy,
you can further limit your exposure by limiting the amount
of time you use the equipment or by placing more distance
between your body and the device, since exposure level
drops off dramatically with distance.
version 2.0 FEBRUARY 2021
911 Mariner St., Brea, CA 92821
PH: 714.257.0300 FAX: 714.257.0600
TOLL FREE: 800.666.2654
WWW.PRYME.COM
Support and Warranty
PRYME Radio Products warrants this product against defects in materials or workmanship for a
period of one year from the date of retail purchase. PRYME will repair or replace a defective unit, at
our option, without charge for parts or labor. The limited warranty is extended only to the original
purchaser and is valid only to consumers in the United States and Canada. It does not cover
damage or failure caused by or attributable to Acts of God, abuse, misuse, improper or abnormal
usage, faulty installation, improper maintenance, lightning, or other incidences of excessive
voltage, or any tampering or repairs by other than a PRYME authorized repair facility. It does not
cover replacement
of consumable parts, transportation costs, or damage in transit.
Repair or replacement under the terms of this warranty does not extend the terms of
this warranty. This warranty can only be modified by an officer of PRYME Radio Products,
and then only in writing. Should this product prove defective in workmanship or material, the
consumer’s sole remedies shall be such repair or replacement as provided by the terms of this
warranty. Under no circumstances shall PRYME Radio Products be liable for any loss or damage,
direct, consequential, or incidental, arising out of the use of or inability to use this product. Some
states do not allow limitations on how long an implied warranty lasts or the exclusions or
limitations of incidental or consequential damages, so the above limitations or exclusions may not
apply to you. This warranty gives you specific legal rights. You may also have other rights, which
may vary, from state to state.
For support or warranty service on your PRYME product, contact us at 1-800-666-2654
or visit us on the web at www.PRYME.com.
Copyright and Trademark Info
© 2021 PRYME Radio Products, Brea CA. All rights reserved.
PRYME® and PRYMEBLU® are trademarks owned by PRYME Radio Products, Brea CA.
Android is a trademark of Google Inc.
Apple is a trademark of Apple Inc.
iOS is a trademark of Cisco Systems and is used by Apple Inc. under license.
ZELLO is a trademark of Zello, Inc..
WAVE and WAVE COMMUNICATOR are trademarks of Twisted Pair Solutions, a wholly owned
subsidiary of Motorola Solutions, Inc.
All other product or service names are the property of their respective owners.
App Setup (Wave Communicator)
5 6
Setting up WAVE Communicator (iOS)
1. Make sure that your phone's BT radio is enabled and the Push-to-Talk
is powered on using the slide switch.
2. Open WAVE Communicator and log in using your username and password.
3. Tap on the More Options symbol “ ” in the top right hand corner of the app and
then tap “App Settings.”
4. Press and hold the PTT button on the BT-PTT.
5. Make sure that “Use BT Device for PTT” is selected. If it isn’t, tap it to select it.
6. Tap on “BT Device to Use” and then select “PTT-Z” from the list.
7. Release the PTT button on the BT-PTT.
To get the WAVE Communicator app on your phone, download the app from the
Google Play store or Apple App Store.
Setting up WAVE Communicator (Android)
NOTE: The BT-PTT-ZU uses a special version of BT called BT Low Energy (BLE). This
product can only be used with Android handsets that have hardware support for BLE
and are using Android version 5.0 (Lollipop) or newer.
1. Make sure that your phone’s BT radio is enabled
and the Push-to-Talk is powered on using the slide switch.
2. Press and hold the push-to-talk button on the BT-PTT.
3. On your phone, go to Settings > BT. Select “Search
for Devices” from the phone’s BT menu. The phone
will scan for nearby BT devices and a list showing
the names of nearby BT devices will be shown on
the screen.
4. Choose “PTT-Z” from the list.
5. Keep the phone and push-to-talk device near each other
and wait a few seconds. The devices will pair to each other.
6. Open WAVE Communicator and log in using your
username and password.
7. Tap on the More Options symbol “ ” in the top
right hand corner of the app and then tap “App Settings.”
8. Make sure that “Use BT Device for PTT” is selected.
If it isn’t, tap it to select it.
9. Tap on “BT Device to Use” and then select “PTT-Z” from the list.
10. Release the PTT button on the BT-PTT.


Produktspezifikationen

Marke: Pryme
Kategorie: Walkie-Talkie
Modell: BT-PTT-ZU-FOB

Brauchst du Hilfe?

Wenn Sie Hilfe mit Pryme BT-PTT-ZU-FOB benötigen, stellen Sie unten eine Frage und andere Benutzer werden Ihnen antworten