Pyle PSW578UT Bedienungsanleitung
Lies die bedienungsanleitung für Pyle PSW578UT (4 Seiten) kostenlos online; sie gehört zur Kategorie Mikrofon. Dieses Handbuch wurde von 2 Personen als hilfreich bewertet und erhielt im Schnitt 4.7 Sterne aus 1.5 Bewertungen. Hast du eine Frage zu Pyle PSW578UT oder möchtest du andere Nutzer dieses Produkts befragen? Stelle eine Frage
Seite 1/4

Thank
Thank
Thank
ThankThank you
you
you
you you for
for
for
for for choosing
choosing
choosing
choosing choosing our
our
our
our our pr
pr
pr
pr products
oducts
oducts
oductsoducts
-8-
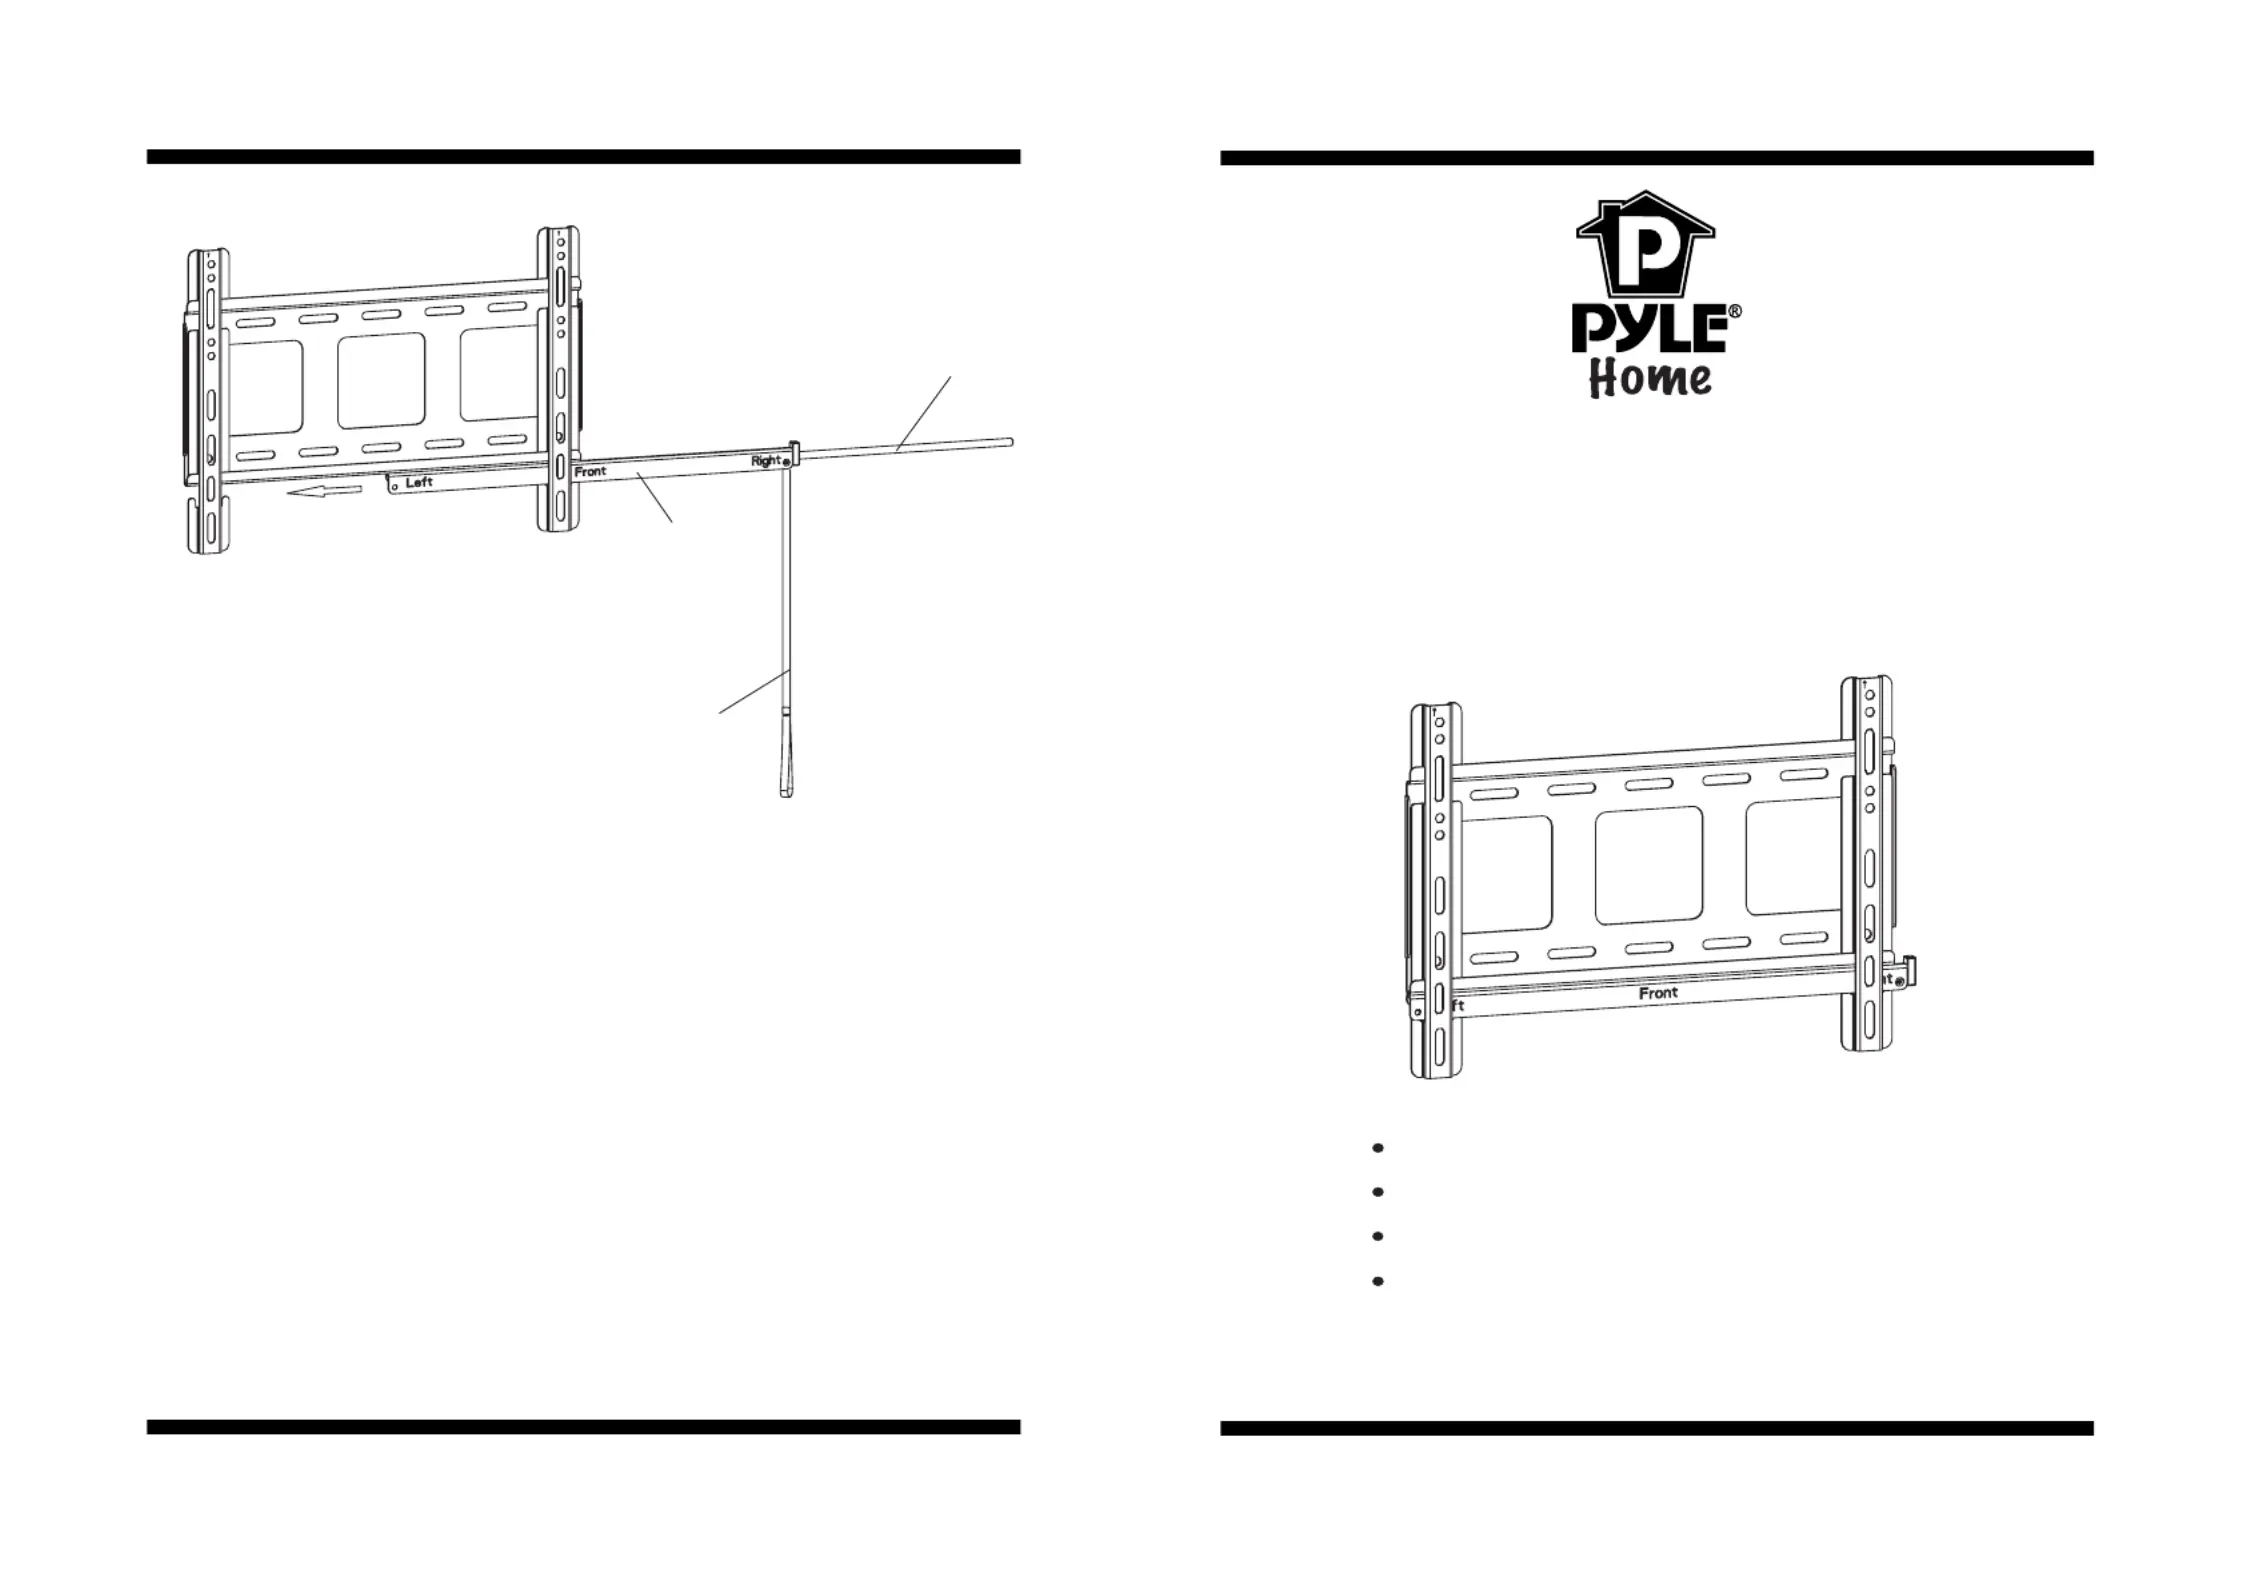
Multifunctional double deck wall mount
Fixed Flat Panel TV Bracket
Easy installing: Just hang up the display
Safety: locking by locking bar on the bottom
Max load capacity:35kg/77lbs
TV size range: 23 ~37" "
INSTALLATION GUIDE
IMPORTANT: If don’t understand about right install ways, please
consult to normal installing specialist.
IMPORT
IMPORT
IMPORT
IMPORTANT
ANT
ANT
ANT:
:
:
:
Item No.:PSW578UT
Item No.:PSW578UT
Item No.:PSW578UT
Item No.:PSW578UTItem No.:PSW578UT
Fig 3c
Warning: Some TV require two people to lift, as we are not responsible for any personal
injury or product damage due to mishandling.
W
W
W
Warning:
arning:
arning:
arning:
www pyleaudio com. .
MADE IN CHINA
Pyle Audio
1600 63rd st , Brooklyn, NY, 11204
(718)236-8000
UP
UP
UP
UPUP
UP
UP
UP
UPUP
3
4
UP
UP
UP
UPUP
UP
UP
UP
UPUP
5

Hardware List: Actual parts appearance and the quantity may different
with illustrated.
Hardwar
Hardwar
Hardwar
Hardware
e
e
e List:
List:
List:
List:
-2-
-7-
Fig 3b
Step 3: Hanging display
Firstly lift the bracket mounted display over the wall
mount. And then hook the brackets over the top of the
wall mount. Rotate the display let the bottom of the
brackets hook over the bottom of wall mount, as shown
in Fig.3a. Then use the Locking bar(3) to prevent the
display from being removed or accidentally knocked off
of the wall plate.When the locking bar half insertes into
the wall plate , you can use the rotating rod(4) to make
it fully inserted. (4)
Step
Step
Step
Step 3:
3:
3:
3: Hanging
Hanging
Hanging
Hanging display
display
display
display
Fig 3a
.
.
screw out the locking rod ,then the
TV is settled, if you think
the ribbon is too long,You could hide it at the back of
the televesion,once you want to uninstall the TV, it could help you to take out the
locking bar
As shown in Fig.3b and Fig 3c
(5)
(3)
1
3
2
2
4
5
UP
UP
UP
UPUP
UP
UP
UP
UPUP
3
UP
UP
UP
UPUP
UP
UP
UP
UPUP
5
2
1
A-F
J
G
IH
K
5 1
Ribbon
4
4
H
I
J
K
4
4
Square washer
Long bolt
Wall anchor
Long bolt washer
Spacer
ID Description
1
2
A
3
B
C
1
2
4
1
4
4
Wall plate
Bracket
M4 mm×12 bolt
M4 mm×16 bolt
M5× mm16 bolt
M6×16mm bolt
M5×36mm bolt
M6×36mm bolt
Qty
D
4
4
4
4
E
F
G
ID
Description
Qty
4 1
Rotating rod
Locking bar

-6-
-3-
W
W
W
WWARNING
ARNING
ARNING
ARNINGARNING
We are not responsible for any personal injury or product damage due to mishandling,
incorrect mounting, incorrect assembly or incorrect use of this product.
The supplied wall mounting hardware is not for use on steel stud walls or cold
cinder block walls. If you are uncertain about the nature of your wall, please consult a
qualified contractor. If the hardware you required is not included please contact your
local hardware store.
Note:
Note:
Note:
Note:Note:
Caution:This Product LCD /Plasma Wall Mount Bracket is intended for use only
with the maximum weights indicated .See apparatus instructions .Use with products
heavier than the maximum weights indicated may result in instability causing possible
injury .
Caution
Caution
Caution
Caution :
:
:
:
Step 1: Attach bracket to TV
Check your TV manual to confirm the diameter of bolt to be used or choose an
appropriate bolt according to size, height and position of the holes on your TV. See
pages 4 of these instructions for examples.
For correct installing, make sure that hook of ever y bracket must facing down. Use
selected bolts and washers for installing bracket at the back of display.
Adjust two brackets to equal heights and level. Once aligned, tightly secure the
bolts. As shown in Fig.1a.
Don't force the bolt into the hole, which will cause a damage of
equipments and injure of person. Don't use electric drill to fasten any bolts.
Note:the UP side on the top" " .
IMPORTANT:
Step
Step
Step
Step 1:
1:
1:
1: Attach
Attach
Attach
Attach bracket
bracket
bracket
bracket to
to
to
to TV
TV
TV
TV
IMPORT
IMPORT
IMPORT
IMPORTANT
ANT
ANT
ANT
Note
Note
Note
Note:
:
:
:
Fig .1a
After determining the height of stand, follow the installation instructions in below
to install wall mount to different kinds of wall -wooden, brick, concrete and stone.
Using a a wl o r nail to make where the nails are located, as show n as fig.2b. Pre-drill
these holes with a 5mm drill bit to at least 40mm in deep hole. Please make sure
these holes are level and located at center. Use wall mount as a template to mark the
location of other holes and drill the same holes.Fix the wall mount to the wall
with 4 long bolts(H) and washers(J).
Wooden wall:
three
W
W
W
Wooden
ooden
ooden
ooden wall:
wall:
wall:
wall:
Fig 2b Fig 2c
Brick, Concrete and Stone wall:
Using the wall mount as template to mark 4 holes location on the wall.Two holes are
located at the top row of the slots and two more are located at the bottom row. Please
make sure these holes are level. Pre-drill these holes with a 10mm drill bit to at least
50mm deep hole. Insert wall anchors(I) into each of these holes. Attach the wall
mount to the wall using 4 long bolts(H) and washers(J).
Brick,
Brick,
Brick,
Brick, Concrete
Concrete
Concrete
Concrete and
and
and
and Stone
Stone
Stone
Stone wall:
wall:
wall:
wall:
1
UP
UP
UP
UP
UP
UP
UP
UP
UP
UP
J
H
Produktspezifikationen
Marke: | Pyle |
Kategorie: | Mikrofon |
Modell: | PSW578UT |
Breite: | 399 mm |
Tiefe: | 15.24 mm |
Gewicht: | 2420 g |
Produktfarbe: | Schwarz |
Höhe: | 330 mm |
Befestigungstyp: | Wand |
Höchstgewichtskapazität: | 35 kg |
Verpackungsbreite: | 487.68 mm |
Verpackungstiefe: | 45.72 mm |
Verpackungshöhe: | 208 mm |
Betriebsanleitung: | Ja |
Montageset: | Ja |
Panel-Montage-Schnittstelle: | 400 x 300 mm |
Maximale Bildschirmgröße: | 37 " |
Schrauben enthalten: | Ja |
Anzahl der Display unterstützt: | 1 |
Minimum Bildschirmgröße: | 23 " |
Minimale VESA-Halterung: | - mm |
Maximale VESA-Halterung: | 400 x 300 mm |
Abstand zur Wand (min): | 15.24 mm |
Brauchst du Hilfe?
Wenn Sie Hilfe mit Pyle PSW578UT benötigen, stellen Sie unten eine Frage und andere Benutzer werden Ihnen antworten
Bedienungsanleitung Mikrofon Pyle
25 August 2025
10 August 2025
9 August 2025
27 Juli 2025
15 Juli 2025
15 Juli 2025
15 Juli 2025
15 Juli 2025
4 Juni 2025
5 Oktober 2024
Bedienungsanleitung Mikrofon
- American DJ
- TC Helicon
- Golden Age Project
- AMT
- HyperX
- 1Mii
- Trust
- Behringer
- Sabian
- Nacon
- Chord
- Easyrig
- Intricon
- Fifine
- JBL
Neueste Bedienungsanleitung für -Kategorien-
25 August 2025
24 August 2025
24 August 2025
24 August 2025
24 August 2025
24 August 2025
24 August 2025
24 August 2025
24 August 2025
23 August 2025