Pyle PYGTWIR06 Bedienungsanleitung
Pyle
Nicht kategorisiert
PYGTWIR06
Lies die bedienungsanleitung für Pyle PYGTWIR06 (3 Seiten) kostenlos online; sie gehört zur Kategorie Nicht kategorisiert. Dieses Handbuch wurde von 2 Personen als hilfreich bewertet und erhielt im Schnitt 4.7 Sterne aus 1.5 Bewertungen. Hast du eine Frage zu Pyle PYGTWIR06 oder möchtest du andere Nutzer dieses Produkts befragen? Stelle eine Frage
Seite 1/3

www.PyleUSA.com
Please read this manual carefully before using.
PRECAUTION
Location
Using the product in the following environments could cause the unit to malfunction:
• Locations with extreme temperature or humidity
• Excessively dusty or dirty environments
Power Supply
Be sure to power o the product when it is not in use. Charge the product when the low
battery light is illuminated. When the product is not used for a long period of time,
charge the unit every six months to extend the cycle life of the batteries.
Interference with other electrical devices
Avoid close proximity with other wireless devices using the same frequency.
Handling
To avoid breakage, please do not apply excessive force to the switch, buttons, or other
controls.
Care
If the exterior becomes dirty, wipe it with a clean and dry cloth. Do not apply liquid
cleaning solutions such as: benzene, diluter, or other cleaners that contain ammable
compounds.
Other Contaminants
Do not set beverages or liquids of any kind close to the unit. If liquid gets into the device,
it may cause a malfunction, re, or electrical shock. Keep the device and charging ports
clean from dirt, metal shavings, sand, lint, and dust to avoid a malfunction.
Keep this owner’s manual
After reading this manual, please keep it for later reference.
www.PyleUSA.com
MAIN FEATURES
The Wireless Instrument System consists of two parts:
the Transmitter and the Receiver, which use the 5.8GHz frequency.
1. Suitable for violin, guitar, bass and all instruments with a 6.35mm (¼”) audio jack.
2. Four built-in channels.
3. Delay time less than 5.6 ms.
4. Mute function
5. Transmitter and Receiver have large capacity built-in lithium batteries.
6. Multi-way charging mode.
7. Wireless distance: Guaranteed 20 meters (unobstructed) - can reach up to 100 meters.
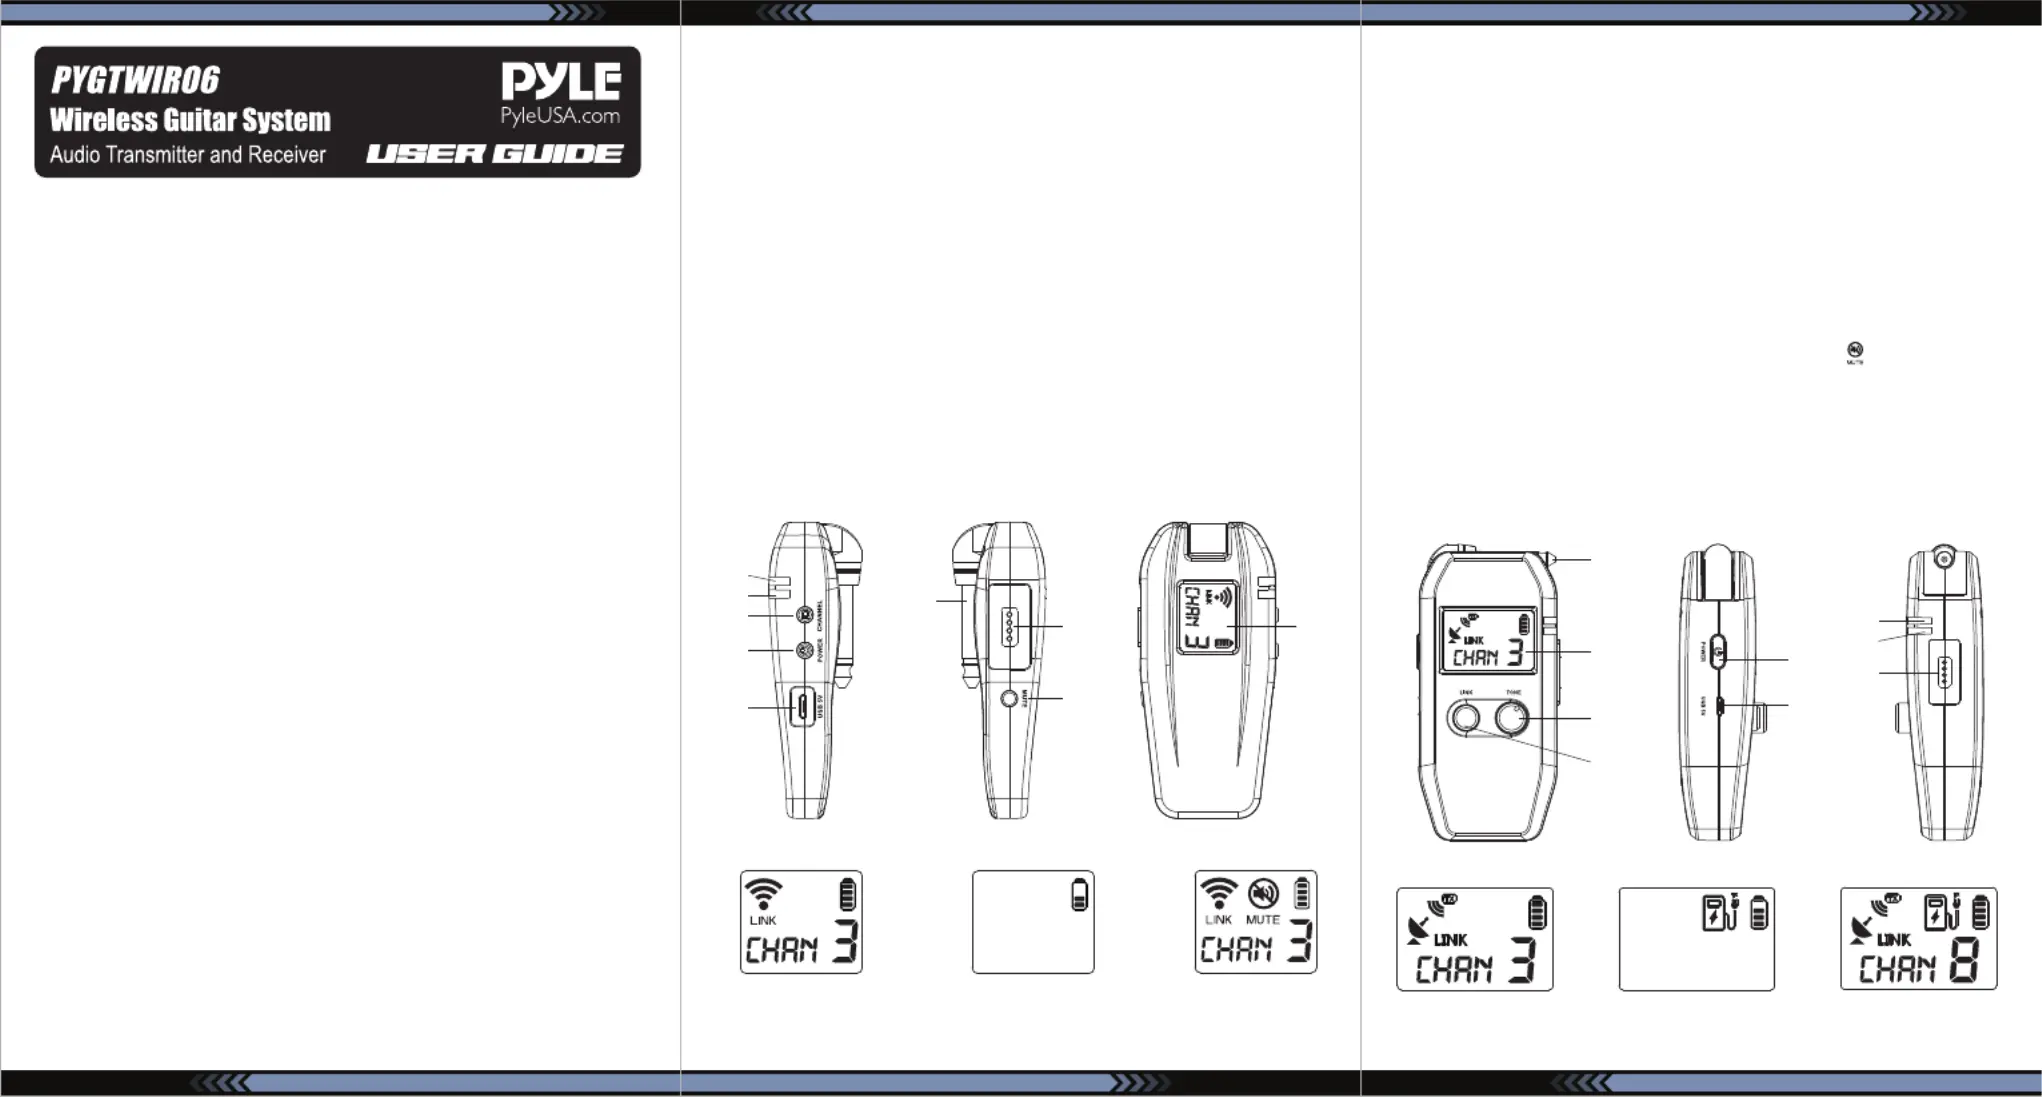
PARTS NAMES AND FUNCTION
Transmitter
www.PyleUSA.com
1. (orange color). The orange indicator ashes when not paired, and Pairing indicator
turns o when paired successfully.
2. (red, green, blue, purple)Channel indicator
3. button. Press the button to switch between dierent channels of wirelessCHANNEL
transmission.
4. buttonPOWER
5. via micro USB cableCharging port
6. Audio jack to instrument
7. Magnetic connector.
Charging connection point between the Transmitter and the Receiver.
8. button. Press and hold for 2 seconds to mute. The sign " " on the screen will MUTE
ash. Another press and hold will unmute.
9. . Displays information about battery level, channel ID, etc.. Screen
The screen turns o after 10 seconds when successfully paired.
Receiver
Transmission working
Transmitter charging for receiver
Mute status
1
3
4
9
8
5
6
7
2
5
6
7
8
9
1
2
3
4
All screen contentsTransmission working Transmitter charging for receiver

1. Audio jack to amp
2. . Displays battery level, channel ID, etc..Screen
3. knob. Turn the knob counterclockwise to increase the bass, turn the knob TONE
clockwise to increase the treble.
4. button. Press (when on the same channel) to pair the channel.LINK
5. buttonPOWER
6. charging portMicro USB
7. (orange color). Pairing indicator
The orange indicator ashes when not paired, and turns o when paired successfully.
8. (red, green, blue, purple).Channel indicator
9. . Magnetic connector
Charging connection port between the transmitter and the receiver.
HOW TO USE
1. Press and hold the POWER buttons of the Transmitter and Receiver to turn the power on.
2. When both channel indicators show the same color and the channel number on the
screens are the same, pairing was successful and the devices are ready to use.
3. If pairing indicators (orange color) are ashing, the Transmitter and Receiver are not
successfully paired. Simultaneously press and hold the CHANNEL button of the
Transmitter and LINK button of the Receiver for 5 to 7 seconds or until the Transmitter
and Receiver channel indicator colors are the same, the channel numbers match, and
both orange color pairing indicators turn o, which means pairing was successful.
4. Once paired, to switch to another channel ID, only press the Transmitter CHANNEL
button. The Receiver channel ID will change to the same channel automatically.
5. Connect the Transmitter and Receiver to your instrument and amp to begin using.
The Transmitter connects to the instrument
The Receiver connects to the amp
www.PyleUSA.com
Troubleshooting
• The frequency 5.8GHz might also be used by other wireless devices, including WiFi
routers. We suggest using the wireless device at a minimum distance of 2 meters 6’)
or more away from other wireless devices to avoid interference. Situations which may
cause interference with the wireless transmission quality:
Multiple 5.8GHz wireless devices nearby. •
Spaces with extremely strong WiFi signals or other complex radio frequencies. •
• If pairing is unsuccessful, simultaneously press and hold the CHANNEL button of the
Transmitter and LINK button of the Receiver for 5 seconds or until the Transmitter and
Receiver channel indicator colors are the same, the channel numbers match, and both
orange color pairing indicators turn o, which means pairing was successful.
• If you are experiencing audio interference, press the CHANNEL button to switch to
another channel.
www.PyleUSA.com
HOW TO CHARGE
Notes:
1. When using the Receiver to charge the Transmitter, both will power o automatically
within 5 minutes. It takes 3.5 hours to be fully charged when using a 5V / 1A power
source (USB cable).
2. Neither the Receiver or Transmitter will work when charging.
3. If the Receiver does not detect a signal from the Transmitter within 30 minutes,
the Receiver will power o automatically.
DEVICE STATUS
www.PyleUSA.com
To Instrument
To Amp
RECEIVER
TRANSMITTER
Orange light ashing,“ ” ashing Orange light ashing,“ ” ashing
STATUS
TRANSMITTER RECEIVER
Orange lights O
After successful pairing, both channel indicators show a same color,
and the channel ID numbers are the same.
25% Power 100% Power
Unpaired
Paired

Questions? Comments?
We are here to help!
Phone: (1) 718-535-1800
Email: support@pyleusa.com
www.PyleUSA.com www.PyleUSA.com
FAQ
Question: There’s no sound after pairing
Solutions:
• Transmitter properly connected?
Try disconnecting the Transmitter, and re-insert it into your instrument.
• Receiver connecting to a wrong input of your amp?
Check the connection of the Receiver to your amp and connect it again correctly.
• Distance between the Transmitter and Receiver is too far?
Obstacles in between the units?
Shorten the distance between the Transmitter and Receiver and remove any obstacles.
• Possibly under charging status?
Do not use the Transmitter when charging
• Low power or power o?
Check power level and try charging the units
Question: Crosstalk
Solutions:
• Transmitter might be connected to another Receiver?
Try switching to another channel ID, or re-pair Transmitter and Receiver.
Question: Stuttering
Solutions:
• Could there be 5.8GHz interference from another device?
Try switching to a dierent channel ID. Or re-pair the Transmitter and Receiver.
Question: Not charging
Solutions:
Try changing to another power source, or change to a new USB charging cable.
www.PyleUSA.com
FCC Statement
This equipment has been tested and found to comply with the limits for a Class B digital
device, pursuant to part 15 of the FCC Rules. These limits are designed to provide reasonable
protection against harmful interference in a residential installation.
This equipment generates, uses and can radiate radio frequency energy and, if not
installed and used in accordance with the instructions, may cause harmful interference
to radio communications. However, there is no guarantee that interference will not
occur in a particular installation. If this equipment does cause harmful interference to
radio or television reception, which can be determined by turning the equipment o
and on, the user is encouraged to try to correct the interference by one or more of the
following measures:
• Reorient or relocate the receiving antenna.
• Increase the separation between the equipment and receiver.
• Connect the equipment into an outlet on a circuit dierent from that to which the
receiver is connected.
• Consult the dealer or an experienced radio/TV technician for help.
Caution:
Any changes or modications to this device not explicitly approved by the could void
your authority to operate this equipment. This device complies with part 15 of the FCC
Rules. Operation is subject to the following two conditions:
(1) This device may not cause harmful interference, and
(2) This device must accept any interference received, including interference that may
cause undesired operation. This equipment complies with FCC radiation exposure
limits set forth for an uncontrolled environment.
This equipment should be installed and operated with a minimum distance of 20cm
between the transmitter & your body.
Features:
• Allows for Cable-Free Connectivity
• Covers a Wide Range of Frequencies for Optimal Signal Transmission
• Delivers Clear and High-Fidelity Sound Reproduction
• Portable and Easy to Use
• Lightweight and Ergonomic Design
• Support Multiple Channels to Accommodate Dierent Instruments
• Adjustable Control Level Function
• Long Running Battery Life
• Stable and Reliable Wireless Connection
• Easy-to-Use Instrument Wireless System
• Great for Strolling Musicians
• Rechargeable Built-in Lithium Battery
• Suitable for Guitar, Violin, Bass, and all Instruments with a 6.35mm (¼”) Audio Jack
What’s in the Box:
• (1) Transmitter
• (1) Receiver
• (1) Rechargeable Cable
• (1) Manual
Technical Specs:
• Construction Material: Plastic
• Battery Type: Lithium Battery
• Battery Volts: 3.7V
• Frequency: 5.8GHz
• Channels: 4
• Milliamp Hours (mAh): 600mAh for Transmitter and 3000mAh for Receiver
• Watt Hours (Wh): 5h
• Max Transmission Distance: 35m
• Product Dimensions (L x W x H): 11.42” x 3.9” x 9.49” -inches
Produktspezifikationen
Marke: | Pyle |
Kategorie: | Nicht kategorisiert |
Modell: | PYGTWIR06 |
Brauchst du Hilfe?
Wenn Sie Hilfe mit Pyle PYGTWIR06 benötigen, stellen Sie unten eine Frage und andere Benutzer werden Ihnen antworten
Bedienungsanleitung Nicht kategorisiert Pyle
15 Juli 2025
15 Juli 2025
15 Juli 2025
7 Juli 2025
4 Juni 2025
27 September 2024
26 September 2024
26 September 2024
25 September 2024
5 September 2024
Bedienungsanleitung Nicht kategorisiert
- Hitron
- Trimble
- Ziggo
- Tactical Fiber Systems
- Walkstool
- Mr. Heater
- Harman Kardon
- Loctite
- Approx
- Ditek
- Intenso
- Yamato
- Glasdon
- JANDY
- GAMO
Neueste Bedienungsanleitung für -Kategorien-
19 Juli 2025
19 Juli 2025
19 Juli 2025
19 Juli 2025
19 Juli 2025
19 Juli 2025
19 Juli 2025
19 Juli 2025