Nilox NXAIRPUMP Bedienungsanleitung
Nilox
Nicht kategorisiert
NXAIRPUMP
Lies die bedienungsanleitung für Nilox NXAIRPUMP (91 Seiten) kostenlos online; sie gehört zur Kategorie Nicht kategorisiert. Dieses Handbuch wurde von 3 Personen als hilfreich bewertet und erhielt im Schnitt 5.0 Sterne aus 2 Bewertungen. Hast du eine Frage zu Nilox NXAIRPUMP oder möchtest du andere Nutzer dieses Produkts befragen? Stelle eine Frage
Seite 1/91

ENGLISH - EN
Instruction Manual
PORTABLE ELECTRIC AIR COMPRESSOR
MODEL: NXAIRPUMP
Rev00 - 08.01.2025
Please read this manual and pay attention to the safety warnings before using the product. Keep the manual for
future reference or in case the product is passed on to third parties. Esprinet S.p.A. cannot be held responsible
for any injuries or damages caused to persons or property resulting from improper use of the product.
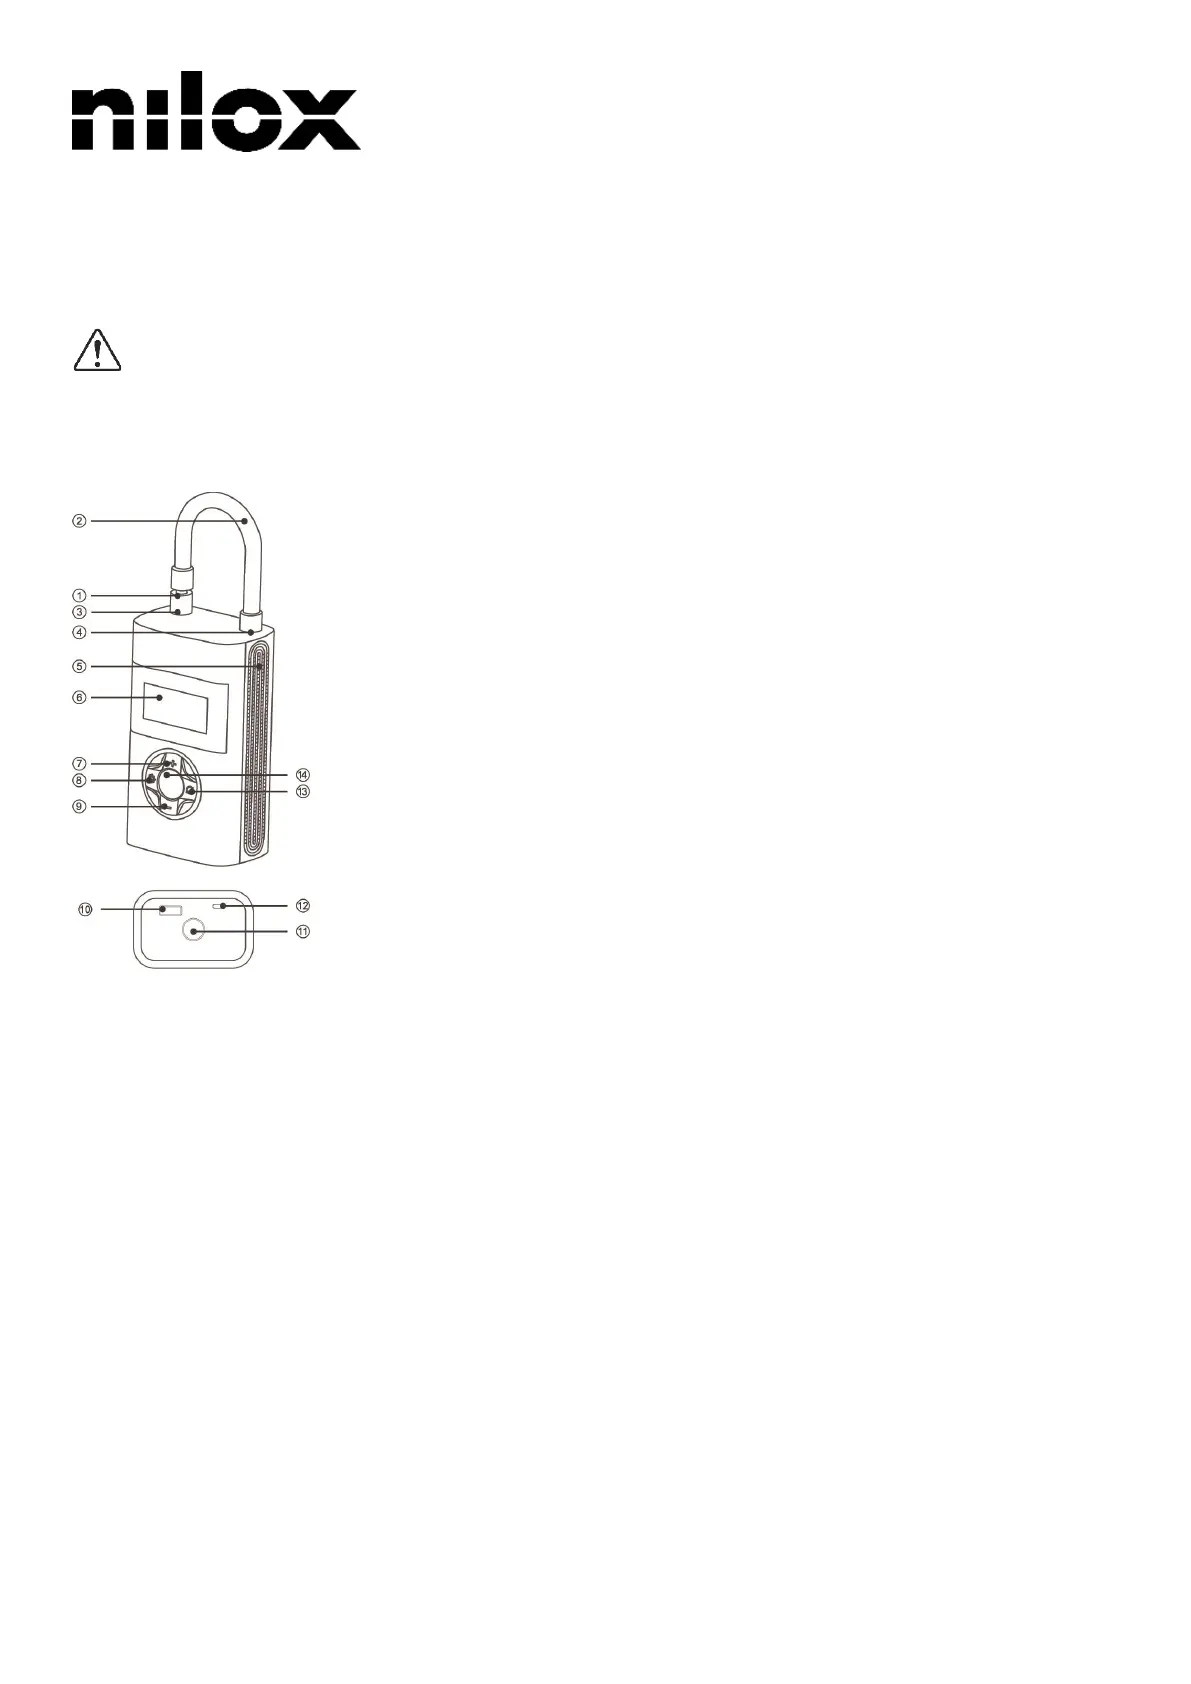
1. Nozzle
2. Hose
3. End section of the hose
4. Beginning section of the hose
5. Heat emission holes or
6. LED Display
7. "+" Button
8. Light Button
9. "_" Button
10. USB Connector
11. LED Light
12. Charging Input
13. "Mode" Button
14. "Start/Stop" Button
PREPARATION
The product must be activated by fully charging it before first use. Press and hold the power button.
Subsequently, ensure that the device remains sufficiently charged. Attach the connector to the body of the
product and insert it into the USB port of a charger to activate it (be careful to insert it correctly and use the
correct current).
USAGE
Before first use, fully charge the device. Use the charging cable to connect a 5V USB charger (not included).
Flashing light: charging in progress.

Four bars lit: charging completed. The length of the power indicator shows the remaining battery charge. Four
bars: 100% battery charge. Three bars: 75% battery charge. One bar: <25% charge, requires recharging. Note:
the device cannot be used for inflation while charging.
To start: pull out the hose and press and hold the "Start/Stop" button for three seconds. To stop (turn off): while
on, press and hold the "Start/Stop" button for three seconds. To restart: after pulling out the hose, restart by
pressing and holding the "Start/Stop" button. Pressure connector: insert the pressure connector into the air
compressor hose and connect it to the tires of the car, motorcycle, or bicycle for inflation. Release the pressure
connector for deflation. When the device is on, connect the hose to the tire or ball for inflation. The screen
displays the current pressure.
Note: the pressure recommended by the device is provided for reference only. Always consult the instruction
manual of the inflated product for precise inflation guidelines. Press the "Mode" button to scroll through the six
modes. For preferred air pressure units, press and hold the "Mode" button to switch between "PSI," "BAR," "KPA,"
"Kg/cm²."
• Zero Mode: freely adjust the pressure from 3 to 150 psi.
• Bicycle Mode: default: 45 psi - Adjustable range: from 30 to 65 psi.
• Motorcycle Mode: default: 2.4 bar - Adjustable range: from 1.8 to 3.0 bar.
• Car Mode: default: 2.5 bar - Adjustable range: from 1.8 to 3.5 bar.
• Ball Mode: default: 8 psi - Adjustable range: from 4 to 16 psi.
After selecting the desired mode, use a short press of "+" or "-" to adjust the preset pressure value. For quick
adjustment, press and hold "+" or "-".
The flashing number indicates the adjustable preset pressure, while the non-flashing number indicates the real-
time pressure. Press the "LED Light" button to turn the light on or off. The light helps in connecting the nozzle
and in other operations in low light conditions. Press the "Start/Stop" button after selecting the default mode.
The device automatically stops inflating when the air pressure reaches the preset setting. Manually stop inflation
by pressing the "Start/Stop" button during the process. Be cautious when inflating small products (balloons, toy
balls, life rings) as their maximum pressure is lower than the device's range. Manually stop inflation at the target
pressure as it will not stop automatically. With a full charge, the device operates continuously for about 25
minutes without load at 25 ℃. Resistance decreases with increased pressure load and lower temperatures. The
air hose may be warm after inflation; be careful when removing the air nozzle. Expect a slight air leak during
disassembly; promptly remove the nozzle to minimize air escape. When the air compressor is on, press and hold
the "Start/Stop" button to turn it off, otherwise it will automatically turn off after 45 seconds of inactivity.
TROUBLESHOOTING
• Low inflation speed.
Ensure the battery is sufficiently charged.
Check for air leaks in the air hose.
Check if the inflated object is leaking air.
Ensure that the connecting parts at both ends of the hose are tight.
• No inflation.
Check if the hose is pulled out; you can only start inflation with the hose pulled out.
Ensure the battery is sufficiently charged.
Check if the current tire pressure is above the preset pressure.
• Unable to increase or decrease the preset pressure.
Check if you are using the wrong inflation mode; alternatively, select zero mode and adjust the inflation
pressure within the allowed range of 3-150 psi – 0-2-10 bar.
• Lack of pressure during inflation.
Low-pressure inflatable products, such as balloons, do not fall within the measurable range of the air
compressor.
• The device automatically turns off after screwing in the air nozzle.
Press and hold the start/stop button to turn the device back on.
• Air leak.
Tighten the nozzle.
• The device cannot be charged.
Check if the charging cable is connected correctly.
• If the battery is left discharged for a long period, it requires a charging period before it starts displaying
the charge status.
CLEANING
Do not use solvents, corrosive or gaseous cleaners.
SAFETY REGULATIONS
Produktspezifikationen
Marke: | Nilox |
Kategorie: | Nicht kategorisiert |
Modell: | NXAIRPUMP |
Brauchst du Hilfe?
Wenn Sie Hilfe mit Nilox NXAIRPUMP benötigen, stellen Sie unten eine Frage und andere Benutzer werden Ihnen antworten
Bedienungsanleitung Nicht kategorisiert Nilox
19 Juli 2025
19 Juli 2025
29 Juli 2024
28 Juli 2024
23 Juli 2024
17 Dezember 2023
Bedienungsanleitung Nicht kategorisiert
- Gembird
- Theragun
- Zega
- Bébé Confort
- Fritel
- Bricasti Design
- Craftfull
- JVC
- MTM
- Sky
- Integral
- Janitza
- Avinity
- Oben
- Closer Pets
Neueste Bedienungsanleitung für -Kategorien-
19 Juli 2025
19 Juli 2025
19 Juli 2025
19 Juli 2025
19 Juli 2025
19 Juli 2025
19 Juli 2025
19 Juli 2025
19 Juli 2025