Quoizel BRT5204GK Bedienungsanleitung
Quoizel Beleuchtung BRT5204GK
Lies die bedienungsanleitung für Quoizel BRT5204GK (2 Seiten) kostenlos online; sie gehört zur Kategorie Beleuchtung. Dieses Handbuch wurde von 2 Personen als hilfreich bewertet und erhielt im Schnitt 4.6 Sterne aus 6 Bewertungen. Hast du eine Frage zu Quoizel BRT5204GK oder möchtest du andere Nutzer dieses Produkts befragen? Stelle eine Frage
Seite 1/2
1of2
ForStyleBRT5204GK
WarningsandCautions
Turnoffelectricityatcircuitbreakerormainfuseboxbeforeinstallation.Consultalicensedelectricianifindoubt.
Theseinstructionsareprovidedforyoursafety.Itisveryimportantyoureadthemcompletelybeforeinstallingthefixture.Westrongly
recommendthatalicensed,professionalelectricianperformtheinstallation.
Disconnectfixturefrompowersourcebeforereplacingbulbs.Makesurebulbsaregivensufficienttimetocoolbeforeremoval.
Pleasegotoforproductcleaningtips.Gototheselection.
(4)A19MediumBaseBulb100WMaximum,bulbnotincluded.
MinimumHangingHeightis27.5”,MaximumHangingHeightis63.5”.
30-45minutes
Identifyandinspectallpartsbeforebeginninginstallation.Checkpackagecontentlistanddiagramsbelowtoensureallpartsare
present.Ifanypartsaremissingordamaged,donotattempttoassemble,install,oroperatethefixture.MissingParts?Contactyouroriginalplaceof
purchase.
www.quoizel.comCare+Maintenance
LightSource:
FixtureHangingHeight:
EstimatedAssemblyTime:
Preparation:
ToolsRequired:Flatheadscrewdriver,Phillipsscrewdriver,pliers,wirecutters,wirestrippers,electricaltape,safetyglasses.
InstallationGuide#IS-BRT5204GK
2018QuoizelInc.
visituson-lineatwww.quoizel.com
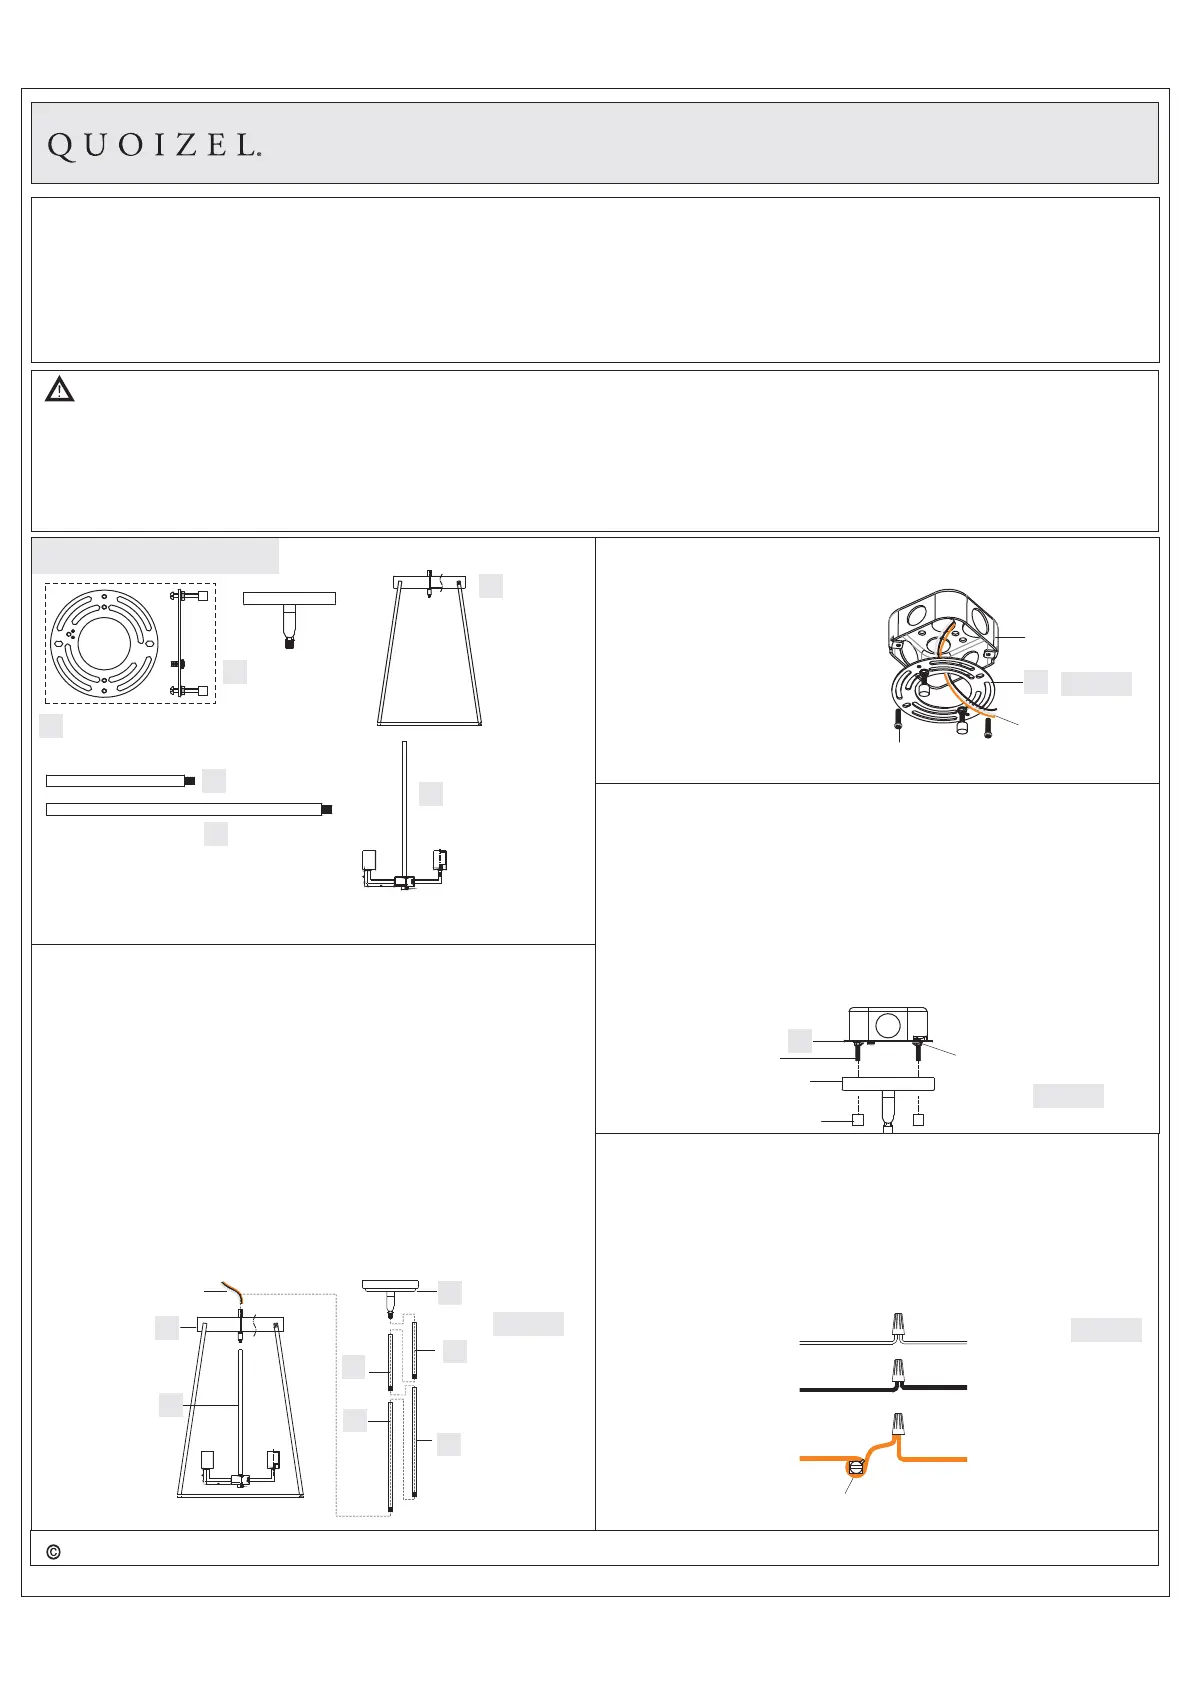
Cage
x1
E
E
Socketassembly
x1
F
F
PackageContents
A
CrossbarAssembly
x1
D
CeilingCanopy
x1
B
6”Rod
x2
C
12”Rod
x2
STEP1-InstallCeilingCanopy,RodsandFixtureBodytogether
a.Threadthecage(E)andthesocketassembly(F)togetherasshown,
Handtightenuntilsnug.
b.DeterminetheRods(B/C)tobeassembledtotheFixtureBody
accordingtoyourhangingheight.
c.Passthesupplywiresandgroundwirethroughthechosenrods
(B/C)andtheCeilingCanopy(D).ThreadtheFixtureBody,the
chosenRods(B/C)andtheCeilingCanopy(D)together.Hand
tightenuntilsnug.
SuggestedrodsforCeilingheight:
8’ceiling:use(1)6”rods
9’ceiling:use(1)6”rodsand(1)12”rods
10’ceiling:use(1)6”rodsand(2)12”rods
B
B
D
SupplyWires
andGroundWire
C
C
Figure1
STEP2-Installingthe
CrossbarAssembly
A.Passthesupplywiresfrom
outletboxthroughthe
CrossbarAssembly(A).
AttachtheCrossbarAssembly
(A)totheOutletBoxwiththe
headoftheGreenGround
Screwfacingyou.Securethe
CrossbarAssembly(A)with
OutletBoxScrews(not
included).Tightenuntilsnug.
SupplyWireswith
GroundWire
OutletBoxScrews
(notincluded)
OutletBox
A
Figure2
STEP3TestFittingCeilingCanopytoCrossbarAssembly-
A.
tothe
ceiling
RemovemountingballsfromtheCrossbarAssembly(A).Fitthe
CrossbarAssembly(A)andsecurewith
mountingballs.Note:Theshouldbesnugagainst
theandthemountingballs.If
FixtureCanopy
FixtureCanopy
not,adjustthelengthofthe
nippleontheCrossbarAssembly(A)byunscrewingthe
preassembledhexnutandlockwasherandthenscrewingthe
mountingscrewsinoroutofthecrossbaruntilthecorrectlengthis
achieved.OncetheFixtureCanopyissecure,removethemounting
ballandFixtureCanopyandproceedtoStep4.
MountingScrew
HexNutand
LockWasher
MountingBall
A
Figure3
FixtureCanopy
STEP4-WireConnections
A.
B.Usestandardwireconnectors(notincluded)tomakeallwire
connections.Twistconnectorsuntilwiresaretightlyjoinedtogether.
Wrapeachconnectionwithapprovedelectricaltapeandcarefully
stuffalltheconnectedwiresintotheOutletBox.
Wrapbareorgreengroundwirearoundgreengroundscrewonthe
crossbar,nolessthan2inchesfromtheendofthewire.Tightenthe
greengroundscrew.
GreenGroundScrew
ontheCrossbar
Whitewire
fromoutletbox
Whitewire
fromfixture
Blackwirefrom
outletbox(orRed)
Blackwire
fromfixture
Bare,orGreen
Groundwire
fromoutletbox
Groundwire
fromFixture
Figure4
ReleasedDate:2019-01-15
Produktspezifikationen
| Marke: | Quoizel |
| Kategorie: | Beleuchtung |
| Modell: | BRT5204GK |
Brauchst du Hilfe?
Wenn Sie Hilfe mit Quoizel BRT5204GK benötigen, stellen Sie unten eine Frage und andere Benutzer werden Ihnen antworten
Bedienungsanleitung Beleuchtung Quoizel

29 März 2026
29 März 2026
28 März 2026
28 März 2026
25 März 2026
25 März 2026
25 März 2026
24 März 2026
18 März 2026
18 März 2026
Bedienungsanleitung Beleuchtung
Neueste Bedienungsanleitung für -Kategorien-
29 März 2026
29 März 2026
29 März 2026
29 März 2026
29 März 2026
29 März 2026
29 März 2026
29 März 2026
28 März 2026