Rossmax BP5 Bedienungsanleitung
Rossmax Thermometer BP5
Lies die bedienungsanleitung für Rossmax BP5 (8 Seiten) kostenlos online; sie gehört zur Kategorie Thermometer. Dieses Handbuch wurde von 36 Personen als hilfreich bewertet und erhielt im Schnitt 4.5 Sterne aus 3 Bewertungen. Hast du eine Frage zu Rossmax BP5 oder möchtest du andere Nutzer dieses Produkts befragen? Stelle eine Frage
Seite 1/8
Model: BP5
www.qutie-rossmax.com
Electric Breast Pump
WARNING:The symbol on this product means that it’s an electronic product and
following the European directive 2012/19/EU the electronic products have to be
disposed on your local recycling centre for safe treatment.
Warranty Card
This instrument is covered by a 1 year guarantee from the purchase date. The
guarantee is valid only on presentation of the guarantee card completed by the
dealer confirming purchase date or the receipt. Pump parts, accessories and bat-
tery are not included. Opening or altering the instrument invalidates the guaran-
tee. The guarantee does not cover damage, accidents or noncompliance with the
instruction manual. Please contact your local seller/dealer or www.rossmax.com.
Customer Name: ________________________________________________
Address: _______________________________________________________
Telephone: _____________________________________________________
E-mail address: __________________________________________________
Product Information
Date of purchase: ________________________________________________
Store where purchased:
________________________________________________________________
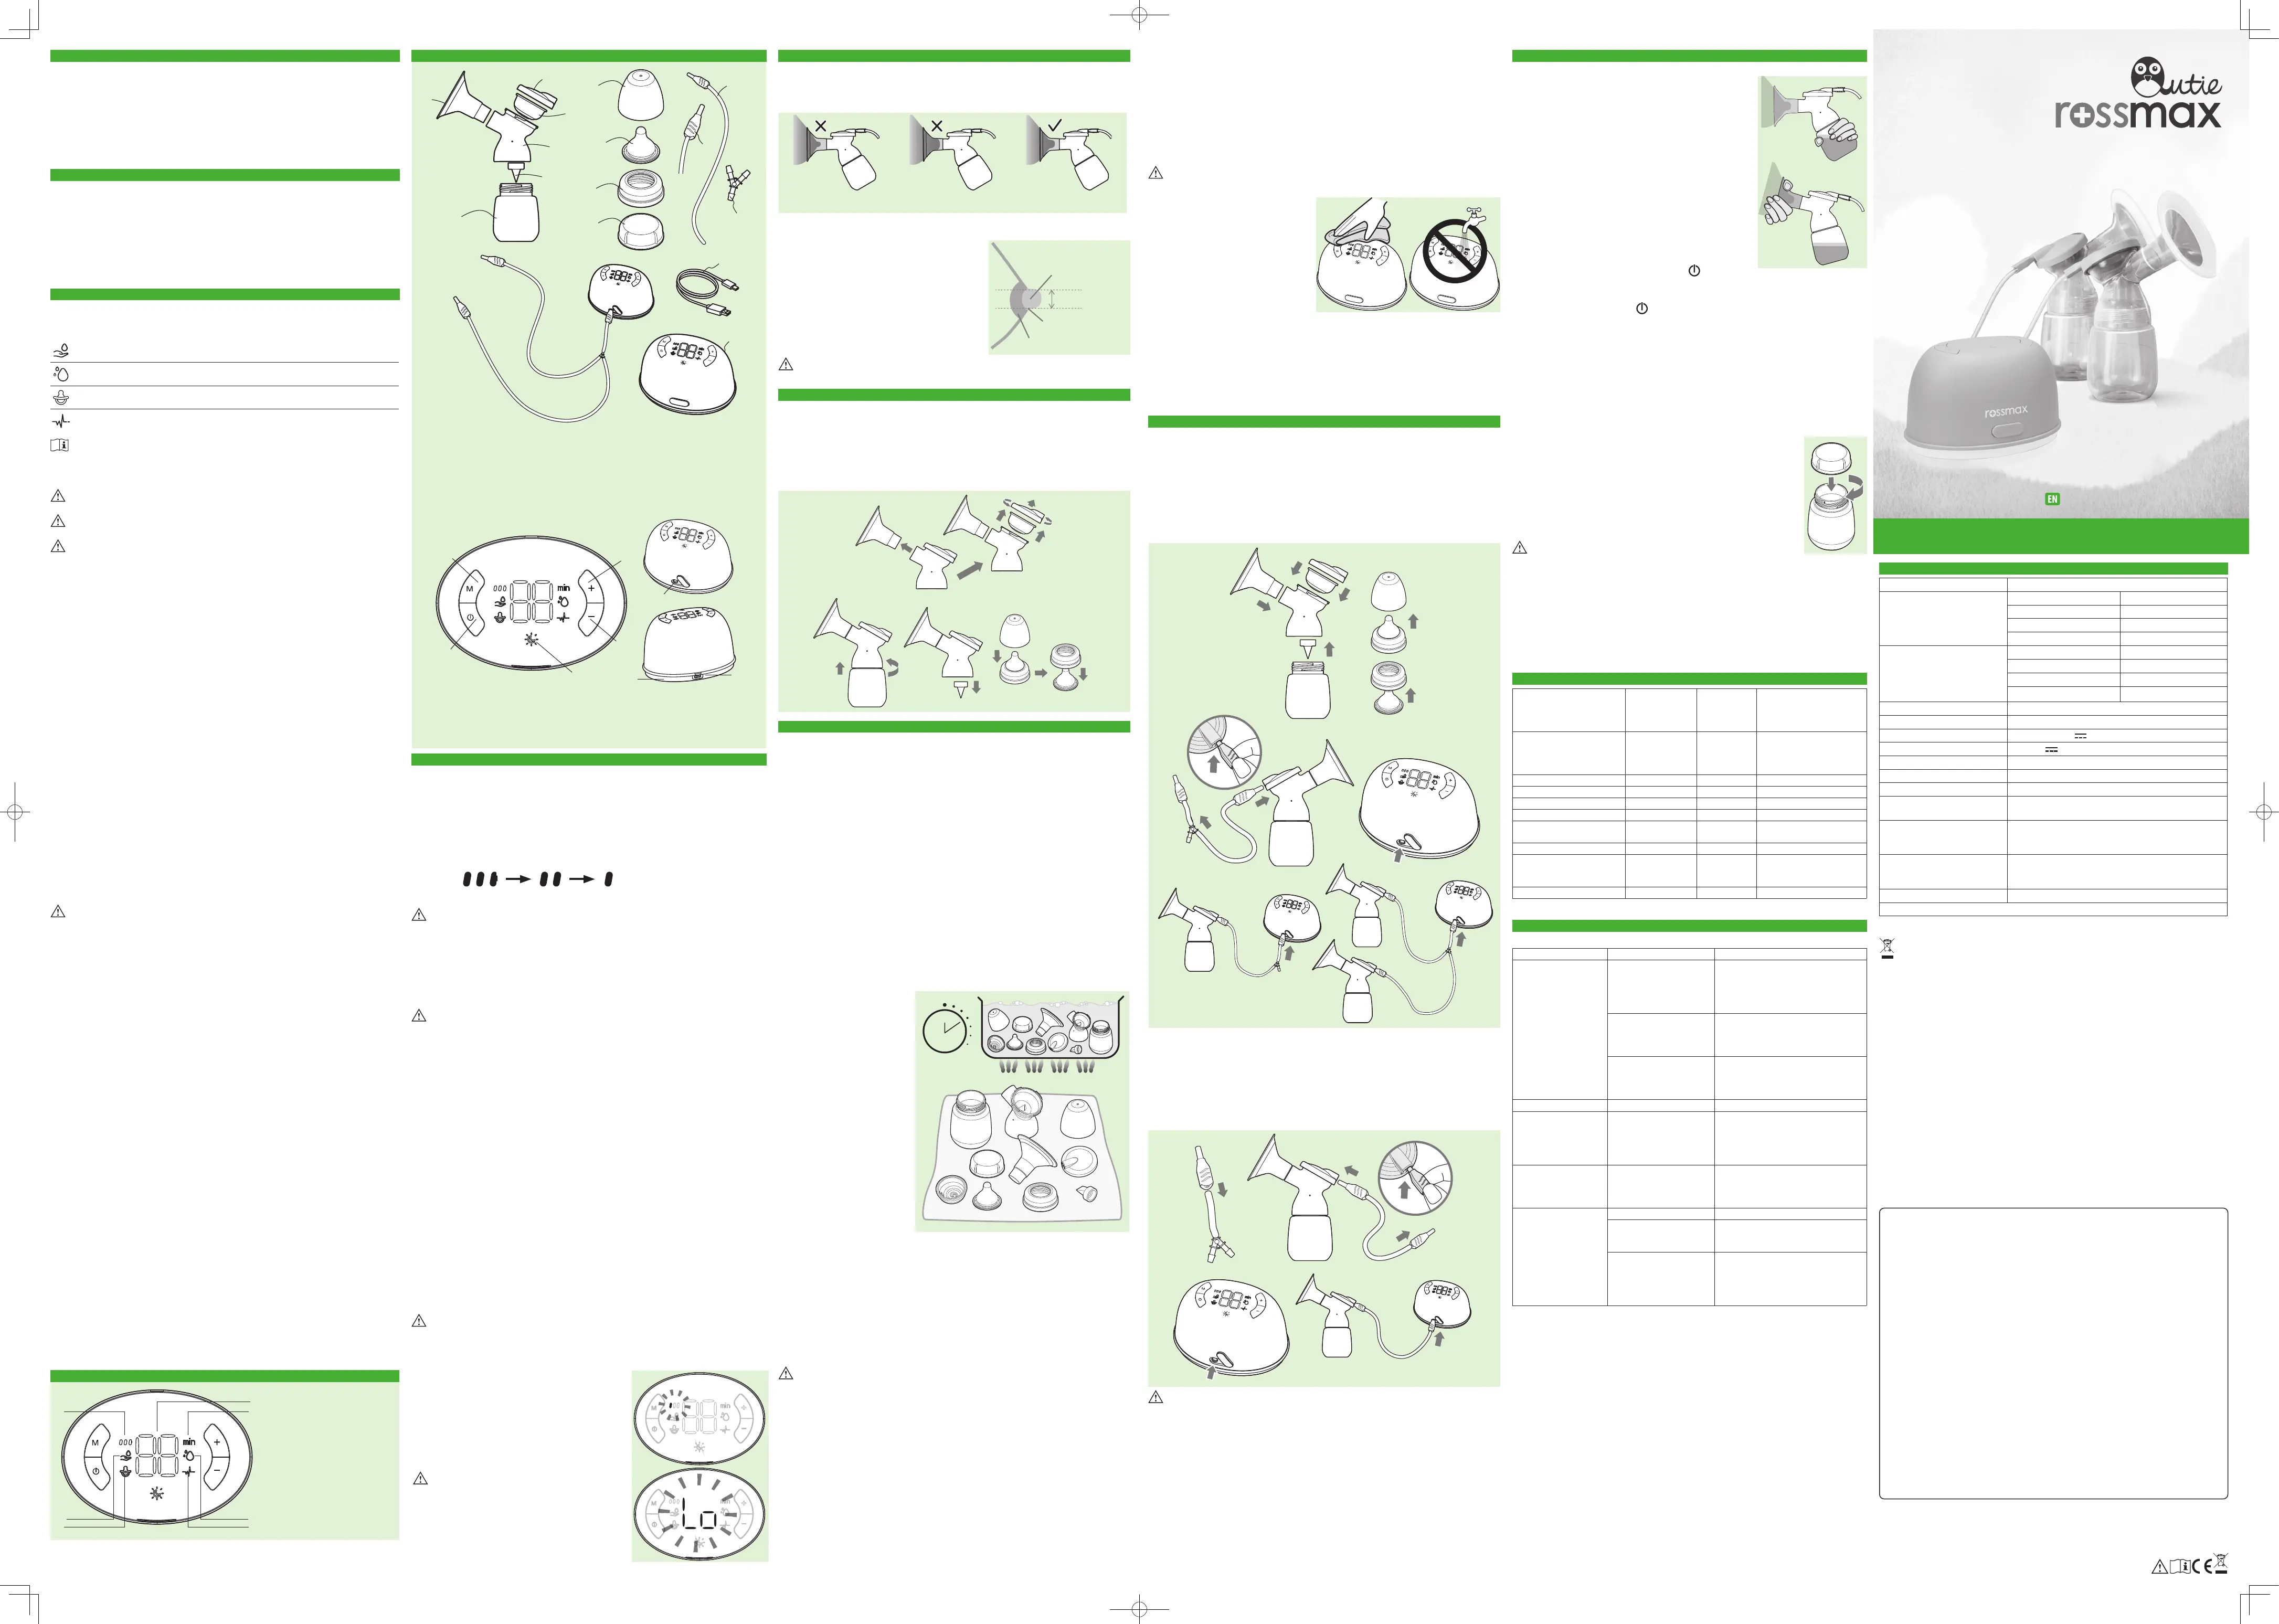
16. Mode-Switching key
17. On/Pause/O button
18. Increase vacuum button (+)
19. Decrease vacuum button (-)
1. Battery level
2. Stimulation mode
3. Suck simulate mode (as
baby)
4. Pumping level or Timer
5. Time symbol
6. Expression mode
7. Multitronic suction
mode
Introduction
We thank you for purchasing the Rossmax Breast Pump BP5. Your journey with
Rossmax is the rst step in nurturing your baby. We hope that you and your baby will
enjoy the Rossmax experience.
The Rossmax electric breast pump is an electric powered breast pump used to
express and collect breast milk from lactating mother. This product follows a baby’s
natural nursing rhythm. The unique design can help you to express breast milk
quickly and comfortably, and the LED night light with touch control is designed for
easy operation at night.
Intended use
1. This breast pump is intended for single user in a home environment. As the pump
is compact and discrete to use, you can take it with you anywhere, allowing you to
express milk at your own convenience and maintain your milk supply.
2. If your breasts are engorged (painful or swollen), you can express a small amount
of milk before or between feeds to ease the pain and to help your baby latch on
more easily.
3. If you are separated from your baby and wish to continue to breast feed when you
are reunited, you should express your milk regularly to stimulate your milk supply.
Product Description
The Rossmax Breast Pump BP5 has 4-modes technology and is capable of two-sided
and one-sided expressing. This product has Stimulation mode, Expression mode,
Suck simulate mode and Multitronic suction mode with 6-9 levels selection.
Stimulation mode: Fast sucking/pumping rhythm to stimulate the milk
ejection reex and to start the milk owing.
Expression mode: Slower sucking/pumping rhythm for gentle and ecient
milk removal as quickly as possible.
Suck simulate mode: Fast sucking/pumping rhythm and Slower sucking/
pumping rhythm combined. This mode works at a faster pace.
Multitronic suction mode: Fast sucking/pumping rhythm and Slower suck-
ing/pumping rhythm combined. This mode works at a slower pace.
Please read this manual carefully before use and be sure to keep this
manual.
Warnings identify all instructions that are important for safety. Failure to observe
these instructions can lead to personal injury or damage to the product.
Warning: Important safety information for hazards that draws attention to a
potential danger.
Caution: Indicates correct operating or maintenance procedures to prevent
damage to the product or other property.
Warning:
• Never operate the device if it has a damaged cord or plug, if it is not working
properly, if it has been dropped or damaged, or dropped into water.
• Do not use the product that has been exposed to water or other liquids, including:
– Do not use while bathing or showering.
– Never place or drop into water or other liquids.
– Do not run water over the pump unit.
– If the product has been exposed to water or other liquids, do not touch, unplug
the device from electrical outlet, turn o and contact your local distributor or
authorized Rossmax service center
• Pumping can induce labor. Do not pump until after giving birth. If you become
pregnant while breastfeeding or breast pumping, consult with a licensed healthcare
professional before continuing.
• This is a single-user product. Use by more than one person may present a health risk
and void the warranty.
• Do not use the device while operating a moving vehicle.
• There are no user serviceable parts inside the pump. Do not attempt to open,
modify or repair the breast pump yourself.
• If expressing becomes painful, stop and consult your breast feeding advisor or
healthcare professional.
• The tubing poses a risk of strangulation when being played with and small parts
may be swallowed by children. Children should be supervised to ensure that they
do not use or play with the product. Place the product out of reach from children
and pets.
• Make sure not put any products on the pump unit, like pillow, blanket etc. Please
make sure pump unit work in well ventilation and heat dissipation condition.
• Do not service or maintain device while in use.
• Do not use the tubing and/or AC adaptor for any other purpose than those specied,
as they can cause risk of strangulation.
Caution:
• Do not use the product outdoors.
• This product can be used by people with reduced physical, sensory or mental
capabilities or lack of experience and knowledge if they have been given supervision
or instruction concerning use of the appliance in a safe way and if they understand
the hazards involved.
• The product should not be left unattended when plugged into a power socket.
Always unplug electrical products immediately after use except for when charging.
• The device and its accessories are not heat-resistant. Keep away from heated
surfaces or open ames.
• Do not use the breast pump in the presence of ammable anaesthetic mixtures
with air, with oxygen, or with nitrous oxide.
• Before each use visually inspect the individual parts for cracks, chips, tears,
discoloration or deterioration. In the event that damage to the device is observed,
please discontinue use until the parts have been replaced.
• Never use a damaged device. Replace defective or worn parts.
• Use the device only for its intended purpose as described in these instructions for
use.
• Do not use the device while sleeping or overly drowsy.
• Do not continue pumping for more than ve minutes at a time if no milk is expressed.
• Do not attempt to remove the pump set from the breast while under vacuum.
Switch the device o, break the seal between the breast and the breast shield with
your nger and remove the breast shield from your breast.
• Use only original Rossmax accessories/parts as included in the product.
• Plug the device into the appropriate voltage outlet. Do not overload power outlets
or use extension power cords.
• If tubing becomes mouldy, discontinue use and replace tubing.
• Make sure that the teething baby does not bite the nipple too long. The continuous
and prolonged bite will damage the nipple. For hygiene reasons, replace nipples
after three months of use.
• Do not place or store the product where it can fall or be pulled into a tub or sink.
• Store the device and parts in a clean location to avoid infection.
• Do not store the product in direct sunlight, high temperature or humidity.
1
2
3
5
4
6
7
8
9
10
11
11
11
12
12
13
13
14
15
21
22
23
20. Night light with touch control
21. Air inlet
22. Type C port
23. Rechargeable Lithium-ion
battery (non-detachable)
LED Display Explanations
Charging the battery with authorized AC Adapter (Optional)
The device is equipped with a non-detachable and high-capacity rechargeable
lithium-ion battery and has a LED light for charge indication. We recommend charging
the battery to a full capacity for initial use, and it may take about 4 hours to fully charge.
1. Plug the AC adapter into the socket.
2. Connect the USB cable with AC Adapter, insert the USB cable into Type C port on
the back side of the device.
3. The indicator of Orange light ashes while the battery is being charged. The light
will illuminates when the battery is fully charged.
Full battery Low battery
Warning:
• Do not charge the battery when AC Adapter is wet or with wet hands. You may suer
electric shock.
• If the uid in the battery gets into your eye, wash the eye with sucient water
without rubbing the eye, then immediately consult the doctor for treatment. There is
danger in losing your eyesight.
• Do not throw the battery into re, or heat, or disassemble it. It may cause heat,
ignition, short-circuit, or explode.
Caution:
• AC Adapter is optional. Please contact the distributor for the compatible AC Adapter.
• Use only the authorized USB Adapter (5V) with this breast pump that complies with
the relevant safety standards.
• USB cable can only be connected with Rossmax breast pump and AC Adapter. It
cannot be used for any other purpose.
• Do not charge the battery in environments where there is high heat or cold
temperatures.
Note:
• Recharging the battery to a full capacity may take up to 4 hours depending on the
degree of discharge.
• The battery should be recharged to a full charge every 3 months if the device is not
in use for extended periods to prolong the battery life.
• The device can be left charged every 3 months when the device is in use regularly to
ensure that the battery is always charged to the optimal level.
Battery life
Once fully charged, you can use the product for approximately 150 minutes depending
on battery life and storage condition.
Note: 1. The battery life will be reduced by letting the product not be recharged for
extended periods.
2. The battery life will eventually get shorter as the battery ages. If the low battery
icon keeps appearing on the display after fully charged, return the product
to your local distributor or service center and replace the battery with a new
one.
Caution: Battery replacement must be performed by your local distributor or
authorized Rossmax service center. Disassembling or repairing the device will
void warranty.
Battery low
You need to recharge the battery as soon as possible
when
1. The low battery icon appears on the display.
Note: If the ”Lo” appears simultaneously, which means
the battery remaining is not enough for breast
pump normal work.
2. The On/Pause/O button is pressed and nothing
appears on the display.
Caution:
• There are no user serviceable parts inside. Battery
or damage from old battery is not covered by war-
ranty.
• Rechargeable battery is hazardous waste. Do not
dispose them together with the household garbage.
Size of Breast shield
Make sure that your nipple ts correctly in the breast shield. It is important that the
nipple can move freely, while expressing breast milk. The breast shield should not be
too large or too tight because this can cause pain or less eective expression. Start
with the size 24mm that comes with your pump.
1. This breast shield
is too large.
2. This breast shield
is too small.
3. This breast shield has
an optimum t.
Understanding breast shield sizes
The starting point for choosing the correct breast
shield is to determine your optimal size based on
your nipple diameter. Using a ruler or measuring
tape, measure the diameter (or distance straight
across the middle) of your nipple at the base in
millimeters. Do not include your areola.
We oer a choice of 2 sizes of breast shields,
24mm and 27mm (Optional). Please call your local
distributor or service center. Do not use damaged
parts.
Caution: If there is any pain or discomfort
during pumping, please consider to choose a larger or smaller size.
Disassembling the pump parts
Before cleaning, disassemble the pump set and nipple set into its individual parts as
follows. Make sure you have cleaned and optionally disinfected the parts thoroughly
before and after each use.
1. Remove the breast shield from the connector body.
2. Open the connector body by turning the seal cover in an anticlockwise direction.
3. Remove silicone diaphragm from the connector body.
4. Separate the bottle, valve, cap, nipple and screw ring.
Cleaning procedures
It is important to do the following cleaning instructions before using your breast
pump for the rst time.
Washing and disinfecting are two dierent cleaning procedures. They must be done
separately to protect you and your baby from harm, and to maintain the performance
of the device.
Note: Take extra care when removing and cleaning the valve. Gently pull to remove
the valve and do not use a teat brush or any other implement to clean it. Inspect
the valves for tears or holes and replace any damage valves prior to pumping.
Do not insert bottle brush or something similar into valves. We recommend
replacing valves and silicone diaphragms approximately every 8-12 weeks but
this can vary depending on cleaning and use.
Cleaning before use:
Do not place the parts directly in the sink for rinsing and washing. Use a clean wash
basin only for infant feeding items.
1. Take apart and wash all parts that come into contact with the breast and breast milk
with plenty of water or soapy water, except for the Silicone tubing and Breast pump
unit. Use mind dish soap without articial fragrances and coloring (pH neutral).
Note: Do not use antibacterial, abrasive cleaners, or detergents when cleaning breast
pump parts.
2. Rinse all parts with cold, clear drinking-quality water for 10 to 15 seconds.
3. Put all separated parts into
pot. Fill in the pot with enough
drinking quality tap water or
bottled water to cover all parts.
4. Bring the water to boil. Place
parts in boiling water for 5
minutes or use steam sterilizer.
5. Allow water to cool and gently
remove the parts from the
water. Be careful and don’t
scald your skin.
6. Place the parts neatly on a
clean paper towel or in a
clean drying rack and allow
them to air dry. Avoid using
cloth towels to dry the parts
because they can carry germs
and bacteria that are harmful
to your baby.
5 min.
Cleaning after use:
1. Take apart and wash all parts that come into contact with the breast and breast milk
with plenty of water or soapy water, except for the Silicone tubing and Breast pump
unit. Use mind dish soap without articial fragrances and coloring (pH neutral).
Note: Do not use antibacterial, abrasive cleaners, or detergents when cleaning breast
pump parts.
2. Rinse in cool water all separated parts that come into contact with breast and
breast milk in order to remove breast milk residue.
3. Place the parts neatly on a clean paper towel or in a clean drying rack and allow
them to air dry.
Caution:
• Wash hands thoroughly with soap and water before cleaning.
• Only use drinking-quality tap water or bottled water for cleaning.
• Take apart and wash all parts that come into contact with the breast and breast
milk immediately before and after use to avoid dry up of milk residues and prevent
growth of bacteria.
• Please disassemble all parts which require clean to make sure cleaning thoroughly.
• Please place parts on a clean environment to avoid being polluted.
• Never put breast pump unit and AC adapter in water or a sterilizer, as you can cause
permanent damage to the breast pump.
• Take care not to damage parts during cleaning.
• If you notice a white residue on your parts after boiling, your water may have a high
mineral content. Remove residue by wiping parts with a clean towel and allow to
air dry.
1. Seal covers (x2)
2. Silicone diaphragms (x2)
3. Breast shields (24mm) (x2)
4. Connector bodies (x2)
5. Valves (x4) (2 for back up)
Pump set: 1,2,3,4,5,6; Nipple set: 7,8,9; Tubing set: 11,12,13
Areola
Nipple base
Nipple
measure
• It is recommended to use distilled water when boiling parts to prevent substantial
mineral build-up over time, which may compromise your parts.
Cleaning the pump unit
1. Turn the breast pump o.
2. Unplug the pump unit from the power source.
3. Disconnect the tubing from the pump unit and seal cover.
4. Gently wipe the pump unit with a clean soft towel moistened with mild detergent.
Note: Do not use petrol, thinners or similar solvents.
5. Wipe the pump unit dry with a clean, dry towel.
Caution:
• Unplug the pump unit before cleaning it.
• Avoid dropping, slamming, or throwing
the pump unit.
• Avoid extreme temperatures. Do not
expose the pump unit directly under
sunshine.
• Do not immerse the pump unit in
water; do not run water over the
pump unit.
• Do not spray or pour liquid directly
onto the pump unit.
Silicone tubing
Since the tubing only conveys an air ow (it has no contact with milk), normally
cleaning of the tubing is not necessary. Inspect the tubing after and before use. If
you nd condensation in the air tube, dry it immediately or replace the tubing. If you
nd breast milk inside the tubing or tubing connector do not attempt to wash, clean
or disinfect the tubing. Instead contact your local distributor or authorized Rossmax
service center to check the breast pump. Never use the device with wet tubing.
Assembling the breast pump
Preparing for two-sided expressing
1. Assemble the pump parts, please refer to section “Disassembling the pump parts”.
2. Make the connector of silicone tubing insert into the opening of seal cover, and
connect the other end of tubing to three-way pipe.
Note:Do not attempt to force it to the stop. It is normal to remain a gap between the
connector of the tubing and the seal cover.
3. Open the air inlet of pump unit by pulling and turning the rubber and Insert the
whole assembly into the air inlet as far as it will go.
4. The assembly way on the other side is the same as described above.
Preparing for one-sided expressing
1. Remove the tubing from the plug.
2. Insert the connector of silicone tubing into the opening of seal cover, and connect
the other end of tubing to the plug.
Note:Do not attempt to force it to the stop. It is normal to remain a gap between the
connector of the tubing and the seal cover.
3. Open the air inlet of pump unit by pulling and turning the rubber and Insert the
whole assembly into the air inlet as far as it will go.
Caution:
• To prevent contamination of your milk, wash hands thoroughly with soap and water
before touching the pump unit, parts and breasts, and dry your hands with a fresh
towel or a single-use paper towel.
• Avoid touching the inside of bottles, lids and nipples.
• It is important to use only Rossmax parts with your breast pump. Rossmax parts
create a closed system designed to prevent milk back up.
• Make sure that all parts are completely dry before use. Incompatible or wet
components may cause irreversible damage to your breast pump.
• Check pump parts for wear or damage before use. Replace if necessary.
Always inspect all parts prior to use for cleanliness. If dirty, please follow the
instructions “Cleaning procedures”.
Operating the breast pump
Relax in a comfortable chair, you may wish to use cushions to support your back.
1. Press the assembled pump body against your breasts.
Make sure that your nipple is properly centered in the
tunnel. Hold the breast shields onto your breasts with
your thumbs and index ngers. Support your breasts
with the palm of your hands.
Note: In case of pain or insucient milk expression:
• Do not hold the pump set by the bottle. This can lead
to compression and blockage of the milk ducts and
engorgement.
• Do not try to express with vacuum that is too high and
uncomfortable (painful). The pain, along with potential
breast and nipple trauma, may decrease milk output.
• Contact your healthcare professional or breastfeeding
specialist if you can express only minimal or no milk or if
expression is painful.
2. Hold down the On/Pause/O button , the breast
pump automatically starts up in stimulation mode as per preset level and the
stimulation indicator lights up.
Note:Hold down this button to turn on, then long press to enter shutdown. When
the pump is running, short press pause and then short press to work.
3. Once your milk starts owing, please press the “M” button to enter into expression
mode. You can switch the Stimulation mode, Expression mode, Suck simulate mode
and Multitronic suction mode by pressing the “M” button as per your requirement.
If no action is taken during stimulation mode, after two minutes, the pump will
automatically change to the expression mode.
4. Depending on your own personal comfort, you can press the increase vacuum “+” or
decrease vacuum “–” button to adjust the suction level. Long press the button can
help you adjust the level quicker.
Note: Click or hold press this “+” or “–” button, the stimulation mode
can be adjusted from 1 to 6 levels, and the expression, suck
simulate and multitronic suction mode can be adjusted from
1 to 9 levels.
5. When your pumping is nished, turn o the breast pump and close
the bottle with a lid. Disassemble and clean the parts that come
into contact with breast and milk, please follow the instructions
“Cleaning procedures”.
Note:The breast pump stops automatically about 30 minutes.
Caution:
• Please keep the airway clear and unobstructed during sucking,
prevent air path blocked. Make sure that the tubing is not kinked or pinched while
pumping.
• Please ensure that the pump set is connected and positioned properly.
• Store the tubing in a clean bag/container. Do not wrap the tubing around the pump
unit.
• Use bottle holder to prevent the bottle from tipping over.
• Do not over-ll bottles. Replace bottles before they overow.
• Do not walk around while using the product.
Accessories (Optional)
NameREF No.Material
Disinfecting Method:
Boiling or Steam sterilizer
O: Applicable, X: Not
applicable
Pump set
(Seal cover, diaphragm,
Connector body, Valve,
Bottle)
BP_AC_001_00PP + SiliconeO
Breast shields (24mm (x2)BP_AC_002_00PP + TPEO
Breast shields (27mm)(x2)BP_AC_003_00PP + TPEO
DiaphragmBP_AC_004_00SiliconeO
ValveBP_AC_005_00SiliconeO
Nipple set (x2) (Caps,
Nipples, screw rings)
BP_AC_006_00PP + SiliconeO
Lids (x2)BP_AC_007_00PPO
Tubing set (Silicone
tubing, Plug, Three-way
pipe)
BP_AC_008_00PP + Silicone
X
(Cleaning is not
necessary)
USB cableBP_AC_009_00N/AX
* Please follow the disinfecting methods to boil and wash the accessories.
Trouble Shooting
If any abnormality will arise during use, please check the following points.
ProblemsPossible causesSolutions
Lack of suction or
No suction
Tubing or plug to the
pump unit or pump
set is clogged, bent,
twisted, disconnected
or broken.
Check pump parts for wear or
damage before use.
Make sure that all parts are clean
and dry, and the connections are
secure.
The valve is chipped or
cracked or there are
holes or tears on
silicone diaphragm
Replace valve and/or
silicone diaphragm prior to
pumping.
Breast shield sizes do
not t
Replace an appropriate breast
shield size. Make sure the breast
shields form a complete seal
around the breast while pumping.
Shows ”Lo”Battery atFully charge the battery
LED indicator does
not ash when
charging the battery.
The AC Adapter has not
been correctly inserted
into the port of the
device or the power
socket.
Correctly insert the AC Adapter
into the port/socket.
The device or the
AC Adapter is
abnormally hot when
charging the battery
The device or the
AC adapter may be
damaged.
Unplug the AC adapter from the
socket immediately and contact
your local distributor.
The device does not
work from its battery.
Battery atFully charge the battery
Battery ages
If the device does not operate after
fully charged, replace the battery
with a new one.
Battery broken
If the battery cannot be fully
charged and the charging
indicator keeps ashing,
replace the battery with a new
one.
Note: If the device is still not working properly, return it to your dealer. Under no
circumstance should you disassemble and repair the product by yourself.
Name/Function of Each Part
6. Bottles (180ml) (x2)
7. Caps (x2)
8. Nipples (x2)
9. Screw rings (x2)
10. Lids (x2)
11. Silicone tubings (x2)
12. Plug
13. Three-way pipe
14. Pump unit
15. USB cable
Specications
Product DescriptionElectric Breast Pump
Intermittent Vacuum
Stimulation modeApprox. -40~-100mmHg
Expression modeApprox. -50~-290mmHg
Suck simulate modeApprox. -50~-290mmHg
Multitronic suction modeApprox. -50~-290mmHg
Vacuum Levels
Stimulation mode6 Levels
Expression mode9 Levels
Suck simulate mode9 Levels
Multitronic suction mode9 Levels
Breast shield Sizes24mm, 27mm (Optional)
Adapter Input100-240V, 50/60 Hz
Adapter Output/ USB Input5V, 1A (Type-C)
Li-Ion BatteryDC 3,7 V
Automatic Shut-Oabout 30 minutes
Pump Unit Dimensions129 x 91 x 83mm (L x W x H)
WeightApprox. 295.7g (with battery, w/o accessories)
Permissible Operating Tem-
perature and Humidity
5°C ~ 40°C (41°F~104°F); 15~93%RH;
860hPa~1060hPa
Permissible Transport and
Storage Temperature and Hu-
midity
-20°C ~55°C (-4°F~131°F); 15~93%RH
Expected Service Life
Your appliance has been designed and developed
with the greatest possible care and has an expected
service life of 400 hours
Type of equipmentMedium Vacuum
* Specications are subject to change without notice
Manufacturer: Rossmax Swiss GmbH,
Widnauerstrasse 1, CH-9435 Heerbrugg, Switzerland
18
17
16
19
20
15
4
26
37
Produktspezifikationen
| Marke: | Rossmax |
| Kategorie: | Thermometer |
| Modell: | BP5 |
Brauchst du Hilfe?
Wenn Sie Hilfe mit Rossmax BP5 benötigen, stellen Sie unten eine Frage und andere Benutzer werden Ihnen antworten
Bedienungsanleitung Thermometer Rossmax

29 Juli 2025
8 Juli 2025
22 Juni 2024
21 Juni 2024
21 Juni 2024
15 Juni 2024
14 Juni 2024
14 Juni 2024
Bedienungsanleitung Thermometer
Neueste Bedienungsanleitung für -Kategorien-
24 März 2026
11 März 2026
8 März 2026
1 März 2026
1 März 2026
1 März 2026
25 Februar 2026
23 Februar 2026
20 Februar 2026
30 Januar 2026