Shuttle X50V8 Bedienungsanleitung
Shuttle Nicht kategorisiert X50V8
Lies die bedienungsanleitung für Shuttle X50V8 (2 Seiten) kostenlos online; sie gehört zur Kategorie Nicht kategorisiert. Dieses Handbuch wurde von 7 Personen als hilfreich bewertet und erhielt im Schnitt 4.7 Sterne aus 8 Bewertungen. Hast du eine Frage zu Shuttle X50V8 oder möchtest du andere Nutzer dieses Produkts befragen? Stelle eine Frage
Seite 1/2
Incorrectly replacing the battery may damage this computer. Replace only with the same or equivalent as recommended by Shuttle. Dispose of used batteries according to the manufacturer’s instructions.
Das unkorrekte Austauschen der Batterie kann diesen Computer beschädigen. Ersetzen Sie die Batterie nur durch den von Shuttle empfohlenen Typ oder ein gleichwertiges Modell. Entsorgen Sie gebrauchte Batterien gemäß den Herstellerangaben.
Ne pas replacer correctement la pile peut endommager l'ordinateur. Remplacez-la uniquement par un modèle identique ou un équivalent comme recommandé par Shuttle. Débarrassez-vous des piles usagées d’après les instructions du constructeur.
La sustitución incorrecta de la batería puede dañar este equipo. Sustituya la batería únicamente por una igual o equivalente recomendada por Shuttle. Deseche las baterías usadas según las instrucciones del fabricante.
!
This device complies with Part 15 of the FCC Rules. Operation is subject to the following two conditions: (1) this device may not cause
This device meets the requirements for the EU conformity in accordance to the currently valid EU directives.
Dieses Produkt erfüllt die Anforderungen für die EU-Konformität entsprechend der aktuell geltenden EU-Richtlinien.
Ce produit répond aux exigences de la conformité UE suivant les directives européennes actuellement en vigueur.
2000m
Placing on a desk
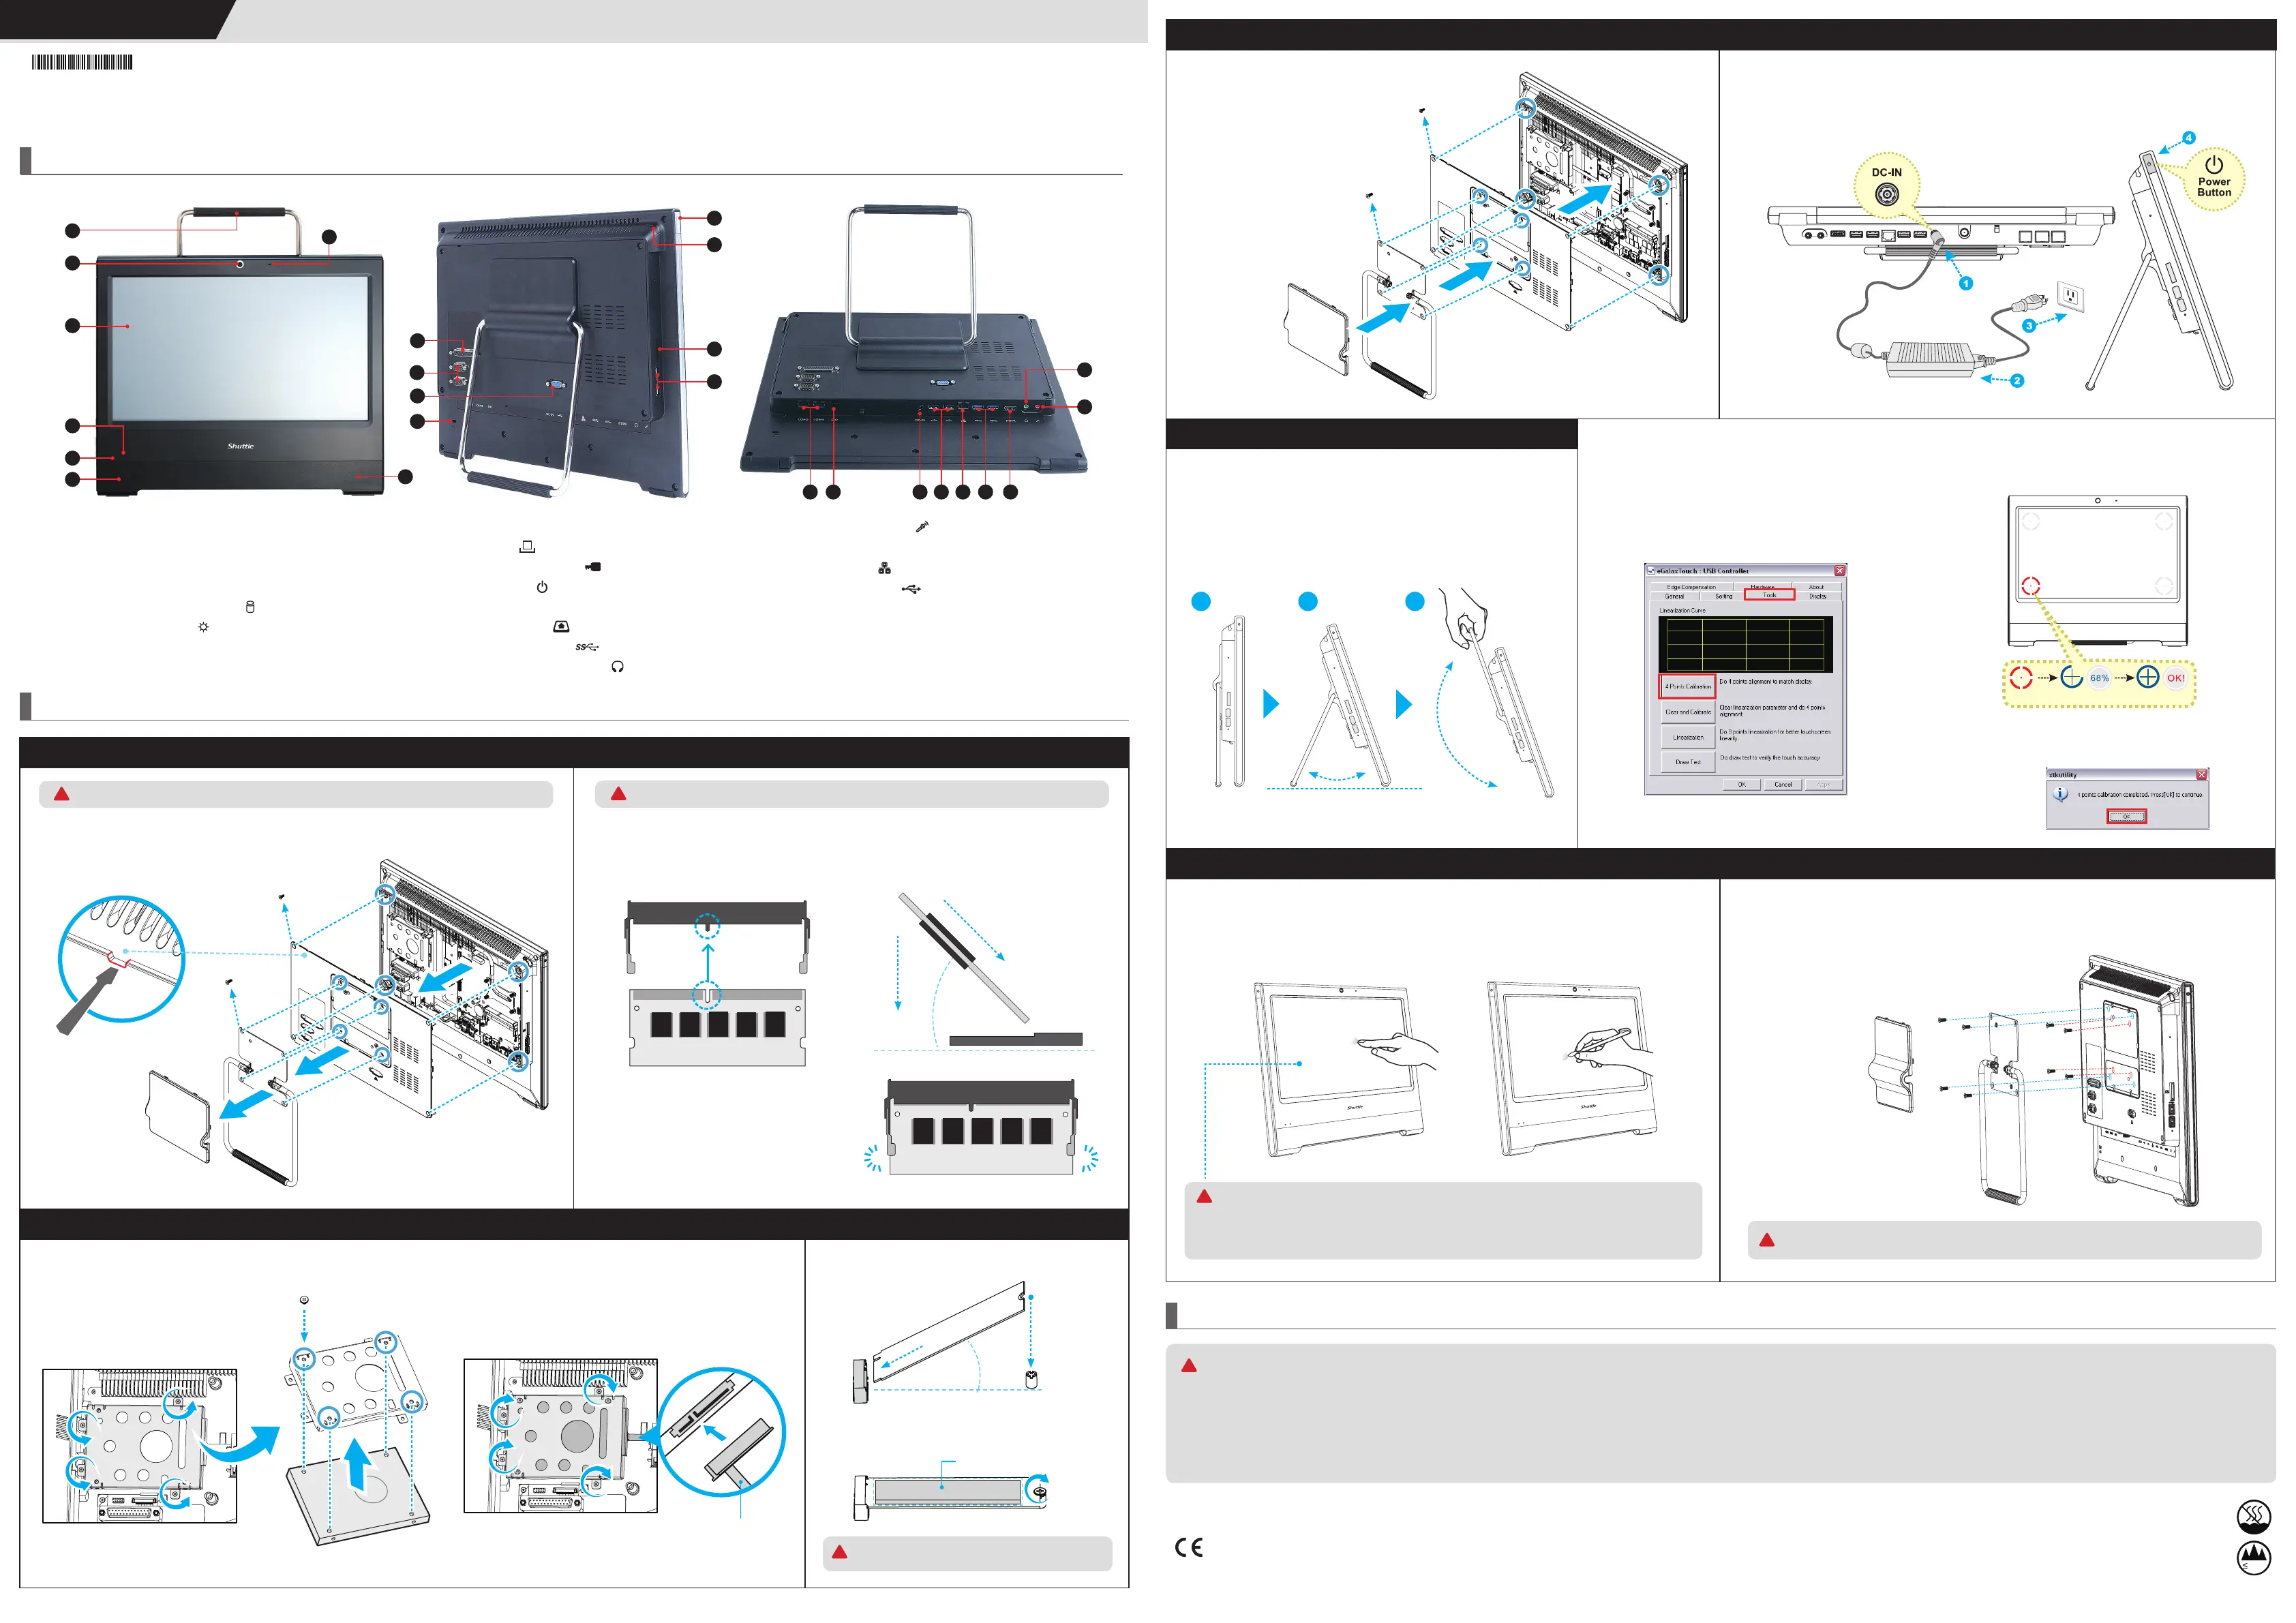
A. Begin Installation
Hardware Installation
L
The product’s colour and specifications may vary from the actually shipping product.
1. Locate the SO-DIMM slots on the motherboard.
Align the notch of the memory module with the one of the relevant memory slot.
until it snaps into the locking mechanism
and put the mylar back in place.
5. Repeat the above steps to install an
Notch
Cutout
SO-DIMM slot
angle
a
b
LatchLatch
!
How to use the Touch Panel
Cleaning the screen
Follow these guidelines for cleaning the outside and handling the screen of the computer:
damp to gently wipe the screen surface. Do not spray liquids directly onto the device.
!
Safety Information
C. HDD or SSD Installation
Experience the ease of managing your digital life with a few touches by using the stylus.
1
Unscrew four screws of the stand mount and remove the stand.
Please refer to the user guide of the wall/arm mount kit
you bought separately to install it.
75 x 75mm
wall/arm bracket.
!
Touch
HoldOK
on-screen calibration.
to continue.
E
Touch and hold the center of the target.
Repeat on four corners and the screen will adjust
automatically.
11. Kensington
®
Lock Hole
HDMI
DC-IN
02
04
03
05
07
13
14
07
06
09
08
12
10
11
15
16
17
18152119202223
01
four screws of the stand mount and remove the stand.
E. Complete
with the screw.
1.
B. Memory Module Installation
b
Serial ATA and power cable
a
1. Unscrew four screws of the bracket and
remove it.
with four screws.
c
d
a
b
Powering on the system
1. Replace the back cover. Refasten the stand
and the back cover with eight screws.
b
d
f
c
a
e
d
b
a
c
e
a
b
Slope angle
!
effectively reduce its temperature.
!
Thermal Pad
Produktspezifikationen
| Marke: | Shuttle |
| Kategorie: | Nicht kategorisiert |
| Modell: | X50V8 |
| Touchscreen: | Ja |
| Bildschirmdiagonale: | 15.6 " |
| Eingebaute Lautsprecher: | Ja |
| Installiertes Betriebssystem: | Nein |
| Prozessorhersteller: | Intel |
| Anzahl Prozessorkerne: | 2 |
| WLAN: | Ja |
| WLAN-Standards: | 802.11b, 802.11g, Wi-Fi 4 (802.11n), Wi-Fi 5 (802.11ac) |
| Bluetooth: | Ja |
| Bluetooth-Version: | 4.2 |
| Breite: | 391 mm |
| Tiefe: | 42 mm |
| Gewicht: | 3500 g |
| AC-Netzadapter: | Ja |
| Produkttyp: | All-in-One-PC-Barebone |
| Produktfarbe: | Schwarz |
| Höhe: | 327 mm |
| RMS-Leistung: | 2 W |
| AC Eingangsspannung: | 100 - 240 V |
| AC Eingangsfrequenz: | 50 - 60 Hz |
| Kopfhörerausgänge: | 1 |
| Anzahl USB 2.0 Anschlüsse: | 2 |
| Gleichstrom-Anschluss (DC): | Ja |
| Betriebstemperatur: | 0 - 40 °C |
| Relative Luftfeuchtigkeit in Betrieb: | 10 - 90 % |
| Paketgewicht: | 4200 g |
| Schnellstartübersicht: | Ja |
| Netzteil Ausgangsspannung: | 19 V |
| AC-Adapter Ausgangssstrom: | 3.42 A |
| Anzahl Ethernet-LAN-Anschlüsse (RJ-45): | 1 |
| Warentarifnummer (HS): | 84713000 |
| HD-Typ: | HD |
| Helligkeit: | 220 cd/m² |
| Anzahl HDMI-Anschlüsse: | 1 |
| Anzahl der Lautsprecher: | 2 |
| Stromversorgung: | 65 W |
| LED-Anzeigen: | HDD, Power |
| Unterstützt Windows-Betriebssysteme: | Windows 10, Windows 11 |
| VESA-Halterung: | Ja |
| Ein-/Ausschalter: | Ja |
| Mikrofon-Eingang: | Ja |
| Netzteiltyp: | Externer AC-Adapter |
| Kabelsperre-Slot: | Ja |
| Slot-Typ Kabelsperre: | Kensington |
| Prozessor-Taktfrequenz: | 2.1 GHz |
| Prozessorfamilie: | Intel® Core™ i3 |
| Prozessor: | i3-10110U |
| Kompatible Speicherkarten: | SD, SDHC, SDXC |
| Unterstützte Speicherlaufwerke: | HDD & SSD |
| Anzahl der unterstützten Speicherlaufwerke: | 1 |
| USB 3.2 Gen 1 (3.1 Gen 1) Anzahl der Anschlüsse vom Typ A: | 4 |
| Gehäusetyp: | All-in-One |
| Prozessor-Cache: | 4 MB |
| Prozessor Boost-Frequenz: | 4.1 GHz |
| Prozessor Lithografie: | 14 nm |
| Prozessor-Threads: | 4 |
| Thermal Design Power (TDP): | 15 W |
| Integrierter Kartenleser: | Ja |
| Top WLAN-Standard: | Wi-Fi 5 (802.11ac) |
| Eingebettete Optionen verfügbar: | Nein |
| Intel® 64: | Ja |
| Intel® Virtualization Technologie (VT-X): | Ja |
| Anzahl VGA (D-Sub) Anschlüsse: | 1 |
| Unterstützte Arbeitsspeicher: | DDR4-SDRAM |
| Arbeitsspeicher Typ: | SO-DIMM |
| Speicherkanäle: | Zweikanalig |
| Ohne ECC: | Ja |
| Unterstützte Arbeitsspeichergeschwindigkeit: | 2666 MHz |
| RAM-Speicher maximal: | 64 GB |
| Maximale Auflösung: | 3840 x 2160 Pixel |
| Treiber enthalten: | Ja |
| HDMI-Version: | 1.4a |
| BIOS-Typ: | AMI |
| Seitenverhältnis: | 16:9 |
| Unterstützte Linux-Betriebssysteme: | Ja |
| Eingebauter Prozessor: | Ja |
| Panel-Typ: | LCD |
| Verbesserte Intel SpeedStep Technologie: | Ja |
| Prozessorgeneration: | Intel® Core™ i3 Prozessoren der 10. Generation |
| Eingebaute Grafikadapter: | Ja |
| SSD-Formfaktor: | 2.5" |
| Netzkabel enthalten: | Ja |
| Execute Disable Bit: | Ja |
| Leerlauf Zustände: | Ja |
| Intel® Trusted-Execution-Technik: | Nein |
| CPU Konfiguration (max): | 1 |
| Intel® VT-x mit Extended Page Tables (EPT): | Ja |
| Intel® TSX-NI: | Nein |
| Intel Stable Image Platform Program (SIPP): | Nein |
| Intel® Virtualisierungstechnik für direkte I/O (VT-d): | Ja |
| Intel® Clear Video Technologie: | Ja |
| Grafikkarte-Familie: | Intel |
| Trusted Platform Module (TPM): | Ja |
| Speicherlaufwerk Schnittstelle: | Serial ATA III |
| Intel® Flex Memory Access: | Ja |
| Kühlung: | Passiv |
| WLAN-Controllermodell: | Realtek RTL8821CE |
| Anzahl von Stromversorgungseinheiten: | 1 |
| Speicherspannung: | 1.2 V |
| unterstützte Speicherlaufwerksgrößen: | 2.5 " |
| Trusted Platform Module (TPM) Version: | 2.0 |
| Display-Auflösung: | 1366 x 768 Pixel |
| Ethernet/LAN: | Ja |
| Eingebautes Grafikkartenmodell: | Intel® UHD Graphics |
Brauchst du Hilfe?
Wenn Sie Hilfe mit Shuttle X50V8 benötigen, stellen Sie unten eine Frage und andere Benutzer werden Ihnen antworten
Bedienungsanleitung Nicht kategorisiert Shuttle

13 März 2026
7 Juli 2025
7 Juli 2025
6 Juli 2025
6 Juli 2025
31 Juli 2024
30 Juli 2024
28 Juli 2024
26 Juli 2024
24 Juli 2024
Bedienungsanleitung Nicht kategorisiert
Neueste Bedienungsanleitung für -Kategorien-
3 April 2026
3 April 2026
3 April 2026
3 April 2026
3 April 2026
3 April 2026
3 April 2026
3 April 2026
3 April 2026
3 April 2026