Sony PSZ-RA4T Bedienungsanleitung
Sony Festplatte PSZ-RA4T
Lies die bedienungsanleitung für Sony PSZ-RA4T (31 Seiten) kostenlos online; sie gehört zur Kategorie Festplatte. Dieses Handbuch wurde von 13 Personen als hilfreich bewertet und erhielt im Schnitt 4.0 Sterne aus 9 Bewertungen. Hast du eine Frage zu Sony PSZ-RA4T oder möchtest du andere Nutzer dieses Produkts befragen? Stelle eine Frage
Seite 1/31
取扱説明書
/Operating Instructions/Mode d’emploi/
Manual de instrucciones/
Инструкция по эксплуатации/
Пайдалану нұсқаулығы
/ /
Bedienungsanleitung/Gebruiksaanwijzing/
Istruzioni per l’uso/Manual de instruções/
Kullanma kılavuzu/Instrukcja obsługi/
Návod k obsluze/Használati útmutató/
Návod na obsluhu/Οδηγίες λειτουργίας/
Instrucţiuni de utilizare/Bruksanvisning/
Betjeningsvejledning/Käyttöohjeet/
Инструкции за експлоатация///
Kasutusjuhend/Eksploatacijos instrukcijos/
Lietošanas instrukcijas/Navodila za uporabo/
Bruksanvisning/Upute za rad/
プロフェッショナル
RAID
/
Professional RAID/RAID
professionnel
/
RAID Profesional
/
Профессиональный
RAID
/
Кəсіби RAID
/
专业RAID
4-576-781-A3 (1)
3
CONFIRM
ボタンを押す。
RAID
モードの変更が確定し、本機がシャットダウンします。
4
ケーブルを接続し、電源を入れ、フォーマットを行う。
RAID
モード変更をキャンセル
RAID
モードの変更を確定させずにキャンセルするには、以下
の方法があります。
この場合、本機は
RAID
モードを変更せずにシャットダウンし
ます。
どのボタンも押さずに
10
秒待つ。
ˎ
電源ボタンを
2
秒以上押す。
ˎ
本機をフォーマットする
本機のフォーマットは、アプリケーション
Memory Media
Utility
をコンピューターにインストールして行います。
以下の
URL
からダウンロードし、インストールしてください。
http://www.sony.net/mmu
フォーマットのしかたについて詳しくは、
Memory Media
◆
Utility
のヘルプをご覧ください。
他の機器を接続して使う
コンピューターと本機以外に、最大
5
台の機器をデイジー
チェーン接続することができます。
すべての機器の動作を保証するものではありません。
本機をコンピューターから取り外
す
本機からケーブルを外したりシャットダウンをする前に、必
ずハードウェアの安全な取り外し操作をしてください。
ハードウェアの安全な取り外し操作
本機のアクセスランプが点滅していないことを確認してくだ
さい。
操作方法について詳しくは、お使いのコンピューターや
◆
OS
の取扱説明書をご覧ください。
Windows
をお使いの場合
Thunderbolt
ケーブルで接続してご使用の場合、データの読
み書きが終了した後も
Windows
が本機にアクセスしている
場合があります。データが破損する恐れがあるので、必ず以
下の手順で取り外してください。
1
画面右下のタスクトレイで<ハードウェアの取り外
し>アイコンを選択する。
現在パソコンに接続されているデバイスが表示されます。
2
本機の項目を選択する。
3
「安全に取り外すことができます。」のメッセージを確
認する。
Mac
をお使いの場合
デスクトップの本機のアイコンをゴミ箱にドラッグ&ドロッ
プします。
シャットダウンする
あらかじめハードウェアの安全な取り外し操作を済ませてく
ださい。
本機の電源ボタンを
2
秒押し続けます。電源ランプが点滅し
てから、消灯するのを確認し、すべてのケーブルを外します。
使用上のご注意
本機は精密機器です。突然の故障等の理由によってデー
タが消失する場合があります。万一の場合に備えて定期
的にバックアップを行ってください。弊社では、いかなる
場合においても記録データの修復・復元・再現などはい
たしません。また、記録データの破損・消失についてはい
かなる原因であっても一切その責任は負いかねます。
本製品を便利にご利用いただくために、以下のサイトから
ˎ
アプリケーション
Memory Media Utility
をインストー
ルすることをお勧めします。
http://www.sony.net/mmu
通電中の本機や
AC
アダプターに長時間触れないでくださ
ˎ
い。長時間皮膚が触れたままになっていると、低温やけど
の原因となることがあります。
付属の電源コードを使わないと、火災や感電の原因となる
ˎ
ことがあります。
付属の
AC
アダプターは本機のみでご使用ください。また、
ˎ
付属以外の
AC
アダプターは本機で使用しないでください。
スタンバイ、休止、スリープ、サスペンド、レジュームなどの
ˎ
パソコンの省電力機能はご使用いただけない場合がありま
す。
本機と他の
USB/Thunderbolt
機器を同時に
1
台のパソコン
ˎ
に接続して使う場合、本機の転送速度が遅くなることがあ
ります。
本機にソフトウェアをインストールしないでください。
OS
ˎ
起動時に実行されるプログラムが見つからなくなる等の理
由により正常に利用できない場合があります。
本機を
USB
ハブに接続しても使えないことがあります。そ
ˎ
の場合は、接続する機器の
USB
端子に直接接続してくださ
い。
本機を
Thunderbolt
デイジーチェーンデバイスに接続して
ˎ
も使えないことがあります。その場合は、接続する機器の
Thunderbolt
端子に直接接続してください。
データの書き込み・読み出し・削除中は、本機をパソコン
ˎ
から取り外さないでください。データが破損する原因とな
ります。
本機を接続したまま以下の操作をすると、正常に動作しな
ˎ
いことがあります。操作する場合は、本機をパソコンから
取り外してから行ってください。
パソコンを起動、または再起動する。
ˋ
スリープや休止状態に移行、または復帰させる。
ˋ
パソコンの動作状況によっては、本機を接続した際に正常
ˎ
に認識しない場合があります。その場合は接続ケーブルを
外した状態で、パソコンと本機を再起動してください。
PSZ-RA
シリーズ
/
PSZ-RA Series/
Série PSZ-RA/
Serie PSZ-RA/
PSZ-RA系列
© 2015 Sony Corporation
各部のなまえ
電源ボタン
電源ランプ
アクセスランプ
ハンドル
吸排気口
ゴムダンパー
セキュリティースロット
DC IN
端子
Thunderbolt
TM
端子
USB
端子
RAID 0
ランプ
RAID 1
ランプ
JBOD
ランプ
SELECT
ボタン
CONFIRM
ボタン
ランプの表示について
●:点灯、:点滅、―:消灯
電源ランプ
ランプの表示状態
電源
OFF
電源
ON
起動中、シャットダウン中、または
HDD
ト
ラブル発生
※
※
HDD
トラブル発生時には背面の
RAID 0
ランプ、
RAID 1
ラ
ンプ、
JBOD
ランプも点灯または点滅します。
ACCESS
ランプ
ランプの表示状態
電源
OFF
、起動中、またはシャットダウン
中
アクセスなし
アクセス中、または
RAID
モード設定中
RAID 0
ランプ
/ RAID 1
ランプ
/ JBOD
ランプ
ランプの表示表示
RAID 0RAID 1JBOD
RAID 0
に設定中
RAID 1
に設定中
JBOD
に設定中
RAID
モード設定時に
RAID 0
を選択中
RAID
モード設定時に
RAID 1
を選択中
RAID
モード設定時に
JBOD
を選択中
HDD
トラブル発生
→
ご購入元にお問い合わ
せください。
ご注意
HDD
にトラブルが発生した場合でも、
HDD
内のデータを
別のストレージにバックアップできることがありますので、
バックアップを試みることをお勧めします。お客様が
HDD
を交換することはできません。
本機の置きかた
本機は縦、横どちらの向きでも設置もできます。
設置の際は、フロントパネル、リアパネルの吸排気口をふさが
ないようにご注意ください。
本機を電源に接続する
以下のイラストのように接続します。
RAID
モードについて
本機は
2
台の
HDD
を搭載しており、
RAID
のモードを以下の
3
タイプから選ぶことができます。工場出荷時は、「
RAID 0
」に
設定されています。
ご注意
本機の
HDD
は取り外すことができません。
RAID 0
2
台の
HDD
にデータを分割して読み書きすることで、転送速
度を上げます。
コンピューターには
1
台のデバイスとして認識されます。
RAID 1
2
台の
HDD
に同じデータを重複して保存することで、安全性
を高めます。
2
台の
HDD
のうち
1
台にトラブルが発生しても、もう
1
台の
HDD
にはデータが保持されます。
コンピューターには
1
台のデバイスとして認識されます。
JBOD
コンピューターには
2
台の
HDD
として認識されます。
各
RAID
モードの特長
RAID
モード
容量
安全性速度
RA4TRA6TRA8TRA12
RAID 04 TB 6 TB8 TB12 TB
普通速い
RAID 12 TB3 TB4 TB6 TB
高い普通
JBOD2TBX23TBX24TBX26TBX2
普通普通
本機を使用する
1
本機をコンピューターに接続する。
ご注意
USB
ケーブルと
Thunderbolt
ケーブル(インターフェー
ス)を同時に接続しないでください。インターフェースを
切り替える場合は、いったん本機をコンピューターから取
り外してから行ってください。
2
電源ボタンを押す。
アクセスランプ(
)が点灯するまでお待ちください。
ご注意
数十秒かかることがあります。
3
コンピューターから本機にアクセスする。
アクセス中はアクセスランプが点滅します。
ご注意
Windows
で
Thunderbolt
接続して使用する場合、本機の
接続を許可するまでエクスプローラーにドライブが表示
されません。
Thunderbolt
ソフトウェア
上で接続を許
可してください。
なお、本機は工場出荷時に
exFAT
でフォーマットされていま
す。
別のフォーマットに変更したい場合は「本機をフォーマット
する」をご覧ください。
RAID
モードを変更する
RAID
モードを変更する際は、本機の電源が切れていて、
USB
ケーブルおよび
Thunderbolt
ケーブルが外れていることを
確認してください。
ご注意
RAID
モードを変更すると
HDD
の内容がすべて削除されま
す。
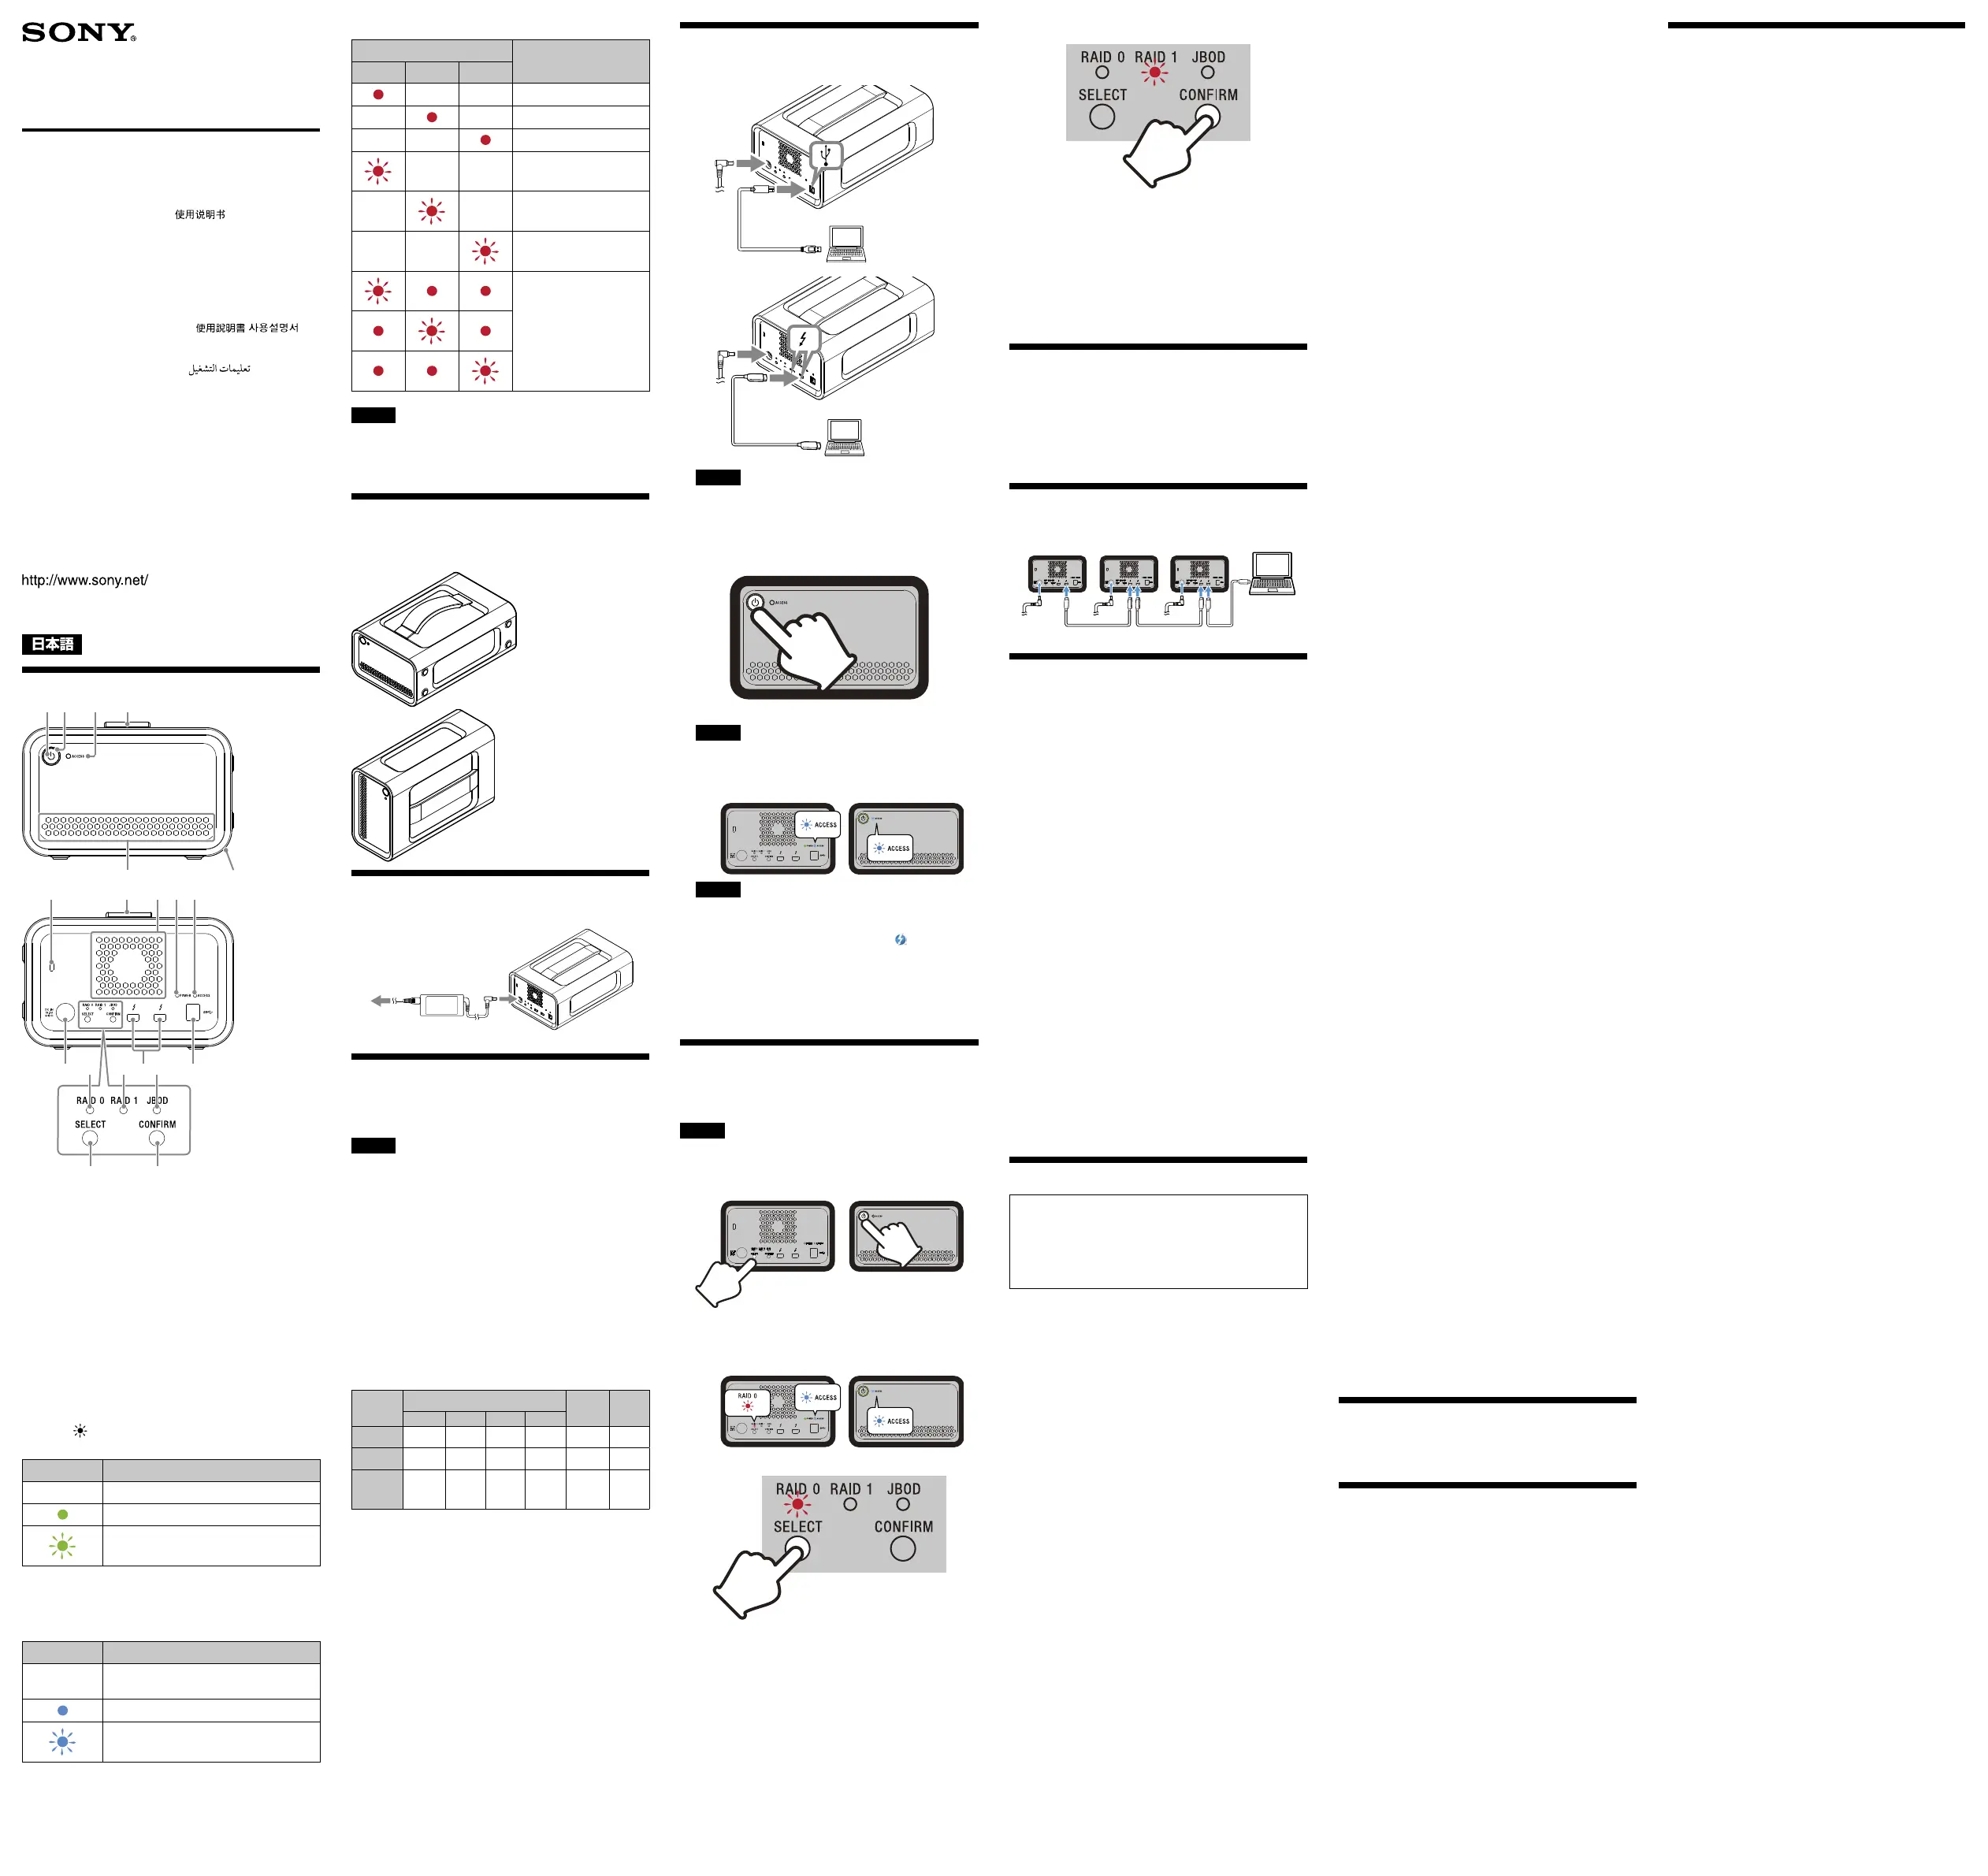
1
SELECT
ボタンを押したまま電源ボタンを押す。
設定している
RAID
モードに対応したランプとアクセスラ
ンプが点滅します。
例:
RAID
モードが「
RAID 0
」に設定されているときは、
RAID 0
ランプとアクセスランプが点滅
2
SELECT
ボタンを押して
RAID
モードを変更する。
SELECT
ボタンを押すごとに、
RAID
モードが「
RAID 0
」
「
RAID 1
」「
JBOD
」「
RAID 0
」の順に切り替わります。
また、点滅するランプも
RAID 0
ランプ
RAID 1
ランプ
JBOD
ランプ
RAID 0
ランプの順に変わります。
「フォーマット」や「削除」では、本機内のデータは完全に消
ˎ
去されません。譲渡
/
廃棄の際は、市販のデータ消去専用ソ
フトをご使用いただくか、本機を物理的に破壊するなどお
客様の責任においてデータの処理をしてください。
本機
1
台を
2
台のパソコンに接続しないでください。
ˎ
本機や
AC
アダプターを布や布団などでおおった状態で使
ˎ
用しないでください。熱がこもってケースが変形したり、
火災の原因となることがあります。
付属のケーブルをご使用にならない場合、性能の保証は致
ˎ
しません。
付属の製品保証書は本機限定のもので、本機の取扱説明書に
従った通常のご使用時、または本機の純正付属品、または必要
動作環境・推奨動作環境でのご使用時に限られます。
ユーザーサポートなどの各種サービスも上記の前提で提供す
るものです。
取り扱いについて
使用中、保管中にかかわらず、次のような場所に置かないで
ˎ
ください。故障の原因になります。
異常に高温、低温または多湿になる場所
ˋ
炎天下や熱器具の近く、夏場の窓を閉め切った自動車内
は特に高温になり、放置すると変形したり故障したりす
ることがあります。
気圧の低い場所(海抜
3,000
m以上)
ˋ
強力な磁気のあるところや放射線のある場所
ˋ
振動や大きな音のする場所
ˋ
不安定な場所
ˋ
風通しが悪い場所
ˋ
湿気の多い場所
ˋ
保管状態によっては結露する場合がありますので、ビニー
ˎ
ル袋に包んで保管しないでください。
分解したり、改造したりしないでください。
ˎ
ゴムダンパーを外さないでください。
ˎ
吸排気口の近くに物を置かないでください。
ˎ
メモラベルは吸排気口には貼らないでください。
ˎ
接続ケーブルを抜くときは、コネクタ部分を持ってくださ
ˎ
い。
安定した場所に設置してください。製品が倒れたり、搭載
ˎ
した機器が落下してけがをすることがあります。充分な強
度がある水平な場所に設置してください。
運
搬時には、振り回さないでください。
ˎ
運搬前にハンドルが傷ついていないかご確認ください。
ˎ
電源コードを傷つけると、火災や感電の原因となります。
ˎ
設置時に、製品と壁や棚との間にはさみ込んだりしな
ˋ
い。
電源コードを加工したり、傷つけたりしない。
ˋ
重いものをのせたり、引っ張ったりしない。
ˋ
熱器具に近づけない。加熱しない。
ˋ
移動させるときは、電源プラグを抜く。
ˋ
電源コードを抜くときは、必ずプラグを持って抜く。
ˋ
万一、電源コードが傷んだら、ご購入元にご相談くださ
ˋ
い。
ケーブル類は、足に引っかけると本機の落下や転倒などに
ˎ
よりけがの原因となることがあります。充分注意して接続・
配置してください。
ぬれた手で
AC
アダプターおよび電源プラグにさわらない
ˎ
でください。感電の原因となることがあります。
長期間使用しないときは安全のため電源プラグをコンセン
ˎ
トから抜いてください。絶縁劣化、漏電などにより火災の
原因となることがあります。
感電や火災の危険を避けるために、本機と
AC
アダプターを
ˎ
水のかかる場所や湿気のある場所では、使用しないでくだ
さい。また、本機や
AC
アダプターの上に花瓶などの水の
入ったものを置かないでください。
雷が鳴り出したら、本機や電源プラグには触れないでくだ
ˎ
さい。本機や電源プラグなどに触れると感電の原因となり
ます。
電源コードや接続ケーブルを
AC
アダプターに巻きつけな
ˎ
いでください。断線や故障の原因となることがあります。
AC
アダプターは手近なコンセントに接続して使用してく
ˎ
ださい。本機を使用中、不具合が生じたときはすぐにコン
セントからプラグを抜き、電源を遮断してください。
AC
アダプターを本機から抜くときは、
DC
プラグと本機を
ˎ
持って取り外してください。
AC
アダプターを壁との隙間などの狭い場所に設置して使
ˎ
用しないでください。
AC
アダプターの
DC
プラグを金属類でショートさせないで
ˎ
ください。
お手入れについて
お手入れをする前に本機をパソコンから取り外し、ケーブ
ˎ
ルを本機から抜いてください。
乾いた柔らかい布、または水をかたくしぼった布で軽く拭
ˎ
いてください。
アルコール、シンナー、ベンジンなどは使わないでくださ
ˎ
い。変質したり、塗装がはげたりすることがあります。
化学ぞうきんをご使用の際は、色落ちや変色する場合があ
ˎ
りますので、ご注意ください。
殺虫剤のような揮発性のものをかけたり、ゴムやビニール
ˎ
製品に長時間接触させると、変質したり、塗装がはげたりす
ることがあります。
液体状の洗剤などは使用しないでください。本機の内部に
ˎ
入って、故障の原因となることがあります。
設置時や
1
年に
1
度は、電源コードに傷みがないか、コンセン
ˎ
トと電源プラグの間にほこりがたまっていないか、プラグ
がしっかり差し込まれているか、などを点検してください。
お問い合わせ先
ご購入元にお問い合わせください。
サポート関連情報については下記
URL
をご覧ください。
http://www.sony.net/promemory
商標について
Microsoft
、
Windows
は米国
Microsoft Corporation
の米
ˎ
国およびその他の国における登録商標または商標です。
Mac
、
OS X
は
Apple Inc.
の米国およびその他の国におけ
ˎ
る登録商標です。
Thunderbolt
と
Thunderbolt
ロゴはインテルの米国およ
ˎ
びその他の国における登録商標です。
その他、本取扱説明書で登場するシステム名、製品名は、一般
に各開発メーカーの登録商標あるいは商標です。なお、本文
中では
、
マークは明記していません。
主な仕様
動作環境
動作温度
5
℃〜
40
℃
動作湿度
8
%〜
90
%(結露なきこと)
保存温度
–20
℃〜
+60
℃
保存湿度
8
%〜
90
%(結露なきこと)
対応
OS
Windows 7
(
SP1
)、
Windows 8.1
、
Windows 10
OS X 10.8.5
、
OS X 10.9
、
OS X 10.10
、
OS X 10.11
、
macOS 10.12
、
macOS 10.13
インターフェース
USB 3.1 Gen 1
×
1
Thunderbolt 2
×
2
電源
AC-DC
アダプター(
VGP-AC19V77
)
入力:
AC 100 V-240 V
、
50 Hz/60 Hz
出力:
DC 19.5 V/3.3 A
(最大)
ファイルシステム(工場出荷時)
exFAT
外形寸法(約)
156 mm
×
100 mm
×
241 mm
(幅/高さ/奥行き)
(最大突起物を除く)
質量(約)
2.9 kg
同梱品
プロフェッショナル
RAID
(
1
)、
USB
ケーブル(
1
)、
Thunderbolt
ケーブル(
1
)、
AC
アダプター(
1
)、
電源ケーブル(
1
)、ラベル、印刷物一式
仕様および外観は、改良のため予告なく変更することがあり
ますが、ご了承ください。
Produktspezifikationen
| Marke: | Sony |
| Kategorie: | Festplatte |
| Modell: | PSZ-RA4T |
Brauchst du Hilfe?
Wenn Sie Hilfe mit Sony PSZ-RA4T benötigen, stellen Sie unten eine Frage und andere Benutzer werden Ihnen antworten
Bedienungsanleitung Festplatte Sony

3 August 2025
15 September 2024
31 März 2024
29 Juni 2023
Bedienungsanleitung Festplatte
Neueste Bedienungsanleitung für -Kategorien-
26 Februar 2026
13 Februar 2026
12 Februar 2026
11 Februar 2026
31 Dezember 2026
8 Dezember 2025
16 Oktober 2025
16 Oktober 2025