StarTech.com M2E1BRU31C Bedienungsanleitung
StarTech.com Externe Festplatte M2E1BRU31C
Lies die bedienungsanleitung für StarTech.com M2E1BRU31C (2 Seiten) kostenlos online; sie gehört zur Kategorie Externe Festplatte. Dieses Handbuch wurde von 22 Personen als hilfreich bewertet und erhielt im Schnitt 4.8 Sterne aus 4 Bewertungen. Hast du eine Frage zu StarTech.com M2E1BRU31C oder möchtest du andere Nutzer dieses Produkts befragen? Stelle eine Frage
Seite 1/2
Quick-Start Guide
To view manuals, FAQs, videos, drivers, downloads, technical drawings, and more, visit www.startech.com/support.
Manual Revision: December 18, 2019 6:37 PM
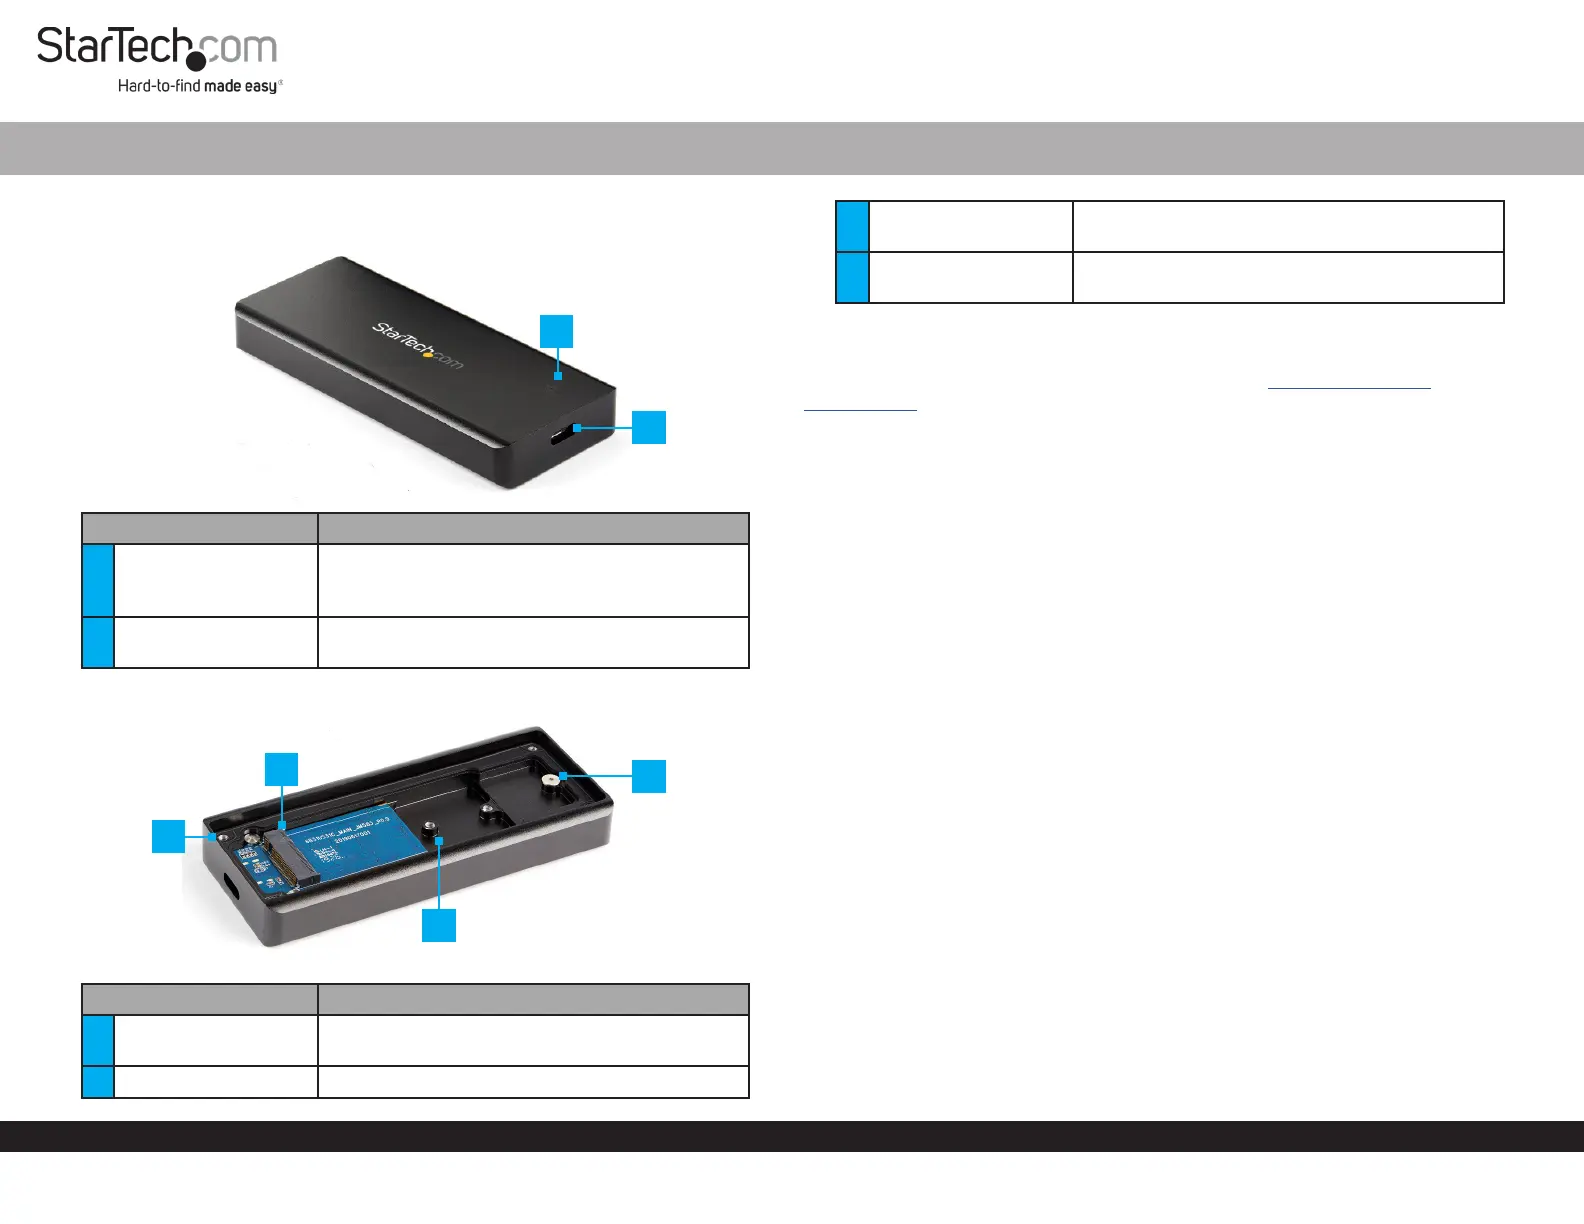
Product Diagram (M2E1BRU31C)
Exterior
ComponentFunction
1Power LED
• Solid: Indicates that the Enclosure is receiving
power.
• Flashing: Indicates that the Drive activity.
2USB-C Port
• Used to connect the Enclosure to the Host
Computer.
Interior
ComponentFunction
3Drive-Bay Screws x 4
• Used to secure the Drive Bay Cover in the
Enclosure.
4Drive Connector• Used to connect the Drive to the Enclosure.
USB 3.2 Gen 2 Type C IP67 Rugged NVMe Enclosure
5
Adjustable Drive
Length Holes
• Used to accommodate dierent drive lengths.
6
Drive-Mount Screw/
Nut
• Used to secure the Drive to the Enclosure.
Requirements
For the latest requirements and full manual, please visit www.startech.com/
M2E1BRU31C
Installation
Warning! Drives should be handled carefully, especially when they’re transported. If
you’re not careful with your drives, you may lose data as a result.
Installing an 80 mm Drive
1. Using the Torx Screwdriver (included), remove the Drive-Cover Screws (x 4) from
the bottom of the Enclosure and remove the Cover Plate.
2. Place the Drive next to the Drive Tray and align the screw groove on the Drive with
the Adjustable Drive Length Holes on the Drive Tray.
3. Use the Torx Screwdriver and to remove the Drive-Mount Screw from the
Enclosure.
4. Gently slide the connector on the Drive (on a 30-degree angle) into the Drive
Connector on the Enclosure.
Note: The connector on your drive is keyed so that it only ts one way.
5. Lightly push the Drive down into position on the circuit board.
6. Insert the Drive-Mount Screw through the screw groove on the Drive and into the
Drive-Mount Screw Hole on the Enclosure.
7. Using the Torx Screwdriver tighten the Drive-Mount Screw, being careful not to
over-tighten.
8. Place the Cover Plate back onto the bottom on the Enclosure. Make sure that the
Cover Plate is properly aligned with the top of the Enculosure creating a tight seal
and that nothing is obstructing the Cover Plate, in order to provide a water and
dust resistance seal.
9. Insert the Drive-Cover Screws back into the four corner on the bottom of the
Enclosure.
6
4
5
3
1
2
Produktspezifikationen
| Marke: | StarTech.com |
| Kategorie: | Externe Festplatte |
| Modell: | M2E1BRU31C |
| USB Anschluss: | Ja |
| Breite: | 105 mm |
| Tiefe: | 45 mm |
| Gewicht: | 164 g |
| Mitgelieferte Kabel: | USB Typ-C |
| Produkttyp: | SSD-Gehäuse |
| Produktfarbe: | Schwarz |
| Internationale Schutzart (IP-Code): | IP67 |
| Höhe: | 14 mm |
| Energiequelle: | USB |
| Material: | Aluminium |
| Betriebstemperatur: | 5 - 35 °C |
| Relative Luftfeuchtigkeit in Betrieb: | 20 - 80 % |
| Verpackungsbreite: | 144 mm |
| Verpackungstiefe: | 175 mm |
| Verpackungshöhe: | 32 mm |
| Paketgewicht: | 256 g |
| Zertifizierung: | CE, FCC, REACH |
| Warentarifnummer (HS): | 84733080 |
| Kabellänge: | 0.05 m |
| LED-Anzeigen: | Aktivität |
| Temperaturbereich bei Lagerung: | -20 - 50 °C |
| Anzahl Produkte pro Versandkarton: | 40 Stück(e) |
| Länge des Versandkartons: | 410 mm |
| Breite des Versandkartons: | 360 mm |
| Höhe des Versandkartons: | 390 mm |
| USB-Version: | 3.2 Gen 2 (3.1 Gen 2) |
| Mittlere Betriebsdauer zwischen Ausfällen (MTBF): | 50000 h |
| Anzahl der unterstützten Speicherlaufwerke: | 1 |
| Schnellinstallationsanleitung: | Ja |
| Unterstützte Speicherlaufwerk-Schnittstellen: | PCI Express 3.0 |
| Nachhaltigkeitszertifikate: | CE, RoHS |
| Datenübertragungsrate: | 10 Gbit/s |
| Größe des Speicherlaufwerks: | M.2 " |
| Chipsatz: | JMicron - JMS583 |
| UASP-Unterstützung: | Ja |
| Schraubendreher enthalten: | Ja |
Brauchst du Hilfe?
Wenn Sie Hilfe mit StarTech.com M2E1BRU31C benötigen, stellen Sie unten eine Frage und andere Benutzer werden Ihnen antworten
Bedienungsanleitung Externe Festplatte StarTech.com

31 August 2024
31 August 2024
31 August 2024
31 August 2024
31 August 2024
20 August 2024
20 August 2024
19 August 2024
19 August 2024
17 August 2024
Bedienungsanleitung Externe Festplatte
Neueste Bedienungsanleitung für -Kategorien-
27 März 2026
22 März 2026
14 März 2026
13 März 2026
22 Februar 2026
25 November 2025
11 November 2025
10 November 2025