Tandoor Morni CH-04 Bedienungsanleitung
Tandoor Morni
Backöfen
CH-04
Lies die bedienungsanleitung für Tandoor Morni CH-04 (5 Seiten) kostenlos online; sie gehört zur Kategorie Backöfen. Dieses Handbuch wurde von 3 Personen als hilfreich bewertet und erhielt im Schnitt 4.5 Sterne aus 2 Bewertungen. Hast du eine Frage zu Tandoor Morni CH-04 oder möchtest du andere Nutzer dieses Produkts befragen? Stelle eine Frage
Seite 1/5

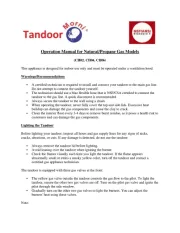
Operation Manual for Natural/Propane Gas Models
(CH02, CH04, CH06)
This appliance is designed for indoor use only and must be operated under a ventilation hood.
Warnings/Recommendations
▪ A certied technician is required to install and connect your tandoor to the main gas line.
Do not attempt to connect the tandoor yourself.
▪ The technician should use a blue exible hose that is NSF/CSA certied to connect the
tandoor to the gas line. A quick disconnect is recommended.
▪ Always secure the tandoor to the wall using a chain.
▪ When operating the tandoor, never fully cover the top and side lids. Excessive heat
buildup can damage the gas components and cause the clay to crack.
▪ Clean the interior oor every 3-4 days to remove burnt residue, as it poses a health risk to
customers and can damage the gas components.
Lighting the Tandoor
Before lighting your tandoor, inspect all hoses and gas supply lines for any signs of nicks,
cracks, abrasions, or cuts. If any damage is detected, do not use the tandoor.
▪ Always remove the tandoor lid before lighting.
▪ Avoid leaning over the tandoor when igniting the burner.
▪ Check the ames visually each time you light the tandoor. If the ame appears
abnormally small or emits a smoky yellow color, turn o the tandoor and contact a
certied gas appliance technician.
The tandoor is equipped with three gas valves at the front:
▪ The yellow gas valve outside the tandoor controls the gas ow to the pilot. To light the
tandoor, ensure the other two gas valves are o. Turn on the pilot gas valve and ignite the
pilot through the side window.
▪ Gradually turn on the other two gas valves to light the burners. You can adjust the
burners' heat using these valves.
Note:

▪ Never operate the tandoor at full heat capacity, as this can damage the gas components
and crack the clay.
▪ If the pilot and burners do not light, ensure all three gas valves are in the o position.
Shutting Down the Tandoor
▪ Each night, turn o the tandoor by closing the yellow gas valve at the front, leaving the
pilot lit.
▪ To completely shut down the tandoor, turn o the main gas valve located before the blue
exible hose, along with the yellow gas valve at the front.
Safety Precautions
▪ Store and use gasoline or other ammable vapors away from the tandoor and any other
appliances.
▪ Failure to follow these instructions could result in a hazardous fire or explosion, causing
serious injury or property damage.
▪ It is your responsibility to ensure your tandoor is properly assembled, installed, and
maintained.
For Your Safety
If you smell gas:
▪ Shut o the gas supply to the appliance.
▪ Extinguish any open ames.
▪ Lift the tandoor lid.
▪ If the odor persists, immediately contact your gas supplier or re department.
Installation
This appliance must be installed in accordance with local codes.
For Your Own Safety
▪ Only use this tandoor indoors under a ventilation hood.
▪ Keep the area around the tandoor clear of any combustible materials, gasoline, or other
ammable liquids.
▪ Do not obstruct the ow of combustion or air ventilation to the tandoor.
▪ Never leave the tandoor unattended while in operation.
▪ Keep children away from the tandoor and do not allow them to operate or play near it.
▪ Do not use the tandoor while under the inuence of alcohol or drugs.
▪ Do not attempt to move the tandoor while it is in operation.
Placement of the Tandoor

Follow these minimum clearance instructions:
▪ 15 cm (6 inches) from both sides of the unit.
▪ 15 cm (6 inches) from the back of the unit.
▪ This equipment is for installation under a ventilation hood only.
Safety Measures
▪ Always securely turn o the safety valve when the tandoor is not in use.
▪ Ensure at least two of the tandoor's wheels are locked in place during operation to prevent
movement.
Flexible Connector & Regulator
▪ Prevent grease or hot materials from contacting the exible connector and keep it away
from hot surfaces.
▪ Visually inspect the entire length of the exible connector assembly before each use of
the tandoor.
▪ Perform a leak test before lighting the tandoor each day or after any gas component has
been replaced.
Warning: Failure to follow these instructions may result in a re, causing death or serious
injury.
Performing a Leak Test
Conduct a leak test to ensure there are no gas leaks before lighting the tandoor. Perform the test
in a well-ventilated area, away from any open ames, heat, or ignition sources. Do not use a
match, open ame, or smoke during the test.
Items Needed for Leak Testing:
▪ A mixture of 50% liquid dish soap and 50% water.
▪ A brush or cloth to apply the mixture.
Areas to Test on a Natural Gas Tandoor:
▪ All exible connector connections.
▪ All valve connections.
Leak Test Procedure:
▪ With the gas supply valve on the tandoor in the o position, turn on the main natural gas
valve. Do not ignite the burners during the leak test.
▪ Apply the soap and water solution to all connections and components.
▪ Watch carefully for growing bubbles, which indicate a leak.
Produktspezifikationen
| Marke: | Tandoor Morni |
| Kategorie: | Backöfen |
| Modell: | CH-04 |
Brauchst du Hilfe?
Wenn Sie Hilfe mit Tandoor Morni CH-04 benötigen, stellen Sie unten eine Frage und andere Benutzer werden Ihnen antworten
Bedienungsanleitung Backöfen Tandoor Morni
21 August 2025

11 Juni 2025

11 Juni 2025
Bedienungsanleitung Backöfen
- Porter & Charles
- Omega
- Café
- Steba
- Cadco
- Frigidaire
- Elvita
- Foster
- Philco
- Benavent
- Bartscher
- Scandomestic
- Camry
- Silver Style
- Chefman
Neueste Bedienungsanleitung für -Kategorien-
21 August 2025

21 August 2025

21 August 2025

21 August 2025
21 August 2025

21 August 2025

21 August 2025
21 August 2025

21 August 2025

21 August 2025