Techno Line KL4912 Bedienungsanleitung
Techno Line
Wetterstation
KL4912
Lies die bedienungsanleitung für Techno Line KL4912 (6 Seiten) kostenlos online; sie gehört zur Kategorie Wetterstation. Dieses Handbuch wurde von 21 Personen als hilfreich bewertet und erhielt im Schnitt 4.9 Sterne aus 11 Bewertungen. Hast du eine Frage zu Techno Line KL4912 oder möchtest du andere Nutzer dieses Produkts befragen? Stelle eine Frage
Seite 1/6

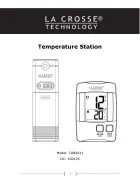
KL4912 Desktop weather station
Instruction Manual
Introduction
This weather station comes with backlight, indoor and outdoor temperature &
humidity display, and alarm clock with calendar.
Fig. 1 Front view Fig. 2 Back view
1. “MODE” button
2. “MAX/MIN” button
3. “
▲
CHANNEL” button
4. “
▼/°
C/
°
F / RCC” button
5. “SNOOZE / LIGHT” button
6. Battery compartment
7. A/C in-jack
Getting started:
Installing A/C adapter – highly recommended
1. Remove all “AAA” batteries before plugging in A/D D/C adapter. See instructions
below.
2. Plug in A/C D/C adapter at A/C input jack (7) (see figure 2).
Batteries installation
1. Open battery compartment (6) on the back of the unit. (see figure 2)
2. Install / replace with 3x “AAA” size batteries in the compartment. It is
recommended that only alkaline batteries are used.
3. Replace the battery compartment (6) on the back of the unit.
4. A short beep will be heard to confirm proper installation of batteries.
Batteries safety warnings:

1. Please read all instructions carefully before use.
2. Install batteries correctly by matching the polarities (+/-).
3. Always replace a complete set of batteries.
4. Never mix used and new batteries.
5. Remove exhausted batteries immediately.
6. Remove batteries when not in use.
7. Do not recharge and do not dispose of batteries in fire as the batteries may
explode.
8. Ensure batteries are stored away from metal objects as contact may cause a
short circuit.
9. Avoid exposing batteries to temperature or humidity extremes or direct sunlight.
10. Keep all batteries out of reach from children. They are a choking hazard.
11. Please retain packaging for future reference.
Note: backlight will be permanently on when the weather station is connected with the ac
adapter. When batteries are used, press “SNOOZE / LIGHT” button for backlight.
Interpreting the weather forecast symbols
sunny slightly cloudy Cloudy Rainy
Figure 3.
The weather station requires at least 24 hours on acclimatizing to local weather
conditions. The weather station process and analyze the weather patterns for the past
24 hours in order to determine the future weather. Until that time has elapsed, the
predicted weather forecast may not accurately reflect the actual weather for your
immediate area.
The weather station will display the symbols (see figure 3) to indicate the predicted
weather forecast for the next 12 to 24 hours for an area within a radius of approximately
30-50 km.
Note:
1. The weather forecasting is approximately 70% accurate. Accuracy rate might be
lower in extreme weather conditions. The weather forecast is only for reference
only and it is only for domestic use only. Do rely on the weather station for NOT
weather forecast if any serious matter replies on it including but not limited to:
personal health, life and death situation, any business or financial decisions,
and/or agricultural planning.
2. The weather forecast does not display the current weather. It displays the
weather for the future.
To set time manually:
When the weather station is displaying the time, hold down the “ ” button (1) for MODE
approximately 3 seconds until the display is flashing.

Press “▲ CHANNEL” button (3) or “▼/°C/°F / RCC” button (4) to change the AM/PM or
12-hour clock setting.
Press “ ” button (1) again. Press “ CHANNEL” button (3) or “ /°C/°F / RCC” MODE ▲ ▼
button (4) to change the TIME ZONE setting.
Press “ ” button (1) again. Press “ CHANNEL” button (3) or “ /°C/°F / RCC” MODE ▲ ▼
button (4) to change the hour setting.
Press “ ” button (1) again. Press “MODE ▲ CHANNEL” button (3) or “▼/°C/°F / RCC”
button (4) to change the minute setting.
Press “ ” button (1) again to confirm settings. Display will no longer flash. MODE
To set calendar:
Press the “ ” button (1) until the calendar is displayed. MODE
Hold down the “MODE” button (1) for approximately 3 seconds until the display is
flashing.
Press “ ” button (1) again. Press “ CHANNEL” button (3) or “ /°C/°F / RCC” MODE ▲ ▼
button (4) to change the year setting.
Press “ ” button (1) again. Press “MODE ▲ CHANNEL” button (3) or “▼/°C/°F / RCC”
button (4) to change between the date/month and month/date setting.
Press “ ” button (1) again. Press “ CHANNEL” button (3) or “ /°C/°F / RCC” MODE ▲ ▼
button (4) to change the month setting.
Press “ ” button (1) again. Press “ CHANNEL” button (3) or “ /°C/°F / RCC” MODE ▲ ▼
button (4) to change the date setting.
Press “ ” button (1) again to confirm settings. Display will no longer flash. MODE
To set alarm time:
Press the “ ” button (1) until the alarm is displayed. “AL” will be shown. MODE
Hold down the “MODE” button (1) for approximately 3 seconds until the display is
flashing.
Press “ CHANNEL” button (3) or “ /°C/°F / RCC” button (4) to change the hour ▲ ▼
setting.
Press “ ” button (1) again. MODE
Press “ CHANNEL” button (3) or “ /°C/°F / RCC” button (4) to change the minute ▲ ▼
setting.
Press “ ” button (1) again. MODE
Press “ CHANNEL” button (3) or “ /°C/°F / RCC” button (4) to change the duration of ▲ ▼
the snooze time (from 1 minute to 20 minutes).
Press “ ” button (1) again to complete. MODE
When Alarm time is shown, press “▲ CHANNEL” button (3) to turn on and off the alarm.
will be shown when the alarm is on.
The alarm will sound for 120 seconds when the preset alarm time is reached. Hit any
button on the back of the clock to deactivate the alarm.
Hit the “SNOOZE / LIGHT” button (5) when the alarm is on to enter snooze mode.
will flash when the clock is it snooze mode. The alarm will sound again after the
preset snooze time has been reached. Hit any button on the back of the clock to
deactivate the alarm.
REMOTE TEMPERATURE SENSOR
Produktspezifikationen
Marke: | Techno Line |
Kategorie: | Wetterstation |
Modell: | KL4912 |
Brauchst du Hilfe?
Wenn Sie Hilfe mit Techno Line KL4912 benötigen, stellen Sie unten eine Frage und andere Benutzer werden Ihnen antworten
Bedienungsanleitung Wetterstation Techno Line
2 September 2024
26 August 2024
21 August 2024
21 August 2024
21 August 2024
21 August 2024
21 August 2024
21 August 2024
20 August 2024
20 August 2024
Bedienungsanleitung Wetterstation
- Hama
- Dexford
- Muse
- GoGEN
- Global Water
- Hyundai
- Krontaler
- ECG
- Theben
- Browin
- TFA
- Greisinger
- Guardo
- DMV Electronics
- Govee
Neueste Bedienungsanleitung für -Kategorien-
14 Juni 2025
13 Juni 2025
13 Juni 2025
12 Juni 2025
11 Juni 2025
11 Juni 2025
11 Juni 2025
11 Juni 2025
11 Juni 2025
11 Juni 2025