Thermalright HR-03 GT Bedienungsanleitung
Thermalright Nicht kategorisiert HR-03 GT
Lies die bedienungsanleitung für Thermalright HR-03 GT (1 Seiten) kostenlos online; sie gehört zur Kategorie Nicht kategorisiert. Dieses Handbuch wurde von 38 Personen als hilfreich bewertet und erhielt im Schnitt 4.0 Sterne aus 4 Bewertungen. Hast du eine Frage zu Thermalright HR-03 GT oder möchtest du andere Nutzer dieses Produkts befragen? Stelle eine Frage
Seite 1/1
The Ultimate Cooling Solutions !
www.thermalright.com
HR-03 GT Heatsink
Screw Cap
HR-03 GT
Heatsink
Ram SinkD
Ram Sink A
Mounting
Bracket
Washer
1
23
45
6
7
8
Ram Sink B
8800GT Video Card
Ram Sink C
9
10
11
13
12
TYPE 2TYPE 1
*
Cross-shaped
Cushion Pad
Cross-shaped Backplate
Screw
Heatsink Base
GPU of Video Card
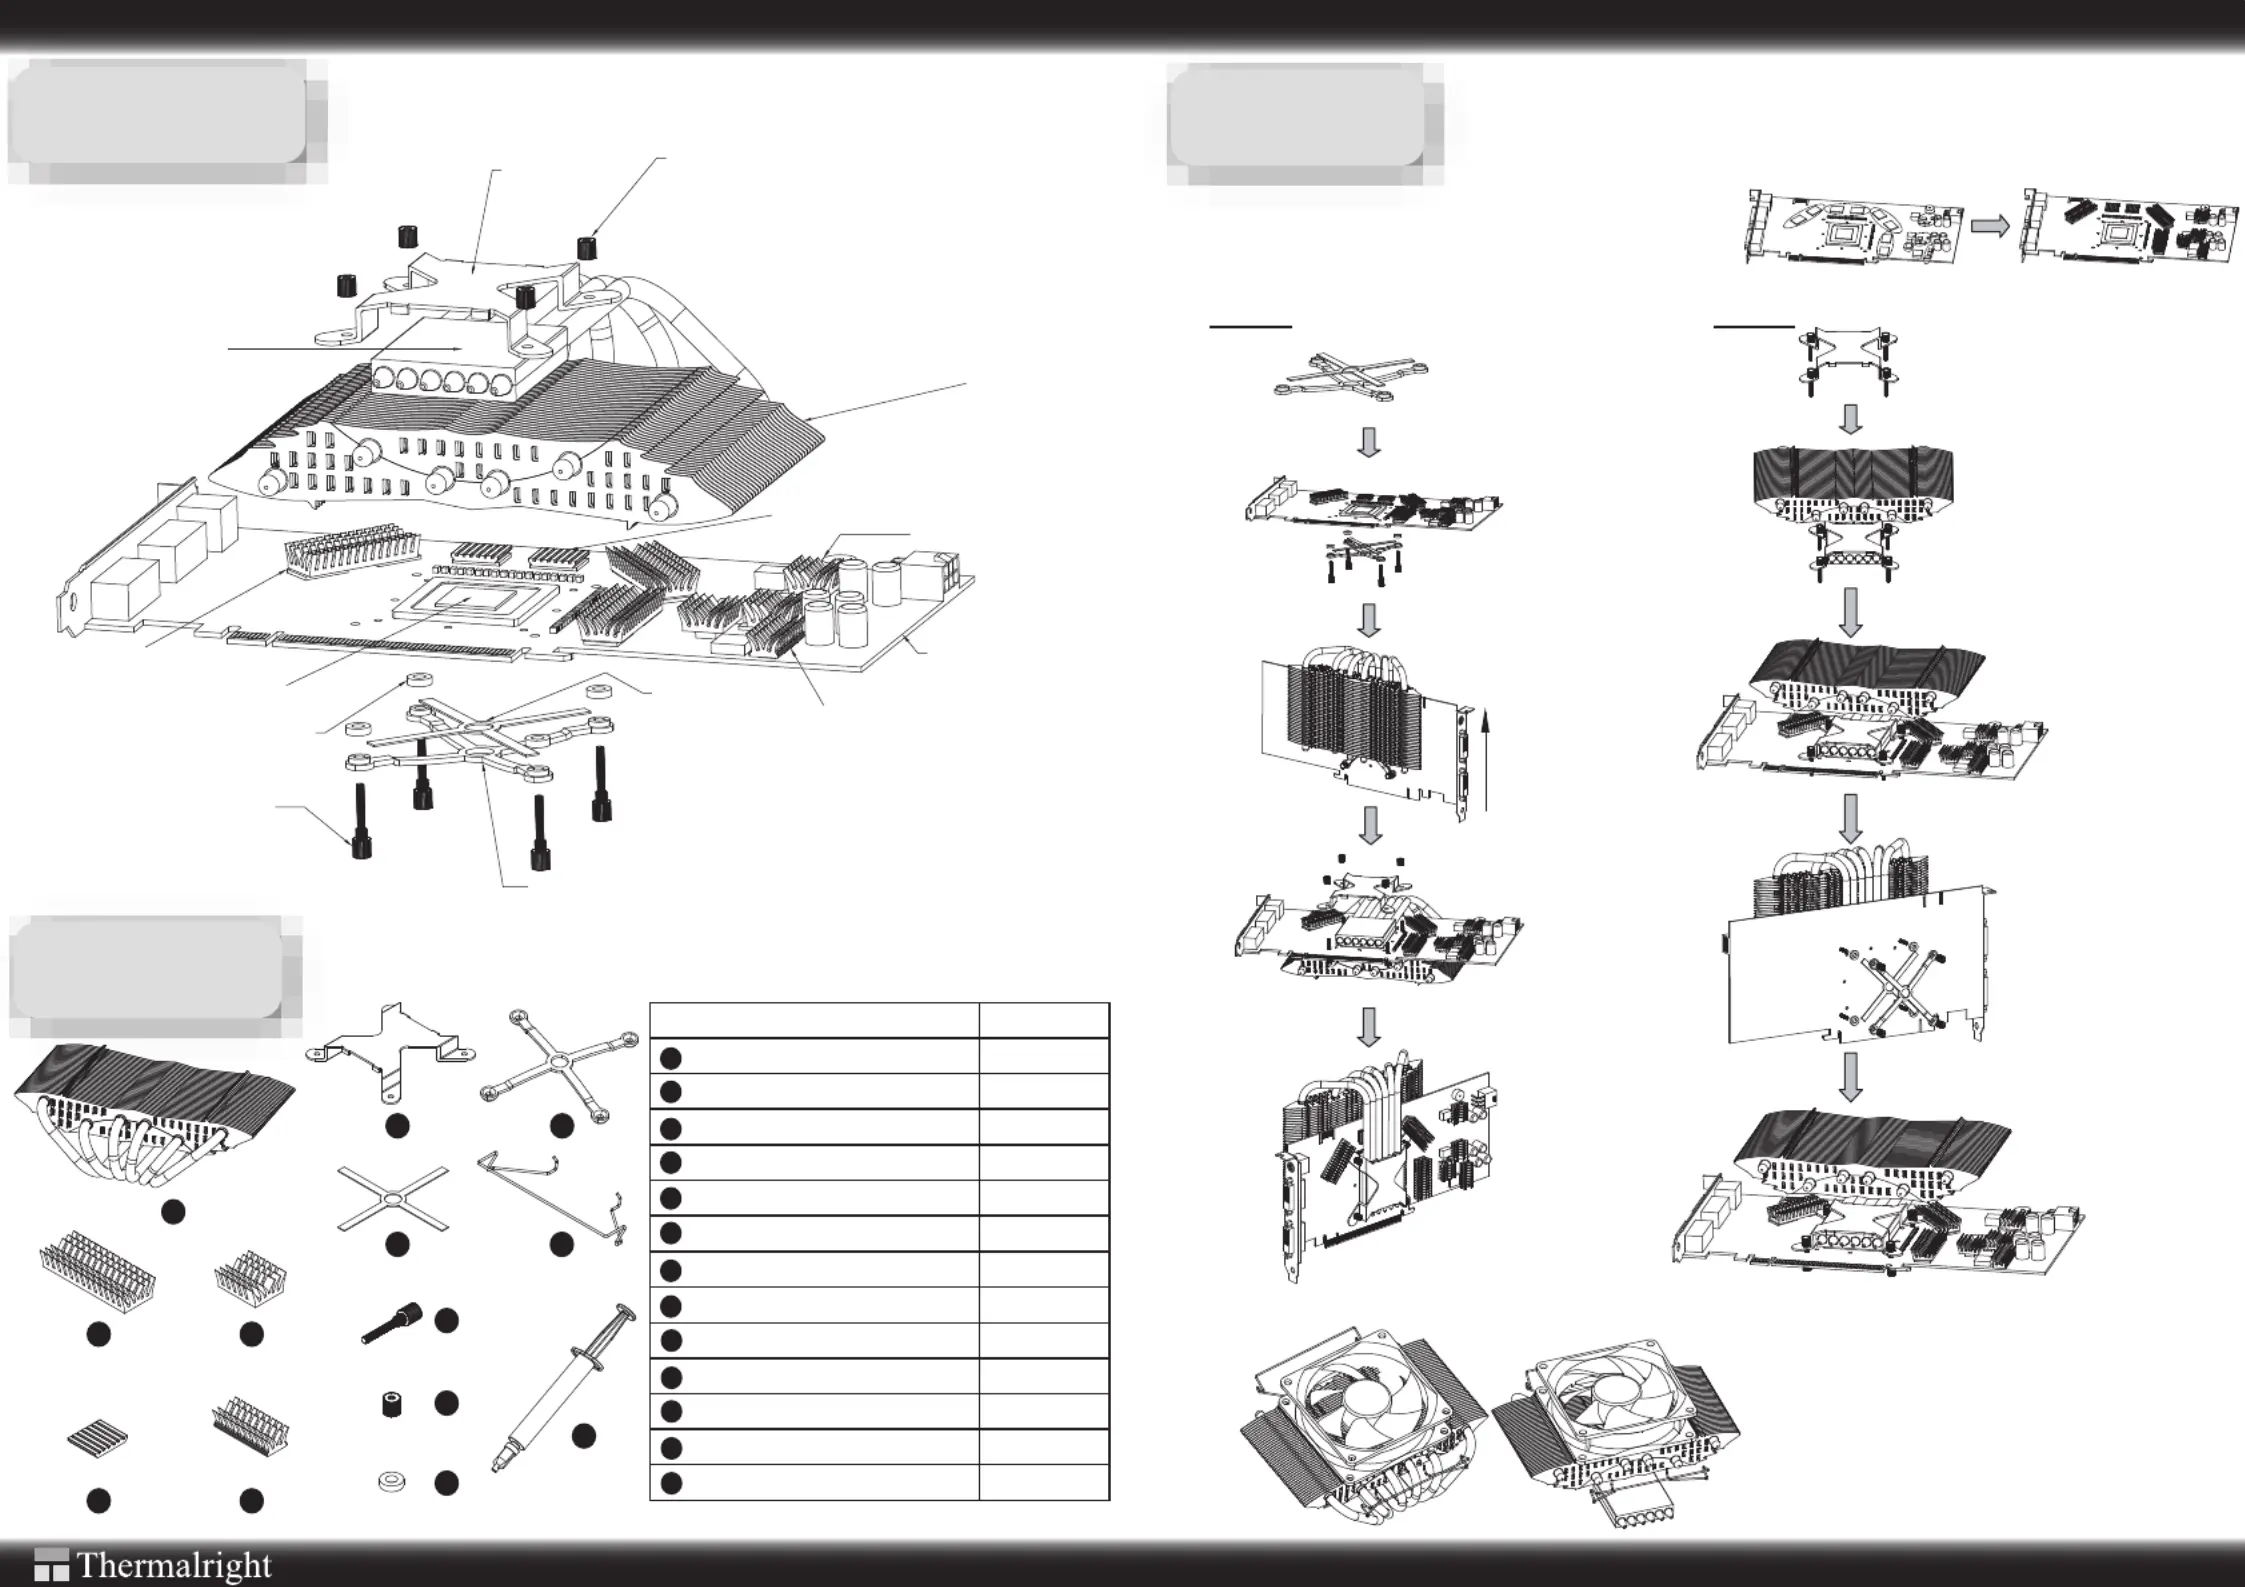
Installation
Component
Exploded View
Important! Before proceeding with installation, please check for the most up-to-date
instructions at www.thermalright.com
There are two types of installation method. Please choose the best one to fit your
system setup and configuration. Type 1 and Type 2 methods share the same Step 1.
Step 1 : Thermal Paste and RAM sinks Application
Remove stock cooler and thorough clean the surface of GPU and RAM
chipsets, making sure oily residue is removed completely. Apply a thin
layer of thermal paste to heatsink base and GPU. Unpeel the backing
of the RAM sinks (A, B, C and D) and stick them to the appropriate
RAM chipsets (see illustration on the right for reference).
Step 2: Backplate Installation
Apply the adhesive padding to
the cross-shaped backplate.
Insert the screws through the
holes from the backplate and
then screw them in to secure in
place. Then insert the washers
from the other side and through
the thread. Finally, insert the
threads through the mounting
holes from the back of the
video card.
Step 3: Heatsink Installation
Slide the heatsink in the
direction depicted by the
arrow from the illustration
with the video card in
between the heatpipes
and the heatsink base.
Step 4: Mounting Bracket Installation
Have the heatsink base in
full contact with the GPU.
Have the mounting bracket
slide through the threads
from the screws and place
it firmly on the heatsink
base.
Step 5: Installation Complete
Use the four screw caps on the
exposed threads and turn till finger
tight to secure heatsink in place.
Installation complete.
Step 2: Moutning Bracket
Installation
Insert screws though the holes
on the mounting bracket and
place the mounting bracket on
top of the heatsink base.
Step 3: Heatsink Installation
Place the heatsink on top of GPU
making sure of a full contact.
Step 4: Backplate Installation
Insert the washers through the
threads on the backside of the
video card and then the cross-
shaped backplate with the
adhesive padding on it.
Step 5: Installation Complete
Use the four screw caps on the
exposed threads and turn till
finger tight to secure heatsink in
place. Installation complete.
Fan Installation
Insert each end of fan wire clip into the holes on the fin (See
illustration for reference). Place any 92 x 25mm fan on top of
heatsink. Pull on fan wire clip to hook into fan mounting holes.
Fan installation complete.
Parts Name
Piece(s)
1
2
3
4
5
6
7
8
9
10
11
12
13
HR-03 GT Heatsink
RAM Sink A
RAM Sink B
RAM Sink C
RAM Sink D
Bracket Mount
Cross-shaped Backplate
Cross-shaped Cushion Pad
Fan Wire Clip
Screws
Washer
Thermal Paste
1
3
3
3
1
1
1
1
2
4
4
1
Nut/Screw Cap
4
Produktspezifikationen
| Marke: | Thermalright |
| Kategorie: | Nicht kategorisiert |
| Modell: | HR-03 GT |
| Gewicht: | 410 g |
| Produktfarbe: | Silber |
| Material: | Aluminium |
| Typ: | Heatsink/Radiatior |
| Abmessungen (BxTxH): | 126 x 159 x 51 mm |
Brauchst du Hilfe?
Wenn Sie Hilfe mit Thermalright HR-03 GT benötigen, stellen Sie unten eine Frage und andere Benutzer werden Ihnen antworten
Bedienungsanleitung Nicht kategorisiert Thermalright

30 August 2025
30 August 2024
Bedienungsanleitung Nicht kategorisiert
Neueste Bedienungsanleitung für -Kategorien-
3 April 2026
3 April 2026
3 April 2026
3 April 2026
3 April 2026
3 April 2026
3 April 2026
3 April 2026
3 April 2026
3 April 2026