Thomson DTH159 Bedienungsanleitung
Thomson DVD Spieler DTH159
Lies die bedienungsanleitung für Thomson DTH159 (4 Seiten) kostenlos online; sie gehört zur Kategorie DVD Spieler. Dieses Handbuch wurde von 102 Personen als hilfreich bewertet und erhielt im Schnitt 4.1 Sterne aus 7 Bewertungen. Hast du eine Frage zu Thomson DTH159 oder möchtest du andere Nutzer dieses Produkts befragen? Stelle eine Frage
Seite 1/4
Connections and Setup
Some points to check before you connect your TV set
•Ensure that the mains supply in your house complies with that indicated on the
identification sticker located on the back of your appliance.
•Install your appliance horizontally,away from any source of heat (fireplace) or appliances
generating strong magnetic or electric fields.The components of this appliance are
sensitive to heat.The maximum ambient temperature should not exceed 35° Celsius.
•Leave sufficient space around the appliance to allow adequate ventilation:10 cm on either
side and at the back,as well as 7 cm above it are ideal.
•The humidity of the room should not exceed 75%.If you have to use the appliance
outdoors,do not expose it to rain or splashing water.The appliance should not be
exposed to dripping or splashing and no objects filled with liquids,such as vases,should
be placed on top of it.
•Moving it from a cold environment to a warm one is likely to cause condensation on
some components inside the appliance.Let the condensation disappear of its own accord
before turning the appliance on again.
•Before moving the player,make sure the disc tray is empty.
The remote control
ZOOM To access the Zoom function.
ANGLE To access the Camera angle function.
OPEN.CLOSE To open and close the disc tray.
To switch the appliance on and off.
PROGRAM To access the Program menu.
RANDOM To access the Random playback function.
REPEAT To access the Repeat playback function.
A-B To access the A-B repeat playback function.
REV To start reverse accelerated play and reverse slow
motion.
FWD To start forward accelerated play and forward
slow motion.
SKIP
/
To start a reverse or forward search for a chapter
or track.
PAUSE To activate freeze frame,frame advance,slow motion.
PLAY To start playing a disc.
STOP To stop play.
CLEAR To clear entered items in a menu.
DISC MENUTo call the disc menu (if there is one).
To access the PBC menu.
To navigate through the menus.
OK To confirm a selection.
PREVIEW To access the Digest or the Introscan function.
SET UPTo access the player’s menu.
0 - 9Number entry.
DISPLAY To display the Status menu.
AUDIO To change the dialogue language or audio format.
SUBTITLE To select a subtitle language and turn the subtitle
menu on and off.
To mute and restore the sound.
BOOKMARK To access the Bookmark function.
TITLE MENUToaccess the title menu of the disc (if there is one).
To turn the PBC function on and off.
Inserting batteries in the remote control
Insert two LR06 or AA batteries in the remote control.
• Do not mix different types of batteries or new and old batteries.Do not use rechargeable batteries.
• In order to avoid any risk of explosion,observe the polarities indicated inside the battery compartment.
Replace only with the type of batteries specified above.Do not dispose of them in a fire or recharge them.
• If you are not using the remote control for a long period of time,remove the batteries.
• Please respect the environment and prevailing regulations.Before you dispose of batteries or
accumulators,ask your dealer whether they are subject to special recycling and if they will accept them
for disposal.
Front panel controls
12 3 4
1SENSOR - Remote sensor.Point the remote control here.
2OPEN/CLOSE - To open and close the disc tray.
3STOP/STANDBY - To stop disc playback.To switch the appliance on and off.
4PLAY - To start playing a disc.
Basic connections (DVD player + TV + video recorder)
1. Connect the DVD player Scart socket (TV AUDIOVIDEOOUT) to the television set’s
Scart socket (AV1,EXT1,AUX1) using a Scart lead (not provided).
- OR -
1. If your television set does not have two Scart sockets,connect the DVD player to the
video recorder’s AV2 socket using a Scart lead (not provided).If you have a satellite or
cable receiver you can also connect the DVD player to the receiver’s second Scart
socket.
Note:If your video recorder only has one Scart socket,but has a modulator,use the aerial cable to connect the
video recorder to the television set,adjust the video recorder’s modulator,then connect the DVD player to the
video recorder’s Scart socket.
2. Connect the video recorder (or satellite receiver) to the television set as shown in the
video recorder’s (or satellite receiver’s) user guide.
3. Connect the DVD player to the mains socket using the mains lead.
4. Switch on the devices.
Note:If one of the devices is not working,check that all the cables have been inserted properly into the sockets
which they should be connected to.
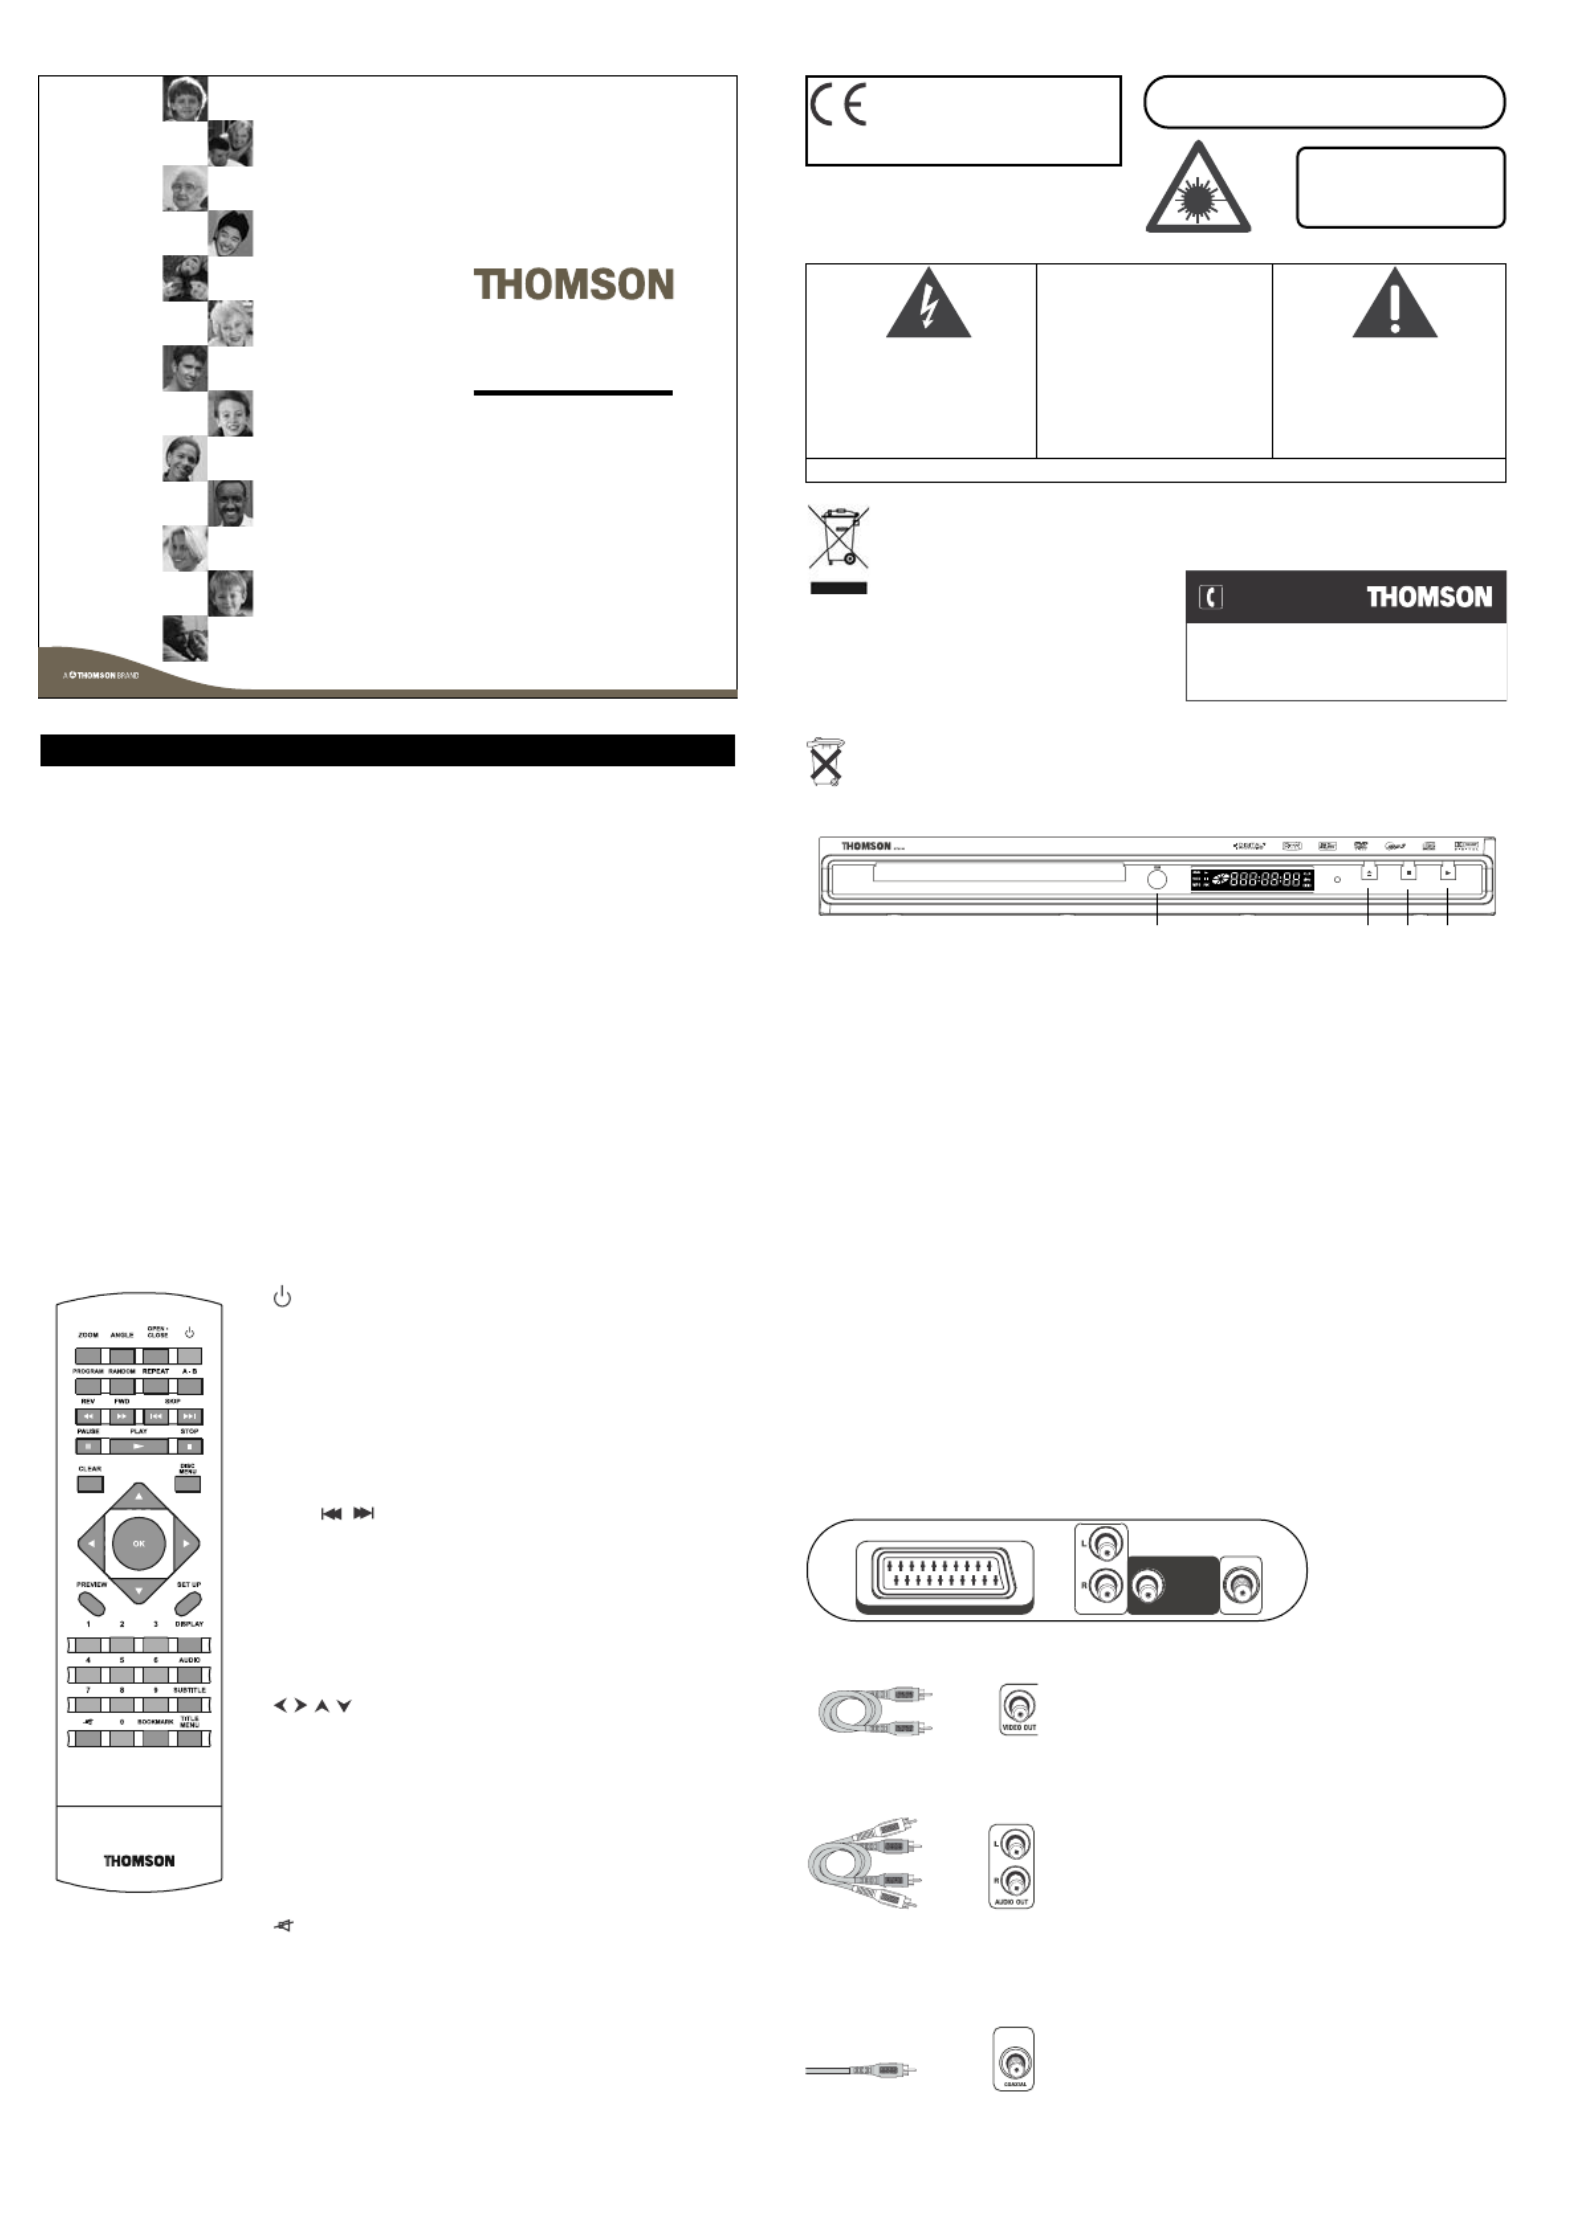
Other connection options
VIDEO OUT socket
This socket (yellow) is also known as a composite video
socket.The video cable (not supplied) usually comes
with two audio cables (white and red).The picture
quality obtained using a video connection is poorer
compared to that obtained using a Scart connection.
AUDIO L (left) and AUDIO R (right) sockets
These are analogue audio output sockets.The
AUDIO L socket and cable are white,while the
AUDIO R socket and cable are red.Connect the
DVD player’s AUDIO L and R sockets to the
television set’s AUDIO L and R sockets using audio
cables (not supplied).
Note:If your television set only has one audio socket connect it
to the DVD player’s left socket (white).
Coaxial digital audio output (COAXIAL)
This socket offers a higher level of sound quality
compared to that provided using an analogue audio
connection.For 6-channel multichannel sound,
connect the audio/video amplifier or receiver to this
socket using a coaxial cable (not supplied).
DVD
DTH159E
User Manual
S TAN D B Y
OP EN /C LO S ES T O P/ S T A ND BYPL AYS T O P/ S T A ND BYPL AY
DVD / COMPACT DISC PLAYER
TV AUDIO VIDEO OUT (RGB)COAXIALVIDEO OUTAUDIO OUT
RCT 1 95D A1
VIDEO OUT socket
Video cable (yellow)
1
Audio cables
(red and white)
AUDIO R and L
sockets
Coaxial cableCoaxial digital
audio output
This THOMSON product is designed and
manufactured with high quality materials and
components which can be recycled and reused.
This symbol means that electrical and electronic
equipment,at their end-of-life,should be disposed
of separately from your household waste.
Please,dispose of this equipment at your local community
waste collection/recycling centre.
In the European Union there are separate collection systems
for used electrical and electronic product.
Please,help us to conserve the environment we live in!
You can contact THOMSON by dialling: 0871 712 1312
(for United Kingdom, £0.10/mn inc VAT)
www.thomson-europe.com
HELPLINE
THELIGHTNINGFLASH AND
ARROWHEADWITHIN THE TRIANGLE
IS A WARNINGSIGN ALERTING YOU
OF ADANGEROUSVOLTAGEINSIDE
THE PRODUCT.
CAUTION
RISK OF ELECTRIC SHOCK - DO
NOT OPEN
CAUTION:TO REDUCE THERISK OF
ELECTRIC SHOCK,DONOTREMOVE THE
COVER (OR BACK). N
O USER-SERVICEABLE
PARTS INSIDE. R
EFERSERVICING TOQUALIFIED
SERVICE PERSONNEL .
THEEXCLAMATIONPOINT WITHIN
THE TRIANGLEIS A WARNINGSIGN
ALERTING YOUOFIMPORTANT
INSTRUCTIONS ACCOMPANYING THE
PRODUCT
.
SEE MARKING ON BOTTOM/BACK OF PRODUCT
CLASS 1
LASER PRODUCT
ENCAUTION - LASER RADIATION WHEN OPEN.
DO NOT STARE INTO BEAM.
In accordance with the rating plate of
the unit,this unit complies with current
standards concerning electrical safety
and electromagnetic compatibility.
Produktspezifikationen
| Marke: | Thomson |
| Kategorie: | DVD Spieler |
| Modell: | DTH159 |
| Gewicht: | 1700 g |
| Produktfarbe: | Silber |
| Paketgewicht: | 2200 g |
| Stromverbrauch (Standardbetrieb): | 15 W |
| Gerätetyp: | DVD Player |
| Stromverbrauch (Standby): | 3 W |
| Energiebedarf: | 230 V - 50 Hz |
| Digital Audio-Ausgang (koaxial): | 1 |
| Rauschverhältnis (SNR): | 100 dB |
| Abmessungen (BxTxH): | 360 x 225 x 48 mm |
| Verpackungsabmessungen (BxTxH): | 440 x 290 x 88 mm |
| Audio D/A Konverter: | 24-bit/96kHz |
| Kompatible Akku-/Batteriegrößen: | AAA |
| Weitere Anschlüsse: | -RCA video out;\n-RCA audio L/R out; |
Brauchst du Hilfe?
Wenn Sie Hilfe mit Thomson DTH159 benötigen, stellen Sie unten eine Frage und andere Benutzer werden Ihnen antworten
Bedienungsanleitung DVD Spieler Thomson

15 Dezember 2023
25 November 2023
19 Juni 2023
Bedienungsanleitung DVD Spieler
Neueste Bedienungsanleitung für -Kategorien-
22 Juni 2024
22 Juni 2024
22 Juni 2024
22 Juni 2024
11 Juni 2024
11 Juni 2024
10 Juni 2024
3 Juni 2024
2 Juni 2024
31 Mai 2024