TP-Link KS230 V2 Bedienungsanleitung
TP-Link Intelligentes Zuhause KS230 V2
Lies die bedienungsanleitung für TP-Link KS230 V2 (2 Seiten) kostenlos online; sie gehört zur Kategorie Intelligentes Zuhause. Dieses Handbuch wurde von 34 Personen als hilfreich bewertet und erhielt im Schnitt 5.0 Sterne aus 2 Bewertungen. Hast du eine Frage zu TP-Link KS230 V2 oder möchtest du andere Nutzer dieses Produkts befragen? Stelle eine Frage
Seite 1/2
Set Up Your 3-Way Dimmer
STEP 2
SET UP
Tap the button in the app. Select Smart Switches
then . Then follow the app Smart 3-Way Dimmer
instructions to set up your smart dimmer.
Get the app from the App Store or Kasa Smart
Google Play.
DOWNLOAD APP
STE1P
OR
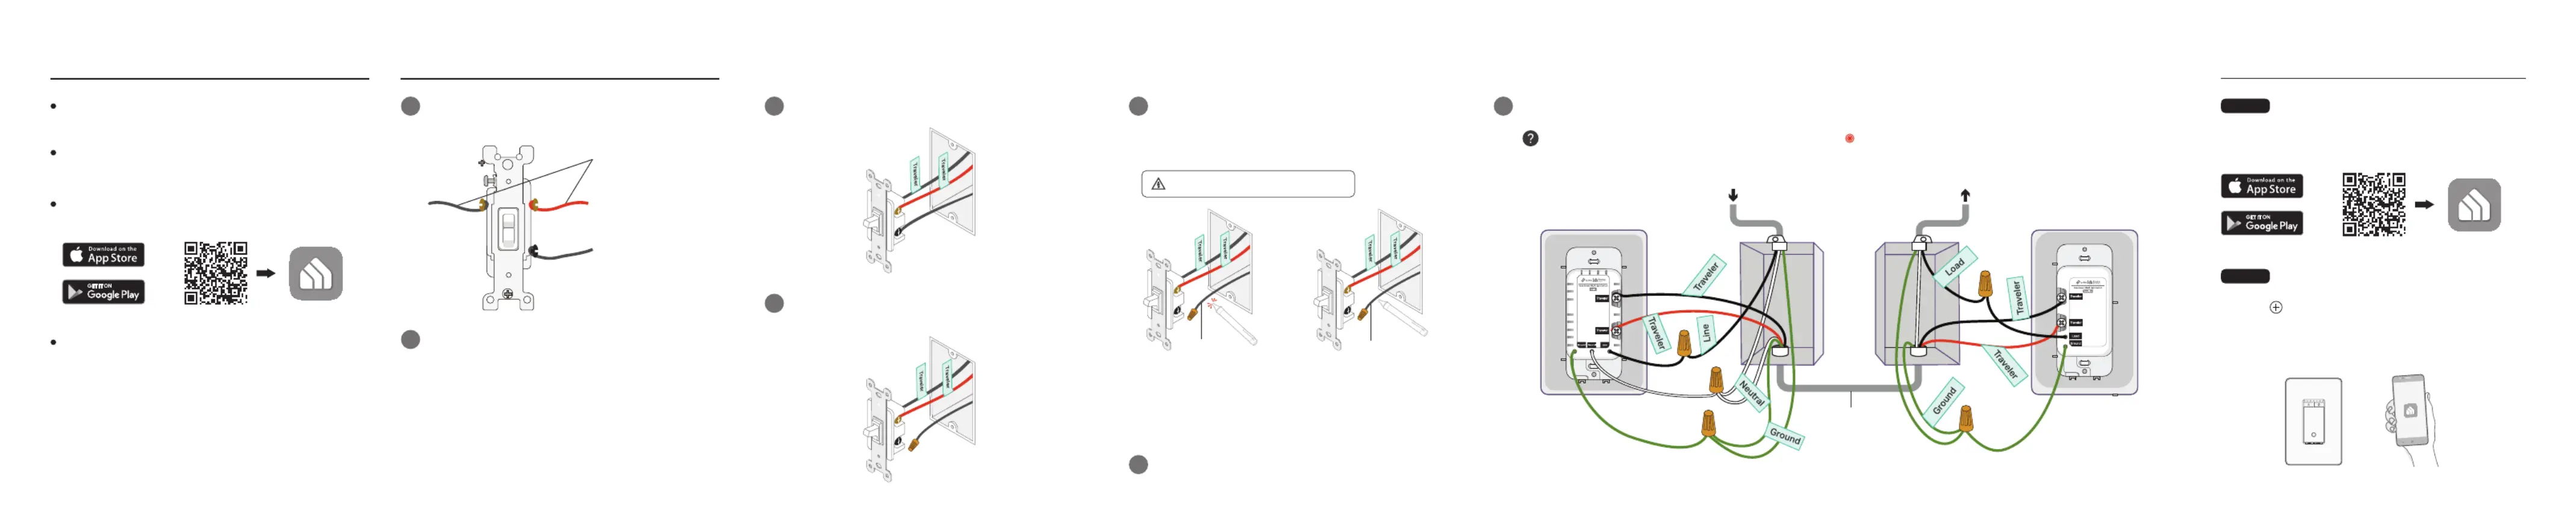
Label the wires in the two wallboxes.Traveler
3
Disconnect all wires from the two dumb switches, and connect them to the Smart 3-Way Dimmer as below.
7
Wire Your 3-Way DimmerBefore You Start
Turn o the circuit breakerThen remove . the two
wallplates. Your dumb switches might look like this.
1
Line (Live/Hot): Usually black. One end is connected to the circuit
breaker, the other to your 3-Way switch. FIRST
Load: Usually black. One end is connected to the light xture, the
other to your 3-Way switch. SECOND
Travelers: Usually one is black and the other is red.
Neutral: Usually a bundle of white wires, not connected to the dumb
switch. They may be folded up in the very back.
Ground: Usually green or copper.
Get to know the wires.
2
Two Traveler wires
(Opposite each other with
the same color screws.)
Line/Load wire
(Black. Line and Load wires
are in dierent boxes.)
3) Label the other wire in the other wallbox as the Load wire.
This is the wallbox for the satellite dimmer.
Identify the wires in the two wallboxes.Line and Load
5
1) the circuit breaker. Use a voltage detector to identify Turn on
the energized wire (). Line wire
2) the circuit breaker and label the wire. This is the Turn oLine
wallbox for the main dimmer.
Take care to avoid electric shocks.
Load wireLine wire
Label the wire in the wallbox for the main Neutral
dimmer, and the wires in both wallboxes.Ground
6
Disconnect the wires from the two Line/Load
switches, then cover them with the provided wire
nuts for safety.
4
Satellite Dimmer
Main Dimmer
Power SourceTo Light Bulbs
Electrical Cable
(Usually inside wall)
This means the wires are incorrectly connected. Please check the wiring. We recommend consulting an electrician.
1. Method of mounting: Independently mounted (Vertically
position only);
2. High Voltage - Disconnect power supply before servicing.
CAUTION:
The wire colors used in this guide are recommended
by the National Electric Code (NEC). Your actual wire
colors may vary.
The main and satellite dimmers cannot work
separately or with traditional 3-way switches.
The main and satellite dimmers are dierent and
should be installed in the correct wallboxes.
You can always nd detailed wiring instructions in the
Kasa Smart app.
OR
What should I do if the main dimmer LED blinks red quickly after installation?
Note: No need to distinguish between the two traveler wires.
Produktspezifikationen
| Marke: | TP-Link |
| Kategorie: | Intelligentes Zuhause |
| Modell: | KS230 V2 |
Brauchst du Hilfe?
Wenn Sie Hilfe mit TP-Link KS230 V2 benötigen, stellen Sie unten eine Frage und andere Benutzer werden Ihnen antworten
Bedienungsanleitung Intelligentes Zuhause TP-Link

22 Januar 2026
22 Januar 2026
28 September 2025
27 September 2025
20 September 2025
19 September 2025
14 September 2025
8 September 2025
6 September 2025
5 September 2025
Bedienungsanleitung Intelligentes Zuhause
Neueste Bedienungsanleitung für -Kategorien-
2 April 2026
1 April 2026
28 März 2026
27 März 2026
24 März 2026
23 März 2026
22 März 2026
20 März 2026
19 März 2026