TP-Link VIGI C340S Bedienungsanleitung
TP-Link Sicherheitskamera VIGI C340S
Lies die bedienungsanleitung für TP-Link VIGI C340S (2 Seiten) kostenlos online; sie gehört zur Kategorie Sicherheitskamera. Dieses Handbuch wurde von 20 Personen als hilfreich bewertet und erhielt im Schnitt 4.3 Sterne aus 3 Bewertungen. Hast du eine Frage zu TP-Link VIGI C340S oder möchtest du andere Nutzer dieses Produkts befragen? Stelle eine Frage
Seite 1/2
OR
Quick Start Guide
*Images may dier from actual products.
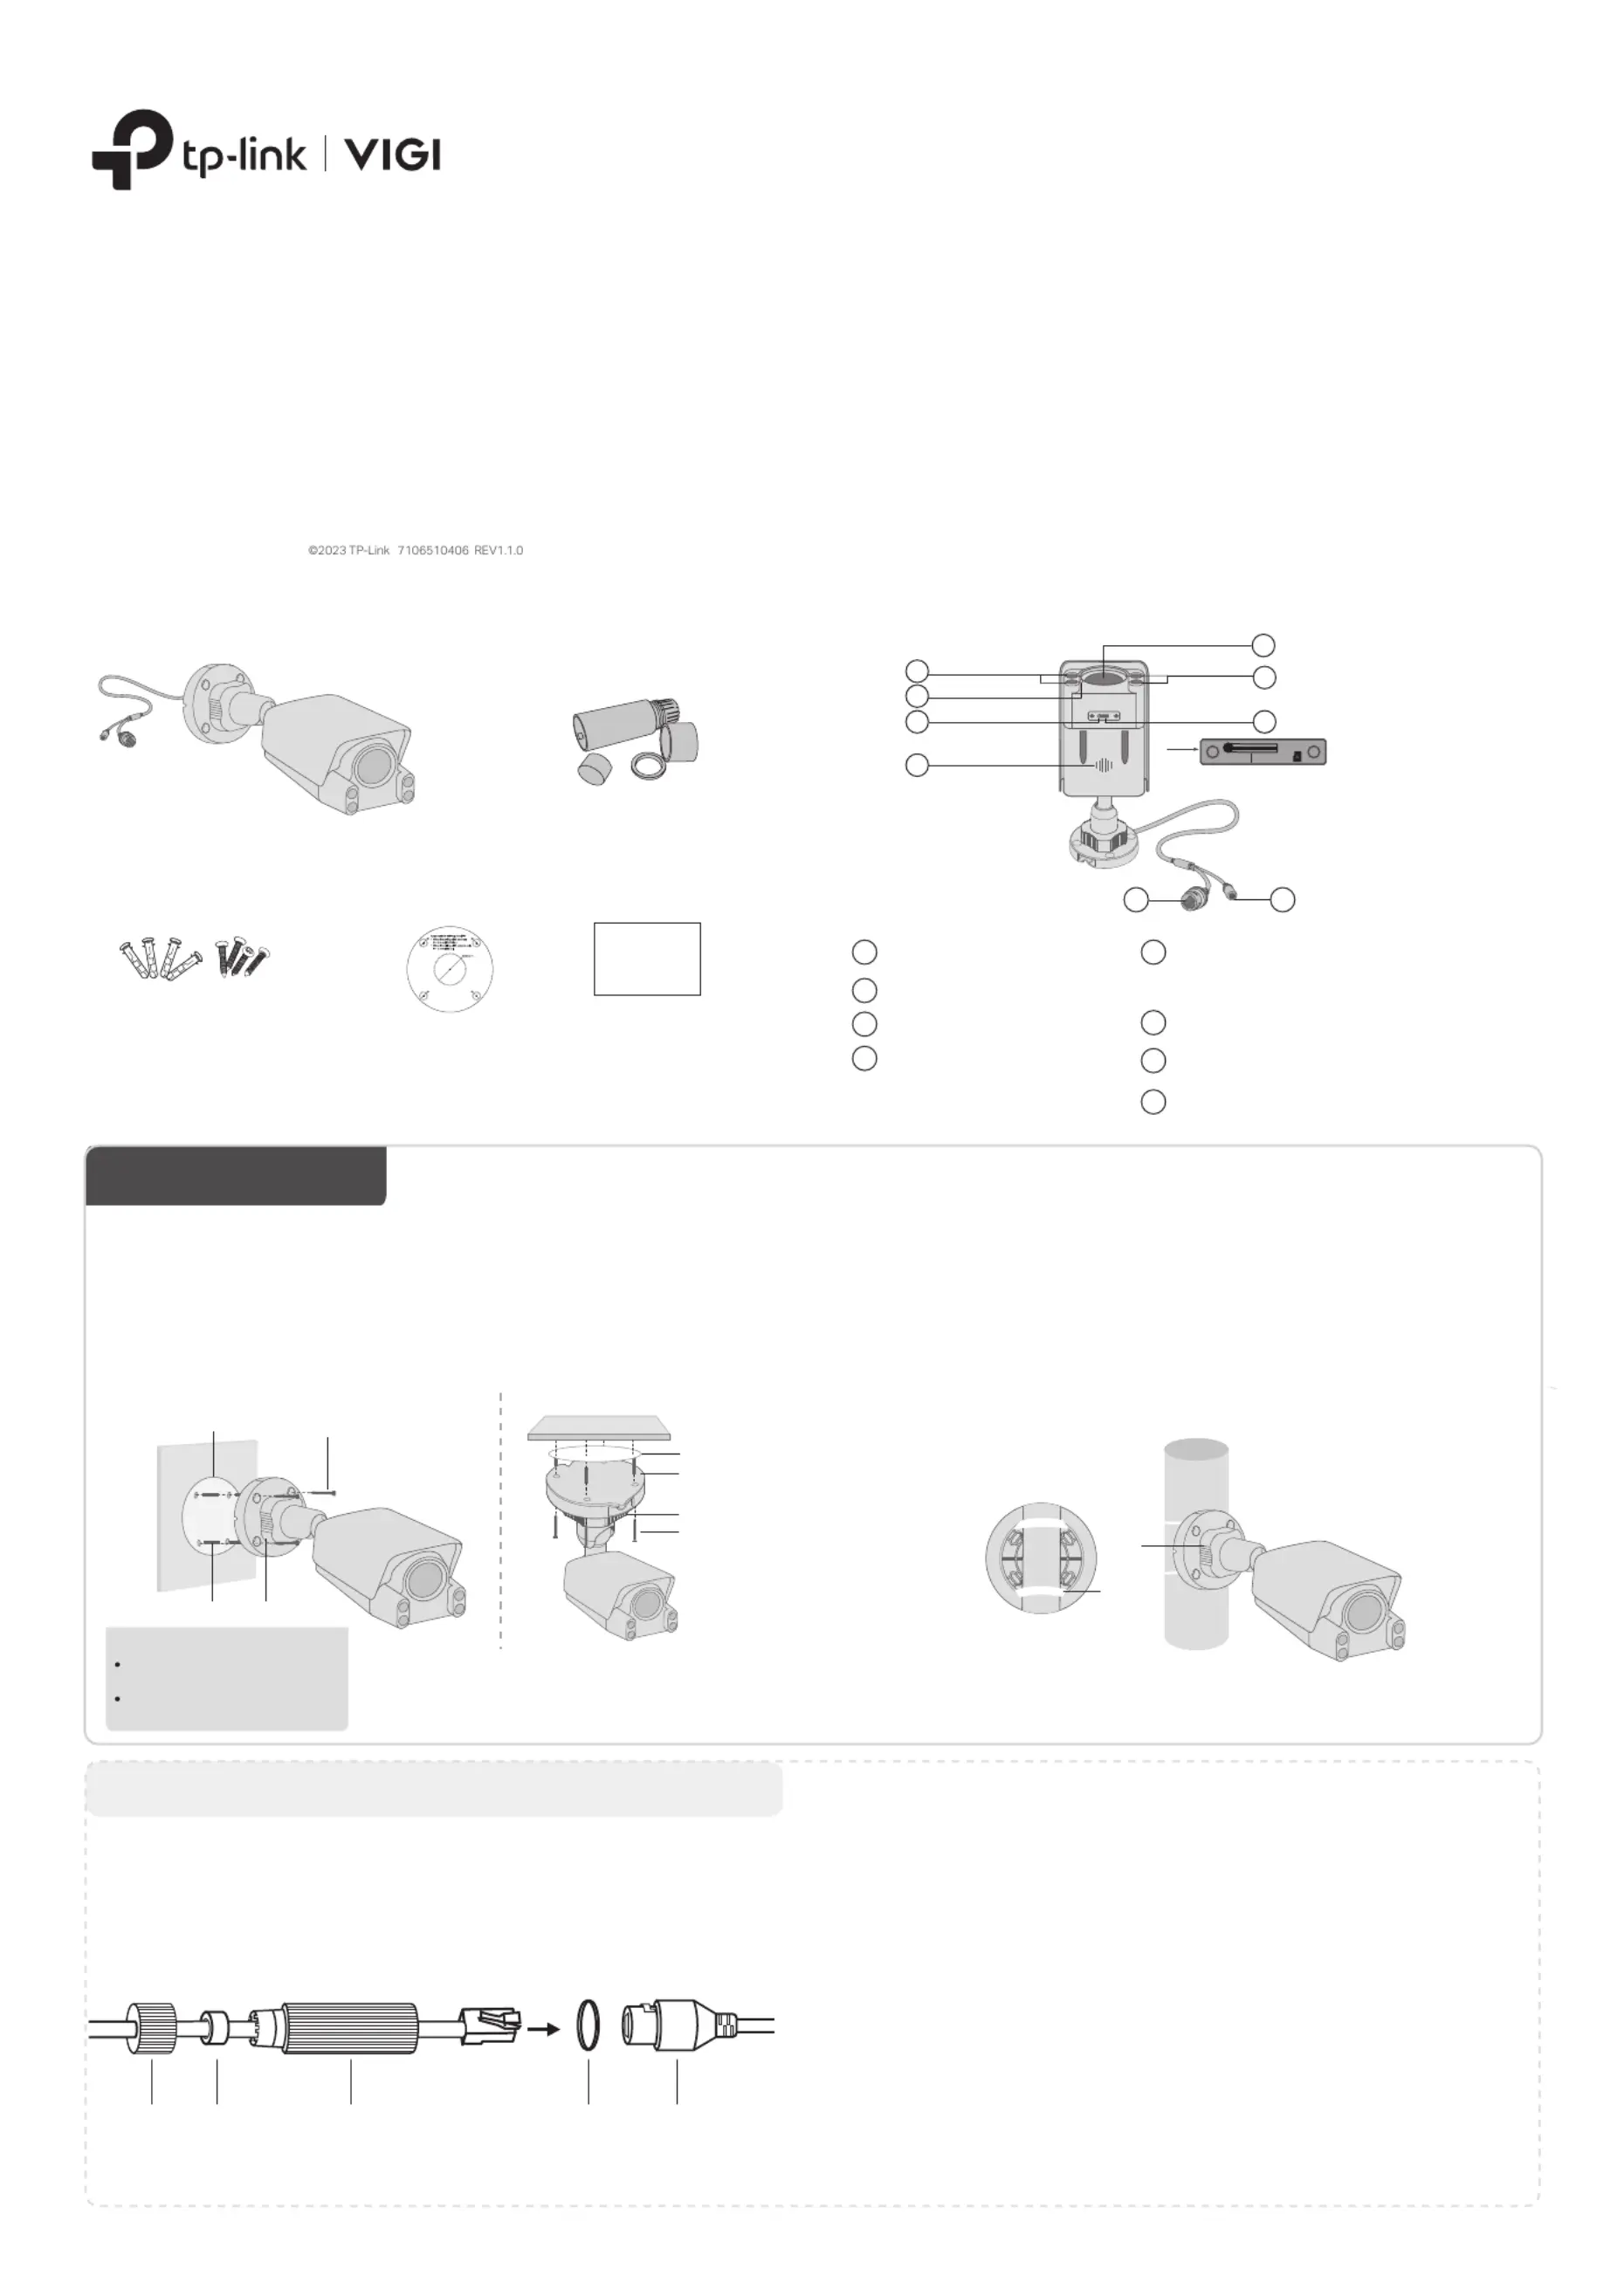
Appearance
Reset
4
Microphone
3
White LED
2
Power Supply Interface (12V DC)
8
7
RJ45 Ethernet Port (supports PoE)
6
Speaker
5
Lens
1
4
3
2
7
Package Contents
Network Camera
Waterproof Cable
Attachments
Quick Start Guide
Anchors and Screws
Quick
Start
Guide
•
Make sure your power supply matches your camera.
The camera’s standard power supply is 12V DC or
PoE (802.3af/at). The power source should comply
with Power Source Class 2 (PS2) or Limited Power
Source (LPS) of IEC 62368-1.
•Make sure that the wall is strong enough to
withstand 4 times the weight of the camera and
mounting bracket.
• If you are uncertain or uncomfortable performing the
installation, consult a qualied electrician.
Safety First:
Installing Waterproof Cable Attachments
Install the waterproof cable attachments for the network
interface when the camera is installed outdoors.
Note: Make sure each part is securely attached and the waterproof
rings are ush to keep out water.
Done! The network interface is now waterproof.
1
Mount Camera
Fix Nut
Waterproof
Ring
O-ring
Network
Interface
Waterproof
Jacket
1. Route the network cable through the following
components in order: x nut, waterproof ring, and then
the waterproof jacket.
2. Fix the O-ring to the network interface of the camera and
connect the network cables.
3. Attach the network interface with the waterproof jacket,
then twist to lock.
4. Insert the waterproof ring into the waterproof jacket.
Rotate the x nut to secure it to the waterproof jacket.
5
2
6
Note: Before inserting the microSD
card, unfasten the two xed screws to
remove the cover.
Mounting Template
1
microSD Card Slot
Insert a microSD card for local storage. Initialize
the SD card via VIGI app before recording videos.
Option 1: Wall/Ceiling Mounting
1. Stick the mounting template to the desired mounting place. Drill
4 screw holes according to the template.
2. Insert the anchors into the holes, use the provided screws to x
the camera’s bracket to the wall or ceiling.
3. Loosen the nut and rotate the camera to the desired position,
then tighten the nut.
Option 2: Pole Mounting
1. Thread each of the two cable ties through the slits on the back
of the camera’s bracket indicated below.
2. Slip the two cable ties through the pole. Tighten them to rmly
attach the pole.
3. Loosen the nut and rotate the camera to the desired position,
then tighten the nut.
8
Long press the button to reset
the camera to factory settings.
Reset microSD
Mounting Template
NutAnchor
Self-tapping Screw
Cable Tie
Mounting Template
Anchor
Nut
Self-tapping Screw
Nut
Φ6 mm Φ3.5 mm
When installing with anchors
Φ = 6 mm (15/64 in).
When installing with screws only
Φ = 3 mm (1/8 in.)
Appropriate drilling size (Φ)
Produktspezifikationen
| Marke: | TP-Link |
| Kategorie: | Sicherheitskamera |
| Modell: | VIGI C340S |
| Eingebautes Mikrofon: | Ja |
| Eingebaute Lautsprecher: | Ja |
| Breite: | 102 mm |
| Tiefe: | 236 mm |
| Produktfarbe: | Weiß |
| Internationale Schutzart (IP-Code): | IP67 |
| Übertragungstechnik: | Kabelgebunden |
| Höhe: | 99 mm |
| Energiequelle: | Gleichstrom |
| Befestigungstyp: | Wand |
| Betriebstemperatur: | -30 - 60 °C |
| Relative Luftfeuchtigkeit in Betrieb: | 0 - 95 % |
| Unterstützte Netzwerkprotokolle: | TCP/IP, UDP, ICMP, HTTP, HTTPS, DHCP, DNS, RTSP, NTP, UPnP UDP, SSL/TLS |
| Anzahl Ethernet-LAN-Anschlüsse (RJ-45): | 1 |
| Typ: | IP-Sicherheitskamera |
| Stromverbrauch (max.): | 10.1 W |
| Gehäusematerial: | Metal, Plastic |
| Temperaturbereich bei Lagerung: | -40 - 60 °C |
| Luftfeuchtigkeit bei Lagerung: | 0 - 95 % |
| Unterstützte Grafik-Auflösungen: | 1280 x 720 (HD 720),1920 x 1080 (HD 1080),2048 x 1280,2304 x 1296,2550 x 1440,2688 x 1520 |
| Rauschverhältnis (SNR): | 52 dB |
| Geräuschunterdrückung: | Ja |
| Größe des Bildsensors: | 1/1.8 " |
| Schwenkbereich: | -90 - 90 ° |
| Neigungswinkelbereich: | -90 - 90 ° |
| Formfaktor: | Box |
| Videokompressionsformate: | H.264, H.264+, H.265, H.265+ |
| Maximale Auflösung: | 2988 x 1520 Pixel |
| IP-Adressen Filter: | Ja |
| Passwortschutz: | Ja |
| Dynamischer Bereich: | 120 dB |
| Brennweitenbereich: | 4 mm |
| Samplerate: | 8 kHz |
| Bis zu 30 Frames pro Sekunde: | 60 fps |
| Megapixel insgesamt: | 4 MP |
| Anzahl der Kameras: | 1 |
| Tag/ Nachtmodus: | Ja |
| Mindestbeleuchtung: | 0.0005 Lux |
| Anzahl der Linsen: | 1 |
| Abstandsfeststellung: | 70 m |
| Sensor-Typ: | CMOS |
| Kamera Verschlusszeit: | 1/10000 s |
| Maximale Blendenzahl: | 1 |
| Geräuschunterdrückungstechnologie: | 3D-Rauschunterdrückung |
| Anzahl der Beleuchtungs-LEDs: | 5 |
| Betrachtungswinkel (horizontal): | 95.2 ° |
| Betrachtungswinkel (vertikal): | 50.6 ° |
| Minimale Blendenzahl: | 1 |
| Feste Brennweite: | 4 mm |
| Betrachtungswinkel des Objektivs, diagonal: | 114.7 ° |
| Bereich der Bitrate: | 64 - 64 Kbit/s |
| Digest-Authentifizierung: | Ja |
| Abstandserkennung: | 14 m |
| Abstandsermittlung: | 7 m |
| Datenschutz: | Ja |
| Abstandsbeobachtung: | 29 m |
| Ethernet/LAN: | Ja |
| Anzahl der Bereiche zur Verdeckung der Privatsphäre: | 4 |
| Unterstützte Positionierung: | Draußen |
Brauchst du Hilfe?
Wenn Sie Hilfe mit TP-Link VIGI C340S benötigen, stellen Sie unten eine Frage und andere Benutzer werden Ihnen antworten
Bedienungsanleitung Sicherheitskamera TP-Link

10 März 2026
1 Februar 2026
26 Januar 2026
24 Januar 2026
23 Januar 2026
23 Januar 2026
22 Januar 2026
22 Januar 2026
21 Januar 2026
21 Januar 2026
Bedienungsanleitung Sicherheitskamera
Neueste Bedienungsanleitung für -Kategorien-
31 März 2026
31 März 2026
31 März 2026
31 März 2026
31 März 2026
29 März 2026
29 März 2026
29 März 2026
29 März 2026
29 März 2026