Tripp Lite PDUH20DV Bedienungsanleitung
Tripp Lite
Nicht kategorisiert
PDUH20DV
Lies die bedienungsanleitung für Tripp Lite PDUH20DV (16 Seiten) kostenlos online; sie gehört zur Kategorie Nicht kategorisiert. Dieses Handbuch wurde von 28 Personen als hilfreich bewertet und erhielt im Schnitt 3.5 Sterne aus 14.5 Bewertungen. Hast du eine Frage zu Tripp Lite PDUH20DV oder möchtest du andere Nutzer dieses Produkts befragen? Stelle eine Frage
Seite 1/16

Owner’s Manual
Rackmount Power Distribution Unit (PDU)
Models: PDUH20DV & PDUH20HVL6
Important Safety Instructions 2
Features 2-3
Installation 3-4
Warranty & Warranty Registration 5
Español 6
Français 11
1111 W. 35th Street, Chicago, IL 60609 USA • www.tripplite.com/support
Copyright © 2014 Tripp Lite. All rights reserved.
14-02-329-933047.indb 1 4/23/2014 3:39:23 PM

2
Important Safety Instructions
SAVE THESE INSTRUCTIONS
This manual contains instructions and warnings that should be followed during the
installation, operation, and storage of this product. Failure to heed these instructions and
warnings may affect the product warranty.
• ThePDUprovidesconvenientmultipleoutlets,butitDOESNOTprovidesurgeorline
noise protection for connected equipment.
• ThePDUisdesignedforindooruseonlyinacontrolledenvironmentawayfromexcess
moisture,temperatureextremes,conductivecontaminants,dustordirectsunlight.
• DonotconnectthePDUtoanungroundedoutletortoextensioncordsoradaptersthat
eliminate the connection to ground.
• ThepowerrequirementforeachpieceofequipmentconnectedtothePDUmustnot
exceedtheindividualoutlet’sloadrating.
• ThetotalpowerrequirementforequipmentconnectedtothePDUmustnotexceedthe
maximumloadratingforthePDU.
• DonotdrillintoorattempttoopenanypartofthePDUhousing.Therearenouser-
serviceable parts inside.
• DonotattempttomodifythePDU,includingtheinputplugsandpowercables.
• DonotattempttousethePDUifanypartofitbecomesdamaged.
• DonotattempttomountthePDUtoaninsecureorunstablesurface.
• Neverattempttoinstallelectricalequipmentduringathunderstorm.
• Useofthisequipmentinlifesupportapplicationswherefailureofthisequipment
canreasonablybeexpectedtocausethefailureofthelifesupportequipmentorto
signicantlyaffectitssafetyoreffectivenessisnotrecommended.Donotusethis
equipmentinthepresenceofaammableanestheticmixturewithair,oxygenornitrous
oxide.
Features
IEC-320-C19 Outlets:Acceptdirectplug-inofIEC-320-C20
input cords.
IEC-320-C13 Outlets: Acceptdirectplug-inofIEC-320-C14
input cords.
IEC-320-C20 Inlet (PDUH20DV Only):Acceptsdirectplug-in
ofanIEC-320-C19cordsetoradapter.
14-02-329-933047.indb 2 4/23/2014 3:39:24 PM

3
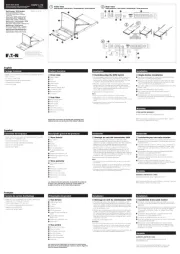
1-3
1-2
1-1
A
B
C
C
A
A
B
B
Installation
Step 1: Determine Installation
Conguration:ThePDUsupportsfour
primaryinstallationcongurations:1U
Rack,0URack,WallandUnder-Counter.
Choose a configuration and follow the
installation instructions in the appropriate
sectionofStep 1 beforeproceedingtoStep
2.
Note: Regardless of installation configuration, the user
must determine the fitness of hardware and procedures
before mounting. The PDU and included hardware are
designed for common rack and rack enclosure types
and may not be appropriate for all applications. Exact
mounting configurations may vary.
Step 1-1: 1U Rack Installation: Attach
thePDUtotherackbyinsertingfour
user-suppliedscrews AthroughthePDU
mounting brackets B and into the mounting
holes of the rack rail as shown.
Step 1-2: 0U Rack Installation:
Part 1: Remove the screws C attaching
themountingbracketstothePDU,change
the orientation of the brackets as shown
andreattachthebrackets.Useonlythe
screws supplied by the manufacturer or
theirexactequivalent(#6-32,1/4”at
head). Part 2:AttachthePDUverticallyby
insertingtwoormoreuser-suppliedscrews
AthroughthePDUmountingbrackets B
and into mounting points in the rack or rack
enclosure.
Step 1-3: Wall Installation: After
repeatingPart1above,attachthePDUtoa
stable mounting surface by inserting two or
moreuser-suppliedscrews A through the
PDUmountingbrackets B and into secure
mounting points on the mounting surface.
Features (continued)
NEMA L6-20P Adapter (PDUH20DV Only): Connects to a
NEMAL6-20Routlet.
14-02-329-933047.indb 3 4/23/2014 3:39:25 PM
Produktspezifikationen
| Marke: | Tripp Lite |
| Kategorie: | Nicht kategorisiert |
| Modell: | PDUH20DV |
| Breite: | 438.2 mm |
| Tiefe: | 95.2 mm |
| Gewicht: | 1410 g |
| Produktfarbe: | Schwarz |
| Höhe: | 44.4 mm |
| AC Eingangsfrequenz: | 50 - 60 Hz |
| Verpackungsbreite: | 276.9 mm |
| Verpackungstiefe: | 510.5 mm |
| Verpackungshöhe: | 57.2 mm |
| Paketgewicht: | 2490 g |
| Montage: | Horizontal |
| Zertifizierung: | UL 60950 (USA), CSA (Canada), CE (EU) |
| Ursprungsland: | China |
| Kabellänge: | 3.7 m |
| Gehäusematerial: | Metall |
| LED-Anzeigen: | Ja |
| Temperaturbereich bei Lagerung: | -15 - 50 °C |
| Anzahl Produkte pro Versandkarton: | 6 Stück(e) |
| Gewicht Versandkarton: | 14880 g |
| Länge des Versandkartons: | 528.3 mm |
| Breite des Versandkartons: | 365.8 mm |
| Höhe des Versandkartons: | 304.8 mm |
| Abmessungen (BxTxH): | 438 x 95 x 44.5 mm |
| Nachhaltigkeitszertifikate: | RoHS |
| Höhe bei Betrieb: | 0 - 3000 m |
| Hauptkarton GTIN (EAN/UPC): | 10037332158960 |
| Anzahl der AC-Ausgänge: | 14 AC-Ausgänge |
| AC-Steckertypen: | C13 coupler, C19 coupler |
| Stromstärke (maximal): | 20 A |
| Nominale Eingang Spannung: | 100-240 V |
| Nominale Ausgang Spannung: | 100-240 V |
| Rack-Kapazität: | 1U |
| PDU-Typen: | Standard |
| Eingang Verbindungstyp: | NEMA L6-20P, IEC-320 C20 |
Brauchst du Hilfe?
Wenn Sie Hilfe mit Tripp Lite PDUH20DV benötigen, stellen Sie unten eine Frage und andere Benutzer werden Ihnen antworten
Bedienungsanleitung Nicht kategorisiert Tripp Lite
13 August 2025

13 August 2025
12 August 2025
11 August 2025
11 August 2025
17 Juli 2025
17 Juli 2025

17 Juli 2025
17 Juli 2025
Bedienungsanleitung Nicht kategorisiert
- Analog Way
- Cosori
- Gridbyt
- Eico
- Vendomnia
- Inspire
- Gira
- Ergotec
- Mulex
- Equip
- Brother
- SureFlap
- Middle Atlantic
- Hive
- EZ Goal
Neueste Bedienungsanleitung für -Kategorien-

16 August 2025

16 August 2025
16 August 2025
16 August 2025

16 August 2025
16 August 2025

16 August 2025
16 August 2025
16 August 2025
16 August 2025