Tripp Lite PDUNV Bedienungsanleitung
Lies die bedienungsanleitung für Tripp Lite PDUNV (16 Seiten) kostenlos online; sie gehört zur Kategorie Nicht kategorisiert. Dieses Handbuch wurde von 14 Personen als hilfreich bewertet und erhielt im Schnitt 4.2 Sterne aus 7.5 Bewertungen. Hast du eine Frage zu Tripp Lite PDUNV oder möchtest du andere Nutzer dieses Produkts befragen? Stelle eine Frage
Seite 1/16

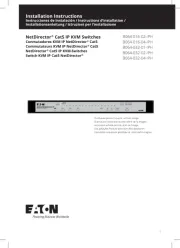
PDUNV
Universal Rackmount
Power Distribution Unit (PDU)
Important Safety Instructions 2
Important Warnings 2
Installation 3
Features 4
Warranty & Warranty Registration 5
Español 6
Français 11
Owner’s Manual
1111 W. 35th Street, Chicago, IL 60609 USA • www.tripplite.com/support
Copyright © 2014 Tripp Lite. All rights reserved.
14-02-336-932537.indb 1 4/24/2014 12:22:40 PM

2
Important Safety Instructions
SAVE THESE INSTRUCTIONS
This manual contains instructions and warnings that should be
followed during the installation, operation, and storage of this
product. Failure to heed these instructions and warnings will void the
product warranty.
Important Warnings
• ThePDUprovidesconvenientmultipleoutlets,butitDOESNOTprovidesurgeorlinenoise
protectionforconnectedequipment.
• ThePDUisdesignedforindooruseonlyinacontrolledenvironmentawayfromexcessmoisture,
temperatureextremes,conductivecontaminants,dustordirectsunlight.
• DonotconnectthePDUtoanungroundedoutletortoextensioncordsoradaptersthat
eliminatetheconnectiontoground.
• ThepowerrequirementforeachpieceofequipmentconnectedtothePDUmustnotexceedthe
individualoutlet’sloadrating.
• ThetotalpowerrequirementforequipmentconnectedtothePDUmustnotexceedthe
maximumloadratingforthePDU.
• DonotdrillintoorattempttoopenanypartofthePDUhousing.Therearenouser-serviceable
partsinside.
• DonotattempttomodifythePDU,includingtheinputplugsandpowercables.
• DonotattempttousethePDUifanypartofitbecomesdamaged.
• DonotattempttomountthePDUtoaninsecureorunstablesurface.
• Neverattempttoinstallelectricalequipmentduringathunderstorm.
14-02-336-932537.indb 2 4/24/2014 12:22:41 PM

3
Installation
Step 1: Determine Installation
Configuration.ThePDUsupportsfourprimary
installationconfigurations:1URack,0URack,
WallandUnder-Counter.Choosea
configurationandfollowtheinstallation
instructionsintheappropriatesectionofStep
1beforeproceedingtoStep2.
Note: Regardless of installation configuration,
the user must determine the fitness of
hardware and procedures before mounting. The
PDU and included hardware are designed for
common rack and rack enclosure types and
may not be appropriate for all applications.
Exact mounting configurations may vary.
Step 1-1: 1U Rack Installation.Attachthe
PDUtotherackbyinsertingfouruser-supplied
screws( )throughthePDUmountingbracketsA
( )andintothemountingholesoftherackrailB
asshown.
Step 1-2: 0U Rack Installation. Part 1:
Removethescrews( )attachingthemountingC
bracketstothePDU,changetheorientationof
thebracketsasshownandreattachthe
brackets.Useonlythescrewssuppliedbythe
manufacturerortheirexactequivalent(#6-32,
1/4”flathead). AttachthePDUPart 2:
verticallybyinsertingtwoormoreuser-supplied
screws( )throughthePDUmountingbracketsA
( )andintomountingpointsintherackorB
rackenclosure.
Step 1-3: Wall Installation. Afterrepeating
Part1above,attachthePDUtoastable
mountingsurfacebyinsertingtwoormore
user-suppliedscrews( )throughthePDUA
mountingbrackets( )andintosecureB
mountingpointsonthemountingsurface.
1-1
1-2
1-3
1-4
A
B
B A
C
A
BC
B
C
A
C
D
2E
F
Step 1-4: Under-Counter Installation. AfterrepeatingPart1above,attachthePDUtoastable
mountingsurfacebyinsertingfouruser-suppliedscrews( )throughthePDUmountingbrackets(A B)
andintosecuremountingpointsonthemountingsurface.
Step 2: Connect PDU to Grounded Outlet.ThePDUincludes
severalplugadapterswhichallowthePDUtoconnecttovarious
outlettypes.Afterchoosingtheappropriateplugadapterforthe
requiredapplication,inserttheIEC-320-C19connector( )oftheD
adapterintotheIEC-320-C20connector( )oftheinputcable.E
SecuretheconnectionwiththeCordRetentionBracket( )byusingF
theincludedboltstofastenthetwohalvesofthebracketaroundthe
connectionasshown.Inserttheplugdirectlyintoaproperlygrounded
ACoutletthatdoesnotshareacircuitwithaheavyelectricalload
(suchasanairconditionerorrefrigerator).Caution: The Line (L1)
conductor includes an over-current protective device for safety. To
avoid the risk of electric shock, ensure that the Neutral (L2)
conductor has been identified before connecting the PDU.
14-02-336-932537.indb 3 4/24/2014 12:22:42 PM
Produktspezifikationen
| Marke: | Tripp Lite |
| Kategorie: | Nicht kategorisiert |
| Modell: | PDUNV |
Brauchst du Hilfe?
Wenn Sie Hilfe mit Tripp Lite PDUNV benötigen, stellen Sie unten eine Frage und andere Benutzer werden Ihnen antworten
Bedienungsanleitung Nicht kategorisiert Tripp Lite
13 August 2025

13 August 2025
12 August 2025
11 August 2025
11 August 2025
17 Juli 2025
17 Juli 2025

17 Juli 2025
17 Juli 2025
Bedienungsanleitung Nicht kategorisiert
- Special-T
- Zweibrüder
- Navionics
- Reflexion
- Orima
- Cello
- Feelworld
- Helix
- Koss
- NewStar
- Vent-A-Hood
- LG
- Canyon
- Doro
- Laplink
Neueste Bedienungsanleitung für -Kategorien-

16 August 2025

16 August 2025
16 August 2025
16 August 2025

16 August 2025
16 August 2025

16 August 2025
16 August 2025
16 August 2025
16 August 2025