Tripp Lite SREXTENDER Bedienungsanleitung
Tripp Lite
Nicht kategorisiert
SREXTENDER
Lies die bedienungsanleitung für Tripp Lite SREXTENDER (20 Seiten) kostenlos online; sie gehört zur Kategorie Nicht kategorisiert. Dieses Handbuch wurde von 28 Personen als hilfreich bewertet und erhielt im Schnitt 4.9 Sterne aus 14.5 Bewertungen. Hast du eine Frage zu Tripp Lite SREXTENDER oder möchtest du andere Nutzer dieses Produkts befragen? Stelle eine Frage
Seite 1/20

1
Owner’s Manual
SREXTENDER
Rack Enclosure Extension Frame
Important Safety Instructions
SAVE THESE INSTRUCTIONS
This manual contains instructions and warnings that must be followed during the installation and operation of the product described in this
manual. Failure to comply may invalidate the warranty.
• Theinstructionsinthismanualareforcommonrackenclosuretypesandmaynotbeappropriateforallmountingapplications.Youmust
determine the fitness of hardware and procedures before mounting. If hardware or procedures are not suitable for your application, contact the
manufacturer of your equipment for a solution.
• Rackmountequipmentmaybeextremelyheavy—becarefulwhenmovingorliftingequipment.Useoneormoreassistantsifnecessary.
Preparation
Note: Tripp Lite recommends using an assistant during installation. Descriptions of left and right are relative to the rear of your rack
enclosure. Illustrations may differ slightly from your enclosure, but procedures are similar for 48U, 42U and 25U enclosures unless
otherwise noted.
• Phillips-headScrewdriver(user-supplied;cordlessscrewdriverrecommended)
Tools Required
1111W.35thStreet,Chicago,IL60609USA
(773)869-1234•www.tripplite.com
Copyright©2008TrippLite.Alltrademarksarethesolepropertyoftheirrespectiveowners.
Warranty
Registration:
register online today for a
chance to win a FREE Tripp Lite
product—www.tripplite.com/warranty
Español 8
Français 15

2
F
G
A B C D E H N
O
P
K
L
M
I
J
A
B
C
D
48/42U
1-1
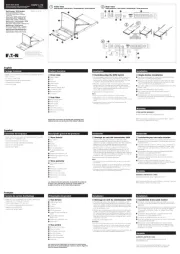
Preparation (continued)
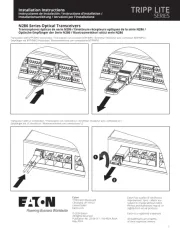
Note: The hinge swivels H and 12 hinge swivel screws L are pre-installed in the vertical sections A through D.
Parts List (If any parts are missing, contact Tripp Lite.)
ALowerLeftVerticalSection(1)
BLowerRightVerticalSection(1)
CUpperLeftVerticalSection(1)
DUpperRightVerticalSection(1)
ETopSection(1)
FBottomSection(1)
G1UBlankingPanels(3)
HHingeSwivels(6-allpre-installed)
IHinges(4)
JCableManagerBrackets(2)
KM6x12mmFlat-HeadScrews(8)
LM6x12mmPan-HeadScrews
andWashers(14total-12pre-installed)
MM5x10mmPan-HeadScrews
andWashers(40)
NGroundingCable(1)
OM5x20mmPan-HeadScrewsand
Washers(4)
PM4x8mmPan-HeadScrews
andWashers(8)
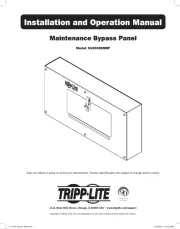
1 – Frame Assembly
Note: For 25U enclosures, you will use only the lower vertical sections A and B. You will not use the upper vertical sections C and D.
For 48U and 42U enclosures, you will use all four vertical sections.
(For25Uenclosures,skipthisstep.)Slidethelowerleftvertical
section A inside the upper left vertical section C as shown.
Repeatforthelowerrightverticalsection B and the upper right
vertical section D. The vertical sections are not interchangeable,
so refer to the diagram to confirm that you’re assembling the
correct sections.
1-1

3
48U
42U
A AB B
C CD D
M
F
M
M
E
M
M
EG
1-2
1-3
1-4
1-5
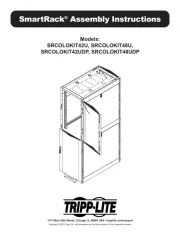
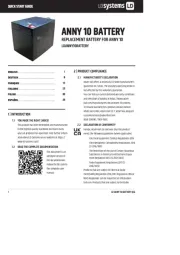
1 – Frame Assembly (continued)
(For25Uenclosures,skipthisstep.)Alignthesetoffourscrew
holes in the lower left vertical section A and the upper left
vertical section C.Usethelowersetofscrewholesfor48U
enclosures(thiswillmaketheverticalsectionlonger).Usethe
uppersetofscrewholesfor42Uenclosures(thiswillmakethe
verticalsectionshorter).InsertfourM5x10mmscrewsand
washers Mandtightensecurely.(Startallthescrewsbefore
tightening.)Repeatforthelowerrightverticalsection B and the
upper right vertical section D.
Insert the lower end of the left vertical section into the
bottom section Fasshown.Alignthescrewholes,insertfour
M5x10mmscrewsandwashers Mandtightensecurely.(Start
allthescrewsbeforetightening.)Repeatthisstepfortheright
vertical section.
Insert the upper end of the left and right vertical sections into the
top section E.Alignthescrewholes,inserteightM5x10mm
screws and washers Mandtightensecurely.(Startallthescrews
beforetightening.)
Insertthe1Ublankingpanels G into the top section E.
EachblankingpanelwillsnapintoplacewiththeTrippLitelogo
facingoutward.Theblankingpanelsmayberemovedtoinstall
standard19-inchrackaccessoriesupto3U–contactTrippLite
for more information.
1-2
1-3
1-4
1-5
Produktspezifikationen
| Marke: | Tripp Lite |
| Kategorie: | Nicht kategorisiert |
| Modell: | SREXTENDER |
Brauchst du Hilfe?
Wenn Sie Hilfe mit Tripp Lite SREXTENDER benötigen, stellen Sie unten eine Frage und andere Benutzer werden Ihnen antworten
Bedienungsanleitung Nicht kategorisiert Tripp Lite
13 August 2025

13 August 2025

12 August 2025
11 August 2025
11 August 2025

17 Juli 2025
17 Juli 2025

17 Juli 2025

17 Juli 2025
Bedienungsanleitung Nicht kategorisiert
- Envitec
- Sunstech
- SWIT
- Sandia Aerospace
- Kitchenware
- KiddyGuard
- Vantage Point
- Blind Spot
- Scotsman
- ASM
- Peterson
- Trisa
- MoFi
- Grand Effects
- Lindell Audio
Neueste Bedienungsanleitung für -Kategorien-

16 August 2025

16 August 2025

16 August 2025

16 August 2025

16 August 2025

16 August 2025

16 August 2025

16 August 2025
16 August 2025

16 August 2025