Tripp Lite U444-06N-MDP8W Bedienungsanleitung
Tripp Lite
Nicht kategorisiert
U444-06N-MDP8W
Lies die bedienungsanleitung für Tripp Lite U444-06N-MDP8W (8 Seiten) kostenlos online; sie gehört zur Kategorie Nicht kategorisiert. Dieses Handbuch wurde von 20 Personen als hilfreich bewertet und erhielt im Schnitt 3.5 Sterne aus 10.5 Bewertungen. Hast du eine Frage zu Tripp Lite U444-06N-MDP8W oder möchtest du andere Nutzer dieses Produkts befragen? Stelle eine Frage
Seite 1/8
1
Quick Start Guide
Guía de Inicio Rápido / Guide de démarrage rapide /
Schnellstartanleitung / Guida d’avvio rapido
Purchased product may differ from image.
El producto comprado puede diferir de la imagen.
Le produit acheté peut différer de l’image.
Das gekaufte Produkt kann vom Bild abweichen.
Il prodotto acquistato potrebbe differire dall’immagine.
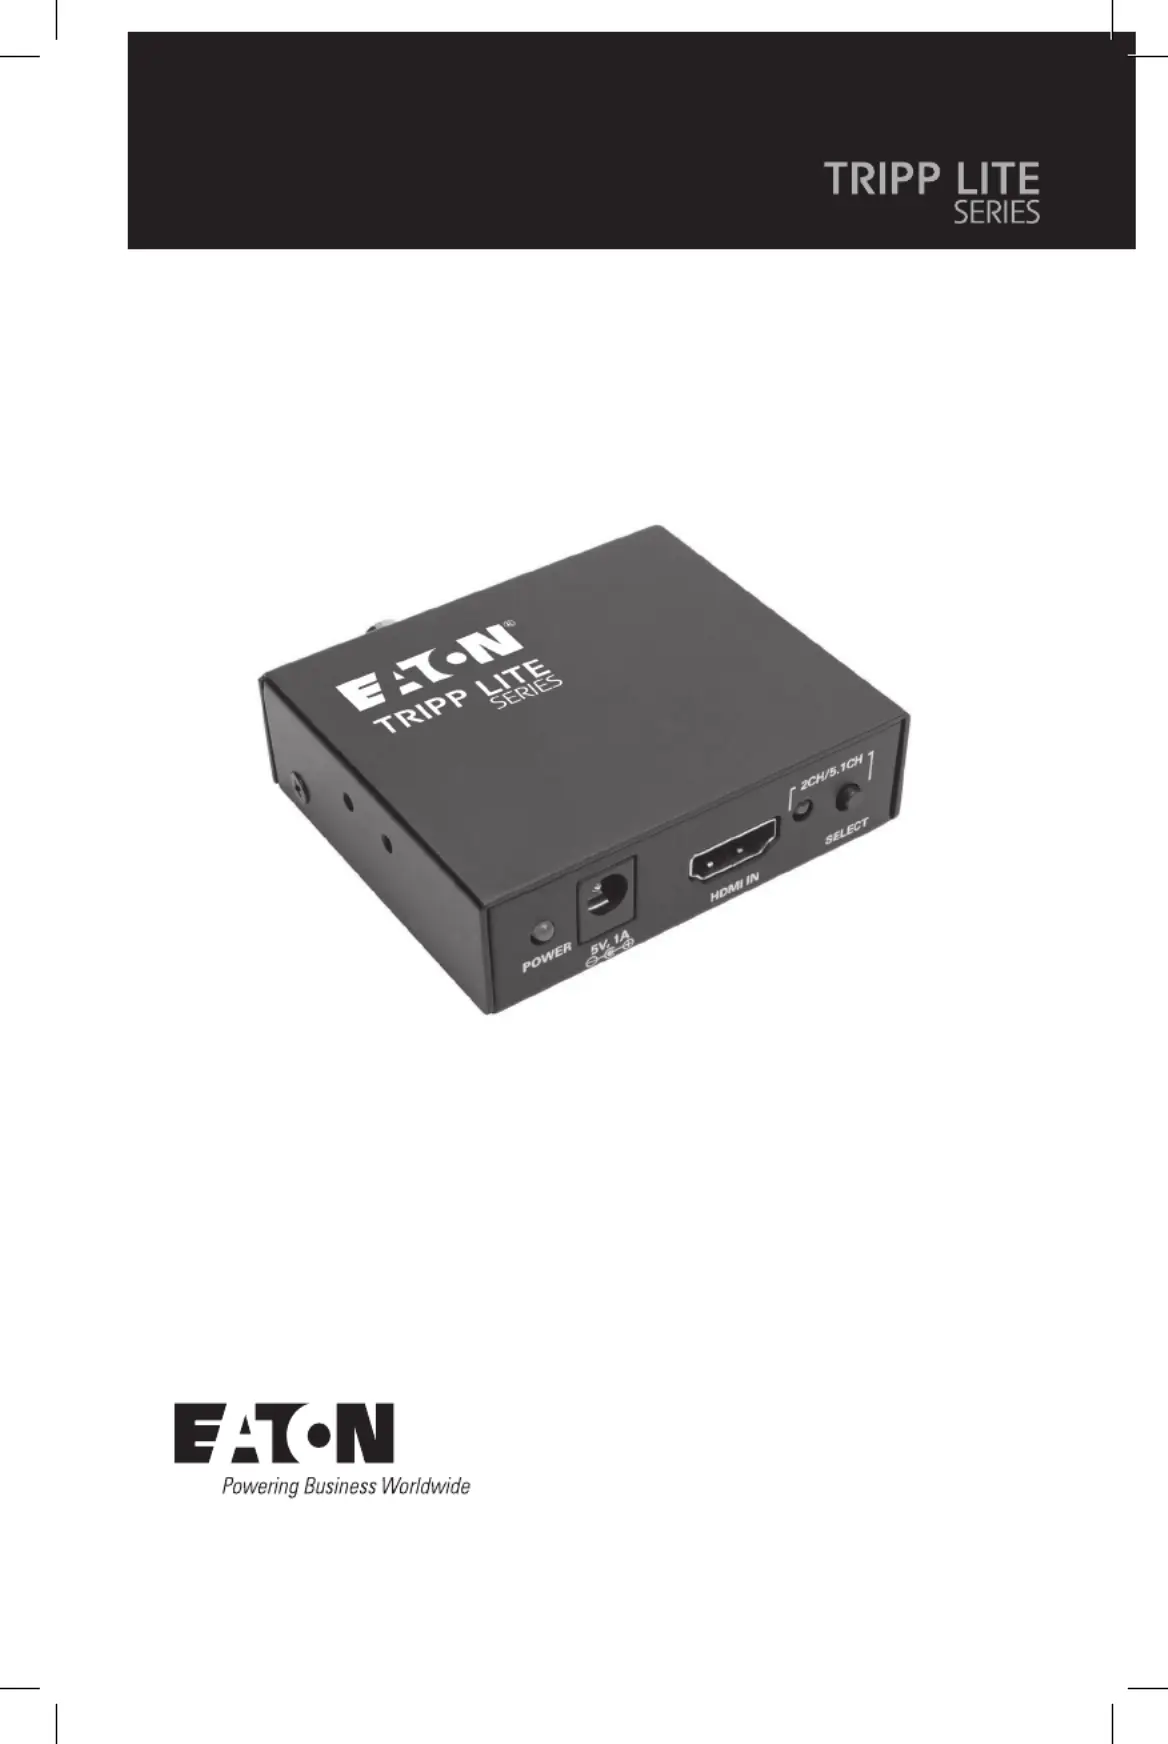
P130-000-AUDIO4K HDMI Audio De-Embedder/Extractor
Desincrustador/Extractor de Audio HDMI 4K
Désintégrateur/extracteur audio HDMI 4 K
4K HDMI Audio De-Embedder/Extractor
De-embedder/estrattore audio 4K HDMI

2
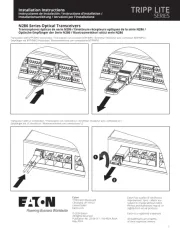
Installation
Instalación / Installation /
Installation / Installazione
Note: Make sure all devices you are connecting are powered off prior to installation.
1
(Optional) Mount the unit to a wall or other surface using the included mounting
hardware.
2
Using an HDMI cable, connect the HDMI source to the HDMI input port on the unit.
3
Using a second HDMI cable, connect an HDMI monitor to the HDMI output port on the
unit.
4
Connect the unit to a set of speakers, an audio receiver or other audio system using the
3.5 mm stereo, TOSLINK or RCA digital outputs.
5
Connect the included external power supply to the unit and plug it into a surge protector,
power distribution unit (PDU) or uninterruptible power supply (UPS). The unit’s red Power
LED will illuminate to indicate it is receiving power.
6
Turn on the power to the connected devices. The red Power LED will change to blue to
indicate the unit is transmitting video and audio from the source to the display and sound
system.
7
To switch between 2-channel stereo and 5.1-channel surround sound, press the button
next to the HDMI input port. When 2-channel stereo audio is selected, the LED next to the
button will not illuminate. When 5.1-channel surround sound is selected, the LED will
illuminate red.
Español
Nota: Asegúrese de que todos los dispositivos que esté conectando estén apagados antes de la instalación.
1
(Opcional) Fije la unidad a una pared u otra superficie con los accesorios de instalación
incluidos.
2
Usando un cable HDMI, conecte la fuente de HDMI al puerto de entrada HDMI de la
unidad.
3
Usando un segundo cable HDMI, conecte el monitor HDMI al puerto de salida HDMI de la
unidad.
4
Conecte la unidad a unas bocinas, un receptor de audio u otro sistema de audio utilizando
las salidas estéreo de 3.5 mm, digitales TOSLINK o RCA.
5
Conecte la fuente de alimentación externa incluida a la unidad y enchúfela en un supresor
de sobretensiones, unidad de distribución de energía o sistema de respaldo
ininterrumpible. El LED rojo de Encendido se iluminará para indicar que está recibiendo
energía.
6
Encienda los dispositivos conectados. El LED rojo de Encendido cambiará a azul para
indicar que la unidad está transmitiendo video y audio de la fuente a la pantalla y sistema
de sonido.
2
2
2
22
5
5
5
55
6
6
6
66
7
7
7
77
3
3
3
33
4
4
4
44

3
Installation
Instalación / Installation /
Installation / Installazione
7
Para cambiar entre 2 canales estéreo y sonido envolvente de 5.1 canales, presione el
botón al lado del puerto de entrada HDMI. Cuando esté seleccionado audio estéreo de 2
canales, no se iluminará el LED junto al botón. Cuando se seleccione sonido envolvente de
5.1 canales, el LED iluminará de rojo.
Français
Remarque : assurez-vous que tous les appareils que vous connectez sont hors tension avant de procéder à
l'installation.
1
(Facultatif) Montez l'appareil sur un mur ou une autre surface à l'aide du matériel de
montage inclus.
2
A l'aide d'un câble HDMI, connectez la source HDMI au port d'entrée HDMI de l'appareil.
3
À l'aide d'un second câble HDMI, connectez un moniteur HDMI au port de sortie HDMI de
l'appareil.
4
Connectez l'appareil à un ensemble de haut-parleurs, un récepteur audio ou un autre
système audio à l'aide des sorties numériques 3,5 mm stéréo, TOSLINK ou RCA.
5
Connectez l'alimentation externe fournie à l'unité et branchez-la dans un parasurtenseur,
une unité de distribution d'énergie ou une alimentation sans interruption. Le voyant rouge
d'alimentation de l'appareil s'allume pour indiquer qu'il est alimenté.
6
Mettez les appareils connectés sous tension. Le voyant rouge d'alimentation passe au bleu
pour indiquer que l'appareil transmet la vidéo et l'audio de la source à l'écran et au
système audio.
7
Pour commuter entre le son stéréo à 2 canaux et le son surround à 5.1 canaux, appuyez
sur le bouton situé à côté du port d'entrée HDMI. Lorsque l'audio stéréo à 2 canaux est
sélectionné, le voyant situé à côté de la touche ne s'allume pas. Lorsque le son surround
5.1 est sélectionné, le voyant s'allume en rouge.
Deutsch
Hinweis: Stellen Sie sicher, dass alle Geräte, die Sie anschließen, vor der Installation ausgeschaltet sind.
1
(Optional) Montieren Sie das Gerät mit Hilfe der mitgelieferten Montageteile an einer
Wand oder einer anderen Oberfläche.
2
Schließen Sie die HDMI-Quelle mit einem HDMI-Kabel an den HDMI-Eingang des Geräts an.
3
Schließen Sie mit einem zweiten HDMI-Kabel einen HDMI-Monitor an den HDMI-Ausgang
des Geräts an.
4
Schließen Sie das Gerät über die digitalen 3,5 mm Stereo-, TOSLINK- oder RCA-Ausgänge
an Lautsprecher, einen Audio-Receiver oder ein anderes Audiosystem an.
5
Verbinden Sie das mitgelieferte externe Netzteil mit dem Gerät und stecken Sie es an
einen Surge-Protector, eine Stromverteilungseinheit oder eine unterbrechungsfreie
Stromversorgung an. Die rote Power-LED des Geräts leuchtet auf, um anzuzeigen, dass es
mit Strom versorgt wird.
6
Schalten Sie die Stromversorgung der angeschlossenen Geräte ein. Die rote Power-LED
wechselt zu blau und zeigt damit an, dass das Gerät Video- und Audiosignale von der
Quelle an das Display und das Soundsystem überträgt.
7
Um zwischen 2-Kanal-Stereo und 5.1-Kanal-Surround-Sound umzuschalten, drücken Sie
die Taste neben dem HDMI-Eingang. Wenn die 2-Kanal-Stereo-Audioausgabe ausgewählt
ist, leuchtet die LED neben der Taste nicht. Wenn die 5.1-Kanal-Surround-Sound-
Audioausgabe ausgewählt ist, leuchtet die LED rot.
Produktspezifikationen
| Marke: | Tripp Lite |
| Kategorie: | Nicht kategorisiert |
| Modell: | U444-06N-MDP8W |
| Gewicht: | 30 g |
| Produktfarbe: | Weiß |
| Betriebstemperatur: | 0 - 45 °C |
| Relative Luftfeuchtigkeit in Betrieb: | 10 - 85 % |
| Verpackungsbreite: | 119.9 mm |
| Verpackungstiefe: | 99.8 mm |
| Verpackungshöhe: | 20 mm |
| Paketgewicht: | 40 g |
| Zertifizierung: | REACH, CE, FCC, WEEE, ISO9001 |
| Warentarifnummer (HS): | 84733080 |
| Ursprungsland: | Vietnam |
| Menge pro Packung: | 1 Stück(e) |
| Kabellänge: | 0.152 m |
| Betriebsanleitung: | Ja |
| Verpackungsart: | Box |
| Plug & Play: | Ja |
| Temperaturbereich bei Lagerung: | -10 - 70 °C |
| Luftfeuchtigkeit bei Lagerung: | 5 - 90 % |
| HDCP: | Ja |
| Unterstützte Video-Modi: | 4320p |
| Anzahl Produkte pro Versandkarton: | 10 Stück(e) |
| Gewicht Versandkarton: | 660 g |
| Länge des Versandkartons: | 120 mm |
| Breite des Versandkartons: | 255 mm |
| Höhe des Versandkartons: | 115 mm |
| Maximale Auflösung: | 7860 x 4320 Pixel |
| Nachhaltigkeitszertifikate: | RoHS |
| DisplayPorts-Version: | 1.4 |
| Datenübertragungsrate: | 5 Gbit/s |
| Hauptkarton GTIN (EAN/UPC): | 10037332255584 |
| Farbtiefe: | 48 Bit |
| HDCP-Version: | 1.4/2.2 |
| Anschluss 1: | USB Typ-C |
| Anschluss 2: | Mini DisplayPort |
| Beschichtung Steckerkontakte: | Nickel/Gold |
| Anschluss1 Formfaktor: | Gerade |
| Steckverbinder 1 Geschlecht: | Männlich |
| Anschluss2 Formfaktor: | Gerade |
| Steckverbinder 2 Geschlecht: | Weiblich |
| AWG Kabelgröße: | 34/28 |
| Kabeldurchmesser: | 3.9 mm |
| Dämpfung (max.): | REACH, CE, FCC, WEEE, ISO9001 |
| Steckermaterial: | Polyvinyl chloride (PVC) + Acrylonitrile butadiene styrene (ABS) |
Brauchst du Hilfe?
Wenn Sie Hilfe mit Tripp Lite U444-06N-MDP8W benötigen, stellen Sie unten eine Frage und andere Benutzer werden Ihnen antworten
Bedienungsanleitung Nicht kategorisiert Tripp Lite
13 August 2025

13 August 2025
12 August 2025
11 August 2025
11 August 2025
17 Juli 2025
17 Juli 2025

17 Juli 2025
17 Juli 2025
Bedienungsanleitung Nicht kategorisiert
- Nobo
- NTi Audio
- Metalux
- Swissvoice
- Apogee
- Match
- Snoes
- Nimbus
- Mytee
- Fresca
- American BioTech Supply
- Trebs
- Cubot
- Gtech
- Sonel
Neueste Bedienungsanleitung für -Kategorien-

16 August 2025

16 August 2025
16 August 2025
16 August 2025

16 August 2025
16 August 2025

16 August 2025

16 August 2025
16 August 2025
16 August 2025