Whirlpool OMR58CU1B Bedienungsanleitung
Lies die bedienungsanleitung für Whirlpool OMR58CU1B (40 Seiten) kostenlos online; sie gehört zur Kategorie Herd. Dieses Handbuch wurde von 6 Personen als hilfreich bewertet und erhielt im Schnitt 4.7 Sterne aus 3.5 Bewertungen. Hast du eine Frage zu Whirlpool OMR58CU1B oder möchtest du andere Nutzer dieses Produkts befragen? Stelle eine Frage
Seite 1/40
1
EN
Owner’s Manual
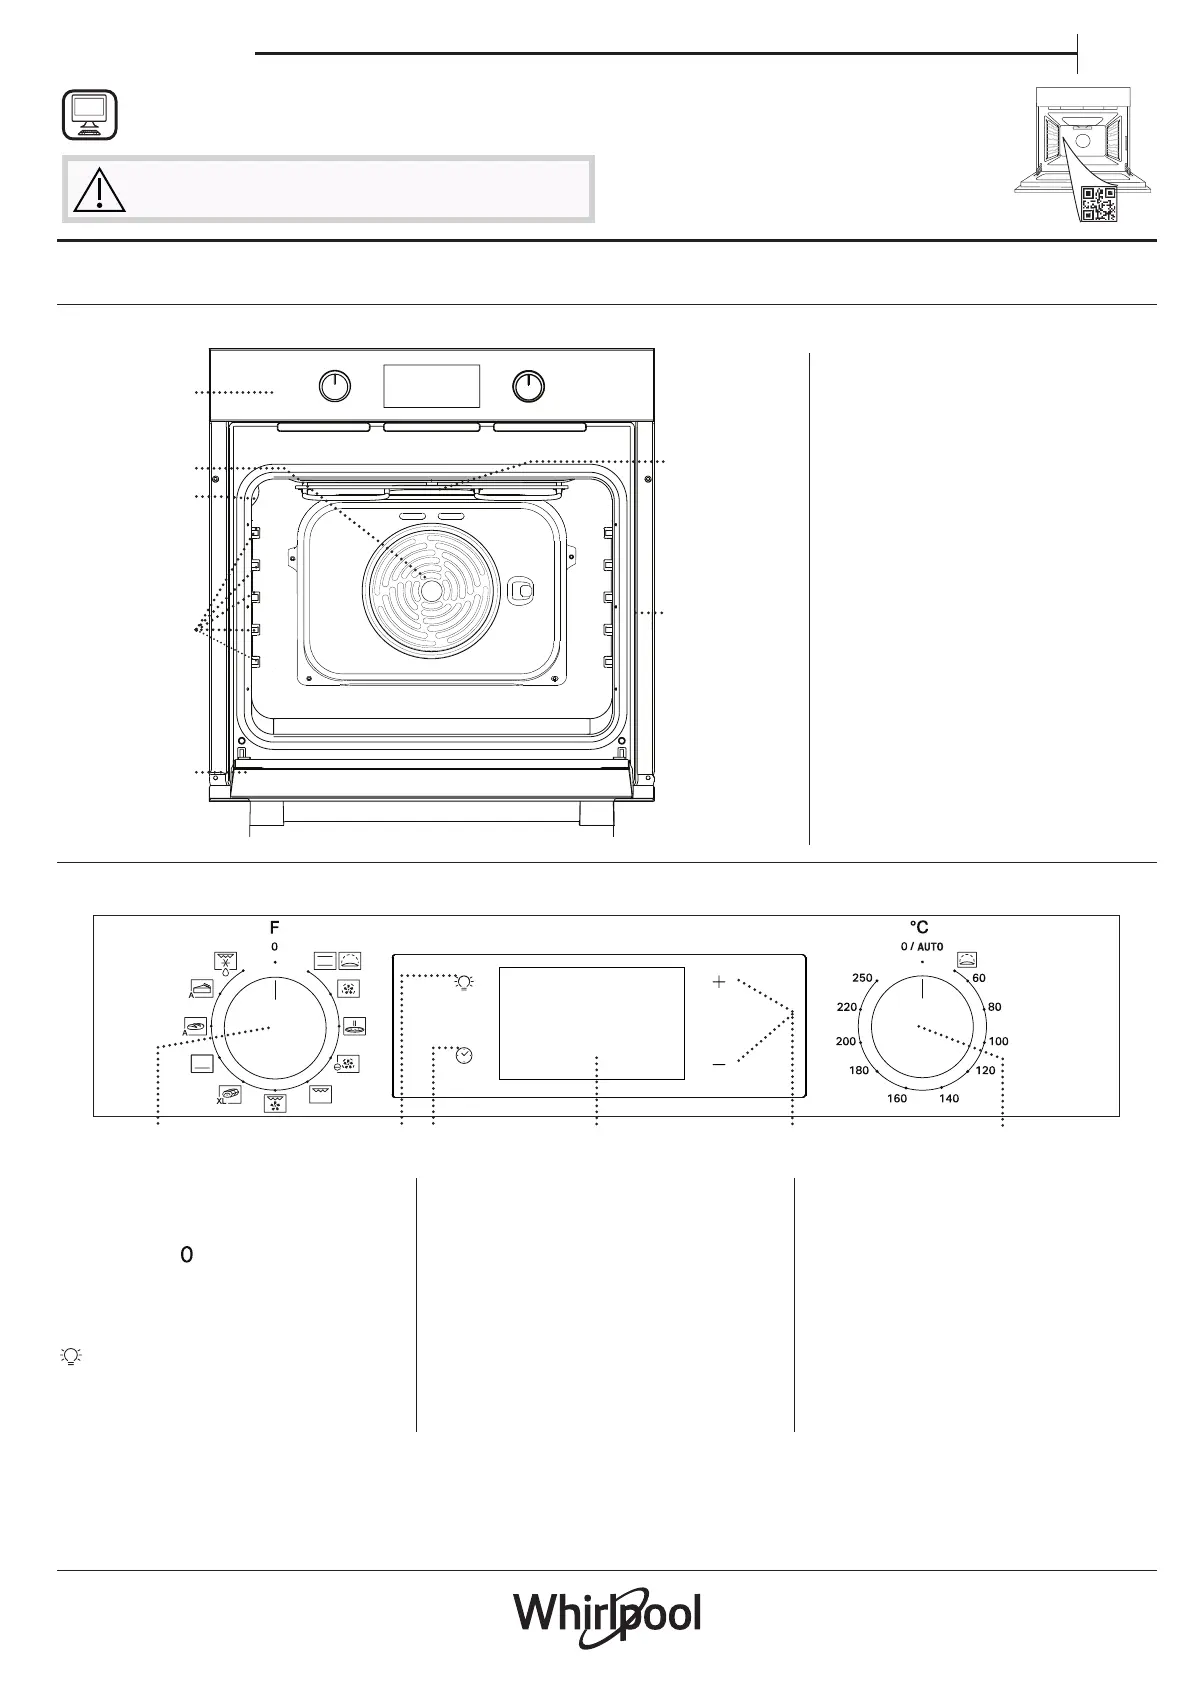
1. SELECTION KNOB
For switching the oven on by
selecting a function.
Turn to the position to switch
the oven off.
2. LIGHT
With the oven switched on, press
to turn the oven compartment
lamp on or off.
3. SETTING THE TIME
For accessing the cooking time
settings, delayed start and timer.
For displaying the time when the
oven is off.
4. DISPLAY
5. ADJUSTMENT BUTTONS
For changing the cooking time
settings.
6. THERMOSTAT KNOB
Turn to select the temperature you
require when activating manual
functions.
1 3
2
4 5
6
1. Control panel
2. Fan and circular heating
element (not visible)
3. Lamp
4. Shelf guides
(the level is indicated on the wall
of the cooking compartment)
5. Door
6. Top heating element/grill
7. Identification plate
(do not remove)
1
2
3
4
5
7
6
THANK YOU FOR BUYING A WHIRLPOOL PRODUCT
In order to receive a more complete assistance, please
register your product on www . whirlpool . eu/ register
PLEASE SCAN THE QR CODE ON
YOUR APPLIANCE IN ORDER TO
REACH MORE INFORMATION
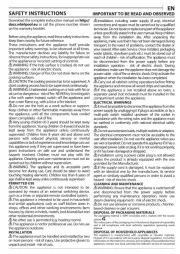
Before using the appliance carefully read the Safety
Instruction.
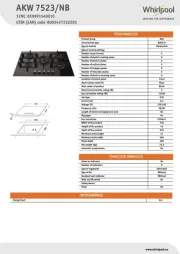
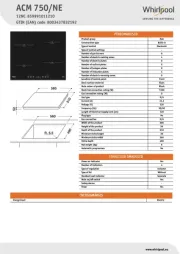
PRODUCT DESCRIPTION
CONTROL PANEL DESCRIPTION
Please note: Type of knob may vary from model type. If the knobs are push-activated, push down on the center of the knob
to release it from seating.
2
ACCESSORIES
WIRE SHELF DRIP TRAY * BAKING TRAY * SLIDING RUNNERS *
Use to cook food or as a
support for pans, cake tins
and other ovenproof items of
cookware.
Use as an oven tray
for cooking meat, sh,
vegetables, focaccia, etc. or
position underneath the wire
shelf to collect cooking juices.
Use for cooking all bread and
pastry products, but also for
roasts, sh en papillotte, etc.
To facilitate inserting or
removing accessories.
* Available only on certain models
The number and the type of accessories may vary depending on which model is purchased.
Other accessories can be purchased separately from the After-sales Service.
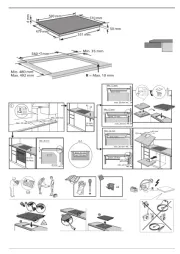
INSERTING THE WIRE SHELF AND OTHER
ACCESSORIES
Insert the wire shelf onto the level you require by
holding it tilted slightly upwards and resting the
raised rear side (pointing upwards) down first.
Then slide it horizontally along the runners as far as
possible.
• Other accessories, like the baking tray, are to be
inserted horizontally, letting them slide on the runners.
SLIDING RUNNERS AND SHELF GUIDES
Before using the oven remove the protective tape
[a] and then remove the protective foil [b] from the
sliding runners.
REMOVING THE SLIDING RUNNERS [c]
Pull the lower part of the sliding runner to uncouple
the lower hooks (1) and pull the the sliding runners
upwards, removing them from the upper hooks (2).
REFITTING THE SLIDING RUNNERS [d]
Hook the upper hooks on the shelf guides (1) then
press the lower part of the sliding runners against the
shelf guides, until the lower hooks are clicking (2).
1
2
1
2
[c] [d]
REMOVING AND REFITTING THE SHELF GUIDES
1. To remove the shelf guides, firmly grip the external
part of the guide, and pull it towards you to extract
the support and the two internal pins from the
lodging.
2. To reposition the shelf guides, position them near
the cavity and initially insert the two pins into their
lodgings. Next, position the external part near its
lodging, insert the support, and firmly press towards
the wall of the cavity to make sure the shelf guide is
properly secured.
FIRST TIME USE
1. SETTING THE TIME
You will need to set the time when you switch on the
appliance for the rst time: Press
until the icon and
the two digits for the hour start ashing on the display.
Use
or to set the hour and press to conrm.
The two digits for the minutes will start ashing.
Use or to set the minutes and press to conrm.
Please note: When the icon is ashing, for example following
lengthy power outages, you will need to reset the time.
2. HEAT THE OVEN
A new oven may release odours that have been left
behind during manufacturing: this is completely
normal. Before starting to cook food, we therefore
recommend heating the oven with it empty in
order to remove any possible odours. Remove any
protective cardboard or transparent film from the
oven and remove any accessories from inside it.
Heat the oven to 250 °C for about one hour.
The oven must be empty during this time.
Please note: It is advisable to air the room after using the
appliance for the first time.
Produktspezifikationen
| Marke: | Whirlpool |
| Kategorie: | Herd |
| Modell: | OMR58CU1B |
Brauchst du Hilfe?
Wenn Sie Hilfe mit Whirlpool OMR58CU1B benötigen, stellen Sie unten eine Frage und andere Benutzer werden Ihnen antworten
Bedienungsanleitung Herd Whirlpool
30 Juli 2025
30 Juli 2025
30 Juli 2025
30 Juli 2025
30 Juli 2025
30 Juli 2025
30 Juli 2025

30 Juli 2025
30 Juli 2025
30 Juli 2025
Bedienungsanleitung Herd
- Inventum
- Mercury
- Mr Safe
- Basetech
- Aurora
- Suntec
- Max Blank
- Einhell
- Corberó
- Aspes
- Lamona
- Efel
- Bartscher
- Waves
- Schmid
Neueste Bedienungsanleitung für -Kategorien-

30 Juli 2025
30 Juli 2025

30 Juli 2025
30 Juli 2025
30 Juli 2025
30 Juli 2025
30 Juli 2025

30 Juli 2025
30 Juli 2025
30 Juli 2025