Whirlpool W8I HF58 TUS Bedienungsanleitung
Whirlpool Spülmaschine W8I HF58 TUS
Lies die bedienungsanleitung für Whirlpool W8I HF58 TUS (146 Seiten) kostenlos online; sie gehört zur Kategorie Spülmaschine. Dieses Handbuch wurde von 10 Personen als hilfreich bewertet und erhielt im Schnitt 4.3 Sterne aus 3 Bewertungen. Hast du eine Frage zu Whirlpool W8I HF58 TUS oder möchtest du andere Nutzer dieses Produkts befragen? Stelle eine Frage
Seite 1/146
EN
Daily Reference Guide
1
THANK YOU FOR BUYING AWHIRLPOOL PRODUCT.
In order to receive amore complete assistance, please
register your appliance on: www.whirlpool.eu/register
PLEASE SCAN THE
QR CODE ON YOUR
APPLIANCE IN
ORDER TO HAVE
MORE DETAILED
INFORMATION
Before using the appliance carefully read Safety and Installation Instructions.
After installation, please remember to remove all transport protection parts from
the dishwasher.
APPLIANCE
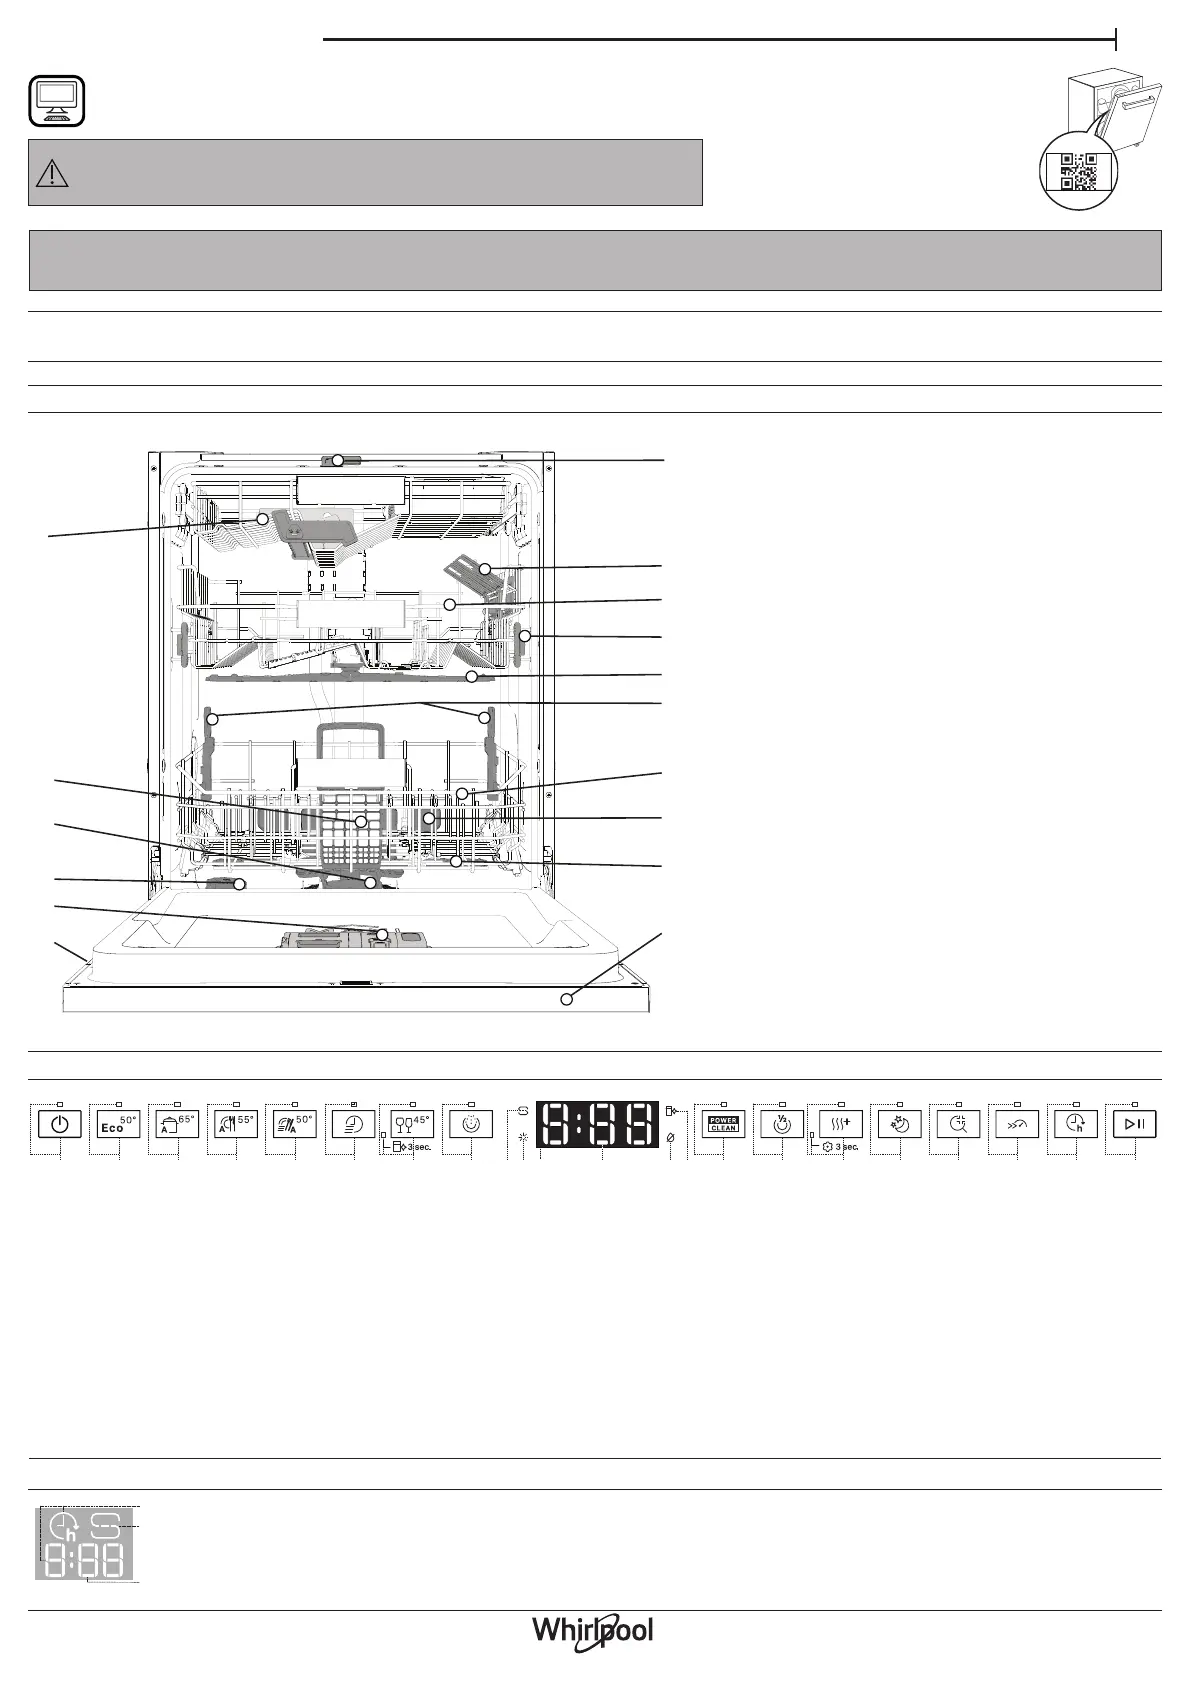
PRODUCT DESCRIPTION
CONTROL PANEL
45678910131415111216171819123202122
1. ON-OFF/Reset button with indicator light
2. Eco program button with indicator light
3. Auto Intensive program button with indicator light
4. Auto Mixed program button with indicator light
5. Auto Fast program button with indicator light
6. Rapid program button with indicator light
7. Crystals program button with indicator light/ Self-Clean program -
3sec. press
8. Prewash program button with indicator light
9. Salt reservoir empty indicator light
10. Rinse Aid reservoir empty indicator light
11. Display
12. Program number and remaining time indicator
13. Closed water tap indicator light
14. DESCALE indicator light
15. Power Clean® option button with indicator light
16. Half Load option button with indicator light
17. Extra Dry option button with indicator light/ Settings - 3 sec. press
18. Silent option button with indicator light
19. Sani Rinse option button with indicator light
20. Turbo option button with indicator light
21. Delay option button with indicator light
22. START/Pause button with indicator light
The control panel of this dishwasher activates pushing by ON/OFF button.
For energy saving the control panel deactivates automatically after 10 minutes if no cycle has started.
1
3
2
1. Delay Time on the oor - indicator of thetime left to the start of the cycle, when the Delay option is set
2. Saltreservoir empty - indicator light on the oor
3. Remaining Time on the oor - indicator of the time left to the end of the cycle
DISPLAY ON THE FLOOR
1. NaturalDry
2. Top rack
3. Foldable aps
4. Upper rack
5. Upper rack height adjuster
6. Upper sprayer arm
7. Power Clean® support
8. Lower rack
9. Cutlery basket
10. Power Clean®
11. Lower sprayer arm
12. Filter Assembly
13. Salt reservoir
14. Detergent and Rinse Aid dispensers
15. Rating plate
16. Control panel
1
3
4
5
6
7
8
10
11
16
2
9
12
13
14
15
Produktspezifikationen
| Marke: | Whirlpool |
| Kategorie: | Spülmaschine |
| Modell: | W8I HF58 TUS |
| Breite: | 598 mm |
| Tiefe: | 555 mm |
| Gewicht: | 35500 g |
| Steuerung: | Berührung |
| Höhe: | 820 mm |
| AC Eingangsspannung: | 220-240 V |
| AC Eingangsfrequenz: | 50 Hz |
| Eingebautes Display: | Ja |
| Paketgewicht: | 37500 g |
| Geräteplatzierung: | Voll integriert |
| Selbstreinigend: | Ja |
| Energieeffizienzklasse: | B |
| Kabellänge: | 1.3 m |
| Energieeffizienzskala: | A bis G |
| Startzeitvorwahl: | Ja |
| Verstellbare Füße: | Ja |
| Anschlusswert: | 1900 W |
| Stromstärke: | 10 A |
| Zykluszeit: | 240 min |
| Geräuschpegel: | 38 dB |
| Halbe Beladung: | Ja |
| Türfarbe: | Nicht zutreffend |
| Trocknungssystem: | Natürlich/Natur |
| Einschalteverzögerung (max.): | 24 h |
| Wasserverbrauch pro Zyklus: | 9.5 l |
| Anzahl Waschprogramme: | 8 |
| Energieverbrauch pro 100 Zyklen: | 64 kWh |
| Lärmemissionsklasse: | A |
| Anzahl Maßgedecke: | 14 Maßgedecke |
| Geschirrspülprogramme: | Auto-Mixed, Daily 50°C, Delicate 45°C, Eco 50°C, Intensive 65°C, Pre-wash, Quick 45°C, Self-Clean 65°C |
| Aquastop Funktion: | Ja |
| Temperatur (max): | 65 °C |
| Produktgröße: | Standardgröße (60 cm) |
| Benutzerdefinierte Panel-Bereitschaft: | Ja |
| Bedienfeld Farbe: | Schwarz |
| Oberer Korb höhenverstellbar: | Ja |
| Art des Besteckeinsatzes: | Korb |
| Restzeitanzeige: | Nein |
| Einbauraum Breite: | 600 mm |
| Einbauraum Tiefe: | 560 mm |
| Anzeige bei geringem Füllstand an Salz: | Ja |
| Anzeige für fehlenden Klarspüler: | Ja |
| Einbauraum Höhe (min): | 820 mm |
| Einbauraum Höhe (max): | 900 mm |
| Schlauchlänge Wasserzulauf: | 1.55 m |
| Schlauchlänge Wasserablauf: | 1.5 m |
| Wasserkapazität: | Cold, Hot |
| Boden-Kontrollleuchte: | Nein |
| Überlaufschutz: | Ja |
| Maximale Versorgungstemperatur für Warmwasser: | 60 °C |
| Verstellbare Körbe: | höher |
| Selbstreinigender Filter: | Ja |
| LED Programm-Kontrollleuchte: | Nein |
| Anzahl der Körbe: | 2 Korb/Körbe |
Brauchst du Hilfe?
Wenn Sie Hilfe mit Whirlpool W8I HF58 TUS benötigen, stellen Sie unten eine Frage und andere Benutzer werden Ihnen antworten
Bedienungsanleitung Spülmaschine Whirlpool

28 Januar 2026
17 Januar 2026
11 Januar 2026
5 Januar 2026
5 Januar 2026
5 Januar 2026
4 Januar 2026
4 Januar 2026
29 Dezember 2026
23 November 2025
Bedienungsanleitung Spülmaschine
Neueste Bedienungsanleitung für -Kategorien-
6 März 2026
6 März 2026
6 März 2026
5 März 2026
5 März 2026
5 März 2026
5 März 2026
5 März 2026
4 März 2026
4 März 2026