AMX NMX-WP-N2510 Bedienungsanleitung
AMX
Nicht kategorisiert
NMX-WP-N2510
Lies die bedienungsanleitung für AMX NMX-WP-N2510 (8 Seiten) kostenlos online; sie gehört zur Kategorie Nicht kategorisiert. Dieses Handbuch wurde von 4 Personen als hilfreich bewertet und erhielt im Schnitt 4.0 Sterne aus 2.5 Bewertungen. Hast du eine Frage zu AMX NMX-WP-N2510 oder möchtest du andere Nutzer dieses Produkts befragen? Stelle eine Frage
Seite 1/8

QUICK START GUIDE
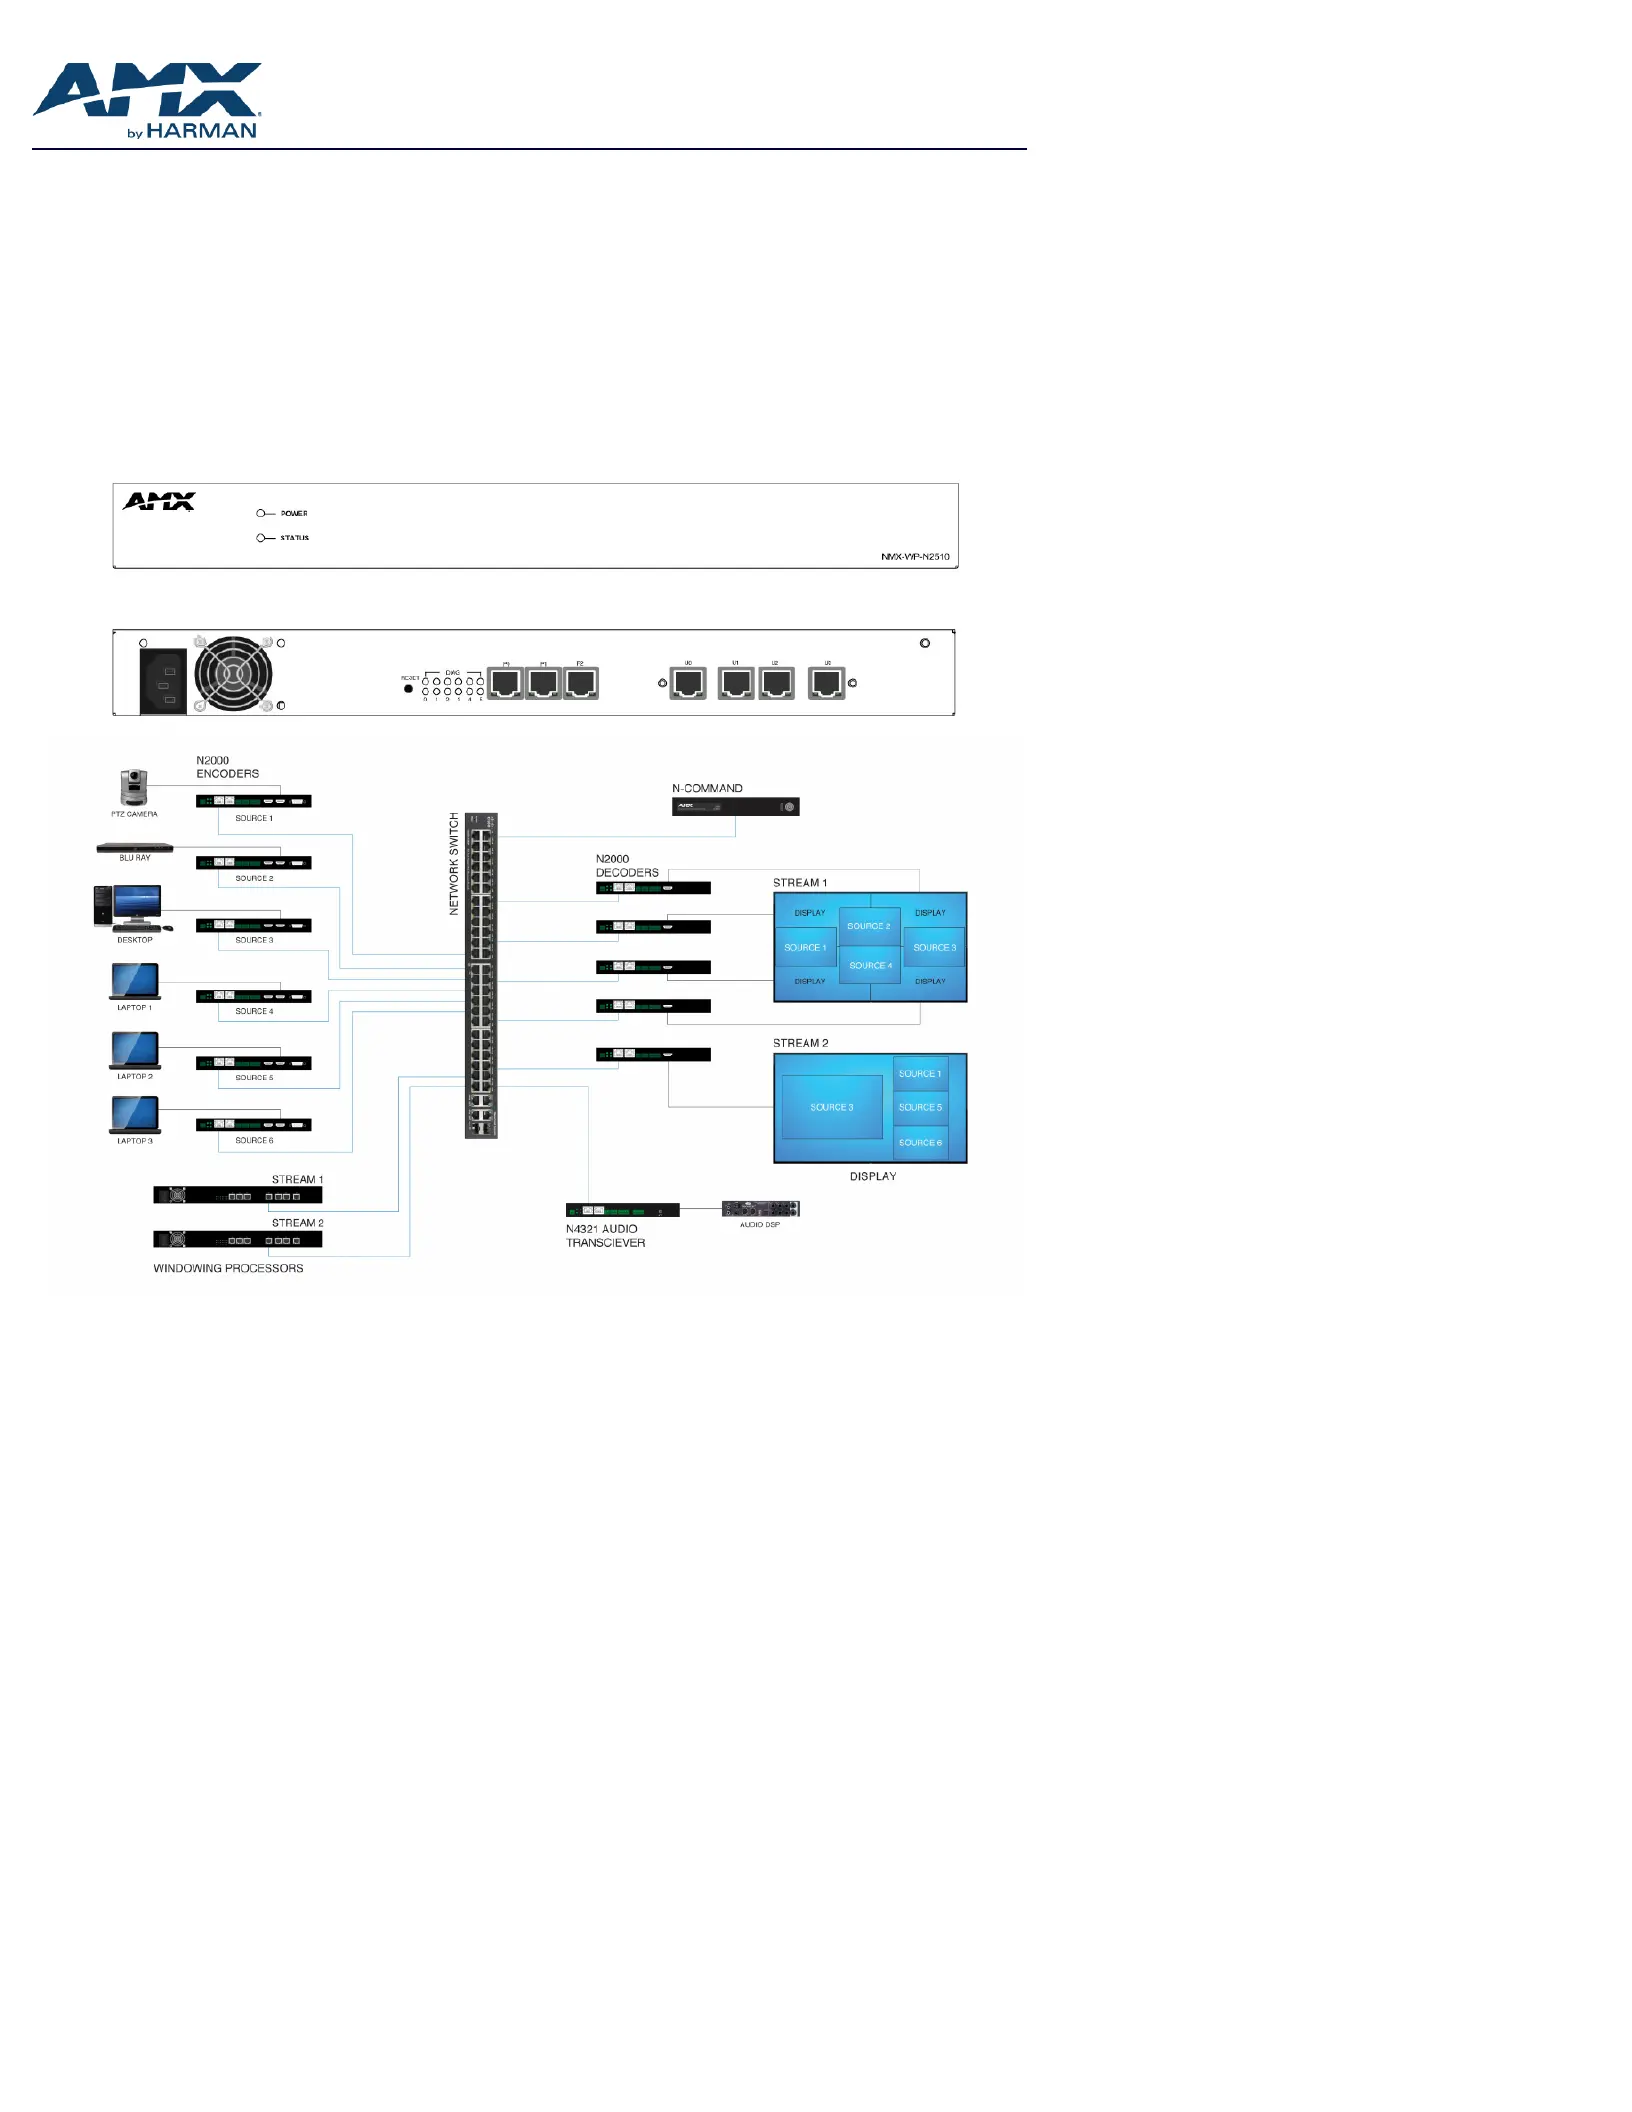
NMX-WP-N2510 N-Series Windowing Processor, 4x1
Overview
The NMX-WP-N2510 4x1 Windowing Processor accepts up to four real-time HD streams and then allows you to combine and customize
them into a single output stream. This1RU rackmount appliance connects to the video over IP network and accepts video streams (from
N2000 Series Encoders) via a single network port. Each input can be cropped, scaled, and positioned according to stored presets (such as
quad, window-in-window, 3+1, etc.) or in any user-defined configuration. The combined output video stream can then be routed as a
single, compressed stream to one or more displays via the same network port.
NOTE: For proper operation, all four U ports must be connected to active streams.
Connect N2000 streams to any of the P0-P2 ports. To achieve larger stacked configurations, additional Windowing Processors can be used
as input streams (using any P0-P2 port).
N2510 Windowing Processor Front View
N2510 Windowing Processor Rear View

Page 2
Establishing Connection
Before using your N2510 unit, it must be configured using the free N-Able device management software. However, you will not be able to
configure units until they are in the same subnet as the host computer. N-Series devices are shipped in Auto-IP mode with a default IP
address of 169.254.xxx.xxx. The sample steps below show how the required changes (to the host computer’s IP settings) are made in a
Windows environment.
Steps for IP address configuration:
1. From the Control Panel > Network and Internet dialog box, select Network and Sharing Center.
2. Select Change adapter settings.
3. Select the wired interface connected to your AV network.
4. Click the Properties button.
5. Scroll down in the list to the Internet Protocol Version 4 (TCP/IPv4) option. Highlight it and click the Properties button.
6. Enable the Use the following IP address option, and enter the static IP address provided to you by your network administrator.
FIG.1 SETTING A STATIC IP ADDRESS
NOTE: If the computer does not need Internet access, you can simply enter a unique 169.254.xxx.xxx IP address with a 255.255.0.0 subnet
mask. Please contact your network administrator if you are unsure of how to configure the existing interface. If the computer has a statically-
assigned IP address, click on the Advanced button. Then click Add to enter a unique 169.254.xxx.xxx address with a subnet of 255.255.0.0.
Steps for auto discovering devices on the network:
1. Use the host computer to download and install the latest version of N-Able:
PC version - http://www.amx.com/products/N-ABLE-PC.asp
Mac version - http://www.amx.com/products/N-ABLE-MAC.asp
2. Attach your N2510 unit(s) to the layer-3 network switch.
3. Disable the wireless adapter on your computer (it must be hard-wired to the switch).
4. Connect the host computer to the layer-3 network switch.
5. Open the N-Able application.
If all devices do not appear automatically in N-Able, click the Auto Discover button on the Unit Management tab. This issues a broadcast
command that will discover all units even if they are not in the same IP subnet.
NOTE: A web server is built into the N2510 and can be accessed directly by typing the unit’s IP address into your web browser (without the
need for N-Able). Internet Explorer is not a supported web browser.

Page 3
Logging in Using N-Able Software
Once the units have been discovered in N-Able, view them on the Unit Management tab. N2510 units have Windowing Processor listed in
their Type fields (as shown in FIG. 2).
FIG.2 FINDING UNIT ON THE UNIT MANAGEMENT TAB
Double-click any device to view its control page. If prompted, enter admin and password as the default username and password. This
brings up the page shown in FIG. 3.
FIG.3 ACCESSING CONFIGURATION PAGES
Click links at top of page to access the
other configuration pages.
Produktspezifikationen
Marke: | AMX |
Kategorie: | Nicht kategorisiert |
Modell: | NMX-WP-N2510 |
Brauchst du Hilfe?
Wenn Sie Hilfe mit AMX NMX-WP-N2510 benötigen, stellen Sie unten eine Frage und andere Benutzer werden Ihnen antworten
Bedienungsanleitung Nicht kategorisiert AMX
30 Juli 2025
30 Juli 2025
30 Juli 2025
30 Juli 2025
29 Juli 2025
29 Juli 2025
29 Juli 2025
29 Juli 2025
29 Juli 2025
27 Juli 2025
Bedienungsanleitung Nicht kategorisiert
- Comtrend
- Duracell
- OXI Instruments
- Yamato
- Dupla
- Tudor
- Nûby
- Contour
- PowerXL
- PcDuino
- Cat & Hound
- Jura
- SoundLAB
- Novero
- Avital
Neueste Bedienungsanleitung für -Kategorien-
31 Juli 2025
31 Juli 2025
31 Juli 2025
31 Juli 2025
31 Juli 2025
31 Juli 2025
31 Juli 2025
31 Juli 2025
31 Juli 2025
31 Juli 2025