Blackburn EX-1 Disc Bedienungsanleitung
Blackburn Nicht kategorisiert EX-1 Disc
Lies die bedienungsanleitung für Blackburn EX-1 Disc (572 Seiten) kostenlos online; sie gehört zur Kategorie Nicht kategorisiert. Dieses Handbuch wurde von 45 Personen als hilfreich bewertet und erhielt im Schnitt 4.0 Sterne aus 7 Bewertungen. Hast du eine Frage zu Blackburn EX-1 Disc oder möchtest du andere Nutzer dieses Produkts befragen? Stelle eine Frage
Seite 1/572
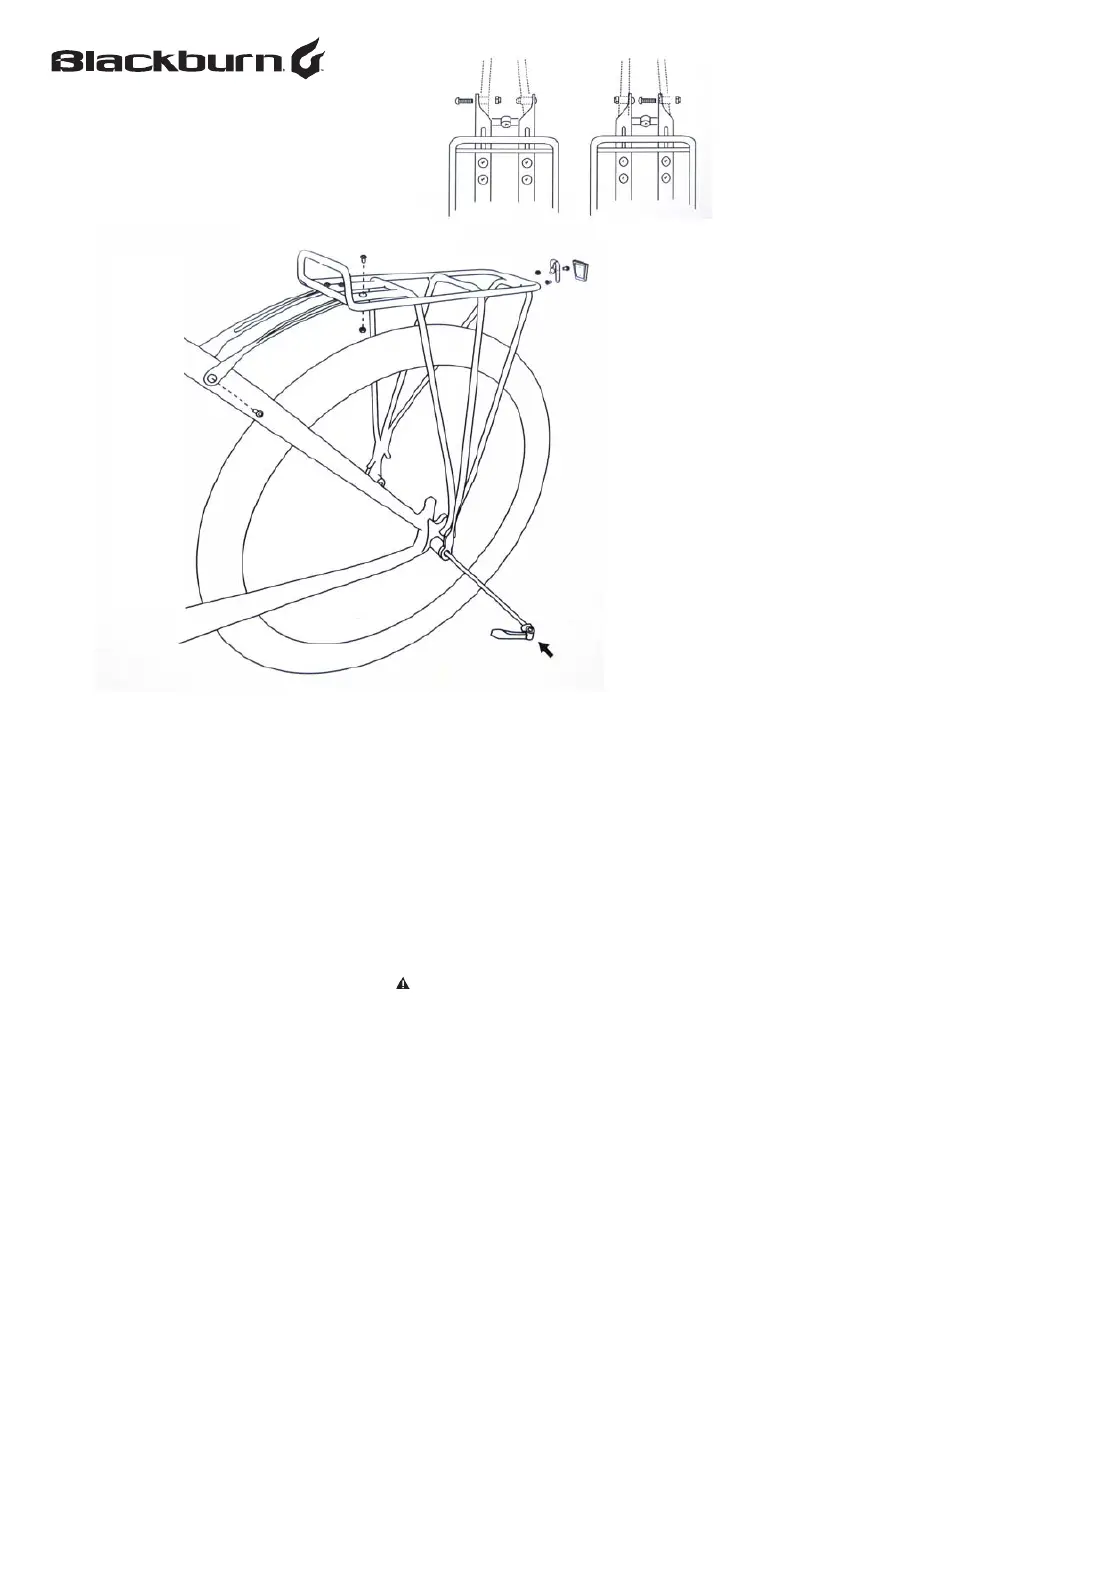
EX1 Disc™
Rack
Installation Instructions
Parts List:
6 – 10 mm Buttonhead Screws
2 – 25 mm Buttonhead Screws
8 – Nylock Nuts
2 – Extenders
2 – 1/2” Seat-Stay Clamps
2 – 9/16” Seat-Stay Clamps
1 – Reflector Bracket
1 – 3 mm Allen Wrench
Installation:
1. ATTACH EXTENDERS:
Attach extenders to
rack using four 10mm button head screws and
nylock nuts. Do not tighten. NOTE: Extenders
have an offset twist and can be installed in wide
or narrow position to match seat stay width.
2. STRUT ATTACHMENT:
Remove rear quick
release. Spread rack struts to fit on the
outside of the dropouts. Install extra long quick
release supplied with rack. Follow your
bicycle/wheel manufacturer recommendations
for removing and installing quick releases or
have a qualified bicycle shop replace it for you.
3. ATTACHING EXTENDERS:
Attach extenders
to the bike frame “Braze-on” mounts with
25mm buttonhead screws. Bend extenders (by
hand or with an adjustable wrench) to align with
braze-on mounts. NOTE: For bicycles without
seat stay “Braze-ons” use vinyl coated Seat-Stay
Clamps (2 sizes included). Attach with 10mm
screws and nylock nuts.
4. RACK ADJUSTMENT:
Adjust rack until rack
top is level with ground by sliding it on extenders
until level. Tighten all rack screws & nuts.
5. Install reflector bracket over rack and tighten
with reflector and reflector screw from your bicycle
.
Warning: Periodically check all nuts and bolts
for tightness.
Produktspezifikationen
| Marke: | Blackburn |
| Kategorie: | Nicht kategorisiert |
| Modell: | EX-1 Disc |
Brauchst du Hilfe?
Wenn Sie Hilfe mit Blackburn EX-1 Disc benötigen, stellen Sie unten eine Frage und andere Benutzer werden Ihnen antworten
Bedienungsanleitung Nicht kategorisiert Blackburn

20 September 2025
22 Juli 2025
22 Juli 2025
22 Juli 2025
21 Juli 2025
21 Juli 2025
21 Juli 2025
21 Juli 2025
21 Juli 2025
5 September 2024
Bedienungsanleitung Nicht kategorisiert
Neueste Bedienungsanleitung für -Kategorien-
3 April 2026
3 April 2026
3 April 2026
3 April 2026
3 April 2026
3 April 2026
3 April 2026
3 April 2026
3 April 2026
3 April 2026