Bodycraft F711 Bedienungsanleitung
Lies die bedienungsanleitung für Bodycraft F711 (4 Seiten) kostenlos online; sie gehört zur Kategorie Nicht kategorisiert. Dieses Handbuch wurde von 2 Personen als hilfreich bewertet und erhielt im Schnitt 4.9 Sterne aus 1.5 Bewertungen. Hast du eine Frage zu Bodycraft F711 oder möchtest du andere Nutzer dieses Produkts befragen? Stelle eine Frage
Seite 1/4

Owner’s Manual
Base Lot Number: _ _ _ _ _ _ _ _ _ _ _ _ _
Purchased Date: ___ / ___ / ______
Dealer’s Name:__________________________
Please register your products at:
https://www.bodycraft.com/product-registration/
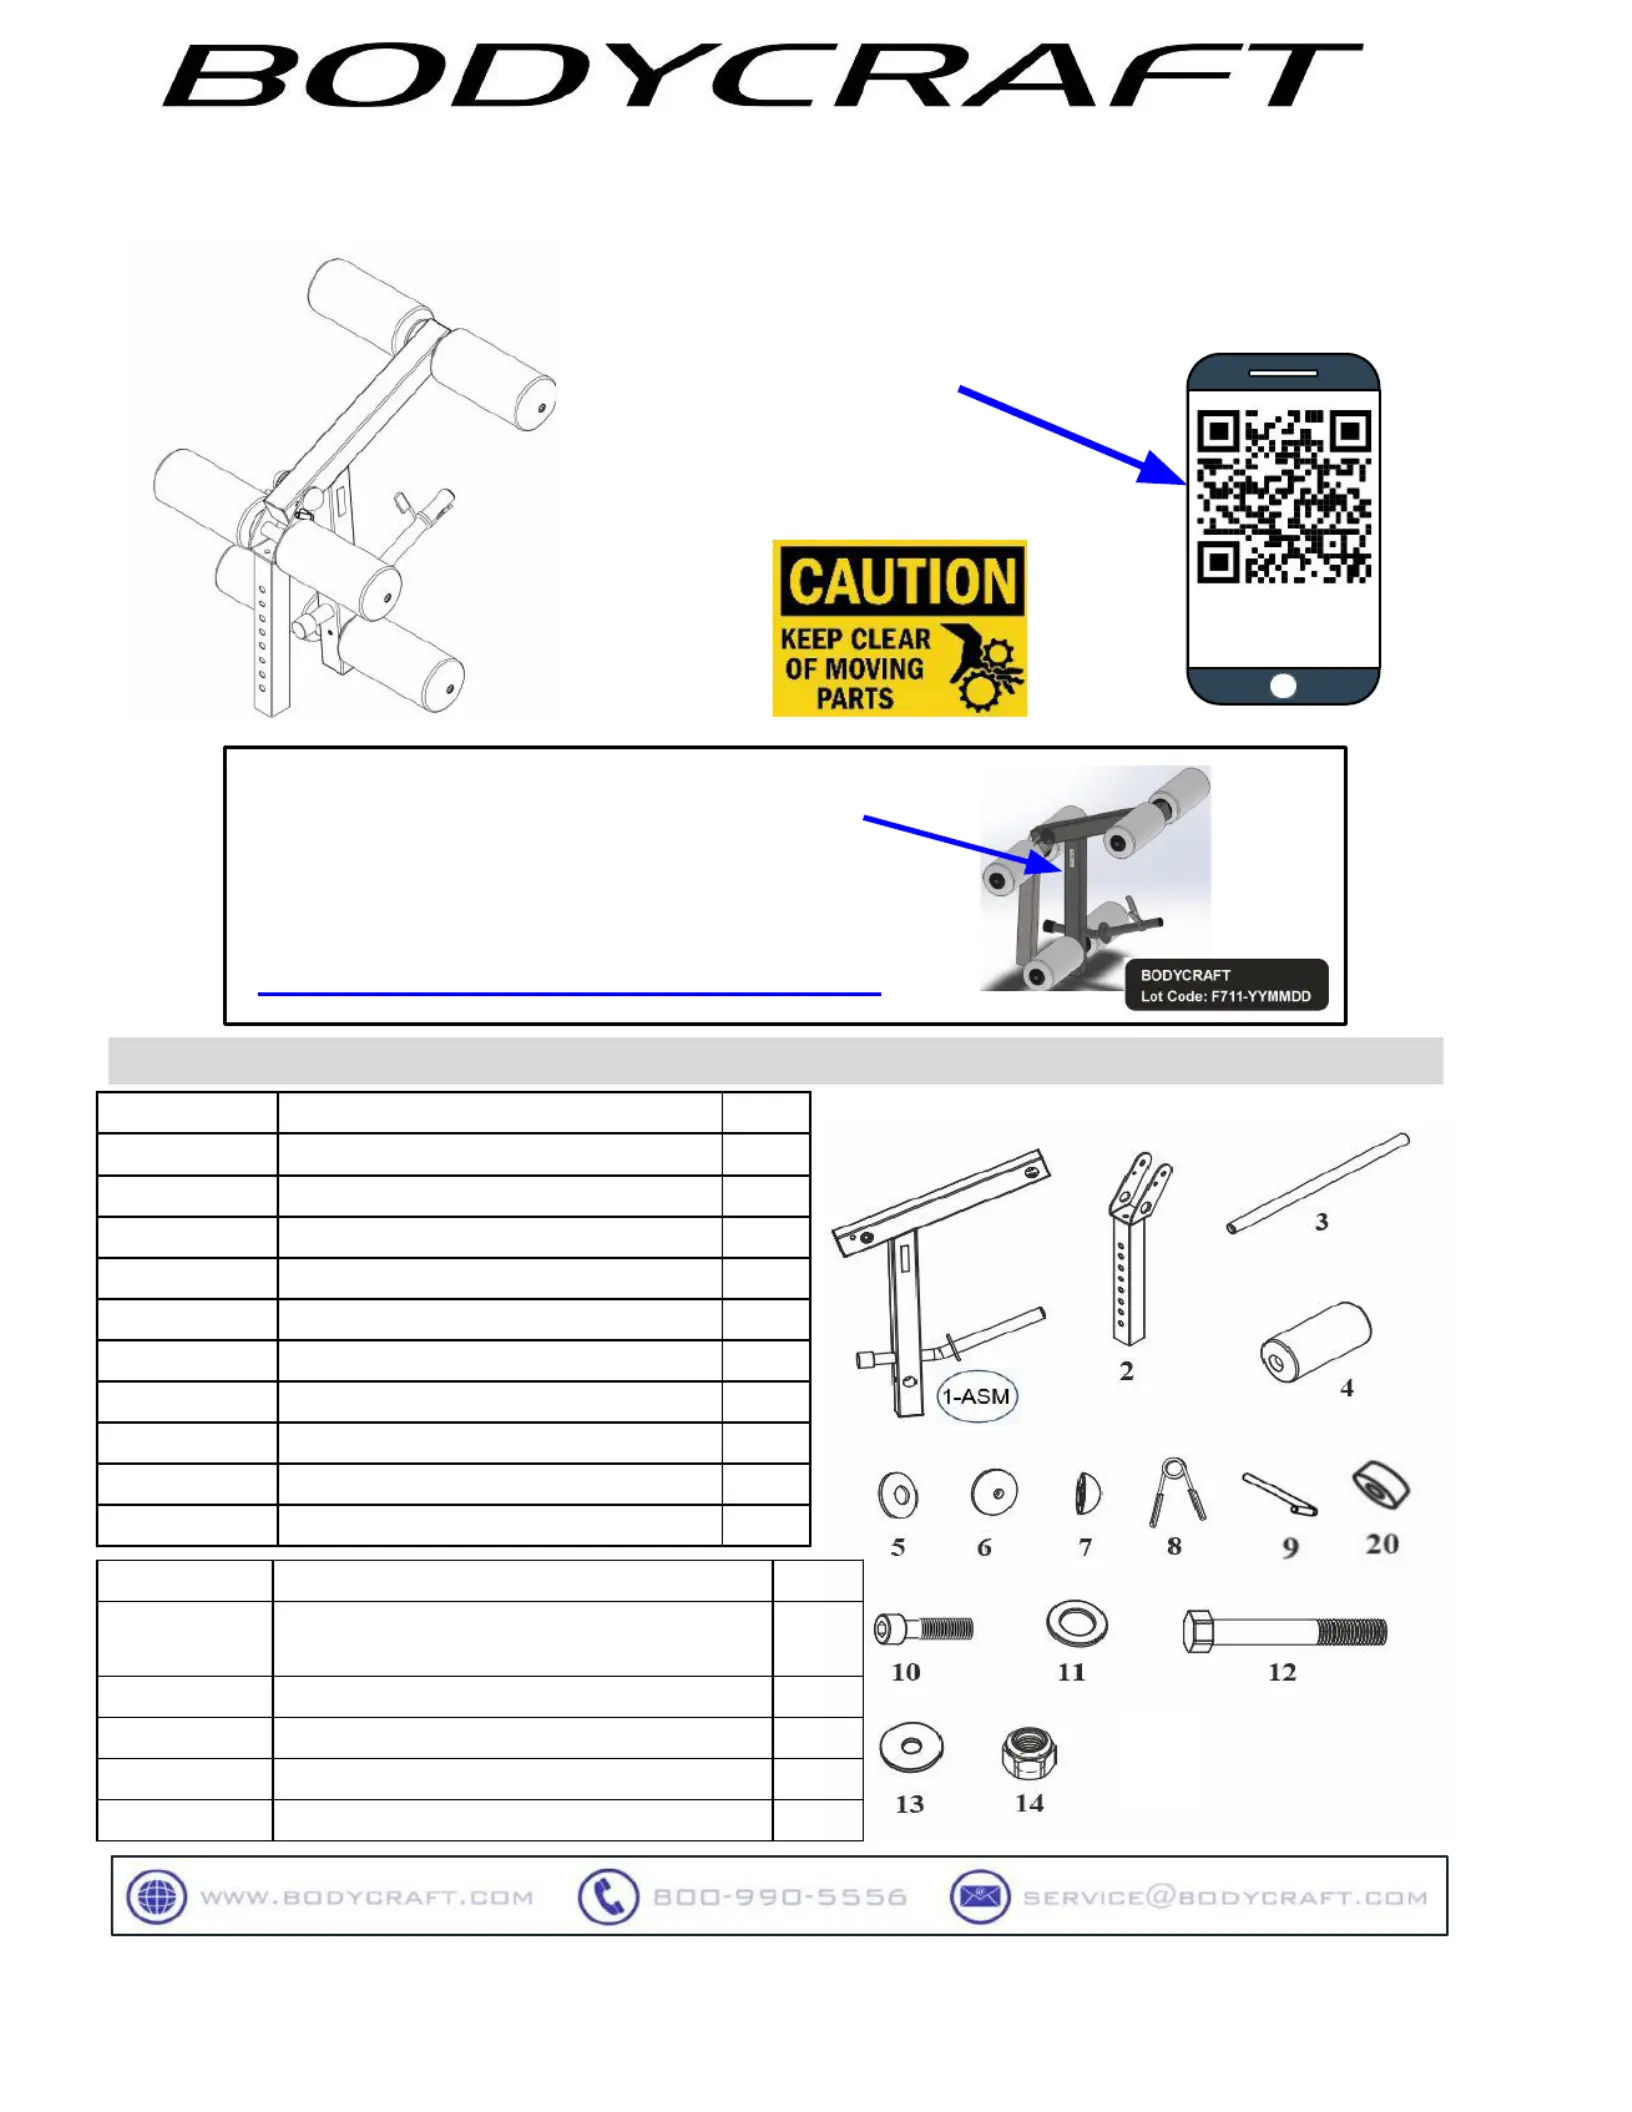
F711 Leg Extension/Curl Attachment
for the BodyCraft F704, F602 & F601 Benches
Open your Camera
App and point it at
the QR Code
Assembled Parts List
F711 v1.5
To see in
FULL COLOR
& additional information,
scan this QR code.
Part # Assembly Parts List QTY
F711-001-ASM LEG WEIGHT HOLDER - Assembly 1
F711-002 ADJUST TUBE 1
F711-003 FOAM ROLLER HOLDER 3
F711-004 FOAM ROLLER 6
F711-005 LARGER END CAP 6
F711-006 SMALLER END CAP 6
F711-007 NUT CAP 2
F711-008 SPRING CLIP 1
F711-009 LOCKING PIN, L-TYPE 1
F711-020 RUBBER CUSHION 1
Part # Assembly Hardware QTY
F711-010
HEX RECESSED HEAD BOLT, 5/16" x
1-1/4" - BLK 6
F711-011 FLAT WASHER, 1/2" - BLACK 2
F711-012 HEX BOLT, 1/2" x 3-1/4" - BLACK 1
F711-013 BIG WASHER, φ8 - BLACK 6
F711-014 NYLON NUT, THICK, 1/2" - BLACK 1

Product Assembly
STEP 1a: Leg Weight Holder
Attach the ADJUST TUBE (2) onto the LEG WEIGHT HOLDER - Assembly (1-ASM) using:
● One HEX BOLT, 1/2" x 3-1/4" (12)
● Two FLAT WASHERS, 1/2" (11)
● One NYLON NUT, THICK, 1/2" (14).
Once fully tightened with movement in parts, see below, then install both NUT CAPS (7). TIP
TIP: Fully tighten HEX BOLT (12)
then loosen the locking NYLON
NUT, THICK (14) approximately 1/4
turn so that the LEG WEIGHT
HOLDER - Assembly (1-ASM) &
ADJUST TUBE (2) pivot freely with
little to no excessive movement
STEP 1b: Foam Roller Holders
Insert all three FOAM ROLLER HOLDERS (3)
into the ADJUST TUBE (2) and the LEG
WEIGHT HOLDER - Assembly (1-ASM).
Place all parts from the box in a cleared area and position them on the floor in front of you. Remove
all packing materials from your area and place them back into the box. Do not dispose of the
packing materials until assembly is completed.
Read each step carefully before beginning.
3/4 SOCKET &
6” EXTENSION
3/4 WRENCHES
Recommended Tools
2

4 ft-lbs
(+/- 1 lbs)
Product Assembly
STEP 2a: Install Foam Rollers
Slide END CAP, LARGER (5) then the FOAM
ROLLER (4) onto each side of FOAM ROLLER
HOLDER (3), one bar post at a time.
NOTE: Confirm centered with equal distance on both
Rt & Lt Sides.
STEP 2b: Secure Foam Rollers
Then slide a HEX RECESSED HEAD
BOLT, 5/16" x 1-1/4" (10) through the
END CAP, SMALLER (6) and the BIG
WASHER, φ8 (13).
Then secure by tightening the HEX
RECESSED HEAD BOLT, 5/16" x 1-1/4"
(10) to the FOAM ROLLER HOLDER (3)
per side. Repeat to the other FOAM
ROLLER HOLDERS.
STEP 2c: Accessories
Attach RUBBER CUSHION (20), SPRING
CLIP (8) and RING PIN (9).
TIP: Recommended Tools
7/32 Allen Wrenches x 2ea.
STEP 2d: “Torque Time”
Tighten STEP 2a & 2b, HEX RECESSED HEAD BOLTS
(10) at this time to the Recommended Torque Specs of
4 ft-lbs (+/-1 lb).
3
4 ft-lbs
(+/- 1 lbs)
TORQUE WRENCH 3/8 DRIVE
w/ 7/32 Allen
Recommended Tools
Produktspezifikationen
Marke: | Bodycraft |
Kategorie: | Nicht kategorisiert |
Modell: | F711 |
Brauchst du Hilfe?
Wenn Sie Hilfe mit Bodycraft F711 benötigen, stellen Sie unten eine Frage und andere Benutzer werden Ihnen antworten
Bedienungsanleitung Nicht kategorisiert Bodycraft
26 Juli 2025
25 Juli 2025
25 Juli 2025
25 Juli 2025
25 Juli 2025
25 Juli 2025
24 Juli 2025
21 Juni 2025
20 Juni 2025
Bedienungsanleitung Nicht kategorisiert
- TROND
- BioChef
- CFH
- Butler
- EAT
- Modbap Modular
- MX Select
- Leap Frog
- Moulinex
- Carry-on
- Skandika
- FoxFury
- Black Box
- Livoo
- Hikmicro
Neueste Bedienungsanleitung für -Kategorien-
26 Juli 2025
26 Juli 2025
26 Juli 2025
26 Juli 2025
26 Juli 2025
26 Juli 2025
26 Juli 2025
26 Juli 2025
26 Juli 2025
26 Juli 2025