Bonelk M-257 Bedienungsanleitung
Bonelk Computermaus M-257
Lies die bedienungsanleitung für Bonelk M-257 (1 Seiten) kostenlos online; sie gehört zur Kategorie Computermaus. Dieses Handbuch wurde von 8 Personen als hilfreich bewertet und erhielt im Schnitt 5.0 Sterne aus 4.5 Bewertungen. Hast du eine Frage zu Bonelk M-257 oder möchtest du andere Nutzer dieses Produkts befragen? Stelle eine Frage
Seite 1/1
WARRANTY INFORMATION - FOR AUSTRALIAN CONSUMERS ONLY
MacGear Australia provides its accessory range of products with a 1 Year back to base
warranty: “Our goods come with guarantees that cannot be excluded under the Australian
Consumer Law. You are entitled to a replacement or refund for a major failure and for
compensation for any other reasonably foreseeable loss or damage. You are also entitled to
have the goods repaired or replaced if the goods fail to be of acceptable quality and the failure
does not amount to a major failure”.
The warranty offered is in addition to other rights and remedies offered under consumer law.
The conditions contained in this warranty apply to purchases made within Australia only.
Purchases made outside of Australia are covered by the warranty procedures and policies that
comply with each respective place of purchase.
Conditions of warranty:
a. The consumer must retain proof of purchase for the warranty period.
b. The warranty period is valid for 1-year from the original purchase date.
c. The warranty applies only to defects in material or workmanship that occur during normal
use of the product.
d. The warranty is a ‘back-to-base’ warranty meaning the consumer is responsible for the costs
associated with returning the product to their place or purchase or to Mac Gear Australia.
e. The consumer must return the goods, original packaging (where feasible) and proof of
purchase to make a warranty claim.
f. If a replacement product is supplied the warranty period applies to the balance of the
warranty period from the original purchase date
.
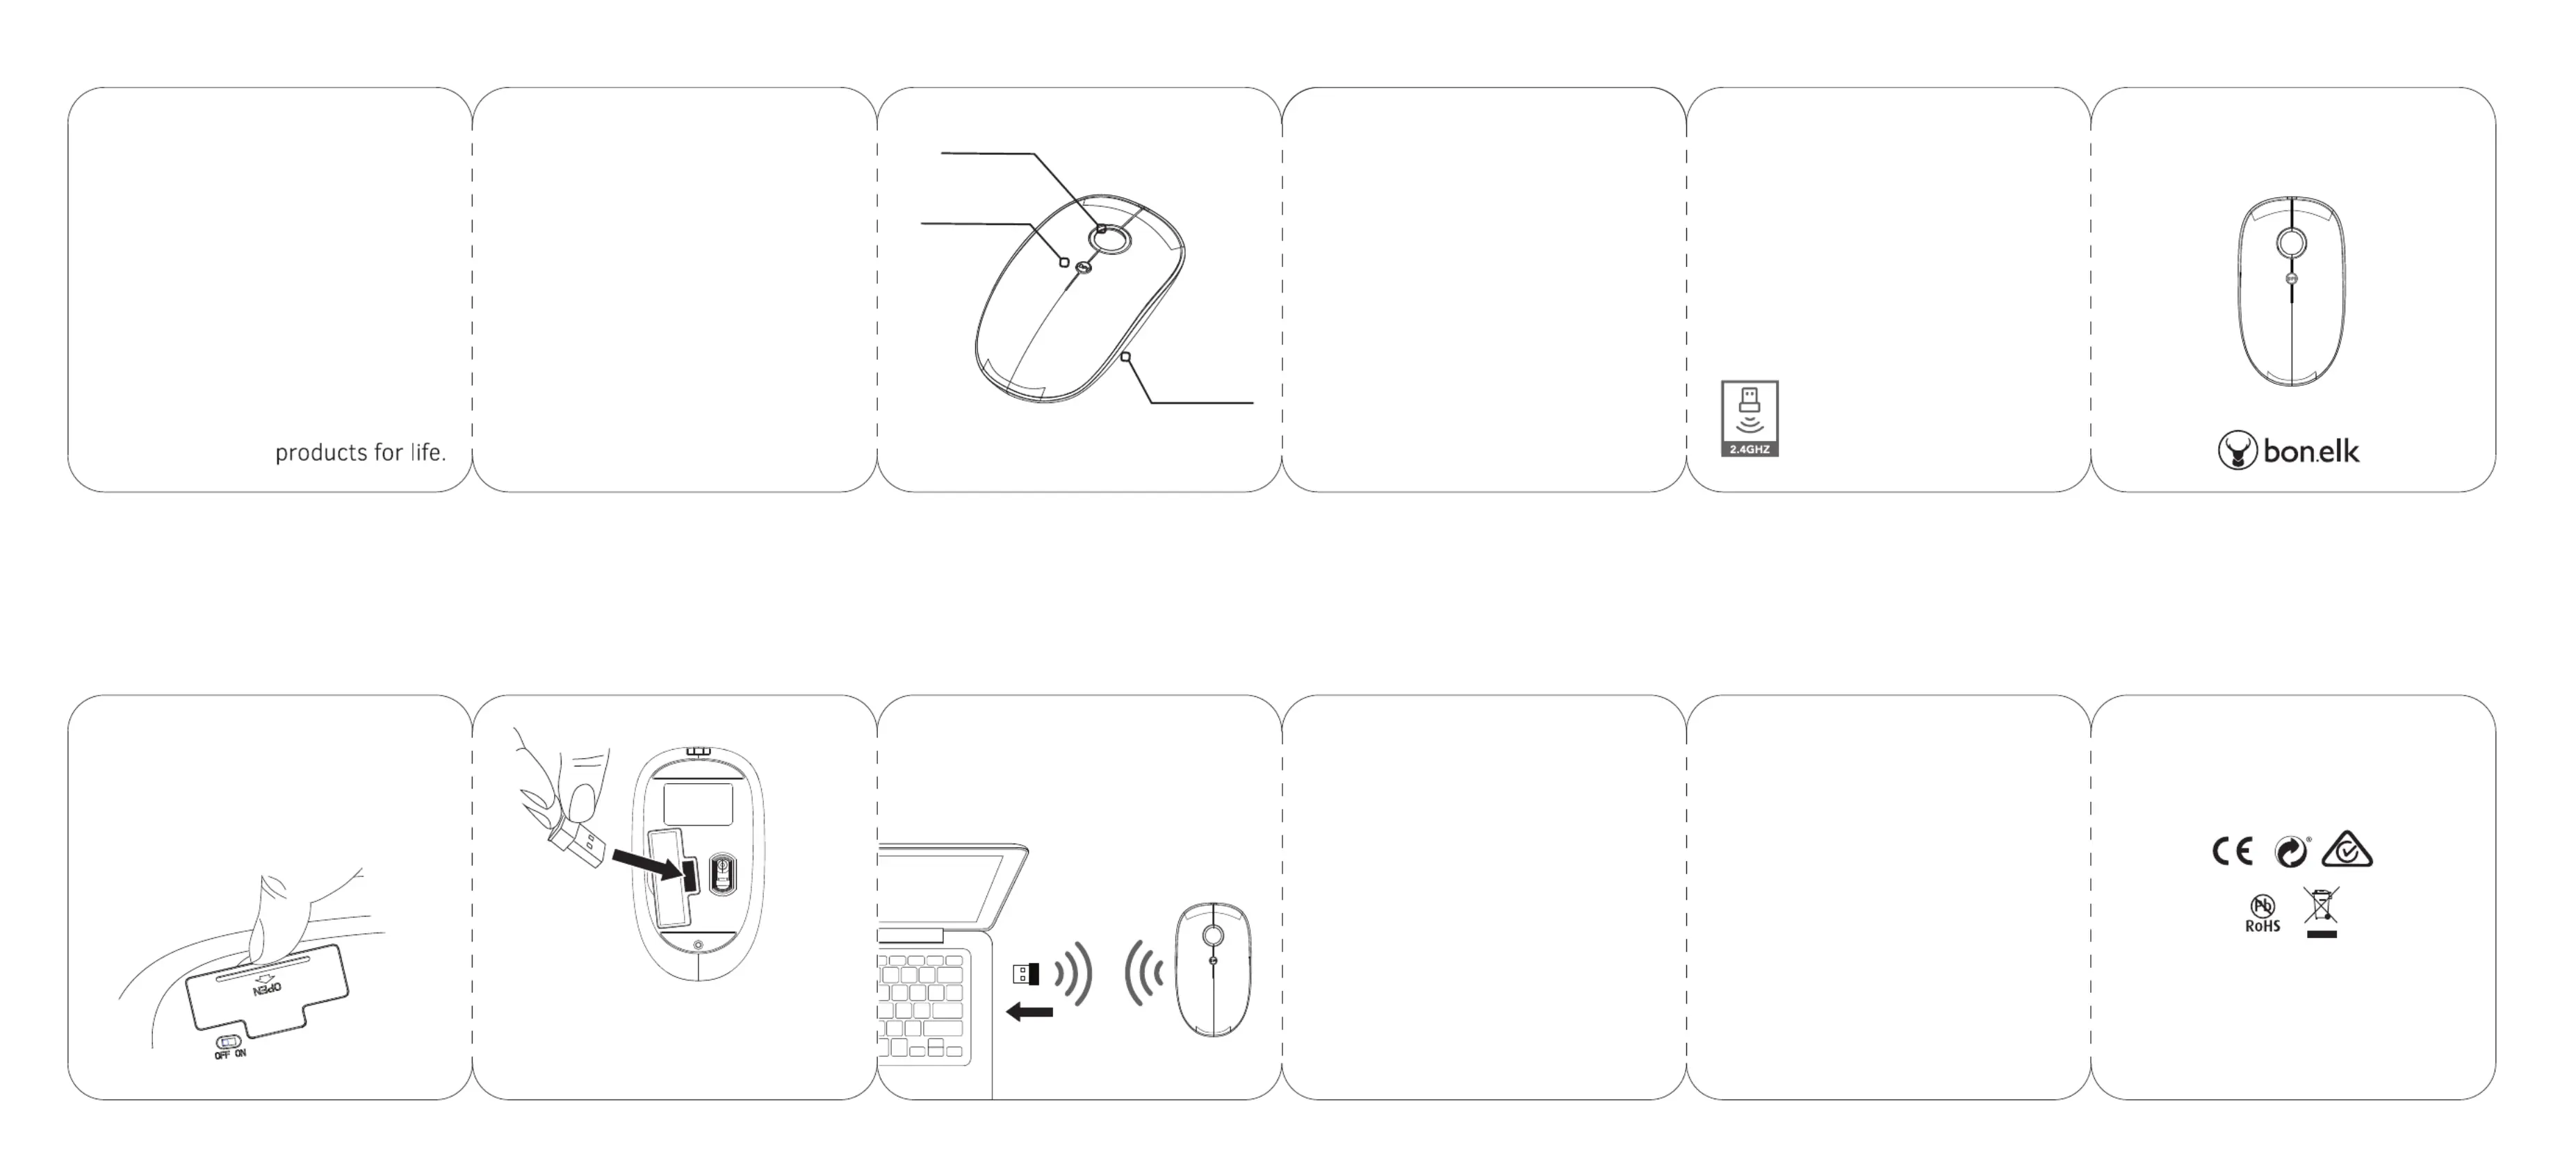
INSERT 1 x AA BATTERY
STEP 1
Lift the edge of the battery casing underneath the mouse to reveal the
dongle and battery storage. Insert AA battery into the battery cavity
matching the + - symbols. (1 x AA battery not included).
STEP 2
Remove the dongle from its
holster and insert into the
USB-A port of your laptop,
computer or Android device.
Reinstall the mouse cover by
aligning the prongs and press
firmly until clicks together.
The Bonelk M-257 wireless mouse connects to your computer wirelessly via
USB-A dongle. Features round scroll wheel for comfortable vertical scrolling
movements, switchable DPI button and soft touch mouse coating. Easy to set
up via Plug and Play connection, the M-257 mouse is the perfect portable
companion for your laptop or desktop computer.
Frequently Asked Questions
How do I connect my RF wireless mouse to my device?
Simply ensure the USB dongle is correctly inserted to the standard USB-A
port of your device. Check that your mouse is close enough to your laptop or
PC computer to be in range.
Do I need to install any software drivers for my wireless mouse?
No. Once the USB dongle is inserted, wireless connection is instant with
your laptop or PC computer, your mouse will be automatically recognised
and ready to go!
What if my computer or laptop does not recognise my mouse?
Insert the USB dongle to your laptop, PC computer or Android device and hard
restart your device. If connection is still unsuccessful please follow the trouble
shooting steps located in this manual.
Bonelk M-257 Wireless Mouse
User Manual and Warranty
WARRANTY CLAIM PROCEDURE:
a. The consumer must return the goods as per the requirements stated in ‘conditions of
warranty’ section d & e.
b. If the consumer is unable to return the goods to the place of purchase they can send the
goods with the required packaging and documentation, along with their contact details
including address, phone number and e-mail to:
MacGear Australia
Suite 4, 204-218 Botany Road, Alexandria NSW 2015
Tel: 02 9435 0387
Email: [email protected]
®
PACK CONTENTS
1 x Bonelk Slim Wireless 4-Button Mouse
1 x User manual
©2022 Bonelk. E&OE. All Rights Reserved. Bonelk is a registered trademark in the
U.S. and other countries. All registered trademarks, trademarks, brand names or
product names are the property of their respective owners. Mac and macOS are
trademarks of Apple Inc., registered in the U.S. and other countries. Windows is a
registered trademark or a trademark of Microsoft Corporation in the United States
and/or other countries. Android is a registered trademark of Google Inc.
BASIC PRECAUTIONS FOR USING YOUR RF WIRELESS MOUSE
- Never force your USB dongle into a port. If the dongle and port do not join with
reasonable ease, they may not match each other.
- Make sure that the dongle matches the port and that you have positioned the
connector correctly in relation to the port before plugging them together.
- Before connecting the USB dongle, make sure there are no foreign objects
inside the USB port you are trying to connect to.
- To reduce the chance of shock or injury, do not use your wireless mouse in or
near water or wet locations.
- Do not attempt to open any other mice housings except for the battery casing.
- Never introduce foreign objects into the interior of the housing.
- If you notice your wireless mouse appears to be in any way damaged, cracked
or broken please do not use and refer to your place of purchase.
- Always use your wireless mouse on a level, stable, clean, dry surface.
- Never immerse your mouse in water and or other liquids.
- Keep your wireless mouse away from open flames, humidity, coals and dust as
it may effect its ability to function correctly.
TROUBLESHOOTING
1. Check that the wireless USB dongle is correctly inserted into the USB-A port.
2. Make sure the USB port of your device is clear from dust and grime.
3. Check that your mouse is in working range of your laptop or PC computer.
(within 2 metres)
4. Ensure you have inserted 1 x AA battery into your mouse. (Not included)
5. Check the AA battery inserted into your mouse is not flat.
6. Restart your computer.
SUPPORTED SYSTEMS
Windows
®
, macOS
®
, Android
TM
TECHNICAL SPECIFICATIONS
SKU: ELK-63015-R / ELK-63016-R / ELK-63017-R
4 BUTTON MOUSE
RF Version: USB Wireless Dongle 2.4Ghz
Resolution: 800, 1200, 1600 DPI
Sleep Mode: Auto Off Sleep Function
Battery: 1 x AA (not included)
USB-A PORT
CONNECT YOUR RF WIRELESS MOUSE
1. Connect the USB dongle (located inside battery cavity of mouse) to the
USB-A port of your laptop, computer or Android device.
2. Make sure you have inserted 1 x AA battery into your mouse.
Your device will automatically recognise once your mouse is connected.
3. Begin to move your mouse so you can see it is working on the screen.
Connect to your device wirelessly via USB
dongle using 2.4GHz technology.
ROUND SCROLL
Comfortable rubber
CONTOURED SIDES
Ergonomic light design
MOUSE FEATURES
ROUND SCROLL WHEEL
Rubber scroll wheel with smooth vertical scrolling movement and classic slim
mouse design.
LOW FRICTION PADS
Features smooth gliding movement for clean and accurate tracking across
mouse pad surfaces.
PRECISION CONTROL
Optical laser sensor with switchable DPI from 800 to 1600 for fast and easy
customisation of your mouse.
USB-A DONGLE
Connect wirelessly to your laptop or computer via any standard USB-A port
with the 2.4GHZ RF USB-A dongle.
DPI ADJUSTMENT
Switch your DPI between resolutions of 800, 1200 or 1600 by pressing the
central button located on the top of the mouse.
QUICK SETUP GUIDE
WIRELESS DONGLE
LOCATION
AUTO / WAKE SLEEP
After a period of non-use your mouse
will enter sleep mode to save battery
life. To wake your mouse simply press
any button or move your mouse.
SWITCHING DPI
800-1200-1600 DPI
Produktspezifikationen
| Marke: | Bonelk |
| Kategorie: | Computermaus |
| Modell: | M-257 |
Brauchst du Hilfe?
Wenn Sie Hilfe mit Bonelk M-257 benötigen, stellen Sie unten eine Frage und andere Benutzer werden Ihnen antworten
Bedienungsanleitung Computermaus Bonelk

19 September 2025
Bedienungsanleitung Computermaus
Neueste Bedienungsanleitung für -Kategorien-
20 Januar 2026
20 Januar 2026
19 Januar 2026
19 Januar 2026
19 Januar 2026
19 Januar 2026
19 Januar 2026
18 Januar 2026
18 Januar 2026
10 Januar 2026