Brady BSP31 Bedienungsanleitung
Brady Etikettendrucker BSP31
Lies die bedienungsanleitung für Brady BSP31 (2 Seiten) kostenlos online; sie gehört zur Kategorie Etikettendrucker. Dieses Handbuch wurde von 33 Personen als hilfreich bewertet und erhielt im Schnitt 4.4 Sterne aus 2 Bewertungen. Hast du eine Frage zu Brady BSP31 oder möchtest du andere Nutzer dieses Produkts befragen? Stelle eine Frage
Seite 1/2
BSP™31
Label Attachment System
Quick Start Guide
Instructions
Instruktionen • Istruzioni
Instructies • Instrucciones
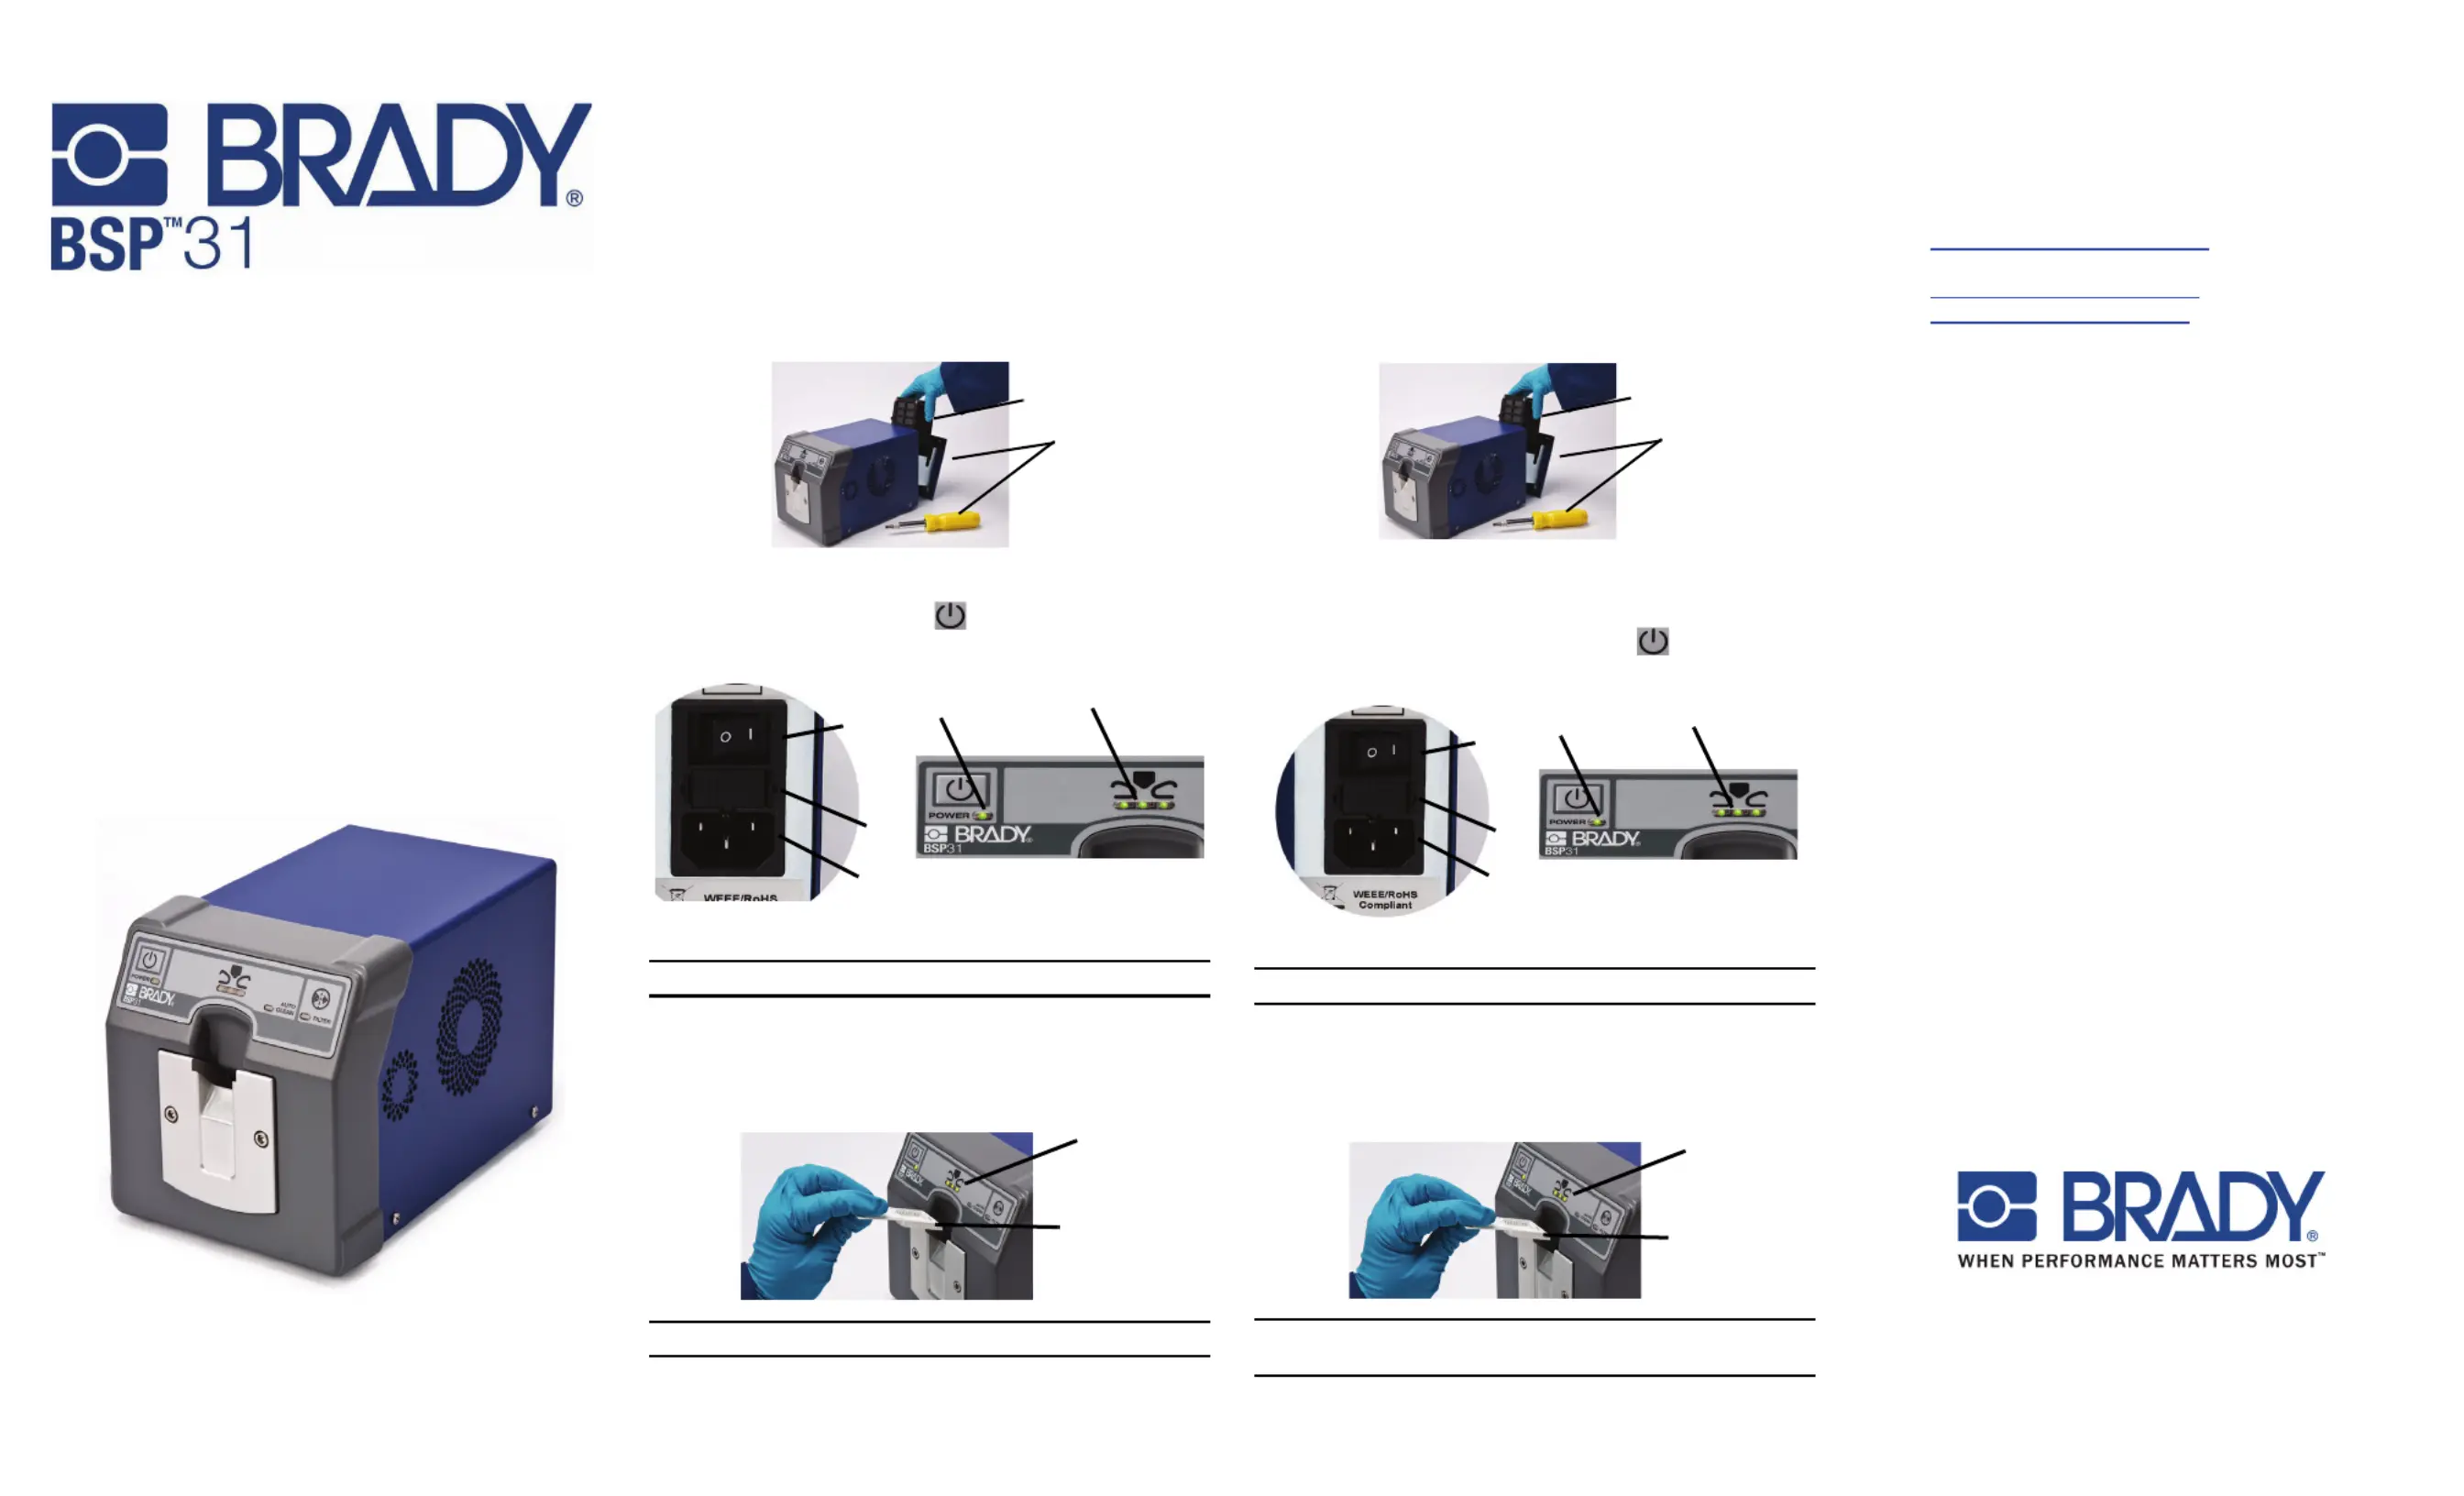
Unpacking/Setup Instructions
The
BSP™31
Label Attachment System and its accessories are
packed in a cardboard carton with padding for protection during
shipment. Keep the packaging materials for future use.
Setup
1.Remove BSP™31 unit, power cord, documentation and filter
from packing carton and place
unit
on a solid surface.
2.Unfasten flat-head screws at back of unit and open filter door
[1].
3.Insert filter, close door and tighten screws [2].
4.Plug power cord into unit [3] and to an AC power outlet.
5.Turn Main Power Switch at back of the unit to ON (4).
6.On front panel, press Power [5]).
7.When the unit is ready to rivet, the 3 LEDs [7] turn steady
green (about 3 minutes).
Operating Instructions
Note: Unit should be operated in a well-ventilated area.
1.Insert a labeled cassette [8], label side up and facing into the
slot (unit will not operate unless cassette is inserted correctly).
Status lights flash green.
2.When riveting is complete, the status lights [9] turn steady
green. Remove cassette.
Note: For more information, see the BSP™31 User Guide.
Instructions de déballage/configuration
Le
BSP™31
Label Attachment System et ses accessoires sont
emballés dans une boîte en carton avec du rembourrage pour les
protéger pendant l’expédition. Gardez les matériaux d’emballage
pour utilisation ultérieure.
Configuration
1.Retirez l’appareil BSP™31, le cordon d’alimentation, la
documentation et le filtre de la boîte
et placez l
’
unité sur une
surface solide.
2.Dévissez les vis à tête plate situées à l’arrière de l’unité et ouvrez
la porte du filtre [1].
3.Insérez le filtre, fermez la porte et serrez les vis [2].
4.Branchez le cordon d’alimentation dans l’unité [3] et dans une
prise à courant alternatif.
5.Mettez l’interrupteur d’alimentation principalsitué à l’arrière de
l’unité à ON [4] (en marche).
6.Sur le panneau avant, appuyez sur Power [5] (alimentation).
7.Lorsque l’unité est prête à riveter, les trois DEL [7] deviennent
vertes (dans environ trois minutes).
Directives d’utilisation
Remarque : L’unité doit être utilisée dans un endroit bien aéré.
1.Insérez une cassette étiquetée [8] dans la fente en gardant
l’étiquette orientée vers le haut (l’unité ne fonctionnera pas si la
cassette n’est pas insérée correctement). Les voyants de
fonctionnement clignotent en vert.
2.Lorsque le rivetage est terminé, les voyants de fonctionnement [9]
sont verts et ne clignotent plus. Retirez la cassette.
Remarque : Pour de plus amples renseignements, reportez-vous au
guide d’utilisation du BSP™31.
Technical Assistance
Thank you for purchasing the
BSP™31
Label Attachment System
from the
Brady
Corporation.
For technical assistance, please contact:
•1-888-272-3946 (USA)
technical_support@bradycorp.com
•1-800-263-6719 (Canada)
techsuppc[email protected]
•www.bradyeurope.com/services (Europe)
www.bradyid.com/bsp31
www.bradyeurope.com
[1]
[2]
[4]
[3]
[6]
[5]
[7]
[8]
[9]
[1]
[2]
[4]
[3]
[6]
[5]
[7]
[8]
[9]
P.O. Box 2131 Milwaukee, Wisconsin 53201-2131 U.S.A.
www.bradycorp.com
Y960221
C
Produktspezifikationen
| Marke: | Brady |
| Kategorie: | Etikettendrucker |
| Modell: | BSP31 |
Brauchst du Hilfe?
Wenn Sie Hilfe mit Brady BSP31 benötigen, stellen Sie unten eine Frage und andere Benutzer werden Ihnen antworten
Bedienungsanleitung Etikettendrucker Brady

27 März 2026
14 August 2025
7 Juli 2025
6 September 2024
4 September 2024
21 August 2024
15 August 2024
15 August 2024
12 August 2024
10 August 2024
Bedienungsanleitung Etikettendrucker
Neueste Bedienungsanleitung für -Kategorien-
27 März 2026
21 März 2026
15 März 2026
24 Februar 2026
23 Februar 2026
20 Februar 2026
19 Februar 2026
19 Februar 2026
18 Februar 2026
18 Februar 2026