ElectriQ IQFC-WiredCasCtrl Bedienungsanleitung
Lies die bedienungsanleitung für ElectriQ IQFC-WiredCasCtrl (2 Seiten) kostenlos online; sie gehört zur Kategorie Regeln. Dieses Handbuch wurde von 28 Personen als hilfreich bewertet und erhielt im Schnitt 5.0 Sterne aus 3 Bewertungen. Hast du eine Frage zu ElectriQ IQFC-WiredCasCtrl oder möchtest du andere Nutzer dieses Produkts befragen? Stelle eine Frage
Seite 1/2
The control panel of wire controller is responsible for it is timing off for 24h. At this time, if you press the Timer button, it
controlling the operation status of the system by the button and
will deactivate Timing Off.
displaying the working status of the entire system by its LCD
screen, and is responsible for communicating with the control
board of the system.
1The Fan Speedbutton is valid in the Cooling mode,
Heating mode and Ventilation mode.
2Press the Fan Speed button of the wire controller or the
Volume button of the remote controller in the Cooling mode
Heating mode or Ventilation mode, and the volume changes as
follows
3There is no Auto wind in the Ventilation mode, and the
volume changes as follows
Press it to display the Swing icon. The Swing icon will
swing back and forth.
2Press the Swing button, and the upper and lower wind
deflectors will swing within the specified range automatically, and
the left and right wind deflectors will swing within the specified
range automatically, and press it again to stop the swing.
1Short press this button , Enter a state of energy saving of )
26 namely thesetting temperature is26Thisfunction, .
underthebootofRefrigerationandHeatingmodeiseffective .
2Long press this buttonwill enter the query conditionIt will) ,.
exit the query conditionwhen you press this button again and do ,
not operate for five seconds in the condition of the query.
By pressing and Button to check the current state of
indoor unit inthe query conditionThe first time is to display the .
address and model HP of the indoor unit, the second time is to
display the address and the power consumption of the indoor unit,
the third time is to display the address of the indoor unit and T1
temperature , the fourth time is to display the address of the
Control the On/Off status of the system.
indoor unit and T2 temperature, the fifth time is to display the
address of the indoor unit and T2B temperature, the sixth time is
When the air conditioning is powered on, every time you press
to display the address of the indoor unit and T2 average
mode button or the mode button of remote controller, the mode
temperature, the seventh time is to display the address of the
will change in the following sequence.
indoor unit and opening of expansion valve, and recovery the
Auto ModeRefrigerationDehumidificationHeating
main page status for the eight time.
VentilationAuto Mode
1Boot state, press andButton, increase/decrease the
setting temperatureRefrigerationDehumidificationVentilation
and Heating mode Scope of temperature setting: 16 ~ 32
1The first,second,third bit of the DIP Switch is no meaning.
The setting temperature do not adjust in Auto Mode
The factory all dial to the OFF state.
Press the and button for 3s simultaneously to lock
The fourth bit ON of the DIP switch indicates it is With
this button. At this time, It will display the locking icon in LCD.
Power Failure Memory function, and the fourth bit OFF indicates it
Deactivate this button, and press the and button again
is Without Power Failure Memory function.The factory dials to the
simultaneously.
OFF state.
Set Timing On or Timing Off. The wire controller to set the time
range as 1-24h.
1Press the Timer button in the Off statusto go into the
Timing On for 1 hour, and then press the Timer button plus 1 until it
is timing on for 24h. At this time, if you press the Timer button, it
will deactivate Timing On.
2Press the Timer button in the On status to go into the
Timing Off for 1 hour, and then press the Timer button plus 1 until
) ""
""""
)
、
:
)
:
)
)
℃℃
""" "
""
→→→→
→
(" "," "):
) """ "
.,,
℃℃.
)
.
2) """"
2)
""""
)
)
Operation and Instruction:
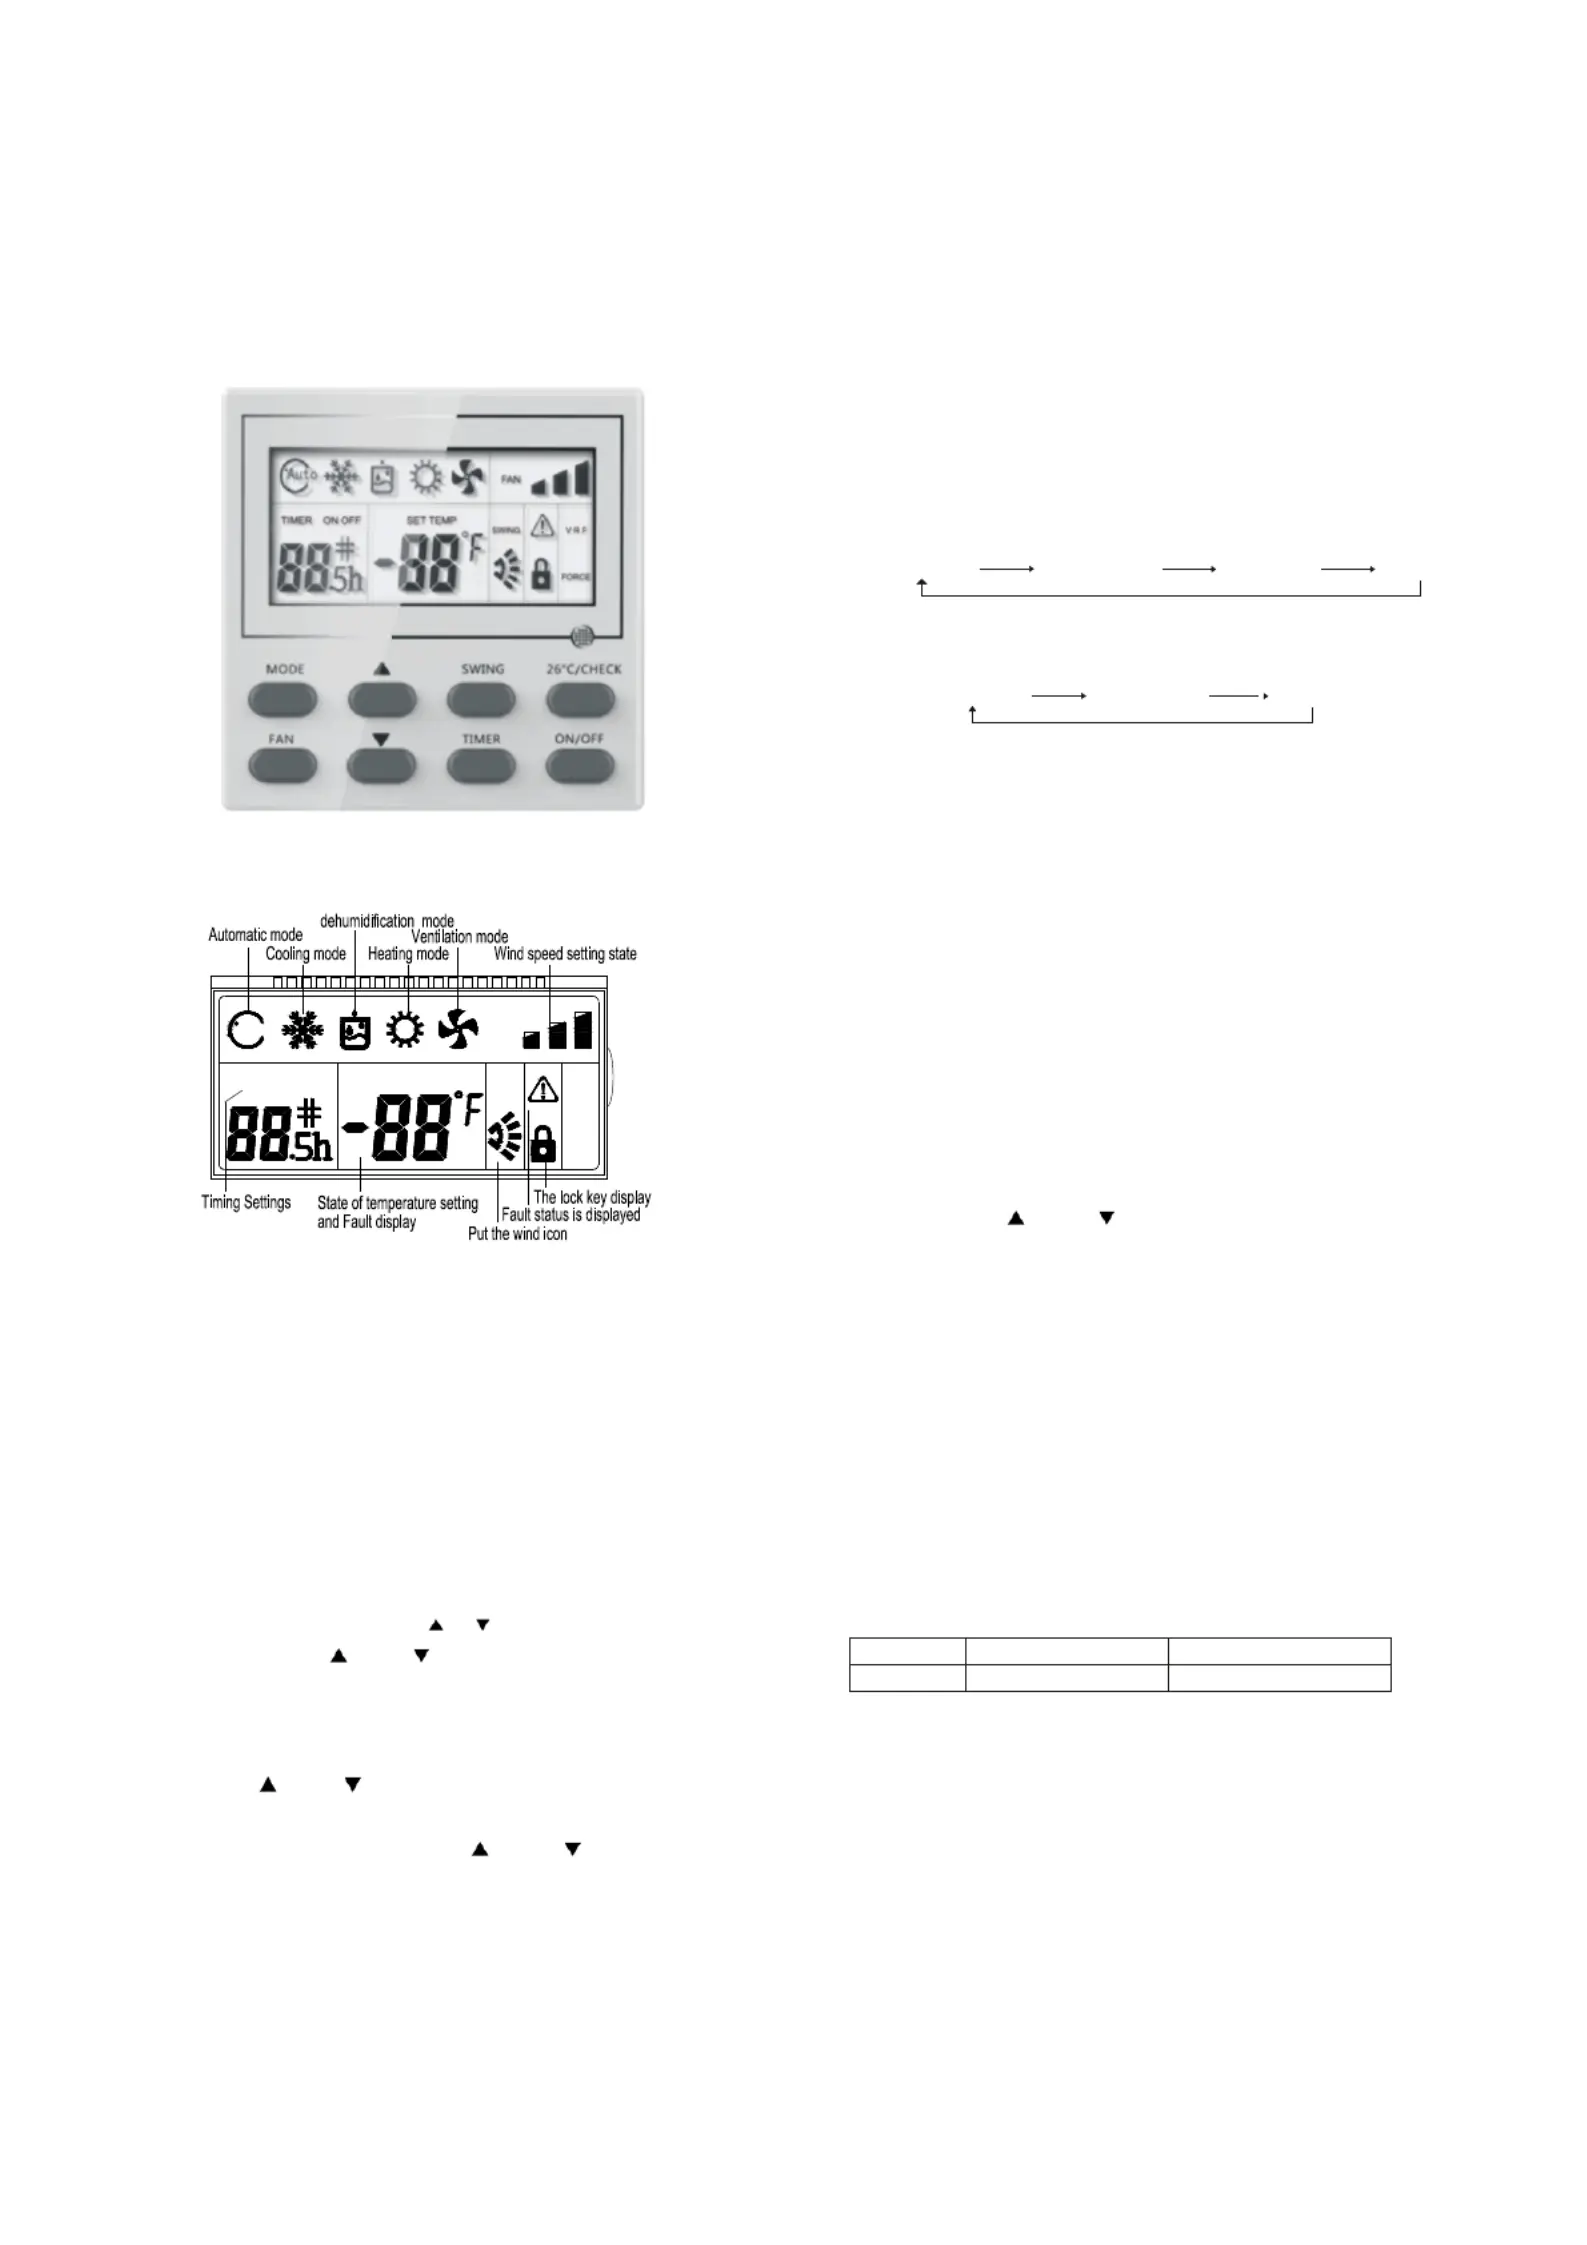
MODEButton:
Description of DIP Switch:
""""TEMP+andTEMP- Button
"":FAN Button
"":SWING Button
1
"℃/":26CHECK Button
"":ON/OFF Button
"":TIMER Button
O
O
O
Op
p
p
pe
e
e
er
r
r
ra
a
a
at
t
t
ti
i
i
io
o
o
on a
n a
n a
n an
n
n
nd I
d I
d I
d In
n
n
ns
s
s
st
t
t
tr
r
r
ru
u
u
uc
c
c
ct
t
t
ti
i
i
io
o
o
on
n
n
n:
:
:
:
"
"
"
""
"
"
":
:
:
:
FA
FA
FA
FAN
N
N
N B
B
B
Bu
u
u
ut
t
t
tt
t
t
to
o
o
on
n
n
n
"
"
"
""
"
"
":
:
:
:
S
S
S
SW
W
W
WI
I
I
IN
N
N
NG
G
G
G B
B
B
Bu
u
u
ut
t
t
tt
t
t
to
o
o
on
n
n
n
"
"
"
"℃/
℃/
℃/
℃/"
"
"
":
:
:
:
2
2
2
26
6
6
6C
C
C
CH
H
H
HE
E
E
EC
C
C
CK
K
K
K B
B
B
Bu
u
u
ut
t
t
tt
t
t
to
o
o
on
n
n
n
"
"
"
""
"
"
":
:
:
:
O
O
O
ON
N
N
N/
/
/
/O
O
O
OF
F
F
FF
F
F
F B
B
B
Bu
u
u
ut
t
t
tt
t
t
to
o
o
on
n
n
n
M
M
M
MO
O
O
OD
D
D
DE
E
E
EB
B
B
Bu
u
u
ut
t
t
tt
t
t
to
o
o
on
n
n
n:
:
:
:
D
D
D
De
e
e
es
s
s
sc
c
c
cr
r
r
ri
i
i
ip
p
p
pt
t
t
ti
i
i
io
o
o
on o
n o
n o
n of D
f D
f D
f DI
I
I
IP S
P S
P S
P Sw
w
w
wi
i
i
it
t
t
tc
c
c
ch
h
h
h:
:
:
:
"
"
"
""
"
"
""
"
"
""
"
"
"
T
T
T
TE
E
E
EM
M
M
MP
P
P
P+
+
+
+a
a
a
an
n
n
nd
d
d
dT
T
T
TE
E
E
EM
M
M
MP
P
P
P-
-
-
- B
B
B
Bu
u
u
ut
t
t
tt
t
t
to
o
o
on
n
n
n
"
"
"
""
"
"
":
:
:
:
T
T
T
TI
I
I
IM
M
M
ME
E
E
ER
R
R
R B
B
B
Bu
u
u
ut
t
t
tt
t
t
to
o
o
on
n
n
n
(
(
(
("
"
"
" "
"
"
",
,
,
,"
"
"
" "
"
"
")
)
)
):
:
:
:
High speedMiddle speed
Low speed
Auto wind
I. Use-method
I
I
I
I.
.
.
. U
U
U
Us
s
s
se
e
e
e-m
-m
-m
-me
e
e
et
t
t
th
h
h
ho
o
o
od
d
d
d
ON
with power failure memory
OFF
without power failure memory
4
Auto
FAN
SET TEMP
TIMERON OFF
VRF
SWING
FORCE
High speedMiddle speed
Low speed
Fig1 Appearance of Wire Controller
Fig2 LCD display content of Wire Controller
IQFC - WiredCasCtrl Wired Remote User Manual
Produktspezifikationen
| Marke: | ElectriQ |
| Kategorie: | Regeln |
| Modell: | IQFC-WiredCasCtrl |
Brauchst du Hilfe?
Wenn Sie Hilfe mit ElectriQ IQFC-WiredCasCtrl benötigen, stellen Sie unten eine Frage und andere Benutzer werden Ihnen antworten
Bedienungsanleitung Regeln ElectriQ

21 Juli 2025
Bedienungsanleitung Regeln
Neueste Bedienungsanleitung für -Kategorien-
3 März 2026
2 März 2026
24 Februar 2026
9 Februar 2026
4 Februar 2026
26 Januar 2026
2 Januar 2026
28 Dezember 2025
18 Dezember 2025
7 Dezember 2025