EXSYS EX-1316HMV Bedienungsanleitung
EXSYS Nicht kategorisiert EX-1316HMV
Lies die bedienungsanleitung für EXSYS EX-1316HMV (2 Seiten) kostenlos online; sie gehört zur Kategorie Nicht kategorisiert. Dieses Handbuch wurde von 35 Personen als hilfreich bewertet und erhielt im Schnitt 4.8 Sterne aus 7 Bewertungen. Hast du eine Frage zu EXSYS EX-1316HMV oder möchtest du andere Nutzer dieses Produkts befragen? Stelle eine Frage
Seite 1/2
Because there are large dierences between PC’s, we can give you only a general installa-
tion guide for the EX-1316HMV. Please refer your computer’s reference manual whenever
in doubt.
1. Connect the USB cable to the USB B-Port of the module an lock the screw.
2. Now connect the other end from the USB cable (A-Plug) to the A-Port at your PC.
HARDWARE INSTALLATION:
6 5
EXEXEX
-
-
-1316HMV1316HMV1316HMV
EnglishEnglishEnglish
EXEXEX
-
-
-1316HMV1316HMV1316HMV
EnglishEnglishEnglish
1
Die EX-1316HMV ist ein Modul zur Umsetzung von USB 2.0 auf sechzehn RS-232
Schnittstellen mit FIFO 16C550 Ports für den Anschluss von High Speed Seriellen RS-
232 Peripherie Geräten (z.B. Modem, Plotter usw.). Die USB Module sind Hot Plug &
Play fähig. Für die Einstellungen der I/O Adressen und Interrupts sind keine Jumper und
Einstellungen notwendig. Sie werden vom System BIOS und beim installieren des
Betriebssystems automatisch vorgenommen. Die EX-1316HMV ist zusätzlich mit ver-
schraubbarem USB-Anschluss ausgerüstet.
BESCHREIBUNG & TECHNISCHE DATEN:
AUFBAU:
Kompatibilität: USB 2.0 Anschluss
Betriebssysteme: WIN 9.x/ ME/ 2000/ XP/ Server 200xx/ Vista/ 7/ 8, Linux, MAC
Anschlüsse: 16x 9 Pin D-Sub Stecker, 1x USB B-Buchse, 1x 12V Buchse,
1x 7V bis 40V Power Anschluss (Terminal Block)
Lieferumfang: EX-1316HMV, Treiber CD, Anleitung, USB Kabel
Zertikate:
CE
CECE
CE / FCC / RoHS / WEEE DE97424562 / WHQL
DRIVER INSTALLATION:
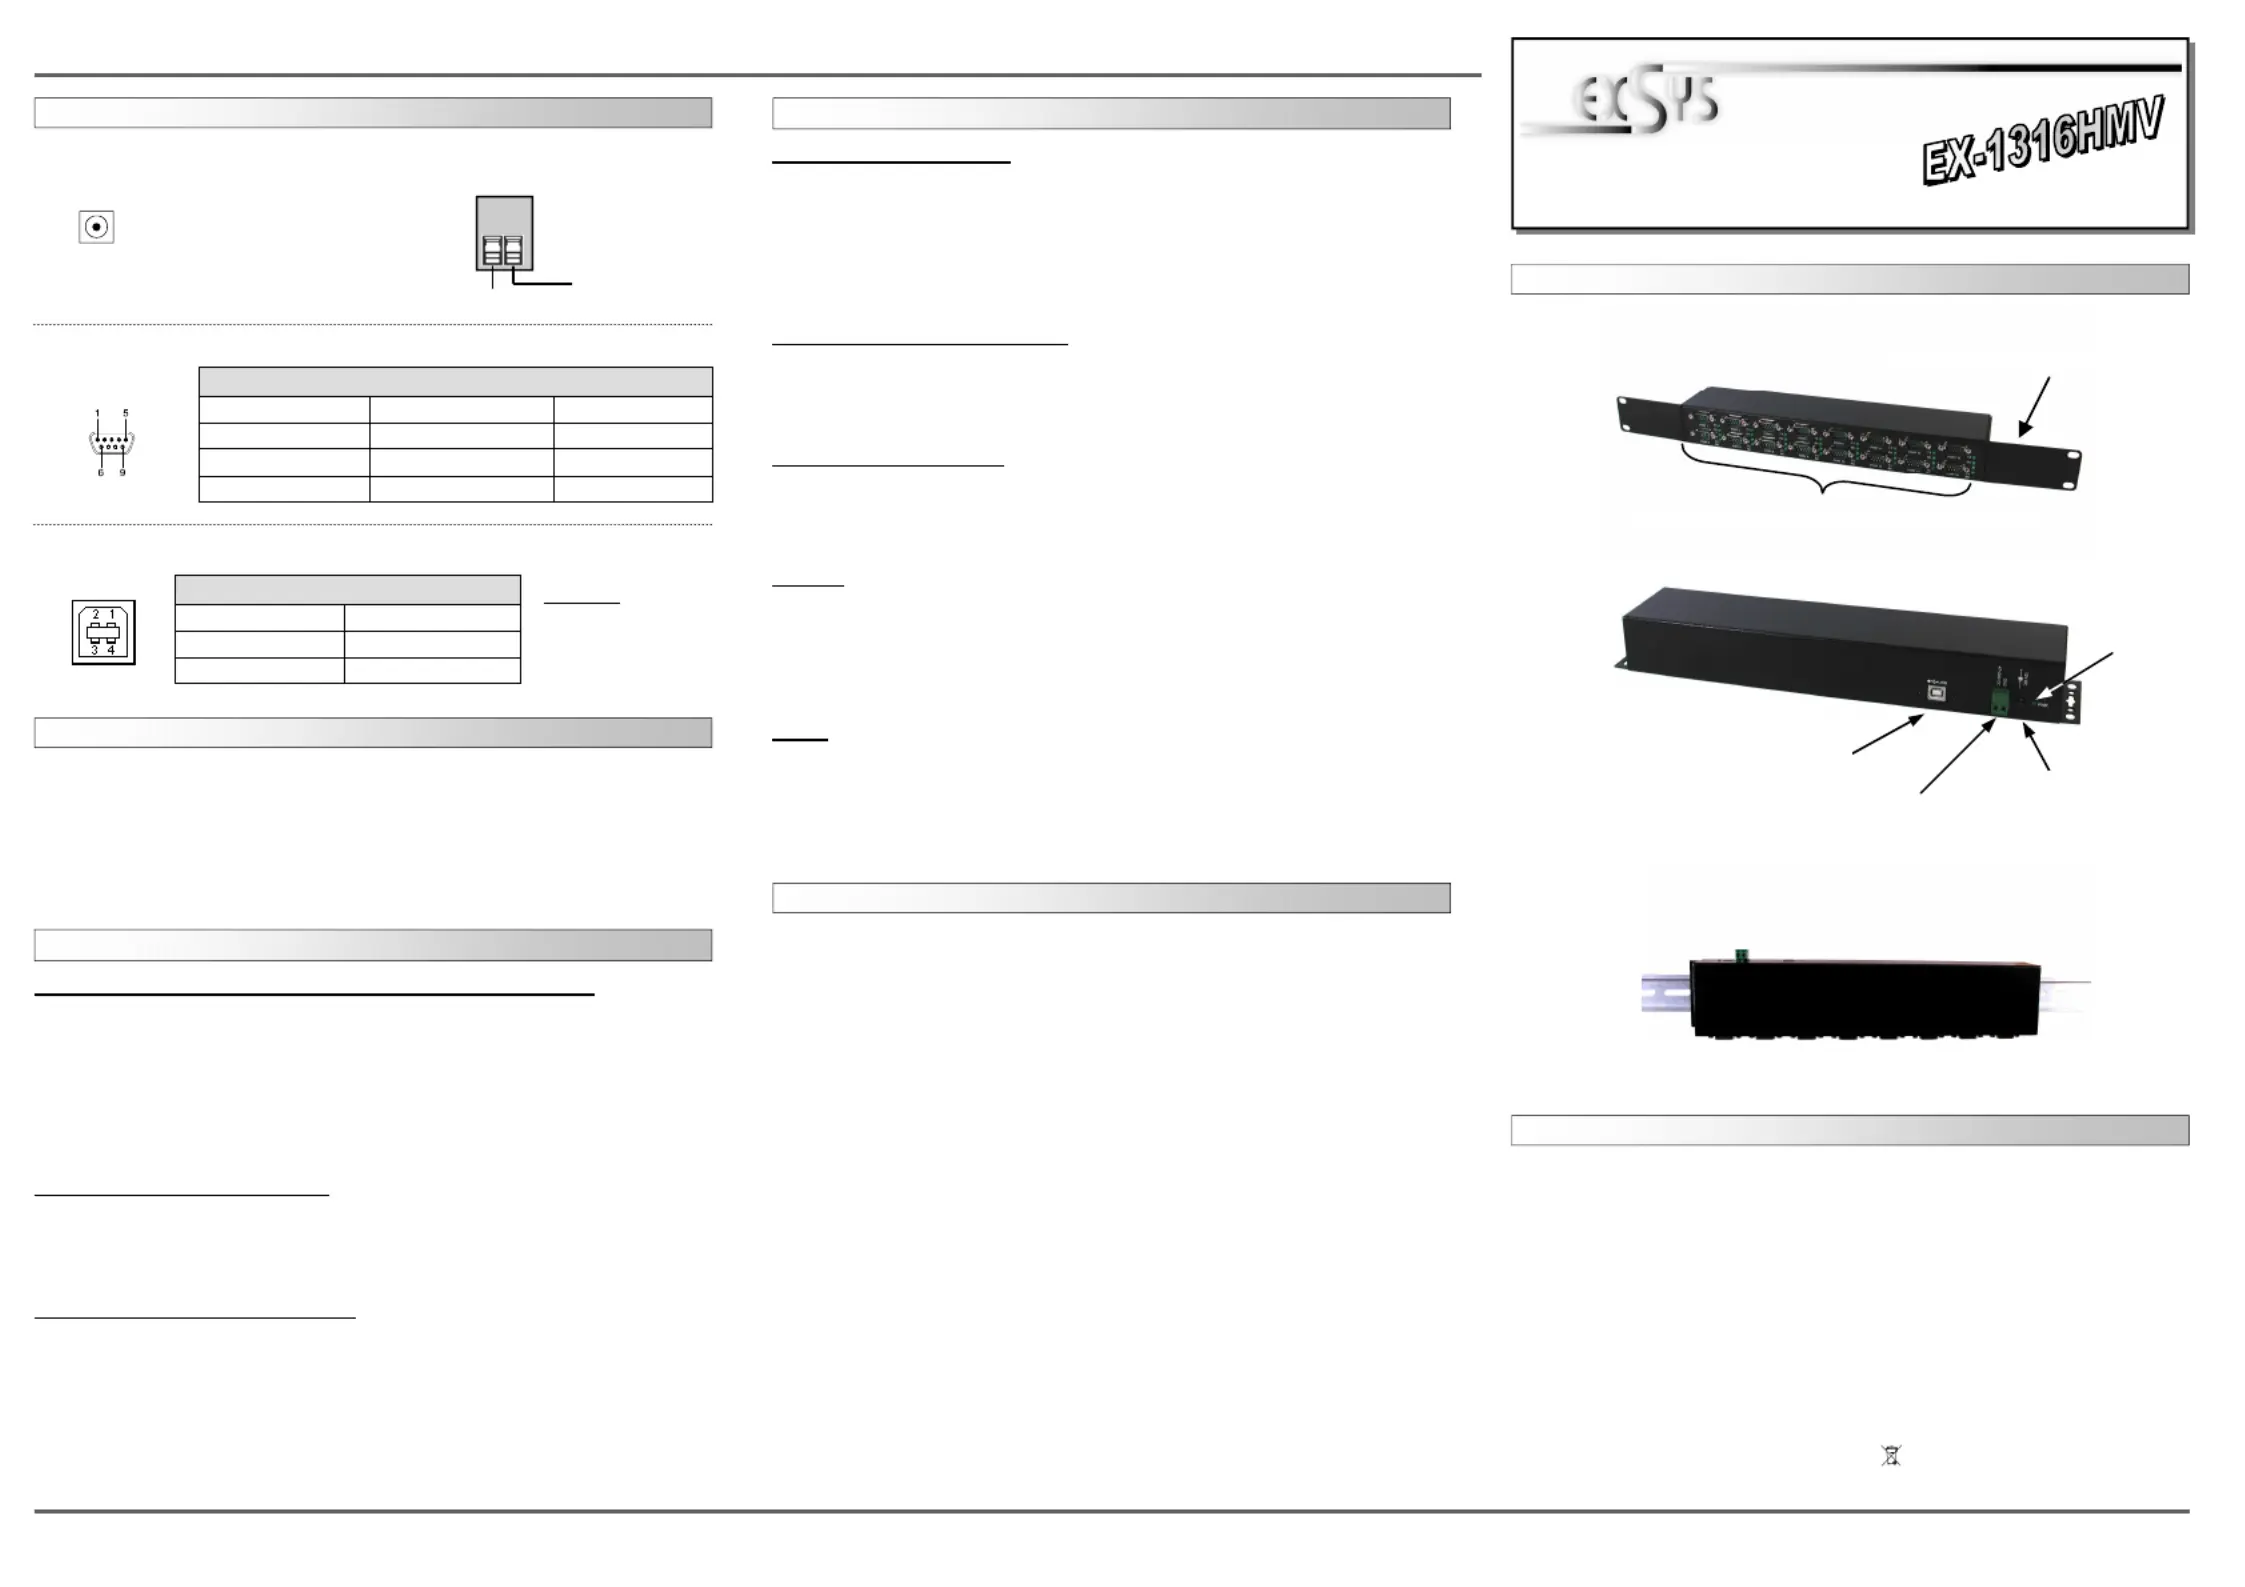
Betriebs LED
12V Buchse für Netzteil
USB B-Buchse
PC-Anschluss
(Verschraubbar)
CLEANING:
For cleaning please use only a dry u less cloth and remove the dirt with gently pres-
sure. In the area of the connectors please make sure that no bres from the cloth re-
main in the connectors. Attention! Never use a moist or wet cloth for cleaning!
BedienungsanleitungBedienungsanleitung
Vers. 1.2 / 05.06.13
Windows XP/ Vista/ 2000/ Server 200x/ 7/ 8 (32&64-Bit) :
Windows will recognize a new and open the hardware assistant. “FT232R USB UART“
Please choose manual installation and put the driver CD into your CD-Rom drive. Enter
the Path
"D:\USB_to_IO\FTDI\(32_64bit)Win7_8_XP_Vista_2008_2008R2_2003_2000”.
into the box for the Path/Source and click at . Now Windows search for >next/continue<
the drivers in the specied directory. Follow the hardware assistant and nish the instal-
lation. If Windows recognizes other new devices repeat the above described steps.
Attention! Restart Windows in any case after installing the drivers.
CHECK THE INSTALLED DRIVER:
Click at <>< then enter and click at . In the windows StartRun“compmgmt.msc“>OK<
that open select Under you should nd >Device Manager<. ”Ports (COM and LPT)“
one more new as sample (COM5). If you see this or similar entries "USB Serial Port„
the module is installed correctly.
INSTALL THE PERIPHERAL DEVICE:
The speed from the serial ports can be set to the maximum baud rate of 115.2Kbaud.
With double click select for example<>Device manager< > USB Serial Port (COM5).
Now you can select the dierent settings of baud rate, stop/start-bits etc. This setting
you can use also for the other COM ports.
DRIVER INSTALLATION:
Windows 98/ 98SE/ ME:
Windows will recognize a new and open the hardware assistant. “FT232R USB UART“
Please choose manual installation and put the driver CD into your CD-Rom drive (as
sample D:) . Now enter the Path into the box for the “D:\USB_to_IO\FTDI\Win98_ME”
Path/Source and click at . Now Windows search for the drivers in the >next/continue<
specied directory. Follow the hardware assistant and nish the installation. If Windows
recognizes other new devices repeat the above described steps. Restart Attention!
Windows in any case after installing the drivers.
CHECK THE INSTALLED DRIVER:
Click at <>< then enter and click at . In the windows StartRun“compmgmt.msc“>OK<
that open select Under you should nd >Device Manager<. ”Ports (COM and LPT)“
one more new as sample (COM3). If you see this or similar entries "USB Serial Port„
the module is installed correctly.
CHANGE PORT NUMBER:
If you like to change the port number for example COM 3 to COM 5, open the >Device
Manager< click at >COM3<, >Settings< and then >Advance<. There you can change
between COM 3 to 256.
LINUX:
There are drivers available for Linux. The drivers are located in the folder
“D:\USB_to_IO\FTDI\Linux x86_64“on the driver CD. They are supported by the most
versions of Linux. Because each individual distribution and kernel version of Linux is
dierent, sadly we cant provide a installation instruction. Please refer to the installation
manual for standard IO ports from your Linux version !
MAC:
There are drivers available for MAC. The drivers are located in the folder
“D:\USB_to_IO\FTDI\MAC OSX or Mac_OS_9_8“on the driver CD. They are support-
ed by the most versions of MAC OS. Because each individual version of MAC OS is
dierent, sadly we cant provide a installation instruction. Please refer to the installation
manual for standard IO ports from your MAC OS version !
Vorderseite:
S1-S16: 9 Pin Seriell RS-232 Stecker
Metallbügel zum Einbau in ein 19“ Rack
+7V ~ 40V
Power Anschluss
Rückseite:
Installation auf einer Trägerschiene:
JUMPERSETTING & CONNECTORS:
ATTENTION !!!
Use only the original
power supply !!!
12 Volt Connector:
DB 9M:
Pin Signal Pin Signal Pin Signal
1 CDC 4 DTR 7 RTS
2 RXD 5 GROUND 8 CTS
3 TXD 6 DSR 9 RI
Serial 9 Pin male connector
USB B-Connector:
Attention!
Never plug in with
force or in wrong
direction.
+7V ~ 40V Terminal Block:
+7V ~ 40V
GND (Ground)
USB 2.0 B-Connector
Pin Signal Pin Signal
1 VCC 3 DATA+
2 DATA- 4 GND
Produktspezifikationen
| Marke: | EXSYS |
| Kategorie: | Nicht kategorisiert |
| Modell: | EX-1316HMV |
| Breite: | 336 mm |
| Tiefe: | 68 mm |
| Gewicht: | 1000 g |
| Produktfarbe: | Schwarz |
| Übertragungstechnik: | Kabelgebunden |
| Höhe: | 43 mm |
| Betriebstemperatur: | 0 - 55 °C |
| Relative Luftfeuchtigkeit in Betrieb: | 5 - 95 % |
| Zertifizierung: | CE, FCC |
| Eingebaut: | Nein |
| Temperaturbereich bei Lagerung: | -30 - 75 °C |
| Unterstützt Windows-Betriebssysteme: | Ja |
| Mac-Kompatibilität: | Ja |
| Unterstützt Mac-Betriebssysteme: | Ja |
| Größe (Imperial): | 19 " |
| Serielle Schnittstelle: | RS-232 |
| Nachhaltigkeitszertifikate: | RoHS |
| Unterstützte Linux-Betriebssysteme: | Ja |
| Anzahl serielle Anschlüsse: | 16 |
| Hostschnittstelle: | USB |
| Chipsatz: | FTDI |
| Ausgangsschnittstelle: | Seriell |
Brauchst du Hilfe?
Wenn Sie Hilfe mit EXSYS EX-1316HMV benötigen, stellen Sie unten eine Frage und andere Benutzer werden Ihnen antworten
Bedienungsanleitung Nicht kategorisiert EXSYS

14 März 2026
26 September 2025
26 September 2025
6 September 2025
6 September 2025
5 September 2025
31 Juli 2025
25 Juli 2025
24 Juli 2025
24 Juli 2025
Bedienungsanleitung Nicht kategorisiert
Neueste Bedienungsanleitung für -Kategorien-
3 April 2026
3 April 2026
3 April 2026
3 April 2026
3 April 2026
3 April 2026
3 April 2026
3 April 2026
3 April 2026
3 April 2026