FLM CP10 Bedienungsanleitung
Lies die bedienungsanleitung für FLM CP10 (4 Seiten) kostenlos online; sie gehört zur Kategorie Stativ. Dieses Handbuch wurde von 35 Personen als hilfreich bewertet und erhielt im Schnitt 4.7 Sterne aus 18 Bewertungen. Hast du eine Frage zu FLM CP10 oder möchtest du andere Nutzer dieses Produkts befragen? Stelle eine Frage
Seite 1/4
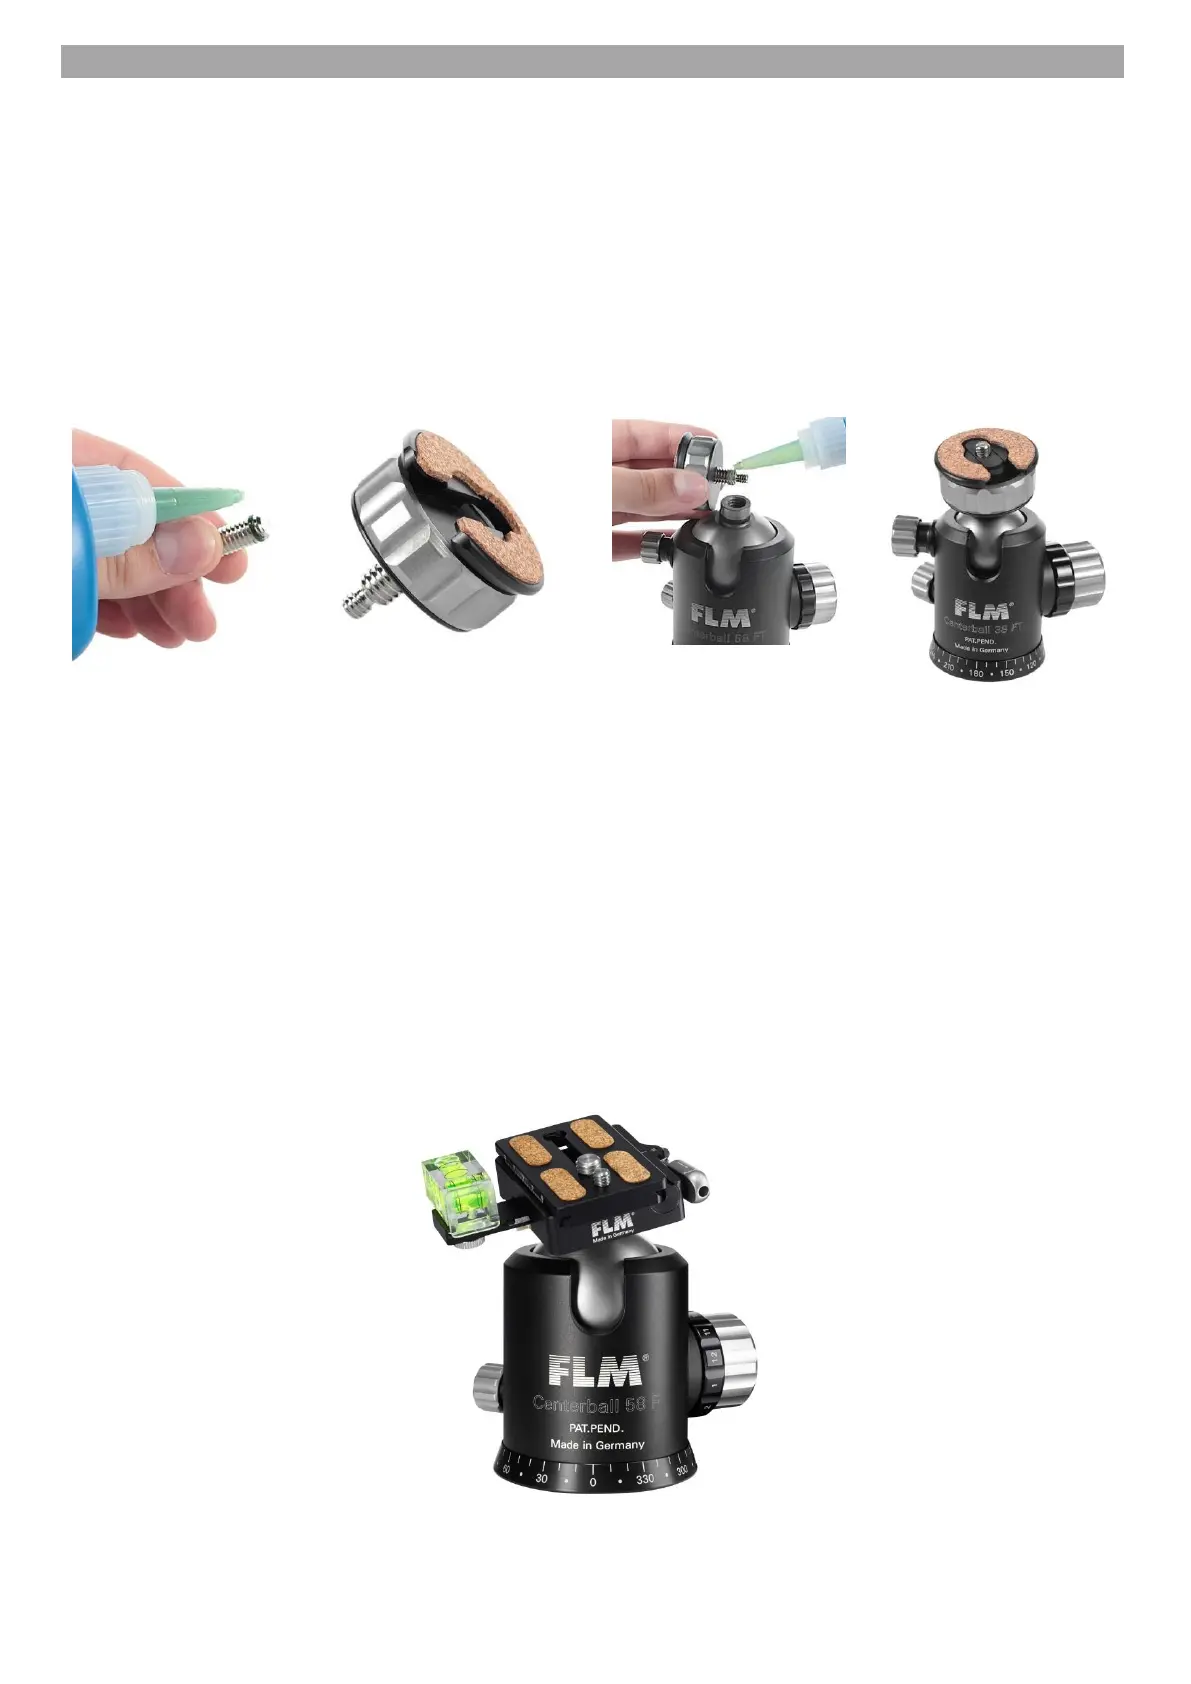
Instructions fort he adhesive assembly of the QRB and PRP
Glued Joints for FLM Centerball
The stud screw, which is supplied with the Centerball, can be screwed into the ball in two ways. With the1/4" threads
on the top, the single plate can be screwed on so that the projecting 1/4" threads can be used for the camera
connection. However, for the setup of special camera plates, the 3/8" threads must point upwards and in this case the
1/4" threads of the stud screw disappear in the ball.
In order to prevent damage to the bottom threads of the camera, you must pay particular attention to the length of the
threads, which projects outwards.
To connect the Quick-Release Basis or the Power-Release Basis (picture 2) firmly and in a manner, which will not
allow it to rotate, with the Centerball, the stud screw is glued to the basis and CenterBall. Please use themetal
adhesive with thermal stability up to about 100° C to allow later changing of your basis. We recommend UHU plus
ultimate strength 300 (UHU plus endfest 300).
Picture 1
Picture 2
Picture 3
Apply the glue to the end of the 3/8" threads about three thread turns all around (no glue on the screw head, see
picture 1) and screw this screw end in up to the stop in the Power-Release Basis. However, for the Quick-Release
Basis, the screw must not be allowed to project out of the basis plate (picture 3).
After hardening (see instructions for use of your glue), the basis is glued to the CenterBall in the same way (picture
3). You can replace your old basis plate later by completely immersing the basis plate—BUT ONLY THE BASIS
PLATE—in hot boiling water. This softens the metal adhesive and the plate can be taken off easily.
Protect your hand against burns when doing this.
Please keep care that no sand and saltwater attained
inside of the ballhead.
Warranty
We provide a 10 year warranty for material and workmanship for all FLM products.
Now, we hope you have lots of fun and enjoy the fast and secure mounting of
your camera.
Produktspezifikationen
| Marke: | FLM |
| Kategorie: | Stativ |
| Modell: | CP10 |
Brauchst du Hilfe?
Wenn Sie Hilfe mit FLM CP10 benötigen, stellen Sie unten eine Frage und andere Benutzer werden Ihnen antworten
Bedienungsanleitung Stativ FLM

3 September 2024
Bedienungsanleitung Stativ
- FeiyuTech
- Sky-Watcher
- Square Jellyfish
- Induro
- Garmin
- Bee Star
- Konig & Meyer
- E-Image
- Peak Design
- Asus
- Essentiel B
- Stalco
- Rollei
- Bauhn
- Ikan
Neueste Bedienungsanleitung für -Kategorien-
17 Januar 2026
14 Januar 2026
13 Januar 2026
3 Januar 2026
23 Dezember 2025
16 Dezember 2025
16 Dezember 2025
11 Dezember 2025
7 Dezember 2025
7 Dezember 2025