Geemarc VISO 5 Bedienungsanleitung
Geemarc Armbanduhr VISO 5
Lies die bedienungsanleitung für Geemarc VISO 5 (27 Seiten) kostenlos online; sie gehört zur Kategorie Armbanduhr. Dieses Handbuch wurde von 32 Personen als hilfreich bewertet und erhielt im Schnitt 4.0 Sterne aus 2 Bewertungen. Hast du eine Frage zu Geemarc VISO 5 oder möchtest du andere Nutzer dieses Produkts befragen? Stelle eine Frage
Seite 1/27
123
UserManual
Viso5–MSF(UK)
!!!PLEASEREFERTOOURWEBSITE:WWW.GEEMARC.COM
FORANUPTODATEUSERGUIDE,ASTHEREMAYBE
IMPORTANTUPDATESANDCHANGESYOUNEEDTOBE
AWAREOF!!!
1.Features
‐EasytoReadandUnderstandTimedisplay
‐PerpetualCalendarUptoYear2099
‐14languages(usertoselectatsetupstage).
‐Dayoftheweek,month,stageofthedayandtime
modes
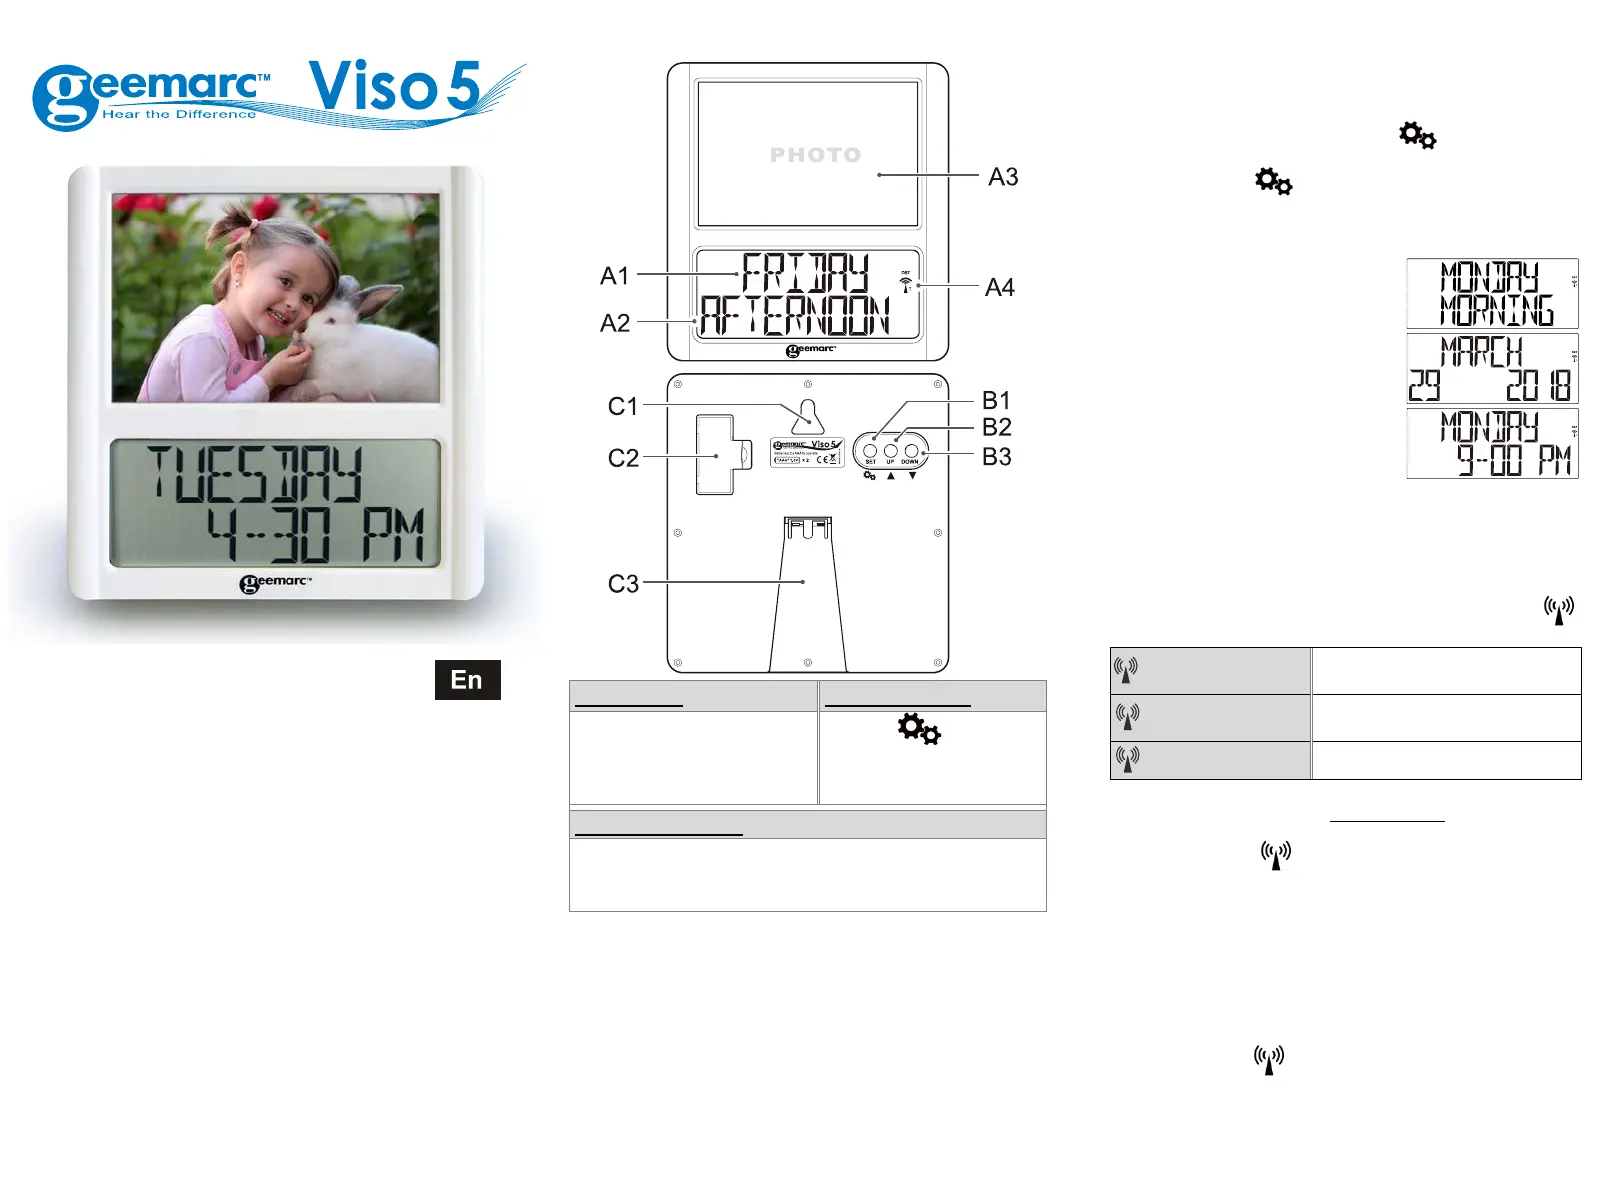
2.UnitAppearance
PartA‐LCDPartB‐Button
A1:DayofWeekorMonth
A2:Stageoftheday
A3:Photoframe
A4:RadioControlIcon
B1:“SET/
”Button
B2:“▲”Button
B3:“▼”Button
PartC‐Structure
C1:HangingHole
C2:BatteryDoor
C3:Stand
3.Insertapicture:
zRemovethetemporarypicturewithdryprotectionby
slidingupwards.
zInsertyourpicturewhichneedstobe15x11cmandslide
down.
4.TOBEGIN:
zOpenthebatteryCover(C2).
zInsert2xAAAsizebatteriesobservingpolarity(+and–).
zReplacebatterycompartmentcover(C2).
4.1Tobegin
Tobegin,youhave1minutetoarrangethefirstsetting.
TheclockdisplaysEnglish,press“▲”(B2)or”▼”(B3)to
selectyourlanguageandpress“SET/
”(B1)tovalidate,
Press”▲”(B2)or”▼”(B3)tochoosethemodeofdisplay
setandpress“SET/
”(B1)tovalidate(seenote).
Ifyoudon’tpressanykeys,after1minutetheViso5will
launchtheautomaticclocksetting.
Note:PlacetheVISO5nearawindowfortheclockto
automaticallyset.
‐DP‐1displaysthedayoftheweek
andthe2
nd
linethepartoftheday.
‐DP‐2displaystheMonthandthe2
nd
linethedateandtheyear.
‐DP‐3displaysthedayofweekand
the2
nd
linethetime.
‐DP‐4rotatesbetweenall3displaysandyoucansetthe
timethateachdisplayisshown.Seechapter4.3.Cforfull
instructions.
4.2RadioControlledTime:
zTheclockautomaticallystartstoscantheMSFtime
signalinthefirst10minutes.(RadioControlIcon“
”
(A4)flashesonLCD).
(A4)flashing
IndicatestheMSFsignalis
beingreceived
(A4)Continuous
Indicatessignalreceived
successfully
(A4)Icondisappears
Indicatessignalreceptionfailed
zTheclockcanbesettoscantheradiosignalmanuallyby
holding“▼”(B3)buttonfor3seconds
.Eachreception
takesaroundseveralminutes.Ifthereceptionfails,
scanningstops.(“
”(A4)onLCDdisappear)andrepeats
againonnextfullhour.E.g.scanningfailedat8:20a.m.It
willscanagainat9:00a.m.
zSummerandwintertimechange(andreverse)isset
automatically.
4.3TimeSetting
Youmustwait10mintochecktheclockissetautomatically
(seechapter4.2)beforeyouproceedtothesetting,press
andhold“▼”(B3)for3secondstoturnofftheautomatic
clocksetting(icon
(A4)disappears).
(a)DateandTimeSetting
Notethatduringthesettingsituation,alongpress“▼”
or”▲”canacceleratewhilescrollingthroughthesettings.
Produktspezifikationen
| Marke: | Geemarc |
| Kategorie: | Armbanduhr |
| Modell: | VISO 5 |
Brauchst du Hilfe?
Wenn Sie Hilfe mit Geemarc VISO 5 benötigen, stellen Sie unten eine Frage und andere Benutzer werden Ihnen antworten
Bedienungsanleitung Armbanduhr Geemarc

8 Oktober 2025
7 August 2025
8 Juni 2024
8 Juni 2024
22 Mai 2024
Bedienungsanleitung Armbanduhr
Neueste Bedienungsanleitung für -Kategorien-
26 März 2026
17 Februar 2026
14 Februar 2026
3 Februar 2026
2 Februar 2026
2 Dezember 2025
14 November 2025
14 November 2025
13 November 2025
13 November 2025