Hinkley Lighting Moore 46412HB Bedienungsanleitung
Hinkley Lighting Nicht kategorisiert Moore 46412HB
Lies die bedienungsanleitung für Hinkley Lighting Moore 46412HB (25 Seiten) kostenlos online; sie gehört zur Kategorie Nicht kategorisiert. Dieses Handbuch wurde von 12 Personen als hilfreich bewertet und erhielt im Schnitt 4.3 Sterne aus 4 Bewertungen. Hast du eine Frage zu Hinkley Lighting Moore 46412HB oder möchtest du andere Nutzer dieses Produkts befragen? Stelle eine Frage
Seite 1/25
start here
commencez ici
empezar aquí
Mounting Instructions
Item No:46410,46412,46413
Consignes de montage
Numéro d’article:46410,46412,46413
Instrucciones De Montaje
EnglishSpanish
Número del artículo:
46410,46412,46413French
1.Find a clear area in which you can work.
2.Unpack
fixture and glass from carton.
3.Carefully review instructions prior to assembly.
1.Encontrar un área clara en la que se puede trabajar.
2.Desembale xture fi y el vidrio de la caja.
3.Revise cuidadosamente las instrucciones antes del montaje.
1.Trouvez un endroit clair dans lequel vous pouvez travailler.
2.Déballez fi xture et de verre du carton.
3.Examinez attentivement les instructions avant l'assemblage.
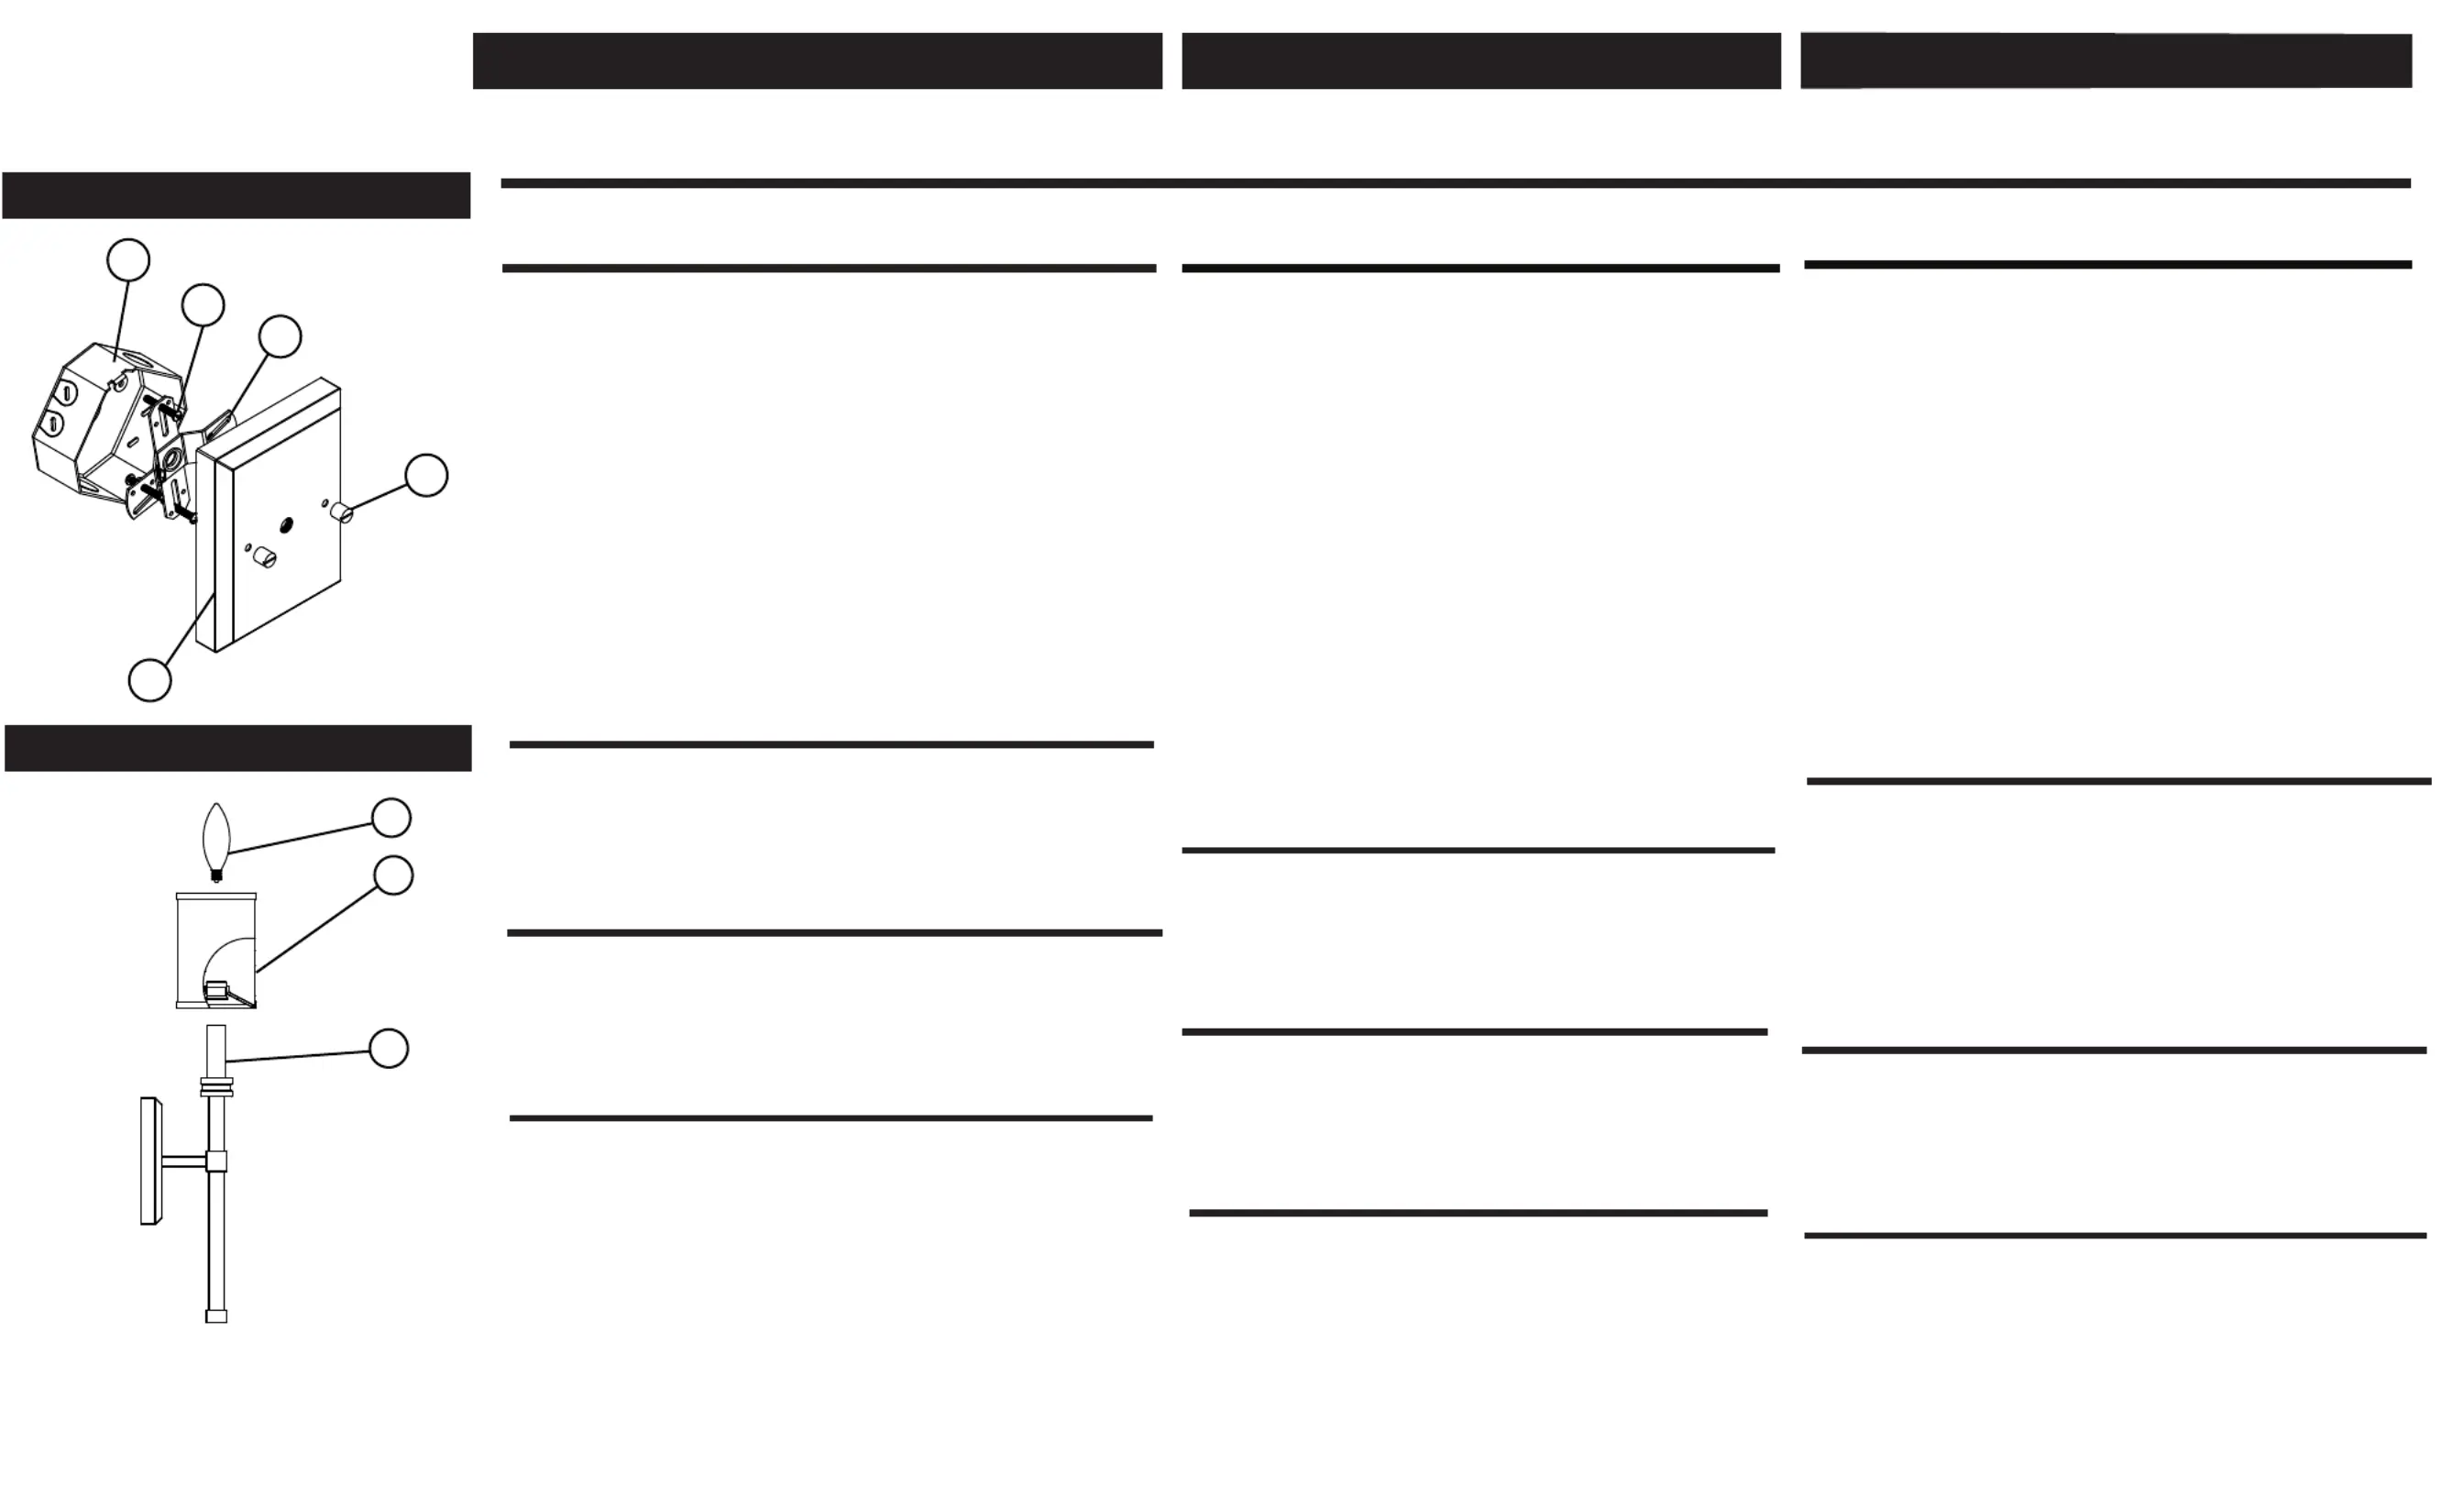
DRAWING 1 - MOUNTING
DRAWING 2-Shade INSTALL
1.Place shade (1) over socket (3)
2.Lamp fixture with appropriate candle base bulb(s)
(2)
3.Fixture can now be powered on .
1.To begin installation of your fixture it will first be
necessary to remove the mounting plate (A) from
thebackplate (B). This is accomplished by first
removing thet
wo. knobs (C)Set knobs in a safe
place for uselater.
2.Next attach mounting plate (A) to junction box (J)
with two screws (D), NOT PROVIDED
3.Make all necessary electrical connections following
instruction sheet IS-18 provided.
4.After all connections are made, tuck wires into
junction box (J) and slip backplate (B) over
mounting tabs (T) and align threaded holes in tab
(T)with holes (H) in backplate (B).
5.Thread in screws (C) removed earlier, and tighten to
secure fixture to wall.
SAFETY WARNING: READ WIRING AND GROUNDING
INSTRUC-TIONS (I.S. 18) AND ANY ADDITIONAL
DIRECTIONS. TURN POWER SUPPLY OFF DURING
INSTALLATION. IF NEW WIRING IS REQUIRED, CONSULT
A QUALIFED ELECTRICAN OR LOCAL ATHORITES FOR
CODE REQUIREMENTS
AVERTISSEMENT DE SCURIT : LIRE LES INSTRUCTIONS DE ÉÉ
CBLAGE ET DE MISE LA TERRE (I.S. 18) ET TOUTES ÂÀ
INSTRUCTIONS SUPPLMENTAIRES. COUPEÉ
Z L'ALIMENTATION
ÉLECTRIQUE PENDANT L'INSTALLATION. SI UN NOUVEAU
CBLAGE EST NCESSAIRE, CONSULTE UN LECTRICIEN ÂÉZÉ
QUALIFI OU LES AUTORITS LOCALES POUR CONNATRE LES ÉÉÎ
EXIGENCES DU CODE
HINKLEY 33000 Pin Oak Parkway, Avon Lake, OH 44012 800.446.5539 / 440.653.5500 hinkley.com
HINKLEY
1
2
3
J
D
A
B
C
1.Para comenzar la instalación de su dispositivo,
primero será necesario retirar la placa de montaje
(A)de la placa posterior (B). Esto se logra quitando
primero las dos perillas (C). Coloque las perillas en
un lugar seguro para usarlas más adelante.
2.Luego fije la placa de montaje (A) a la caja de
conexiones (J) con dos tornillos (D), NO
SUMINISTRADOS.
3.Realice todas las conexiones eléctricas necesarias
siguiendo la hoja de instrucciones IS-18
proporcionada.
4.Después de realizar todas las conexiones, meta
los cables en la caja de conexiones (J) y deslice la
placa posterior (B) sobre las pestaas de montaje (T)ñ
y alinee los orificios roscados en la pestaa (T) conñ
los orificios (H) en la placa posterior (B).
5.Enrosque los tornillos (C) que quitó
anteriormente y apriételos para asegurar el
accesorio a la pared.
1.Pour commencer l'installation de votre luminaire, il
faudra d'abord retirer la plaque de montage (A) de la
plaque arrière (B). Ceci est accompli en retirant
d'abord les deux boutons (C). Placez les boutons dans
un endroit sr pour une utilisation ultérieure.û
2.Fixez ensuite la plaque de montage (A) à la boteî
de jonction (J) avec deux vis (D), NON FOURNIES
3.
Effectuez toutes les connexions électriques
nécessaires en suivant la feuille d'instructions IS-18
fournie.
4.Une fois toutes les connexions effectuées, rentrez
les fils dans la bote de jonction (J) et glissez la plaqueî
arrière (B) sur les languettes de montage (T) et
alignez les trous filetés de la languette (T) avec les
trous (H) de la plaque arrière (B).
5.Vissez les vis (C) retirées plus tt et serrez pour fixerô
le luminaire au mur.
AVERTISSEMENT DE SCURIT : LIRE LES INSTRUCTIONS ÉÉ
DE CBLAGE ET DE MISE Â
À LA TERRE (I.S. 18) ET TOUTES
INSTRUCTIONS SUPPLMENTAIRES. COUPEZ É
L'ALIMENTATION LECTRIQUE PENDANT É
L'INSTALLATION. SI UN NOUVEAU CBLAGE EST Â
NCESSAIRE, CONSULTEZ UN LECTRICIEN QUALIFI ÉÉÉ
OU LES AUTORITS LOCALES POUR CONNATRE LES ÉÎ
EXIGENCES DU CODE
INSTALACIN DE SOMBRA:Ó
INSTALLATION DU STORE :
1.Coloque la pantalla (1) sobre el casquillo (3).
2.Lámpara con bombilla(s) apropiada(s) con base
de vela (2)
3.Ahora se puede encender el dispositivo.
1.Placez l'abat-jour (1) sur la douille (3).
2.Luminaire avec ampoule(s) à culot de bougie
appropriée (2)
3.L'appareil peut maintenant être allumé.
SHADE INSTALLATION:
Produktspezifikationen
| Marke: | Hinkley Lighting |
| Kategorie: | Nicht kategorisiert |
| Modell: | Moore 46412HB |
Brauchst du Hilfe?
Wenn Sie Hilfe mit Hinkley Lighting Moore 46412HB benötigen, stellen Sie unten eine Frage und andere Benutzer werden Ihnen antworten
Bedienungsanleitung Nicht kategorisiert Hinkley Lighting

28 Juli 2025
28 Juli 2025
Bedienungsanleitung Nicht kategorisiert
Neueste Bedienungsanleitung für -Kategorien-
1 April 2026
1 April 2026
1 April 2026
1 April 2026
1 April 2026
1 April 2026
1 April 2026
1 April 2026
1 April 2026