Hori Fighting Stick Mini Bedienungsanleitung
Lies die bedienungsanleitung für Hori Fighting Stick Mini (12 Seiten) kostenlos online; sie gehört zur Kategorie Regeln. Dieses Handbuch wurde von 13 Personen als hilfreich bewertet und erhielt im Schnitt 4.0 Sterne aus 7 Bewertungen. Hast du eine Frage zu Hori Fighting Stick Mini oder möchtest du andere Nutzer dieses Produkts befragen? Stelle eine Frage
Seite 1/12
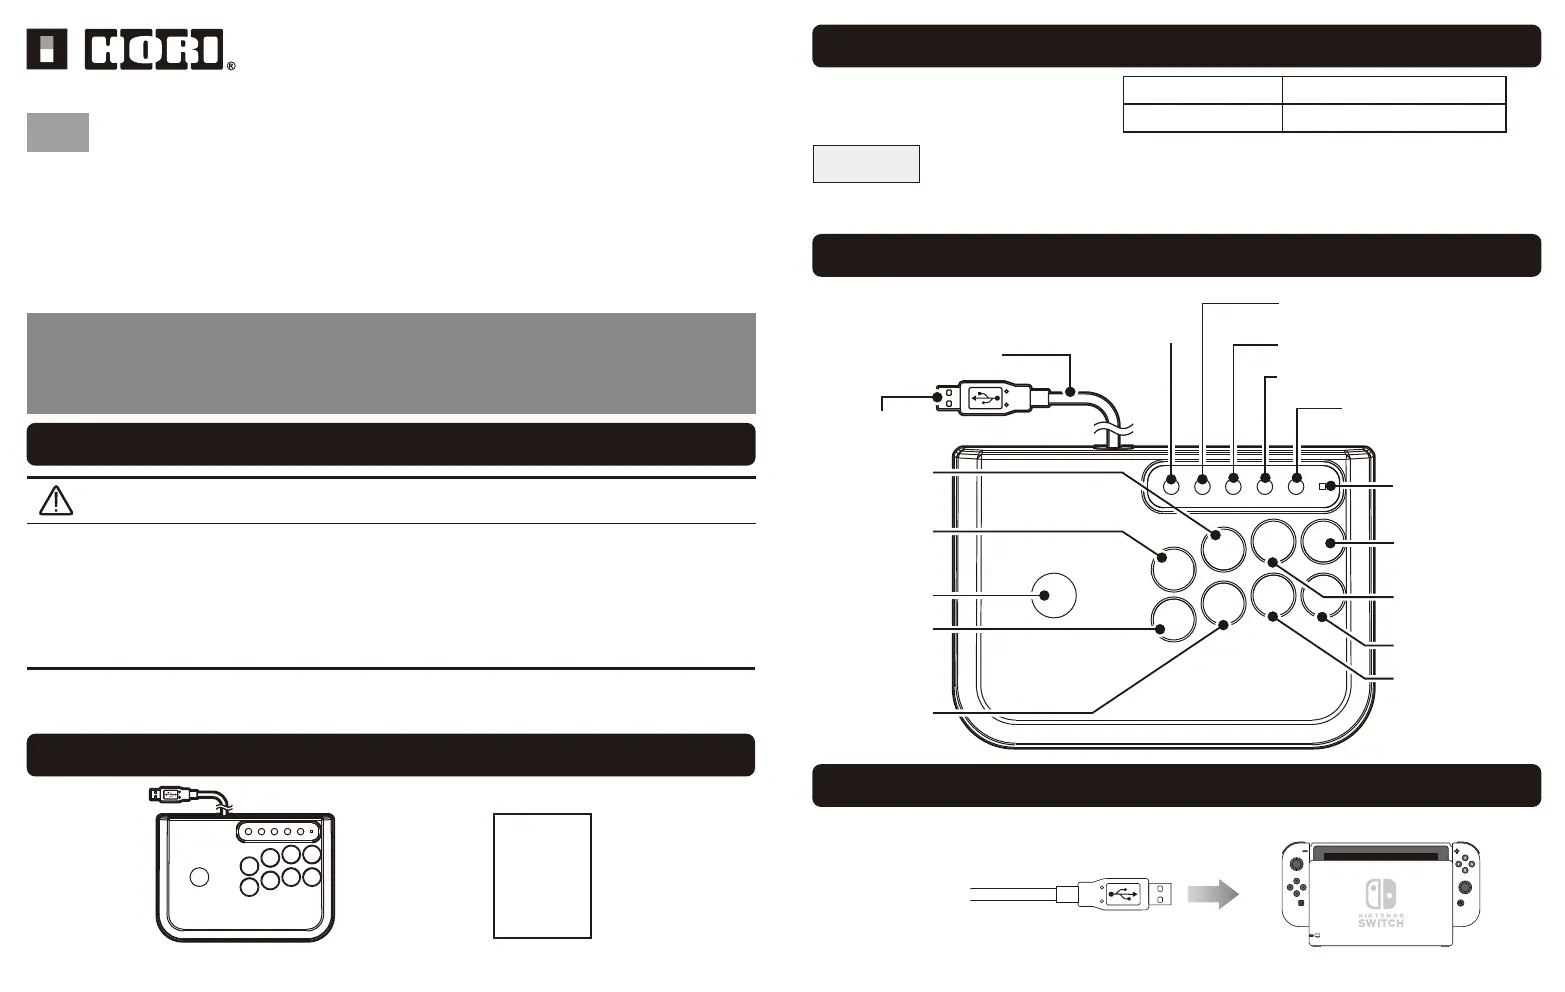
To Nintendo Switch
TM
Dock USB port
* Do not press on any buttons when connecting the USB.
* Make sure to check the connector direction before connecting.
Insert the USB connector of the controller to the USB port of the Nintendo Switch
TM
Dock.
Layout
How to connect
Platform
Important
Please refer to the Nintendo Switch manual before use.
Make sure that your Nintendo Switch is updated to the latest system firmware.
* This product is not a wireless controller.
* Internet connection is required to update the Nintendo Switch firmware and/or to install onto your PC.
Thank you for purchasing this product. Before using this product please read the instructions carefully.
After reading the instruction sheet, please keep it with you for reference.
Instruction Manual
Warning
Caution
To Parent/Guardian, Please read carefully
This product contains small parts and has a long cable. Keep it away from children under 3 years old.
Do not get this product wet or expose to extreme temperatures.
Do not use when the product is damaged.
Do not touch the metal parts of the USB plug.
Do not pull roughly or bend the cable of the controller.
Do not throw or drop this product.
Never disassemble, repair or modify this product.
If the product needs cleaning, use only a soft dry cloth. Do not use any chemical agents like benzene or thinner.
Included
Controller :
×1Instruction manual :
×1
・Make sure that your Nintendo Switch is updated to the latest system firmware.
・This product does not support the following features.
・Gyroscope, Motion IR Camera, Accelerometer, Player LED, HD Rumble, HOME Button Notification LED, NFC,
L Stick / L Stick Button, R Stick / R Stick Button
Nintendo Switch
/ PC(XInput)
Windows
®
10/8〜8.1/7Supported OS
USB Port
System requirements
USB Cable
USB Connector
Direction Pad
TURBO LED
+ Button
(PC : START Button)
TURBO Button
A Button
B Button
X Button
Y Button
L Button
(PC : LB Button)
ZL Button
(PC : LT Button)
R Button
(PC : RB Button)
ZR Button
(PC : RT Button)
(PC : No function)
Capture Button
(PC : BACK Button)
− Button
(PC : GUIDE Button)
HOME Button
EN
2026-40US
Produktspezifikationen
| Marke: | Hori |
| Kategorie: | Regeln |
| Modell: | Fighting Stick Mini |
| Breite: | 203 mm |
| Tiefe: | 152 mm |
| Produktfarbe: | White, Black |
| Übertragungstechnik: | Kabelgebunden |
| Energiequelle: | Kabel |
| Betriebsanleitung: | Ja |
| Gerätetyp: | Flightstick |
| Gamingplattformen unterstützt: | PC, PlayStation 4, PlayStation 5 |
| Gaming-Control Funktionsknöpfe: | Turbo-Taste |
| Programmierbare Tasten: | Ja |
| Geräteschnittstelle: | USB |
| Anzahl der Joysticks: | 1 |
Brauchst du Hilfe?
Wenn Sie Hilfe mit Hori Fighting Stick Mini benötigen, stellen Sie unten eine Frage und andere Benutzer werden Ihnen antworten
Bedienungsanleitung Regeln Hori

18 Dezember 2025
3 September 2025
3 September 2025
3 September 2025
30 Mai 2025
8 Mai 2024
30 April 2024
6 Juni 2023
29 Mai 2023
Bedienungsanleitung Regeln
Neueste Bedienungsanleitung für -Kategorien-
30 März 2026
28 März 2026
24 März 2026
22 März 2026
22 März 2026
22 März 2026
18 März 2026