Kuzco Alonso PD320313 Bedienungsanleitung
Kuzco Beleuchtung Alonso PD320313
Lies die bedienungsanleitung für Kuzco Alonso PD320313 (1 Seiten) kostenlos online; sie gehört zur Kategorie Beleuchtung. Dieses Handbuch wurde von 2 Personen als hilfreich bewertet und erhielt im Schnitt 4.0 Sterne aus 3 Bewertungen. Hast du eine Frage zu Kuzco Alonso PD320313 oder möchtest du andere Nutzer dieses Produkts befragen? Stelle eine Frage
Seite 1/1
ALSSEMBY TRUONINSCTIS
WD CAISARNINGANS UTON
• Make sure POWER is at the fuse boxCOMPLETELY OFF
• Have your fixture installed by a qualified licensed electrician
• Prepare everything in a clear area
• Wear gloves at all times during this installation
• Read instructions carefully before you start assembly
• Keep this installation sheet for future reference
PD320313
Pendant
TEHNICCRTAL SUPPO
1.855.855.8926
ticsualora.comechnalpport@litighng
NOTICE
•afeansctinedn htor The importnt sagurds and itruonouts li ithis see cannot cve
all ssis cce pobitiatile condons a sindtuonthato may urt st b. Imuundtooersd
thutonndrttormufoThtruonat cai a ceaie acnr cafs st be llwe. odese insctis are
proforourndghomndthtrvided y say afet we hily ecrme atnd a licese, ained
eleciciaall is trnnst ithunit.
•fded bed tnstdtaa d This ixture is esigntoe mounton a correcly ialle sndrdroun
orgonbothroughngbothfrThbomu octa x OR a wiri x wi a plaster ame. e x st be
sece e il. sswaurely me sounted tothtructurofth budingThe crobar ha andrdre
sdld buddirti f tupplie shoue se, ecly mountngthe ixe turtothoute le
may box
make i imly alitpossible ectoorr ctgn the fixture.
CANADA:
USA: 3035 E. Lone Mountain Rd - Las Vegas, NV, 89081
wwligtingcowlora.ah.m
20230628
P:
1.855.855.8926
19054 28th Avenue Surrey - BC V3Z 6M3
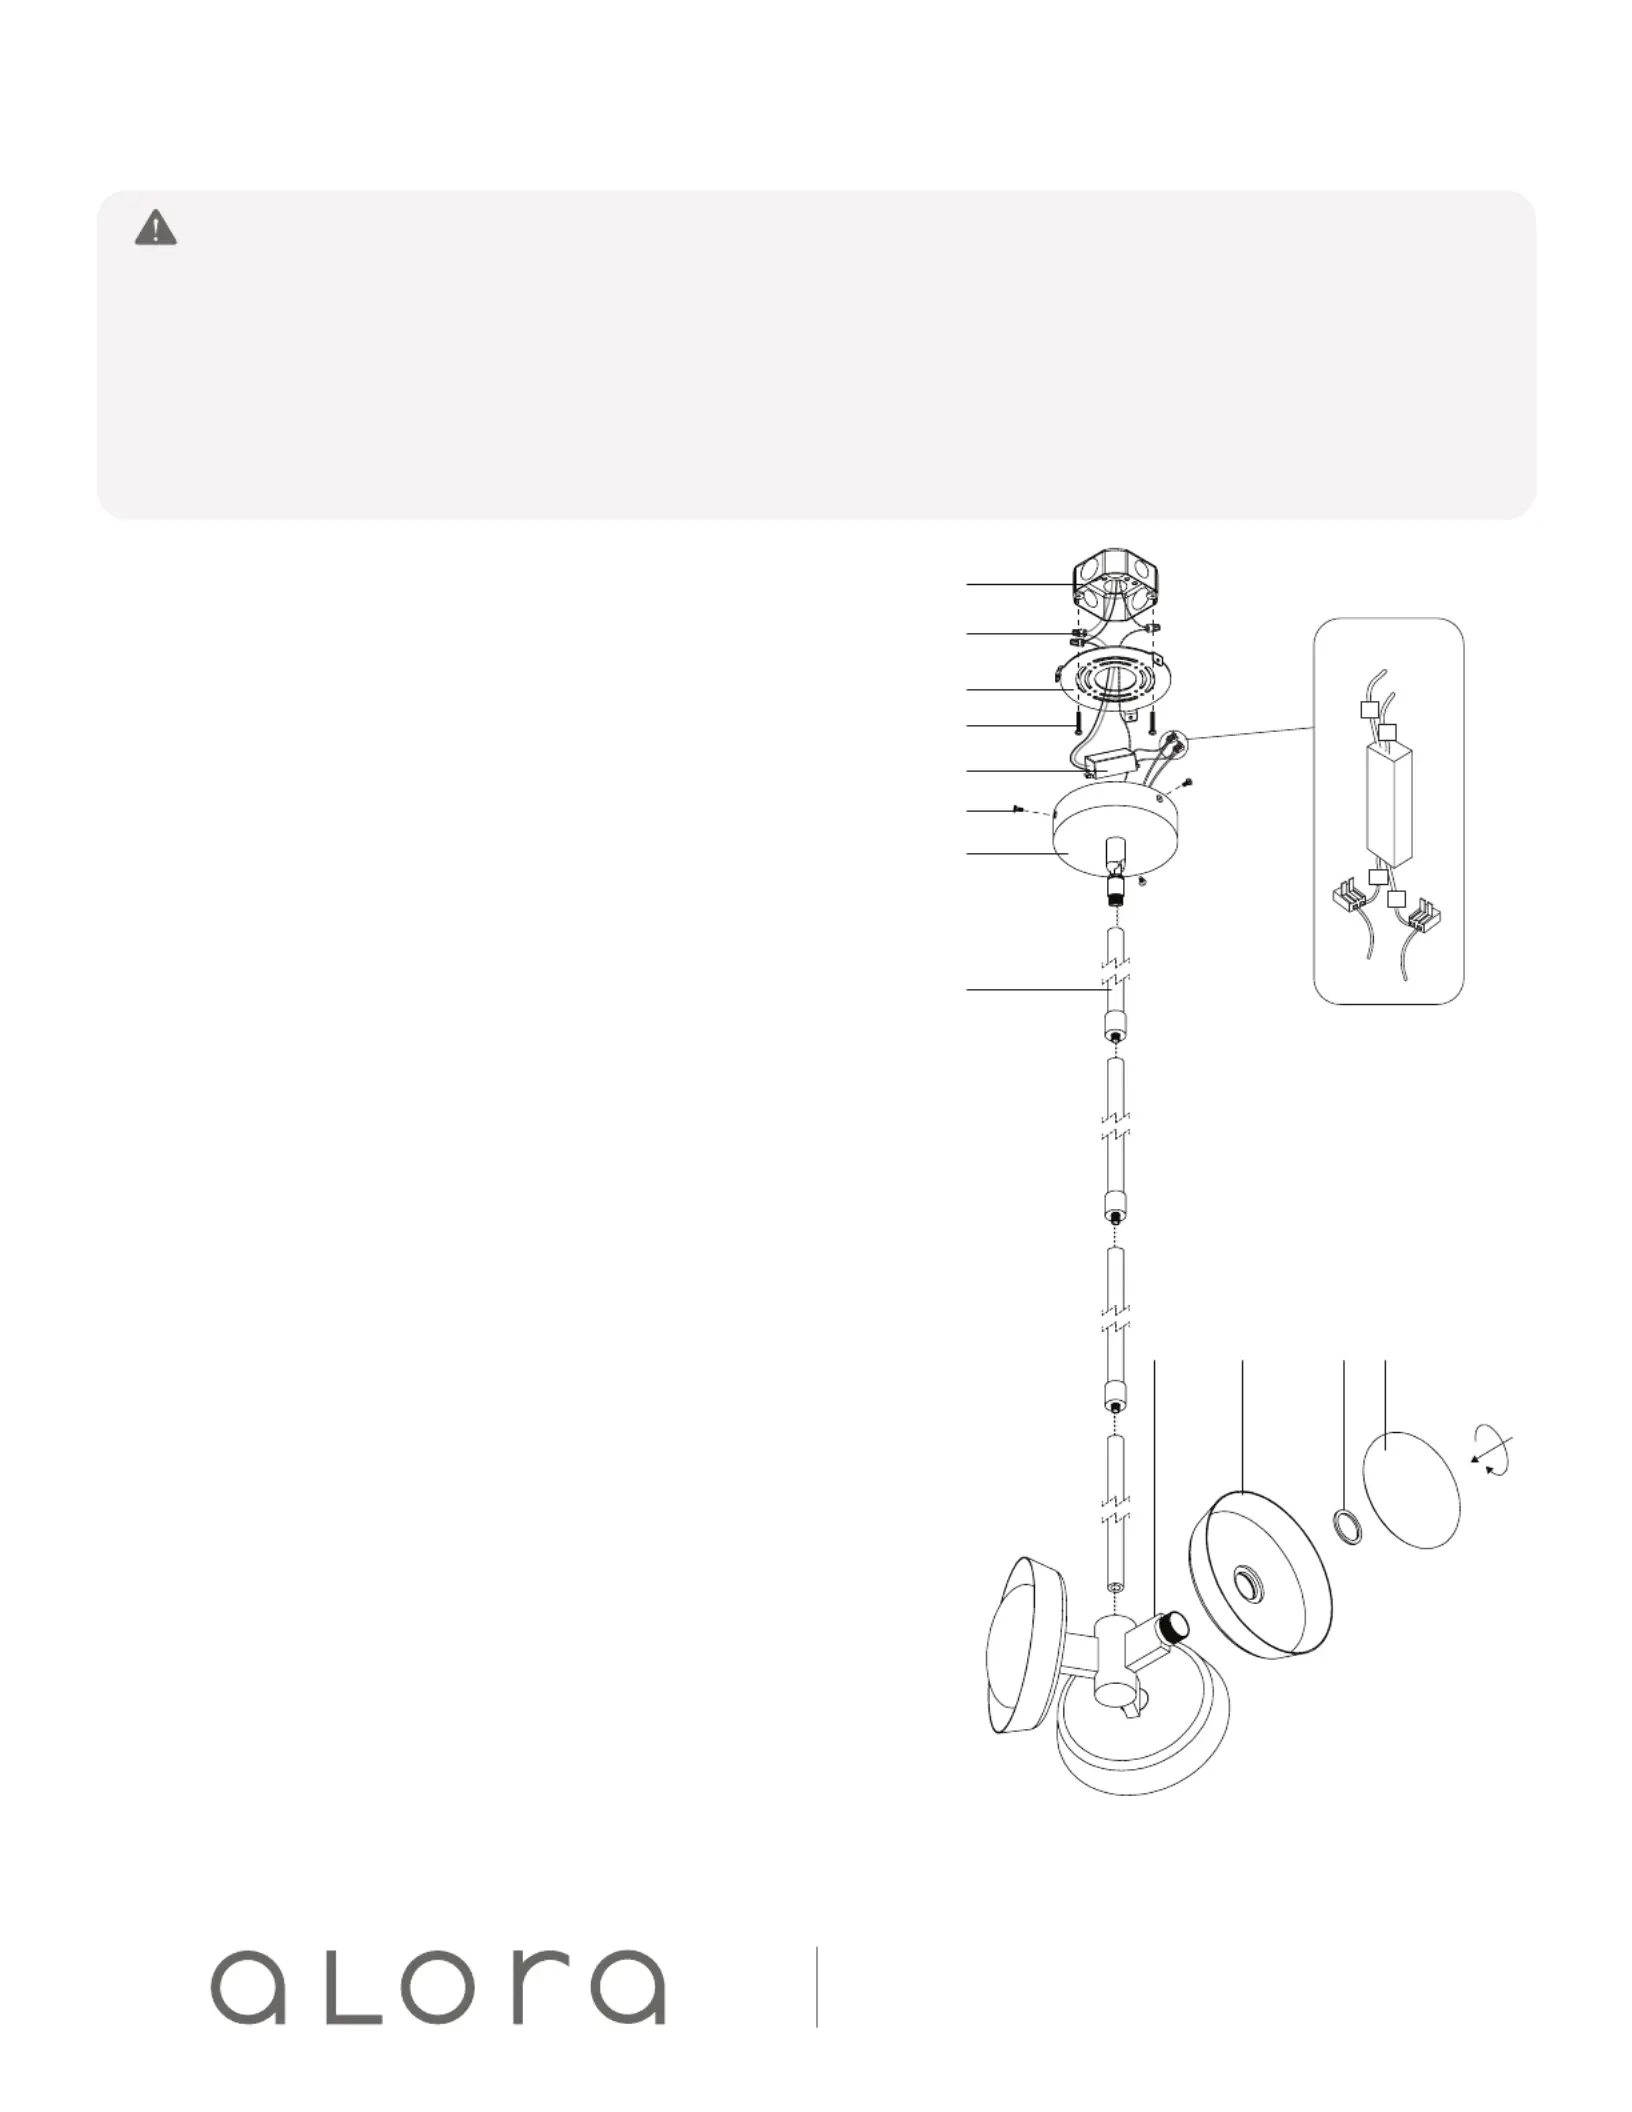
1a.
1b.
1c.
1e.
4a.
2b.
2a.
2d.
5a.3a.5b.5c.
Step 1
Remove fixture from its original package.
Step 2
Separate mounting plate (1c) from canopy (2a) by removing canopy screws
(2b).
Step 3
Attach mounting plate (1c) to electrical junction box (1a) using junction box
screws provided (1e) in hardware package.
Step 4
Determine hanging height of fixture by securing rods (2d) to canopy (2a)
and fixture (3a) after feeding fixture wires (LED+ and LED-) through rods.
Step 5
Make proper electrical connections between LED and DC driver, LED-
Negative, LED+ Positive using quick connector provided (See Illustration 1
and refer to diagram on driver).
Step 6
Make proper electrical connections ( to to “N”, blackhot white“L”, neutral
ground GNDto “”) with wire nuts provided in hardware package and (1b)
place driver (4a) in canopy (2a).
Step 7
Secure shade (5a) to fixture (3a), followed by ring (5b) and glass (5c) by
threading clockwise.
Step 8
Attach canopy (2a) to mounting plate (1c) with canopy screws (2b).
You are now ready to enjoy your fixture.
Please Note:
•This Alora LED fixture comes with pre-wired LED module(s)
•Unless instructed, Do Not touch any part of the LED module(s) as any unnecessary contact with
the module could cause permanent damage
•For dimming, an ELV (Electronic Low Voltage) or TRIAC type of dimmer is required
• 120V input
DC
Driver
N
L
-
+
Illustration 1
Low Voltage
Produktspezifikationen
| Marke: | Kuzco |
| Kategorie: | Beleuchtung |
| Modell: | Alonso PD320313 |
Brauchst du Hilfe?
Wenn Sie Hilfe mit Kuzco Alonso PD320313 benötigen, stellen Sie unten eine Frage und andere Benutzer werden Ihnen antworten
Bedienungsanleitung Beleuchtung Kuzco

31 März 2026
4 März 2026
1 März 2026
1 März 2026
28 Februar 2026
28 Februar 2026
28 Februar 2026
25 Februar 2026
25 Februar 2026
25 Februar 2026
Bedienungsanleitung Beleuchtung
Neueste Bedienungsanleitung für -Kategorien-
31 März 2026
31 März 2026
30 März 2026
30 März 2026
30 März 2026
30 März 2026
30 März 2026
30 März 2026
30 März 2026
30 März 2026