Livarno Lux IAN 292097 Bedienungsanleitung


Lies die bedienungsanleitung für Livarno Lux IAN 292097 (2 Seiten) kostenlos online; sie gehört zur Kategorie Beleuchtung. Dieses Handbuch wurde von 3 Personen als hilfreich bewertet und erhielt im Schnitt 4.3 Sterne aus 2 Bewertungen. Hast du eine Frage zu Livarno Lux IAN 292097 oder möchtest du andere Nutzer dieses Produkts befragen? Stelle eine Frage

Seite 1/2
GB/IE/NI GB/IE/NI GB/IE/NI GB/IE/NI GB/IE/NI GB/IE/NI GB/IE/NI
The right to claim under the
guarantee shall be rendered invalid
in respect of damage caused by the
non-observance of these operating
instructions! No liability is
accepted
for consequent damage!
is accepted for
damage to property
or persons caused
by improper
handling or non-observance of the
safety advice!
J This product can be used by
children aged from
8 years and above and persons
with reduced physical, sensory
or mental capabilities or lack of
experience and knowledge if
they have been given
supervision or instruction
concerning use of the product in
a safe way and understand the
hazards involved. Children shall
not play with the product.
Cleaning and user maintenance
shall not be made by children
without supervision. This product
is not a toy and should be kept
out of the reach of children.
Children are not aware of the
dangers associated with
handling electrical products.
J Do not allow the product or the
packaging materials to lie
around unattended. Plastic film
or bags, Styrofoam etc. can turn
into dangerous toys for children.
J CAUTION!
DANGER OF
EXPLOSION!
Do not operate the product in
potentially explosive
environments in which there are
inflammable vapours, gases or
dusts.
J Do not expose the product to
direct sunlight, rain, snow or ice.
Failure to observe this advice
may result in damage to the
product.
LED Light Strip:
Operating voltage:
12 V
Illuminants:
6 x power LED
LEDs:
6 x
0.5 W
Nominal power:
approx. 2.4 W
Power adapter:
Rated voltage,
primary: 100–240 V
~
50–60 Hz
Rated voltage,
secondary: 12 V 250 mA
Protection class: II /
Power adapter (model no.:
YNQST120025BL) CE standard
tested.
HG00198C-BS
Operating voltage:
230 V
~
50 Hz
Illuminants:
16 x power LED
LEDs:
16 x
0.5 W
Nominal power: approx. 8 W
Protection
category: II /
Q
Safety instructions
Safety advice
DANGER TO LIFE
AND RISK OF
ACCIDENTS FOR INFANTS
AND CHILDREN! Never
leave children alone and
unsupervised with the
packaging material. There is
always a risk of suffocation if
children play with the
packaging material. Children
often underestimate risks.
Always keep children away
from the packaging material.
This product is not a toy.
LED LIGHT STRIP
Operation and safety notes
LED LIGHT STRIP
IAN 292097
HG00198A-BS
HG00198C-BS
HG00198A-BS
HG00198C-BS
HG00198C-BS
HG00198C-BS
HG00198C-BS HG00198C-BS
List of pictograms used
Direct current
Alternating current
Protection class II
Use in dry indoor
rooms only
LED lifespan
Non-short-circuit proof
safety isolating
transformer
Polarity of the input
and output terminal
Independent lamp
controlgear
LED LIGHT STRIP
Q
Introduction
We congratulate you on the
purchase of your new product. You
have chosen a high quality product.
The instructions for use are part of
the product. They contain important
information concerning safety, use
and disposal. Before using the
product, please familiarise yourself
with all of the safety information
and instructions for use. Only use
the product as described and for the
specified applications. If you pass
the product on to anyone else,
please ensure that you also pass on
all the documentation with it.
Q
Proper use
The products HG00198A-BS and
HG00198C-BS are intended for
providing illumination and for
mounting on furniture. The product
HG00198C-BS can also be
mounted on walls.
This product is only
suitable for private use in
indoor in dry rooms. The
product is not intended for
commercial use or for use in other
applications.
The product can be
mounted
on all normally flammable
surfaces. This product is intended for
use only in a domestic, private
household environment.
Q
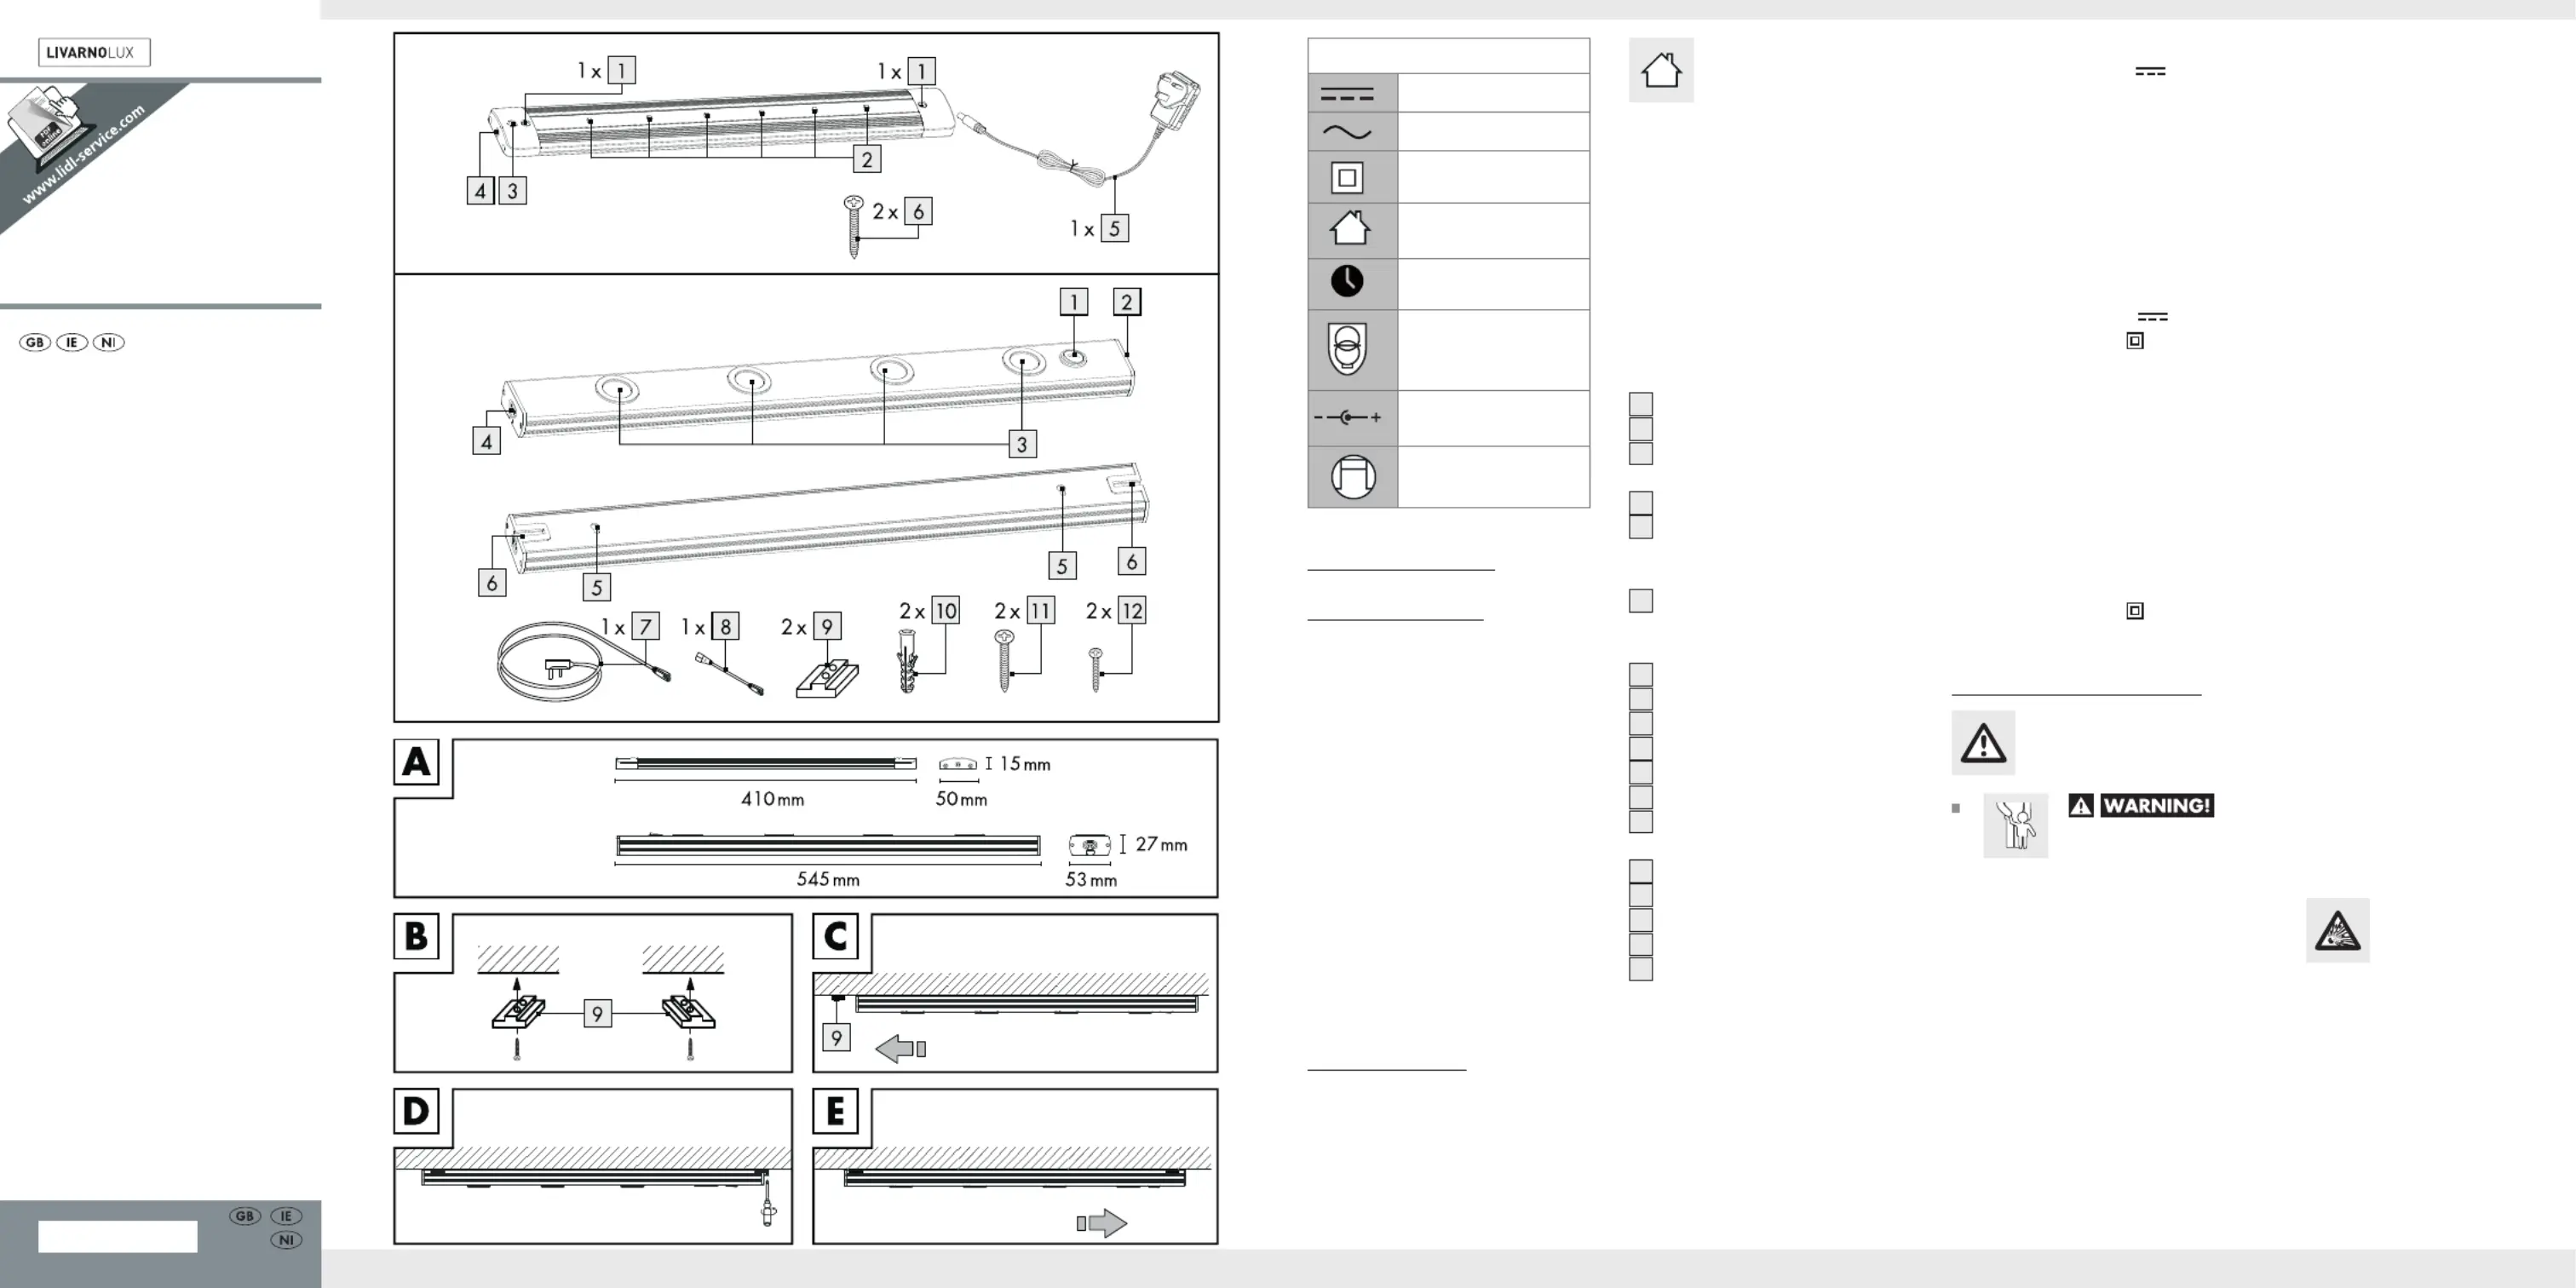
Description of parts
and features
HG00198A-BS
1
Drill hole
2
LED
3
ON/OFF switch
(“Touch switch)
4
Socket for connecting lead
5
Plug-in power adapter with
mains power connection lead
(length approx. 2 m)
6
Screw
HG00198C-BS
1
ON/OFF switch
2
Socket for connecting lead
3
LED
4
Protective cap
5
Drill hole
6
Slot
7
Connecting lead with mains
power plug
8
Extension lead
9
Mounting rail
10
Dowel
11
Screw for wall mounting
12
Screw for under-cabinet
installation
Q
Technical data
HG00198A-BS
LED Light strip +
Power adapter:
Total power
consumption: approx. 3.2 W
GB/IE/NI GB/IE/NI GB/IE/NI GB/IE/NI GB/IE/NI GB/IE/NI GB/IE/NI
Q
Warranty
The product has been manufactured
to strict quality guidelines and
meticulously examined before
delivery. In the event of product
defects you have legal rights against
the retailer of this product. Your
legal rights are not limited in any
way by our warranty detailed
below.
The warranty for this product is 3
years from the date of purchase.
Should this product show any fault
in materials or manufacture within 3
years from the date of purchase, we
will repair or replace it – at our
choice – free of charge to you.
The warranty period begins on the
date of purchase. Please keep the
original sales receipt in a safe
location. This document is required
as your proof of purchase. This
warranty becomes void if the
product has been damaged, or
used or maintained improperly.
The warranty applies to defects in
material or manufacture. This
warranty does not cover product
parts subject to normal wear, thus
possibly considered consumables
(e.g. batteries) or for damage to
fragile parts, e.g. switches,
rechargeable batteries or glass
parts.
IAN 292097
OWIM GmbH & Co. KG
Stiftsbergstraße 1
DE-74167 Neckarsulm
GERMANY
Model no.: HG00198A-BS /
HG00198C-BS
Version: 10/2017
DANGER
TO LIFE FROM
ELECTRIC
SHOCK! For reasons of
electrical safety, the product
must never be cleaned with
water or other fluids or be
immersed in water. When
cleaning, only use a dry, lint-
free cloth.
Disposal
The packaging is made entirely of
recyclable materials, which you
may dispose of at local recycling
facilities.
Observe the marking of
the packaging materials
for waste separation,
which are marked with
abbreviations (a) and numbers (b)
with following meaning: 1–7:
plastics / 20–22: paper and
fibreboard / 80–98: composite
materials.
The product and
packaging materials are
recyclable, dispose of it
separately for better waste
treatment. The Triman logo is valid in
France only.
Contact your local refuse
disposal authority for
more details of how to
dispose of your worn-out product.
To help protect the
environment, please
dispose of the product
properly when it has reached the
end of its useful life and not in the
household waste. Information on
collection points and their opening
hours can be obtained from your
local authority.
pre-drilled positions with the
supplied screws
12
.
j Place the under-cabinet light flat
on the mounting surface and
push it onto the mounting rail
9
up to the stop in the slot
6
(see Fig. C).
j Push the second mounting rail
9
into the slot
6
on the
under-cabinet light so that the
drilled hole is visible. Tighten the
screw in this position (see Fig.
D).
j Now push the product a little to
the right. Both mounting rails
9
should now be firmly positioned
(see Fig. E). Check that the
product is fitted securely.
j Plug the connecting lead
7
into the socket
2
.
j Plug the mains power plug of
the connecting lead
7
into a
socket
2
. Switch on the
product by pressing the ON/
OFF switch
1
.Your product is
now ready for operation.
Q
Mounting model
HG00198C-BS on a
wall
j Measure up the wall or
mounting surface for drilling
the holes. Use a spirit level to
improve accuracy.
j Mark the two mounting holes a
distance of approx. 403 mm
apart.
j Now drill the mounting holes (ø
approx. 6 mm, depth approx.
30 mm).
CAUTION! Make sure that
you do not damage any
electrical cables during this
operation.
j Insert the supplied dowels
10
into the drilled holes. Insert the
supplied screws
11
into the
dowels and tighten them. Let
them project a distance of about
1.3 mm from the wall or
mounting surface.
j Attach the product to the screws
11
using the appropriate wall
mounting holes
5
.
j Plug the connecting lead with
mains power plug
7
into the
socket for the connecting lead
2
.
j Plug the connecting lead with
mains power plug
7
into the
mains power socket. Your
product is now ready for
operation
Extensions
j Note: Ensure that no more
than 3 products of the same type
(HG00198C-BS ) are connected
together in a series. Install each
additional light at a distance of
approx. 15 cm as described.
j Remove the protective cap
4
.
Connect the two products to the
socket
2
using the extension
lead
8
. Then you only need
one connecting lead
7
for the
power supply.
j CAUTION! First ensure that all
the products are connected by
an extension lead
8
before
you insert the mains power lead
into the mains power socket.
Q
Maintenance and
Cleaning
Allow the product to cool down
completely.
DANGER
TO LIFE FROM
ELECTRIC
SHOCK! Before carrying out
any tasks on the product, switch
off the electrical circuit at the
circuit breaker box or remove
the fuse from the fuse box.
j CAUTION! Do not use
solvents, petrol etc.
be familiar with the properties
of the product and the
connection regulations. Make
sure you will not be drilling into
electrical, gas or water lines
inside the wall. Use a power
drill to drill the holes into the
brick wall. Always observe all
safety instructions for the power
drill in the manual for the power
drill. Death or injury due to
electric shock may otherwise
result. If necessary, check the
wall using a suitable detector
before you drill.
J Do not use this product for
dimmers or electronic switches.
It is not suitable for these
purposes.
Working safely
J Install the product so that it is
protected from moisture, wind
and dirt.
J Make careful preparations for
the assembly and take sufficient
time. Clearly lay out all
components and any additional
tools or materials that might be
required so that they are readily
to hand.
J Remain alert at all times and
always watch what you are
doing. Always proceed with
caution and do not assemble
the product if you cannot
concentrate or feel unwell.
Q
Installation and
operation
Note: Remove all packaging
materials from the product.
Q
Installing model
HG00198A-BS
j Measure the space for
installation of the product. Use a
spirit level to position it correctly.
j Mark the position of the drill
holes
1
in the product.
j Mark the two mounting holes at
a distance of 362 mm apart.
j Drill the holes, ø approx. 2 mm,
depth approx. 10 mm.
j Position the product according
to the drilled holes
1
and
tighten the screws
6
.
j Plug the connecting lead
5
into the socket
4
.
j Plug the mains power plug of
the connecting lead
5
into a
socket
4
. Switch on the light
by pressing the ON/OFF switch
3
. Your product is now ready
for operation.
Note: Only use the product with
the power adapter it was delivered
with (YNQST120025BL). Damage
due to use of a different adapter is
not covered by the guarantee.
Q
Installing model
HG00198C-BS
j Use the mounting rails
9
(see
also Fig. B) and the screws
12
for under-cabinet installation.
j Measure the space for
installation of the product. Use a
spirit level to position it correctly.
Mark where you wish to drill
and pre-drill the holes.
j Mark the distance of 533 mm
for the two fixing drill holes
5
.
Drill the holes: ø approx. 2 mm,
approx. 10 mm deep.
Note: The supplied screws are
for standard installation under
wall cabinets and are not
suitable for every type of wall. If
installing on concrete walls, for
example, you will need to use
special dowels and screws.
Information on suitable
installation material can be
obtained from specialist stores.
j First screw only one of the
mounting rails
9
in the
HG00198A-BS
J The product is only suited for
use with the included power
adapter (Model No.
YNQST120025BL).
J Please note that the power
adapter continues to draw a
small amount of power even if
the product is turned off as long
as the power adapter is
plugged into a power outlet. To
switch the product off
completely, unplug the power
adapter from the socket.
HG00198C-BS
J The product may only be used
with the built-in LED control
gear.
J The product continues to draw a
small amount of power even if
the lamp is off as long as it is
still connected to the mains
power supply. To switch the
device off completely, the mains
power switch should be
switched off.
To avoid danger of
fire and injury
J RISK OF INJURY! Check
every LED and lampshade for
damage immediately upon
unpacking. Do not fit the
product if the LEDs and / or
lampshades are faulty. If they
are, contact the service point for
a replacement.
DANGER
OF ELECTRIC SHOCK!
DANGER OF DAMAGE TO
PROPERTY! DANGER OF
INJURY! Important: The
electrical connection must be
established by a qualified
electrician or a person trained
to perform electrical
installations. This person must
J Do not attach the product to
damp or conductive substrates.
The LEDs cannot be replaced by
end user.
If the LEDs fail at the end of their
lives, they must be repaired by
qualified electrician or the en tire
product must be replaced.
To avoid danger to
life from electric
shock
J Always check the product for
damage before connecting it to
the mains power supply. Never
use the product if it shows any
signs of damage.
J In the event of damage, repairs
or other problems with the
product, please contact the
Service Centre or an electrician.
J Before installation, switch off the
electrical circuit at the circuit
breaker box or remove the fuse
from the fuse box.
J Never let the product come into
contact with water or other
liquids.
J Never open or insert anything
into electrical fittings or
equipment. Doing this sort of
thing can lead to a serious
danger to life from electric
shock.
J If the external flexible cable or
cord of this luminary is
damaged, it shall be replaced
by a special cord or cord
exclusively available from the
manufacturer or his service
agent.
J Before assembly, ensure that the
mains power voltage available
corresponds to the operating
voltage necessary of the light
(HG00198A-BS: 100 - 240 V ;
HG00198C-BS : 230 V ).


Produktspezifikationen

Marke: Livarno Lux
Kategorie: Beleuchtung
Modell: IAN 292097

Brauchst du Hilfe?

Wenn Sie Hilfe mit Livarno Lux IAN 292097 benötigen, stellen Sie unten eine Frage und andere Benutzer werden Ihnen antworten