Livex Lighting Hamilton 7553-07 Bedienungsanleitung
Livex Lighting Beleuchtung Hamilton 7553-07
Lies die bedienungsanleitung für Livex Lighting Hamilton 7553-07 (1 Seiten) kostenlos online; sie gehört zur Kategorie Beleuchtung. Dieses Handbuch wurde von 25 Personen als hilfreich bewertet und erhielt im Schnitt 4.7 Sterne aus 13 Bewertungen. Hast du eine Frage zu Livex Lighting Hamilton 7553-07 oder möchtest du andere Nutzer dieses Produkts befragen? Stelle eine Frage
Seite 1/1
ASSEMBLING & INSTALLATION INSTRUCTIONS
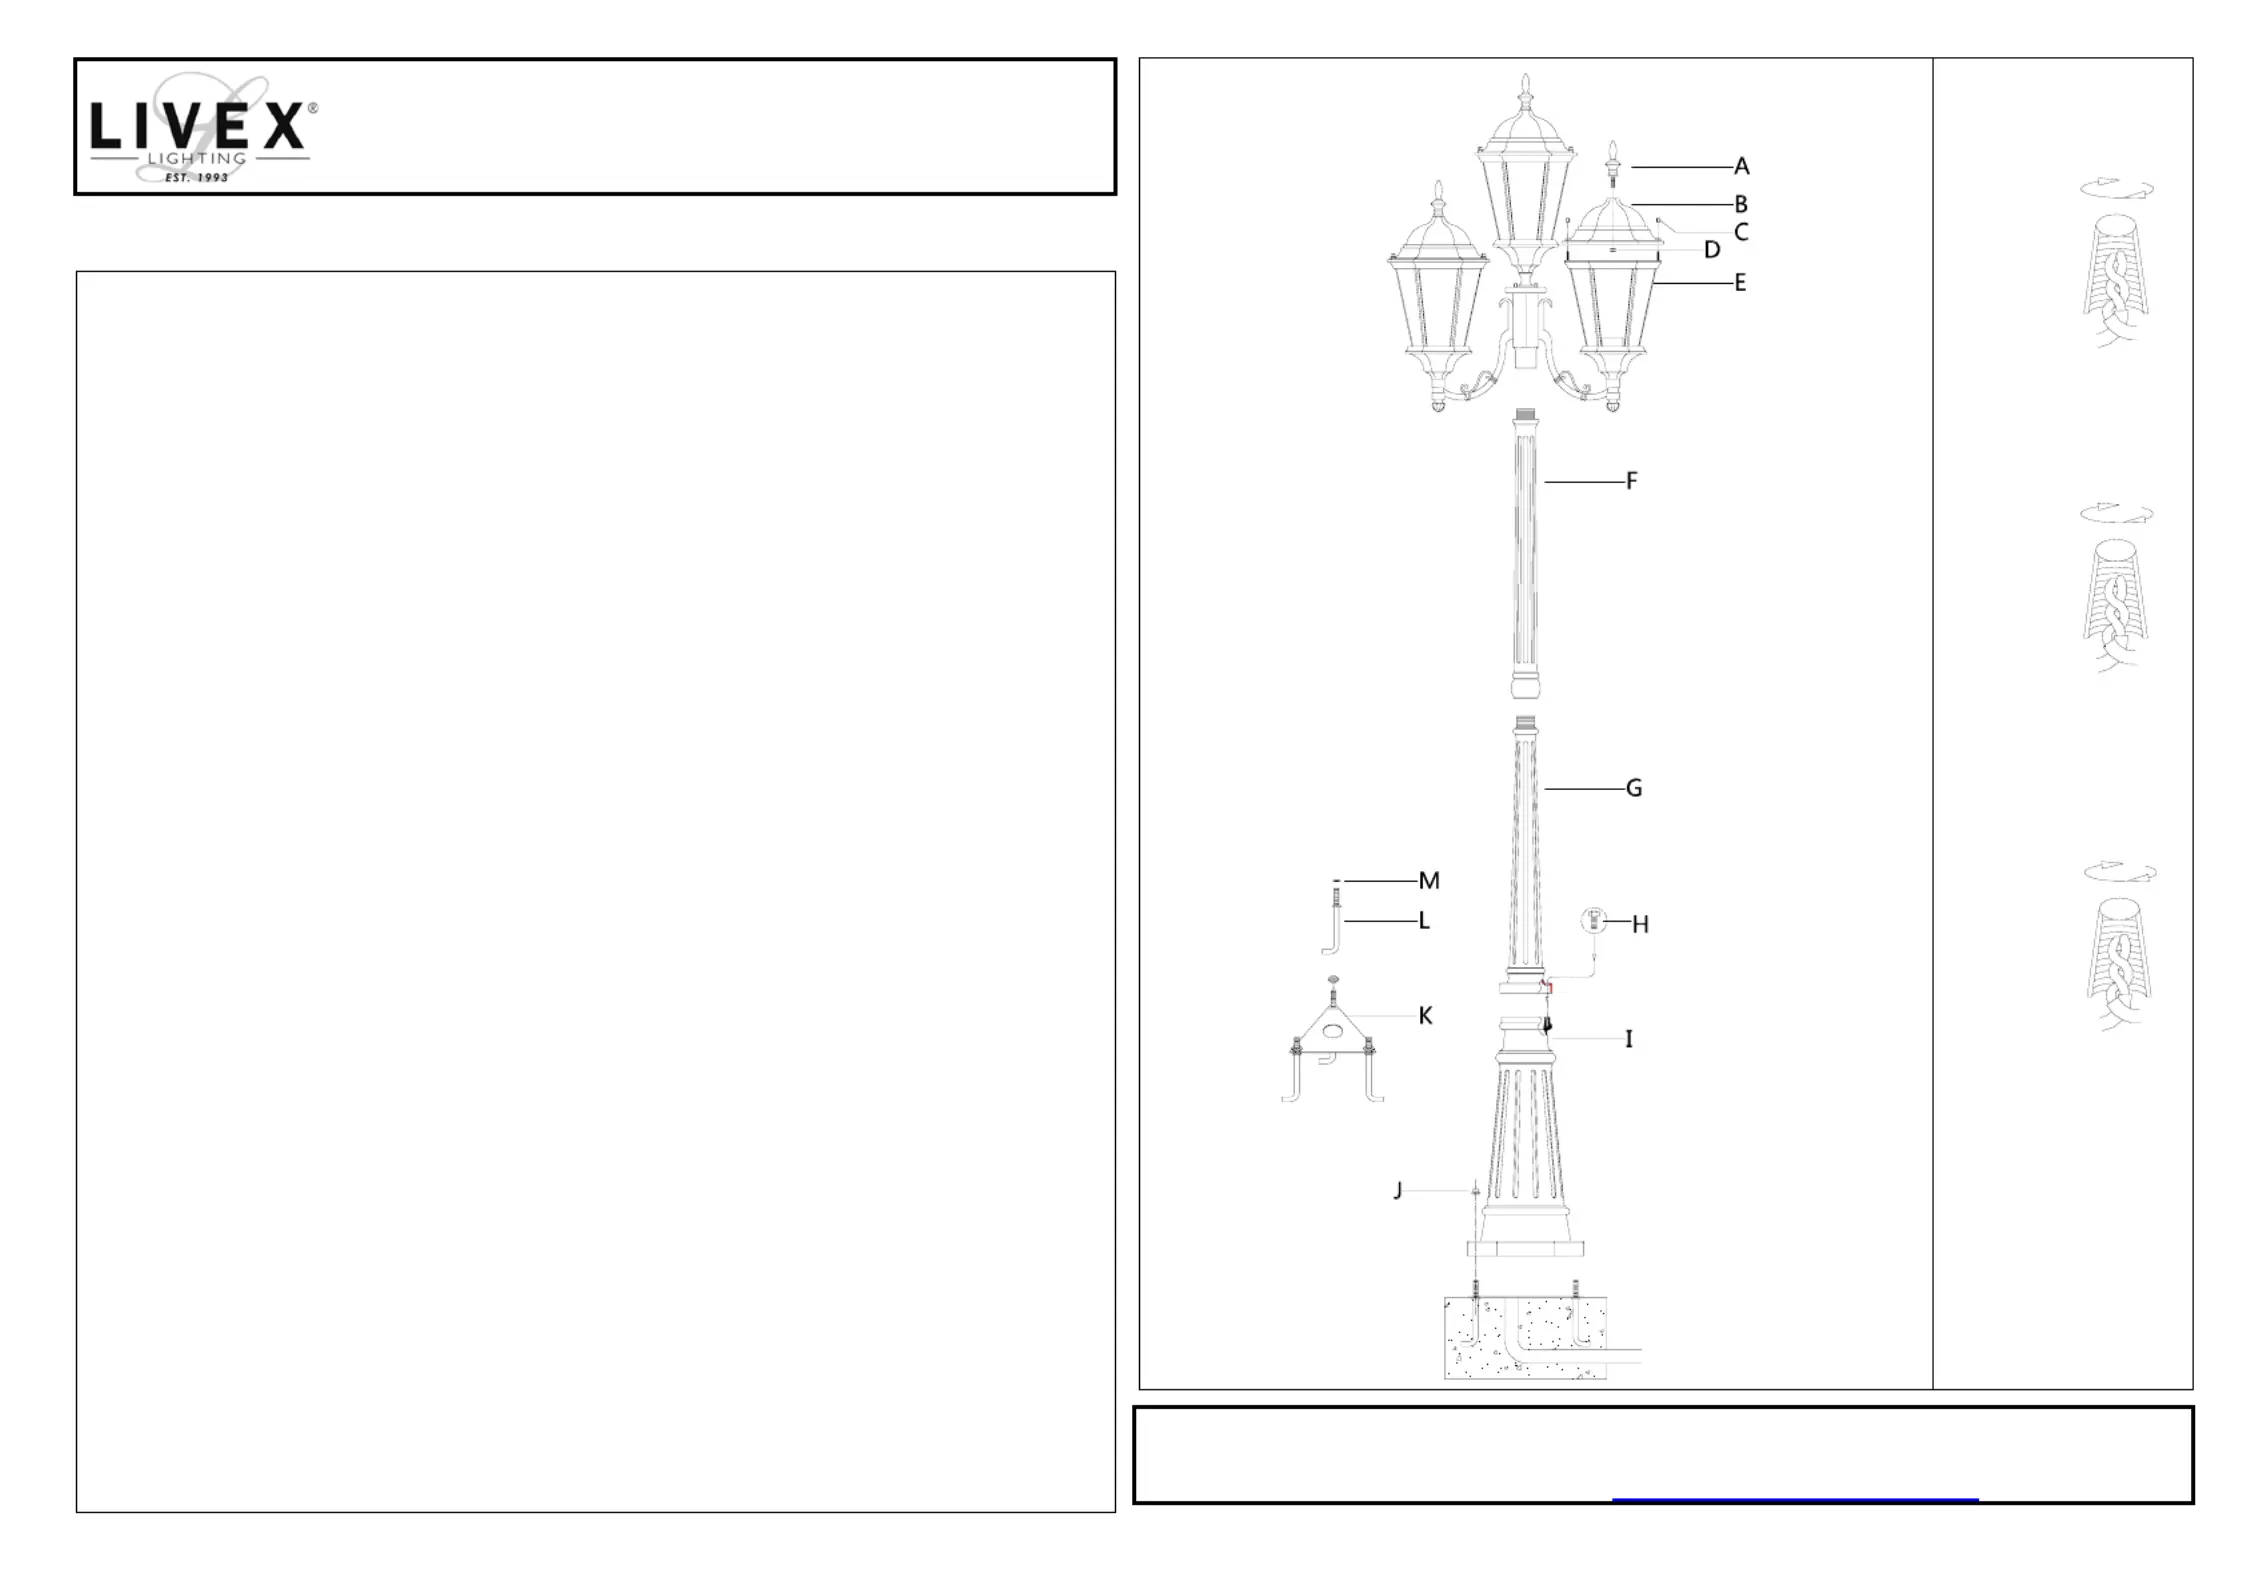
The drawing shown may not exactly match the product enclosed.
However, the installation instructions do apply to this product.
Hamilton series post lamp
WARNING! SHUT POWER OFF AT FUSE OR CIRCUIT BREAKER.
ATTENTION! COUPER LE COURANT AU FUSIBLE OU UN DISJONCTEUR.
ASSEMBLING THE FIXTURE (Fig.1).
*Shut off the power at the circuit breaker and remove old fixture, including the
old small hardware.
1. Carefully unpack new fixture and lay all the parts on a clear surface. Take care not
to lose any small parts necessary for installation.
2. Install the light bulbs(not included) in accordance with the fixture specifications.
NOTE: DO NOT EXCEED THE SPECIFIED WATTAGE!
3. Raise the pipe nipple of the finial(A) insert cover (B) and lock it securely with the
hex nut(D).
4. Attach the cover(B) onto the fixture body(E), aligning the holes on it and lock it
securely with hex nut(C). Screw the pole(F),(G) together tightly. Follow wiring
instructions carefully (see fig.2).
5. Put the pole(I) onto the concrete base using the mounting knob(J).
A. The depth of the base will depend on local soil conditions and
frost line. The diameter of the base should be 305mm in order
to hold the anchor bolts on the plate.
B. Take the three bolts(L) and run a hex nut(M) fully down each part of the
threaded section. Insert the bolt(L) to the template(K) and secure with the
second hex nuts.
C. Mix and pour the concrete into the former until it reaches the top. Push the
assembly into concrete until the plate are 0.25inches above the
concrete .Leaving 2.5 inches of the thread above the concrete.
D. It is important to level the template before the concrete sets.
7. Install the fixture together with the pole(F),(G) onto the pole(I),secure them using
the machine screws(H).
CONNECTING THE WIRES (Fig.2)
*Feed the fixture wires through the pole(F),(G) .
1. Take the black wire(hot) from the outlet box and the black wire of fixture and twist
bare ends together. Twist wire connector onto end of wire until snug.
2. Repeat same process with white wire(neutral) from outlet box and white wire of
fixture.NOTE: Twist wires together in the same direction you twist the wire
connector onto wires.
3. If your outlet box has a grounding wire (green or bare copper), attach this wire and
the bare copper wire from the fixture together as step 1.If junction box has no
ground wire, attach the bare copper fixture wire to the green ground screw in the
bottom of the pole(I).
4. Tuck the wire connections neatly into the pole. Take the fixture(E) mount onto the
pole(F).
Your installation is now complete. Return power to the junction box and test the
fixture.
Fig.1
FIXTURE
WIRES
Black
or
Smooth
HOUSE
WIRES
Black(Hot)
FIXTURE
WIRES
White
or
Ribbed
FIXTURE
WIRES
Bare
Copper
(Ground)
HOUSE
WIRES
White
(Neutral)
HOUSE
WIRES
Green or Bare
Copper(Ground)
Fig.2
Thank you for purchasing aLIVEX product.
Need assistance with parts or assembly? Please call customer service at: 800-761-8056
Or visit us on-line at: WWW.LIVEXLIGHTING.COM
©COPYRIGHT ALL RIGHTS RESERVED.LIVEX LIGHTING,INC. DOC20160907557
Produktspezifikationen
| Marke: | Livex Lighting |
| Kategorie: | Beleuchtung |
| Modell: | Hamilton 7553-07 |
Brauchst du Hilfe?
Wenn Sie Hilfe mit Livex Lighting Hamilton 7553-07 benötigen, stellen Sie unten eine Frage und andere Benutzer werden Ihnen antworten
Bedienungsanleitung Beleuchtung Livex Lighting

28 Juli 2025
28 Juli 2025
28 Juli 2025
28 Juli 2025
28 Juli 2025
28 Juli 2025
Bedienungsanleitung Beleuchtung
Neueste Bedienungsanleitung für -Kategorien-
21 Januar 2026
21 Januar 2026
21 Januar 2026
21 Januar 2026
Philips Ultinon Drive 2001L LUMUD2001LX2 Bedienungsanleitung
21 Januar 2026 21 Januar 2026
21 Januar 2026
21 Januar 2026
21 Januar 2026