Noctua NH-C14S Bedienungsanleitung
Noctua Gaming stol NH-C14S
Lies die bedienungsanleitung für Noctua NH-C14S (6 Seiten) kostenlos online; sie gehört zur Kategorie Gaming stol. Dieses Handbuch wurde von 49 Personen als hilfreich bewertet und erhielt im Schnitt 4.6 Sterne aus 9 Bewertungen. Hast du eine Frage zu Noctua NH-C14S oder möchtest du andere Nutzer dieses Produkts befragen? Stelle eine Frage
Seite 1/6
Required mounting parts:
Dear customer,
Congratulations on choosing the Noctua NH-C14S. Succeeding
the award-winning NH-C14, the NH-C14S is an elite class
top-flow CPU cooler that is extremely efficient, highly
compatible and remarkably adjustable – a top-flow solution for
the highest demands.
Enjoy your NH-C14S!
Yours sincerely,
Roland Mossig, Noctua CEO
This manual will guide you through the installation process of the
SecuFirm2™ mounting system step by step.
Prior to installing the cooler, please consult the compatibility list
on our website (www.noctua.at/compatibility) and verify that
the cooler is fully compatible with your motherboard.
Should you encounter any difficulties, please check the FAQs on
our website (www.noctua.at/faqs) and don’t hesitate to contact
our support team at support@noctua.at.
Noctua cannot be held responsible for any damage or losses
caused by compatibility issues.
Multilingual versions of this manual are available on our
website: www.noctua.at/manuals
Removing the mainboard
In case you want to use the cooler on an assembled system and
your case doesn’t have a cut-out at the rear side of the mainboard
tray, you first have to remove the mainboard from the case in
order to be able to install the supplied backplate.
Step 1
2x NM-IMB2 Mounting Bars1x NM-IBP2 Backplate
4x NM-ITS1 Thumbscrews4x NM-IPS1 Spacers
Place the backplate on the rear side of the mainboard so that the
bolts stick through the mounting holes.
Caution: Please make sure that the three cut-outs in the
supplied backplate align with the screws of the mainboard’s stock
backplate.
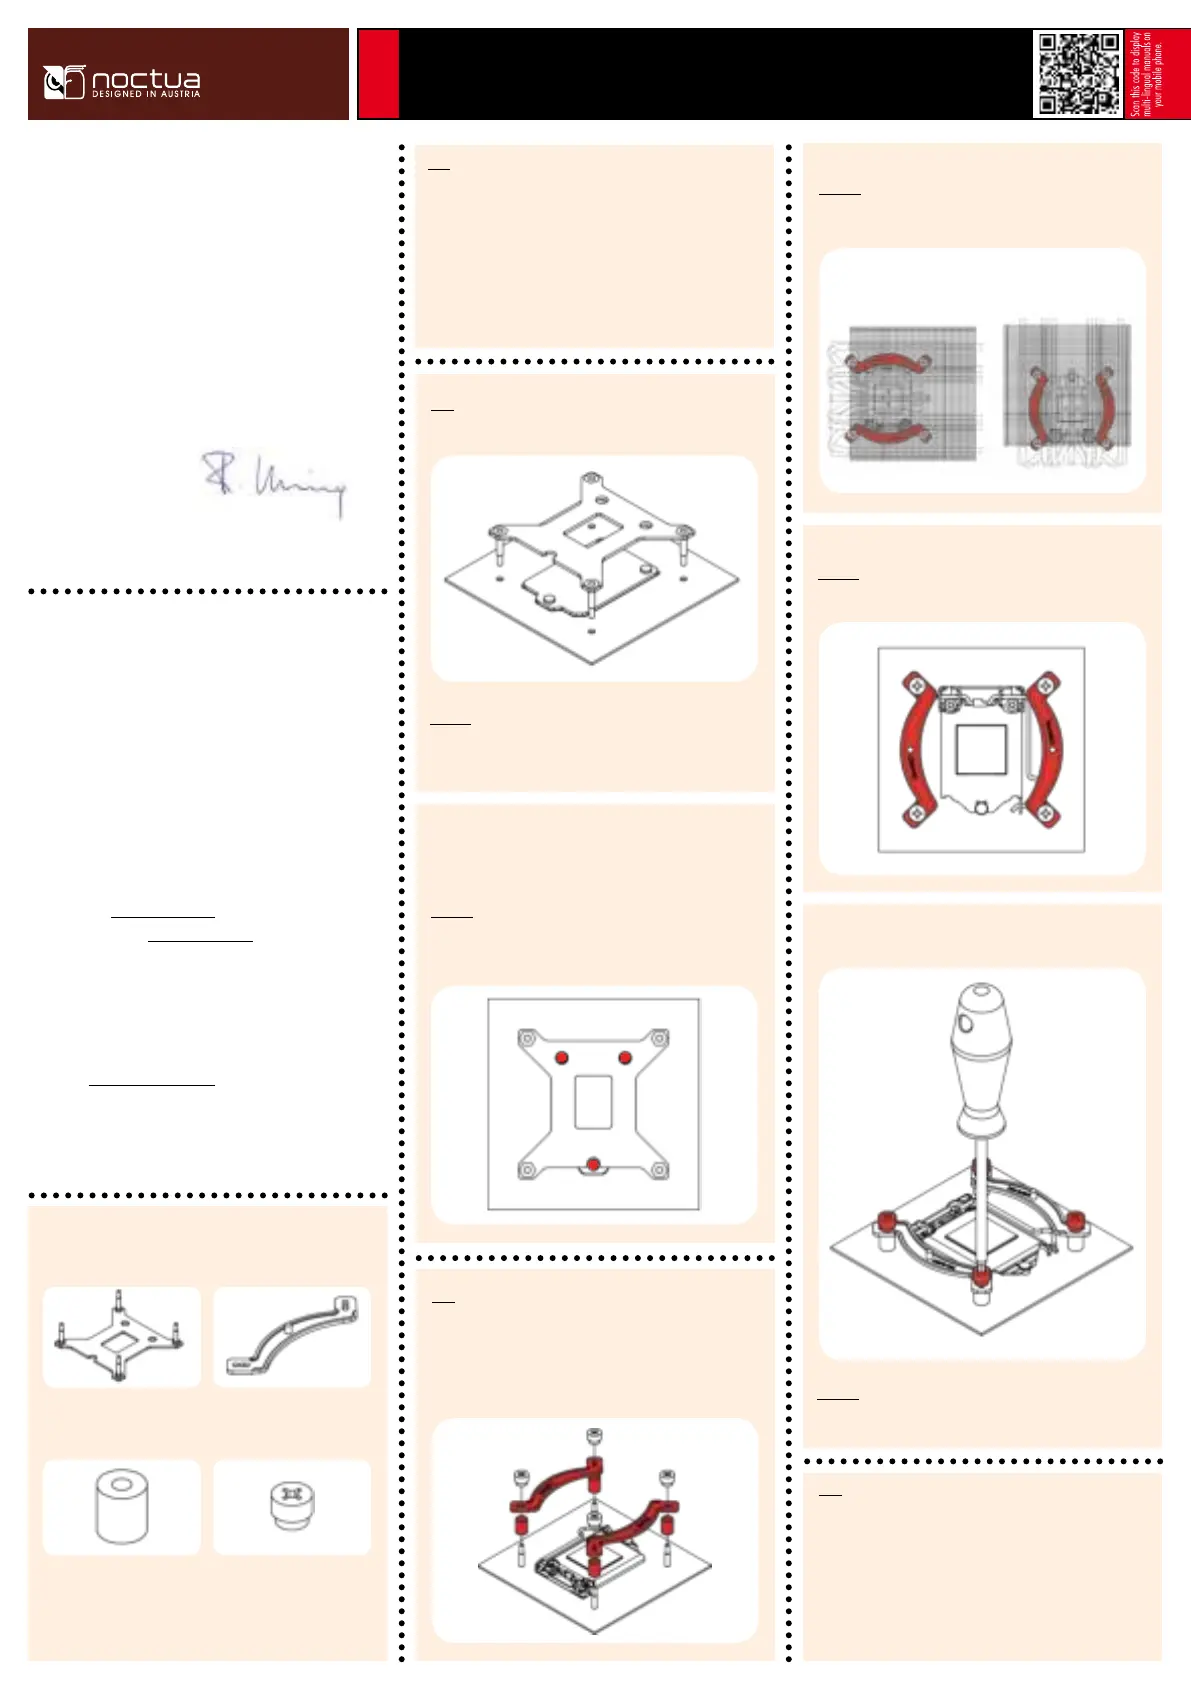
Installing the mounting bars
Caution: Choose the alignment of the mounting bars according to
the desired final orientation of the cooler:
Step 3
First put the plastic spacers onto the bolts of the backplate, then
add the mounting bars.
Attaching the backplate
Caution: The supplied backplate will install over the mainboard’s
stock backplate, so the mainboard’s stock backplate must not be
taken off.
Step 2
Orientation AOrientation B
Noctua NH-C14S | Installation Manual | LGA115x
LGA115x
Caution: Make sure that the curved sides of the mounting bars are
pointing outwards.
Fix the mounting bars using the 4 thumb screws.
Caution: Gently tighten the screws until they stop, but don’t use
excessive force.
Applying thermal paste
If there are residual traces of thermal paste or thermal pads on
your CPU, please clean them off first. Then press a small drop
(4-5mm diameter) of NT-H1 onto the centre of the heatspreader.
Step 4
Produktspezifikationen
| Marke: | Noctua |
| Kategorie: | Gaming stol |
| Modell: | NH-C14S |
| Breite: | 140 mm |
| Tiefe: | 163 mm |
| Gewicht: | 820 g |
| Höhe: | 115 mm |
| Material: | Aluminium, Copper |
| Warentarifnummer (HS): | 84733080 |
| Typ: | Kühler |
| Geräuschpegel: | 19.2 dB |
| Empfohlene Platzierung: | Prozessor |
| Lüfterdurchmesser: | 140 mm |
| Spannung: | 12 V |
| Unterstützte Prozessorsteckplätze: | Socket AM2, Socket AM2+, Socket AM3, Socket AM3+, Socket FM1, Socket FM2, Socket FM2+, LGA 1151 (Socket H4), LGA 2011-v3 (Socket R) |
| Abmessungen Gebläse (B x T x H): | 140 x 140 x 25 mm |
| Rotationsgeschwindigkeit (min.): | 300 RPM |
| Rotationsgeschwindigkeit (max.): | 1500 RPM |
Brauchst du Hilfe?
Wenn Sie Hilfe mit Noctua NH-C14S benötigen, stellen Sie unten eine Frage und andere Benutzer werden Ihnen antworten
Bedienungsanleitung Gaming stol Noctua

24 Mai 2024
16 Mai 2024
26 März 2024
8 Oktober 2022
8 Oktober 2022
8 Oktober 2022
Bedienungsanleitung Gaming stol
Neueste Bedienungsanleitung für -Kategorien-
24 November 2024
5 Juli 2024
5 Juli 2024
8 Mai 2024
30 April 2024
20 April 2024