NUVO 62/1762 Bedienungsanleitung
NUVO Beleuchtung 62/1762
Lies die bedienungsanleitung für NUVO 62/1762 (4 Seiten) kostenlos online; sie gehört zur Kategorie Beleuchtung. Dieses Handbuch wurde von 3 Personen als hilfreich bewertet und erhielt im Schnitt 4.5 Sterne aus 3 Bewertungen. Hast du eine Frage zu NUVO 62/1762 oder möchtest du andere Nutzer dieses Produkts befragen? Stelle eine Frage
Seite 1/4
1
WARNING: Risk of Fire or Electric Shock
• Disconnect power before installation or maintenance of the xture.
• LED Retrot Kit installation requires knowledge of luminaires electrical
systems. If not qualied, do not attempt installation. Contact a qualied
electrician.
• Do not make or alter any open holes in an enclosure of wiring or electrical
components during kit installation.
• To prevent wiring damage or abrasion, do not expose wiring to edges of
sheet metal or other sharp objects.
• The product is purposed for interior use only, suitable for wet locations.
• Protect the product against direct contact with water.
• Assemble the product only with the use of parts provided and the housing;
improper assembly may result in device failing which could damage the
product, personal property or cause injury.
• CAUTION: When handling the xture, do not apply pressure to the LEDs.
Hold the xture by the base only.
LED DISK AND SURFACE
MOUNT FIXTURES
Models: 62-1751, 62-1752, 62-1761, 62-1762, 62-1763
Satco Products, Inc.
Brentwood, NY 11717
INSTALLATION – Junction Box
INSTALLATION AND SAFETY INSTRUCTIONS
IMPORTANT: Read before installing xture. Retain for future reference.
© Copyright 2022 Satco Products, Inc. 7/22 v1.1
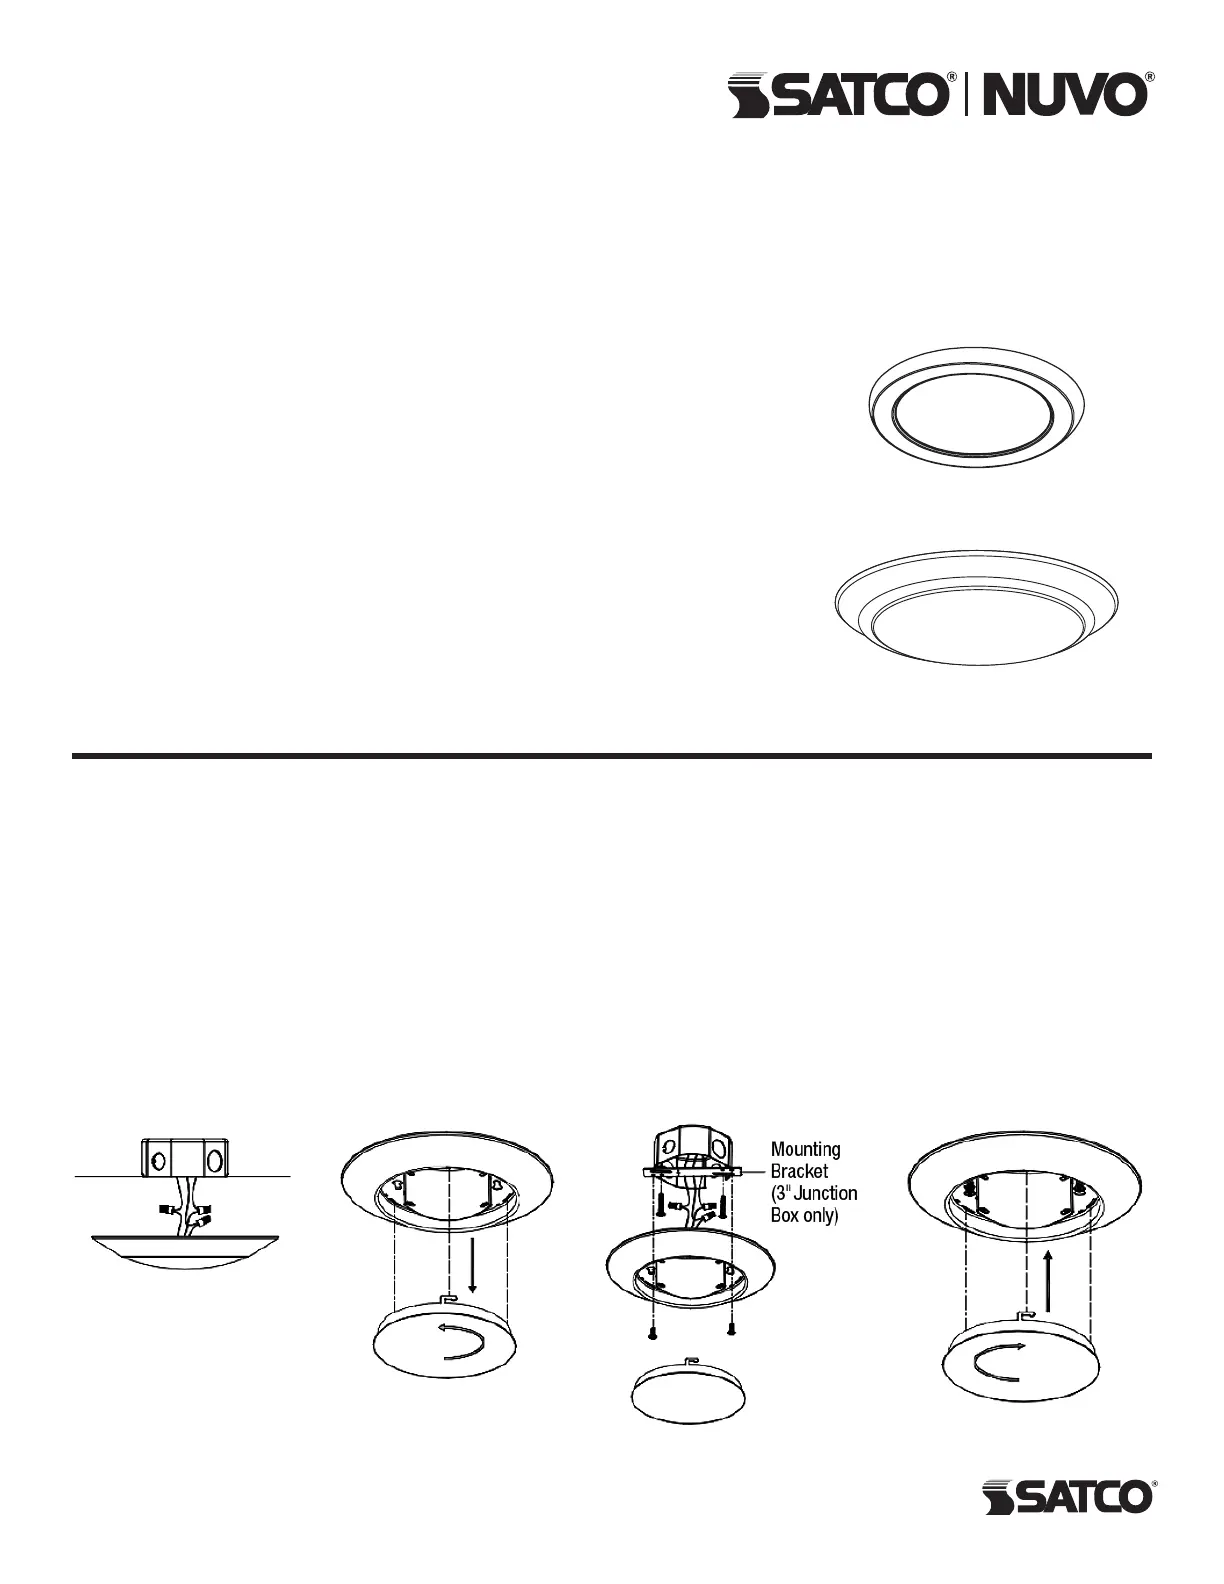
NOTE: Turn OFF main power at the circuit breaker.
1. Connect the luminaire to supply wires with wire nuts
(included) (Figure A).
2. Remove lens by turning counter clockwise to unlock
(Figure B).
3. Mount luminaire to the junction box and screws
through the keyhole slots (Figure C). Mounting bracket
needed for 3" junction box only.
62-1761, 62-1762, 62-1763
62-1751, 62-1752
4. Replace lens and twist clockwise to lock (Figure D).
IMPORTANT: Should mounting holes not line up with
hole(s) in junction box, secure the Opal to the ceiling
material using compatible screws making sure to
completely cover junction box.
NOTE: If the luminaire includes the optional LED color
temperature selectable switch, select the desired LED
color temperature.
Figure AFigure BFigure CFigure D
Produktspezifikationen
| Marke: | NUVO |
| Kategorie: | Beleuchtung |
| Modell: | 62/1762 |
Brauchst du Hilfe?
Wenn Sie Hilfe mit NUVO 62/1762 benötigen, stellen Sie unten eine Frage und andere Benutzer werden Ihnen antworten
Bedienungsanleitung Beleuchtung NUVO

20 März 2026
19 März 2026
16 März 2026
16 Februar 2026
14 Februar 2026
3 Februar 2026
3 Februar 2026
2 Februar 2026
2 Februar 2026
1 Februar 2026
Bedienungsanleitung Beleuchtung
Neueste Bedienungsanleitung für -Kategorien-
3 April 2026
3 April 2026
3 April 2026
3 April 2026
3 April 2026
3 April 2026
3 April 2026
3 April 2026
3 April 2026
3 April 2026