NZXT Control Hub Bedienungsanleitung
Lies die bedienungsanleitung für NZXT Control Hub (2 Seiten) kostenlos online; sie gehört zur Kategorie Regeln. Dieses Handbuch wurde von 31 Personen als hilfreich bewertet und erhielt im Schnitt 5.0 Sterne aus 3 Bewertungen. Hast du eine Frage zu NZXT Control Hub oder möchtest du andere Nutzer dieses Produkts befragen? Stelle eine Frage
Seite 1/2
COMPONENT LIST
INSTALLATION
DIGITAL RGB LIGHTING & FAN SPEED CONTROLLER
LISTA DE COMPONENTES
LISTE DES COMPOSANTS
KOMPONENTENLISTE
ELENCO DEI COMPONENTI
LISTA DE COMPONENTES
INSTALACIÓN
INSTALLATION
INSTALLIEREN
INSTALLAZIONE
INSTALAÇÃO
구성품목록
部品リスト
零件表
零件表
설치
取り付け
安装
安裝
A.
NZXT Control Hub
B.
Divisor NZXT de 8 pines
C.
Divisor RGB NZXT (de 1 a 3 divisiones)
D.
Divisor de ventilador de 4 pines PWM (de 1 a 3 divisiones)
E.
3M Dual Lock
A.
NZXT Control Hub
B.
Répartiteur à 8 broches NZXT
C.
Répartiteur RGB NZXT (1 à 3)
D.
Répartiteur de ventilateur PWM à 4 broches (1 à 3)
E.
3M Dual Lock
A.
NZXT Control Hub
B.
NZXT-8-Pin-Splitter
C.
NZXT-RGB-Splitter (Dreifach-Verteilung)
D.
4-Pin-PWM-Lüftersplitter (Dreifach-Verteilung)
E.
3M Dual Lock
A.
NZXT Control Hub
B.
Splitter da 8 pin NZXT
C.
Splitter RGB NZXT (ripartizione da 1 a 3)
D.
Splitter per ventola PWM da 4 pin (ripartizione da 1 a 3)
E.
3M Dual Lock
A.
NZXT Control Hub
B.
Splitter de 8 pinos NZXT
C.
Splitter RGB NZXT (split 1 para 3)
D.
Spliter de Ventoinha PWM de 4 pinos (split 1 para 3)
E.
3M Dual Lock
CONTROL HUB
A.
NZXT Control Hub
B.
NZXT 8핀분배기
C.
NZXT RGB 분배기분할(1대3 )
D.
4 )핀 PWM 팬분배기(1대3 분할
E.
3M Dual Lock
A.
NZXTコントロールハブ
B.
NZXT 8-ピンスプリッター
C.
NZXT RGBスプリッター(13対スプリット)
D.
4- PWMピンファンスプリッター(13対スプリット)
E.
3Mデュアルロック
A.
NZXT Control Hub
B.
NZXT 8-pin 分线器
C.
NZXT RGB 分线器(1 分) 3
D.
4-pin PWM 风扇分线器(1 分) 3
E.
3M Dual Lock
A.
NZXT Control Hub
B.
NZXT 8-pin 分配器
C.
NZXT RGB 分配器(1 對) 3
D.
4-pin PWM 風扇分配器(1 對) 3
E.
3M Dual Lock
A1.
8 PCIe 핀전원
A2.
내장커넥터 USB 2.0
A3.
8(PWM )핀전용
A4.
8(DC+PWM)핀
A5.
4 NZXT RGB핀
A6.
4 PWM (DC+PWM)핀
A1.
8-pin PCIe 电源
A2.
内置接口 USB 2.0
A3.
8-pin PWM(仅)
A4.
8-pin (DC+PWM)
A5.
4-pin NZXT RGB
A6.
4-pin PWM (DC+PWM)
A1.
8-pin PCIe 電源
A2.
內部連接器 USB 2.0
A3.
8-pin PWM(僅)
A4.
8-pinDC+PWM()
A5.
4-pin NZXT RGB
A6.
4-pin PWMDC+PWM()
A1.
Alimentacion PCIe de 8 pines
A2.
Conector interno USB 2.0
A3.
8 pines (solo PWM)
A4.
8 pines (DC+PWM)
A5.
RGB de 4-pines NZXT
A6.
4 pines PWM (DC+PWM)
A1.
Alimentation PCIe à 8 broches
A2.
Connecteur USB 2.0 interne
A3.
8 broches (PWM uniquement)
A4.
8 broches (DC+PWM)
A5.
NZXT RGB à 4 broches
A6.
PWM (DC+PWM) à 4 broches
A1.
Cabo de Alimentação PCIe de 8 pinos
A2.
Conector Interno USB 2.0
A3.
8 pinos (Apenas PWM)
A4.
8 pinos (DC+PWM)
A5.
RGB 4 pinos NZXT
A6.
PWM 4 pinos (DC+PWM)
A1.
8-Pin-PCIe-Stromversorgung
A2.
Interner USB-2.0-Anschluss
A3.
8-Pin (nur PWM)
A4.
8-Pin (DC und PWM)
A5.
4-Pin-NZXT-RGB
A6.
4-Pin-PWM (DC und PWM)
A1.
Alimentazione PCIe a 8 pin
A2.
Connettore USB 2.0 interno
A3.
8 pin (solo PWM)
A4.
8 pin (CC+PWM)
A5.
NZXT RGB a 4 pin
A6.
PWM a 4 pin (CC+PWM)
A1.
8- PCIeピン電源
A2.
内部USB 2.0コネクター
A3.
8-PWMピン(のみ)
A4.
8-DC+PWMピン()
A5.
4- NZXT RGBピン
A6.
4- PWMピン()DC+PWM
STEP 1
Ensure your PC is turned off. Connect the PCIe power cable from the controller to the PCIe power cable on the power supply.
Asegúrate de que el PC esté apagado. Conecta el cable de alimentación PCIe del controlador al cable de alimentación PCIe
en la fuente de alimentación.
Assurez-vous que votre PC est éteint. Connectez le câble d'alimentation PCIe du contrôleur au câble d'alimentation PCIe de
l'alimentation.
Stelle sicher, dass dein PC ausgeschaltet ist. Verbinde das PCIe-Stromkabel vom Controller mit dem PCIe-
Stromkabel am Netzteil.
Assicurati che il PC sia spento. Collega il cavo di alimentazione PCIe del controller al cavo di alimentazione PCIe
dell'alimentatore.
Certifica-te de que o PC está desligado. Conecta o cabo de energia PCIe do comando ao cabo de energia PCIe da fonte de
alimentação.
PC가꺼져있는지확인합니다. 컨트롤러의 PCIe 전원케이블을 PCIe 전원공급장치의 PCIe 전원케이블에연결합니다.
PCの電源がオフになっていることを確認します。PCIe電源ケーブルをコントローラーから電源のPCIe電源ケーブルに接続します。
确保你的电脑处于关机状态。连接控制器上的电源线和电源上的电源线。 PCIe PCIe
確認電腦已關閉。將電源線從控制器連接到電源供應器上的電源線。 PCIe PCIe
STEP 2
Connect the USB Cable to an available internal USB 2.0 port on the motherboard.
Conecta el cable USB a un puerto interno USB 2.libre de la placa base.
Connectez le câble USB à un port USB 2.0 interne disponible sur la carte mère.
Verbinde das USB-Kabel mit einem freien internen USB-2.0-Port auf dem Motherboard.
Collega il cavo USB a una porta USB 2.0 interna disponibile sulla scheda madre.
Conecta o Cabo USB a uma porta interna USB 2.0 disponível na motherboard.
USB 케이블을마더보드의사용가능한내장 USB 2.0 포트에연결합니다.
USBケーブルをマザーボード上の空いている内部USB 2.0ポートに接続します。
将线连接到主板上可用的内置接口。 USB USB 2.0
將線連接到主機板上可用的內部端口。 USB USB 2.0
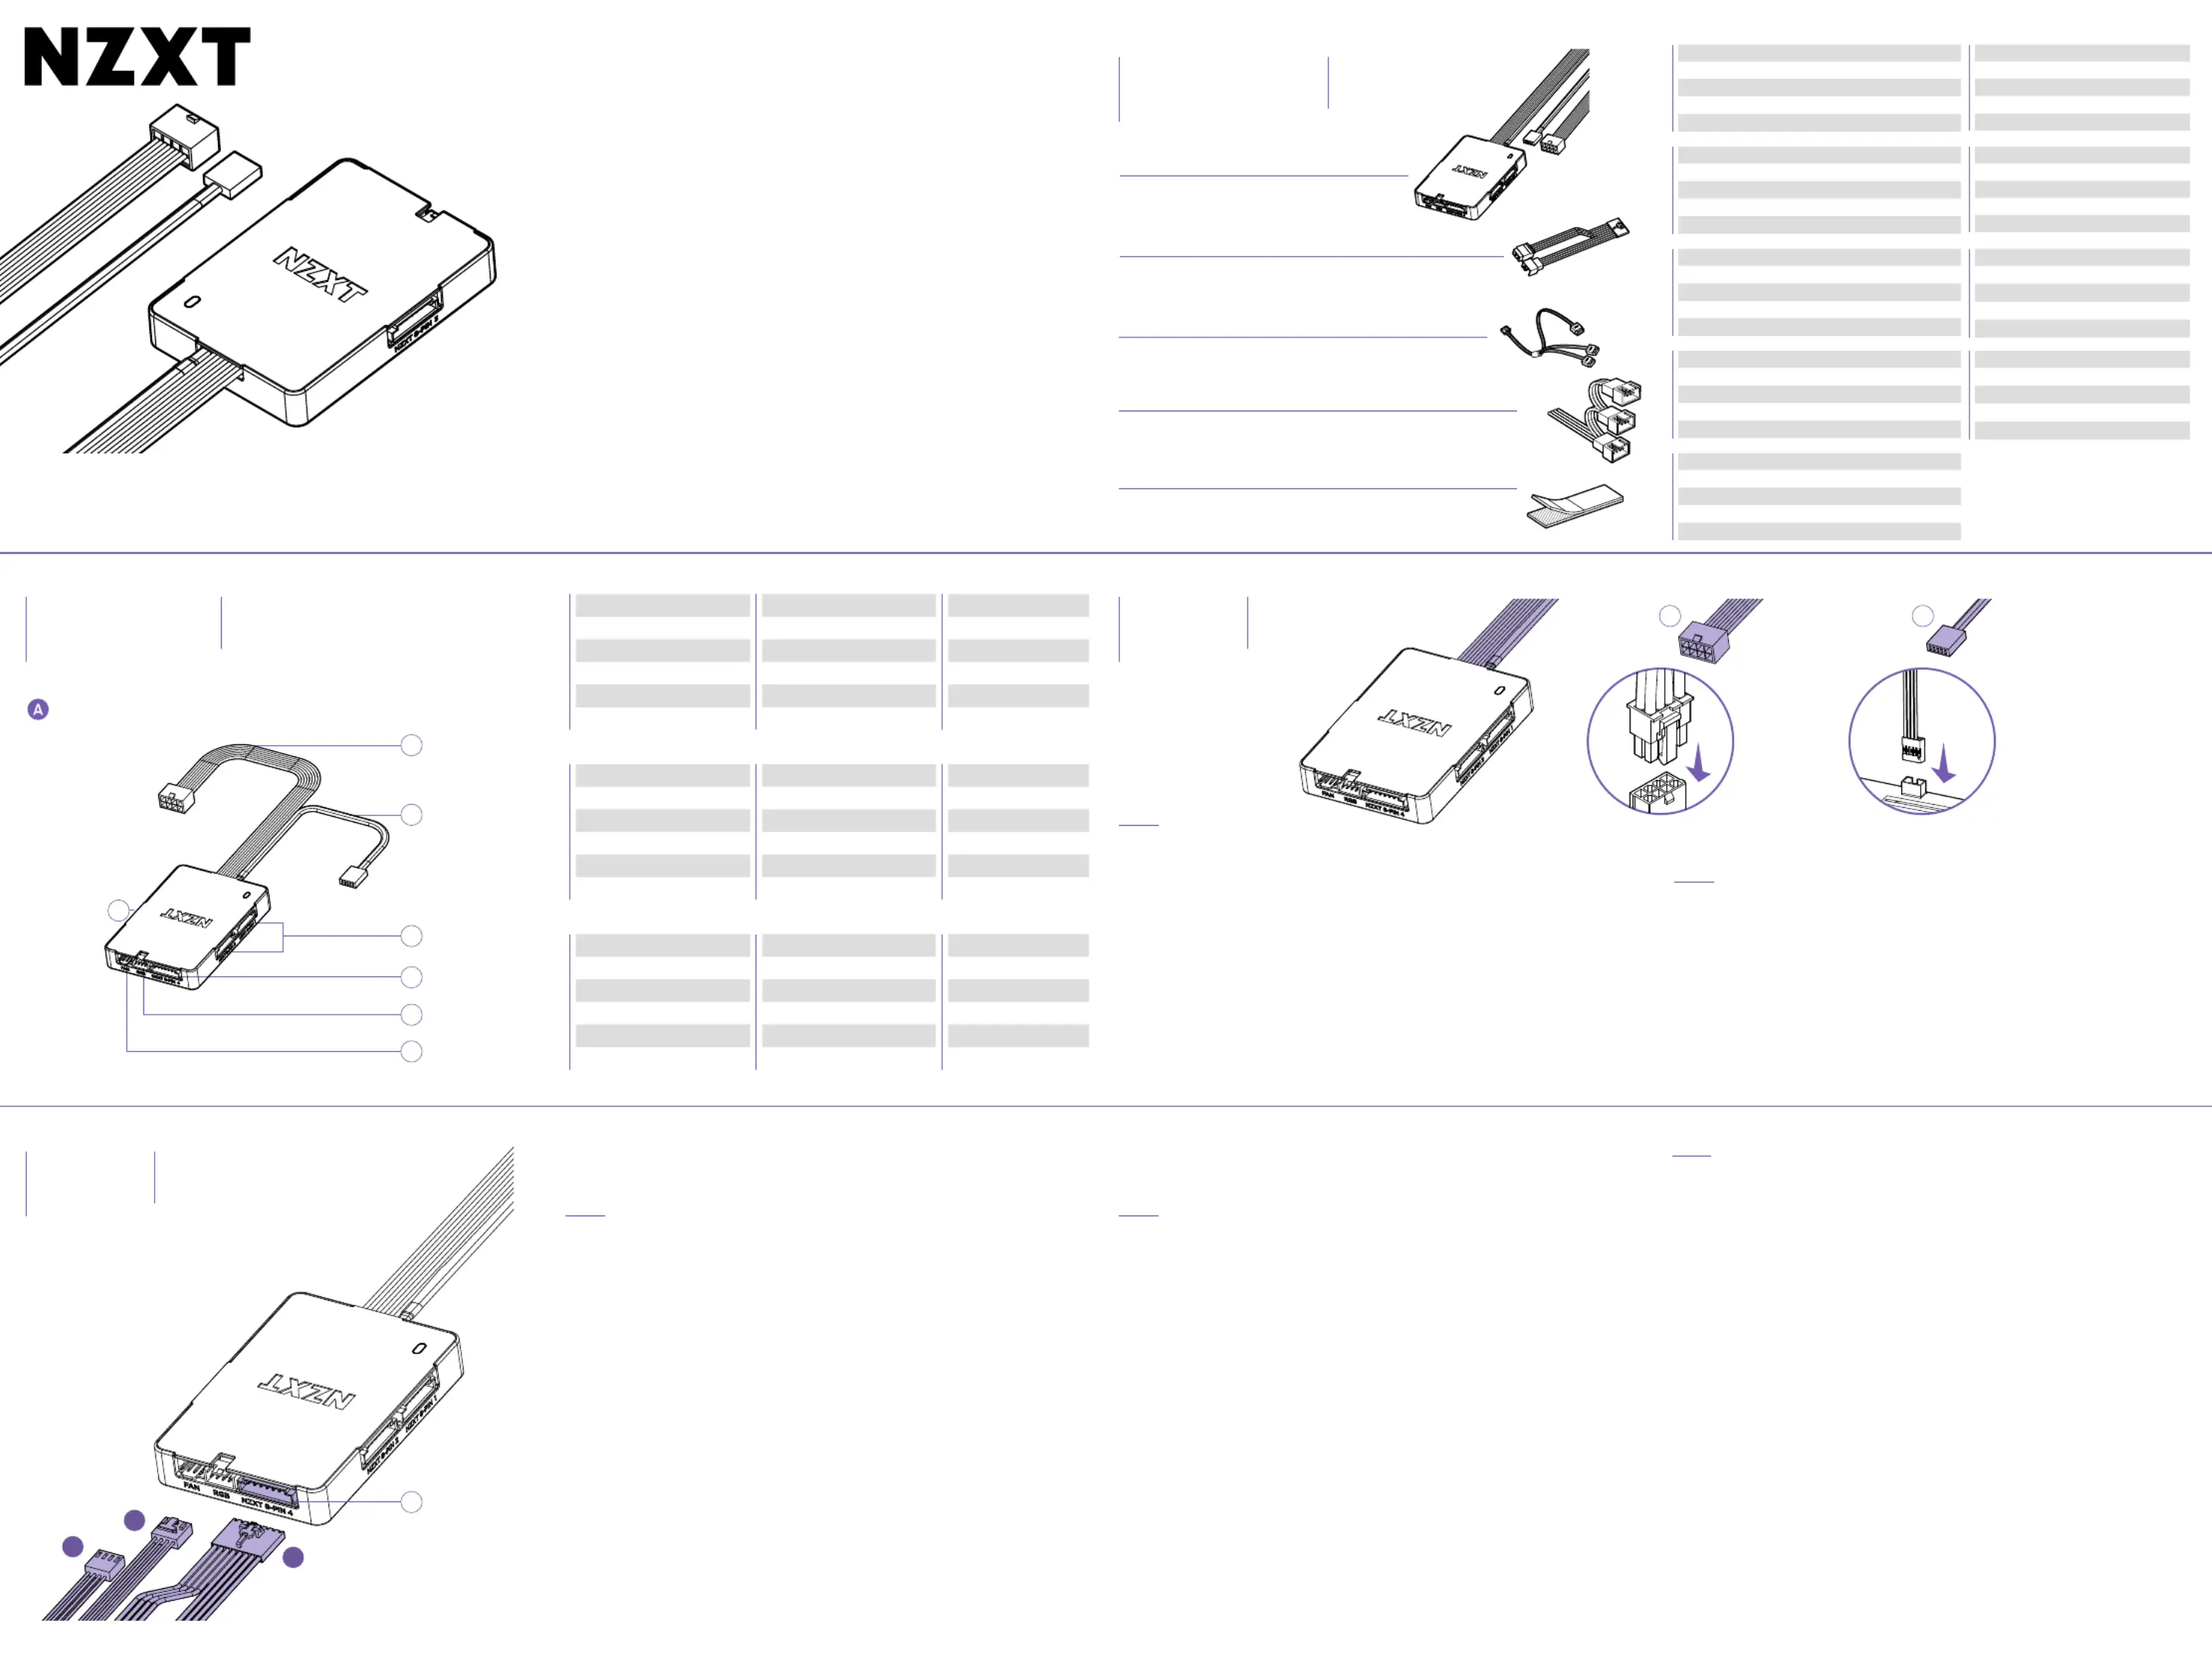
A
NZXT Control Hub
x1
D
4-pin PWM Fan splitter (1 to 3 split)
x1
C
NZXT RGB splitter (1 to 3 split)
x1
x1
B
NZXT 8-pin splitter
x2
E
3M Dual Lock
Connect 8-pin NZXT RGB fans directly to an available 8-pin port.
Note: Please connect case version RGB fans to Channel 4 which supports RPM control for DC fans.
Conecta los ventiladores NZXT RGB de 8 pines directamente a un puerto de 8 pines libre.
Nota: conecta los ventiladores RGB versión torre al canal 4 que soporta control de RPM para ventiladores de CC.
Connectez les ventilateurs NZXT RGB à 8 broches directement à un port 8 broches disponible.
Remarque : veuillez connecter les ventilateurs RGB de la version boîtier au canal 4 qui prend en charge le
contrôle du régime des ventilateurs à courant continu.
Verbinde die 8-Pin-NZXT-RGB-Lüfter direkt mit einem freien 8-Pin-Port.
Hinweis: Bitte verbinde Gehäuseversions-RGB-Lüfter mit Kanal 4, der die Drehzahlsteuerung für DC-Lüfter
unterstützt.
Collega le ventole RGB NZXT a 8 pin direttamente a una porta a 8 pin disponibile.
NB: collega le ventole RGB della versione case al canale 4, il quale supporta il controllo RPM per ventole DC.
Conecta as ventoinhas RGB NZXT de 8 pinos diretamente a uma porta de 8 pinos disponível
Nota: conecta as ventoinhas RGB da versão da caixa ao Canal 4 que suporta o controlo do RPM para
ventoinhas DC.
8 . 핀 NZXT RGB 팬을사용가능한8핀포트에직접연결합니다
참고: 케이스 버전 RGB 팬을 DC 팬의 RPM 제어를 지원하는 4번 채널에 연결하십시오.
8−ピンNZXT RGBファンを空いている8–ピンポートに直接接続します。
注:ケース型RGBファンは、DCファンのRPM制御をサポートするチャンネル4に接続してください。
将风扇直接连接到可用的接口。 8-pin NZXT RGB 8-pin
注意:请将机箱风扇连接到支持直流风扇转速控制的通道。 RGB 4
將風扇直接連接至可用的端口。 8-pin NZXT RGB 8-pin
注意:請將機殼版本的風扇連接至通道,此通道支援風扇的控制。 RGB 4 DC RPM
STEP 3
Use the included splitter(s) as needed to connect to fans and other RGB accessories.
Warning: Do not use more than one 1-to-3 splitter per channel.
Usa el divisor o divisores incluidos según sea necesario para conectar los ventiladores a otros accesorios RGB.
Advertencia: no uses más de entre 1 y 3 divisores por canal.
Utilisez le(s) répartiteur(s) fourni(s) selon vos besoins pour connecter les ventilateurs et autres accessoires RGB.
Attention : n'utilisez pas plus d'un répartiteur 1 à 3 par canal.
Verwende den/die beiliegenden Splitter nach Bedarf, um Lüfter und anderes RGB-Zubehör anzuschließen.
Warnung: Verwende nicht mehr als einen Dreifach-Splitter pro Kanal.
Utilizza gli splitter inclusi secondo necessità per effettuare il collegamento con ventole e altri accessori RGB.
Avvertenza: non utilizzare più di uno splitter con ripartizione da 1 a 3 per canale.
Usa o(s) splitter(s) incluído(s) conforme necessário para conectar às ventoinhas e outros acessórios RGB.
Aviso: não uses mais do que um splitter 1 para 3 por canal.
동봉된분배기를필요에따라팬과다른액세서리에연결합니다 RGB .
경고: 1대3 분배기를 채널당 한 개 이상 사용하지 마십시오.
ファンやその他のRGBアクセサリーに接続するには、必要に応じて付属のスプリッターをご使用ください。
注:各チャンネルに1対3のスプリッターを1つ以上使用しないでください。
根据需要使用附带的分线器连接风扇和其他配件。 RGB
警告:每个通道不要使用超过一个分分线器。 1 3
根據需求使用隨附的分配器連接風扇和其他配件。 RGB
警告:每個通道請勿使用超過一個對分配器。 1 3
Splitter(s) (Optional)
• The Control Hub LED will flash twice continuously for 10 seconds and run the fans at 100% speed to
indicate when the USB cable is disconnected.
• The Control HUB LED will blink continuously to indicate when the PCIe power cable is not connected.
• El led del Control Hub parpareará continuamente dos veces durante 10 segundos y activará los ventiladores
al 100% de velocidad para indicar que el cable USB no está conectado.
• El led del Control Hub parpadeará continuamente para indicar que el cable de alimentación PCIe no está
conectado.
• La DEL du Control Hub clignote deux fois en continu pendant 10 secondes et fait tourner les ventilateurs à
100 % pour indiquer que le câble USB est déconnecté.
• La DEL du Control Hub clignote en continu pour indiquer que le câble d'alimentation PCIe n'est pas
connecté.
• Die Control-Hub-LED leuchtet zwei Mal durchgehend für 10 Sekunden auf und lässt die Lüfter mit 100 %
Geschwindigkeit laufen, um anzuzeigen, dass das USB-Kabel nicht angeschlossen ist.
• Die Control-Hub-LED blinkt durchgehend, um anzuzeigen, dass das PCIe-Stromkabel nicht angeschlossen
ist.
• Il LED del Control Hub lampeggerà due volte ininterrottamente per 10 secondi e farà funzionare le ventole al
100% della velocità per indicare che il cavo USB è scollegato.
• Il LED del Control Hub lampeggerà ininterrottamente per indicare che il cavo di alimentazione PCIe non è
collegato.
• O LED do Control Hub irá piscar duas vezes continuamente durante 10 segundos e as ventoinhas irão correr
na velocidade máxima para indicar que o cabo USB foi desconectado.
• O LED do Control Hub irá piscar continuamente para indicar quando o cabo de alimentação PCIe não está
conectado.
• 케이블이 분리된 경우, Control Hub LED가 10초 동안 계속해서 두 번씩 깜빡이며 팬이 100% 속도로 작동
됩니다.
• PCIe 전원 케이블이 연결되어 있지 않은 경우, Control HUB LED가 계속해서 깜빡입니다.
•USBケーブルが切断されると、コントロールハブのLEDが10秒間連続して2回点滅し、ファンを100%の速度で作動さ
せてお知らせします。
•PCIe電源ケーブルが接続されていない場合は、コントロールハブのLEDが連続して点滅します。
• Control Hub LED 10 100% USB 将连续闪烁两次,持续秒,并以的速度运行风扇,以指示线断开。
• PCIe Control Hub LED 当电源线未连接时,会连续闪烁。
• USB Control Hub LED 100% 當線斷開時,的燈將連續閃兩次,持續十秒,並以的速度運行風扇以示提醒。
• PCIe Control HUB LED 當電源線未連接時,的燈將持續閃爍以示提醒。
Note
INSTALLATION
INSTALACIÓN
INSTALLATION
INSTALLIEREN
INSTALLAZIONE
INSTALAÇÃO
설치
取り付け
安装
安裝
HARDWARE INTRODUCTION
INTRODUCCIÓN DE HARDWARE
DESCRIPTION DU MATÉRIEL
VORSTELLUNG DER HARDWARE
PRESENTAZIONE DELL'HARDWARE
INTRODUÇÃO AO HARDWARE
하드웨어설명
ハードウェアの概要
硬件介绍
硬體介紹
A1
A2
NZXT Control Hub
8-pin PCIe Power
Internal USB 2.0 Connector
A3
A3
A5
8-pin (PWM Only)
8-pin (PWM Only)
4-pin NZXT RGB
8-pin (DC+PWM)
8-pin (DC+PWM)
4-pin PWM (DC+PWM)
A6
A4
A4
STEP 1-POWERSTEP 2-MB
A1A2
D
C
B
Produktspezifikationen
| Marke: | NZXT |
| Kategorie: | Regeln |
| Modell: | Control Hub |
Brauchst du Hilfe?
Wenn Sie Hilfe mit NZXT Control Hub benötigen, stellen Sie unten eine Frage und andere Benutzer werden Ihnen antworten
Bedienungsanleitung Regeln NZXT

4 August 2025
Bedienungsanleitung Regeln
Neueste Bedienungsanleitung für -Kategorien-
30 März 2026
28 März 2026
24 März 2026
22 März 2026
22 März 2026
22 März 2026
18 März 2026