Osight C-RD Bedienungsanleitung
Lies die bedienungsanleitung für Osight C-RD (1 Seiten) kostenlos online; sie gehört zur Kategorie Nicht kategorisiert. Dieses Handbuch wurde von 2 Personen als hilfreich bewertet und erhielt im Schnitt 4.8 Sterne aus 9 Bewertungen. Hast du eine Frage zu Osight C-RD oder möchtest du andere Nutzer dieses Produkts befragen? Stelle eine Frage
Seite 1/1
Ce appareil et
baerie et
accessoire est
recyclable
À DÉPOSER
EN MAGASIN
À DÉPOSER
EN DÉCHÈTERIE
OU
FRFR
• INGESTION HAZARD: This product contains a button cell or coin battery.
• DEATH or serious injury can occur if ingested.
• A swallowed button cell or coin battery can cause in as Internal Chemical Burns
little as .2 hours
• KEEPOUT OF REACH of CHILDREN new and used batteries .
• Seek immediate medical attention if a battery is suspected to be swallowed or
inserted inside any part of the body.
USER
MANUAL
IN THE BOX
Optic
DesiccantCleaning ClothTool
Working Temperature
-22°F~140°F / -30°C~60°C
1.0
m
IPX6
Table 1: Optic
SPECIFICATIONS
Mode
100%
Mode 3
30000 H40000 H100000 H
CR1632
(
3
V)
Lithium battery
Figure 2
Remove The Insulating Film
1
1
2
1.48 42 oz /g
(Including Battery)
(L)(W)(H)1.77*1.18*1.18 in
(L)(W)(H)45*30*30 mm
AL 7075-T6
(Housing Material)
Figure 1
Product Overview
Buttons
Elevation Adjustment
Windage Adjustment
0.75 in / 19 mm
0.95 in / 24 mm
1
Figure 3
Manual On
Figure 4
Manual Off
Press any button
Press the "+" and "-" buttons simultaneously
for more than 0.5 seconds.
OFF
ON
OFF
ON
Figure 5
Motion Sensor Function
On/Off
3s
Double press and hold "-" for over 3s
Flashes Once: On
Flashes Twice: Off
Figure 6
Brightness Adjustment
Press
"+": increase brightness; "-" : decrease brightness
The optic will automatically turn off after 3
minutes of inactivity.
Upon reaching the maximum or
minimum level, flashes once.
Press and hold "" over 3s-
Figure 7
Reticle System Switching
3s
Cycle
Rotate to adjust elevation or windage
Figure 9
Zero Setting
1 MOA per click
Figure 8
How to Install
Screw on
For torque specification, please read the
installation card.
Remove the battery compartment screw
Remove the battery
Replace with new battery
Install the battery tray and press
it flush with the main unit
Tighten the battery compartment screw
Torque ≤ 6.9in-lbs
Figure 10
Battery Replacement
4
5
3
6
Pry open battery tray with the tool
2
Lens
Battery
Compartment
Screw
#6-32#6-40#4-40M3
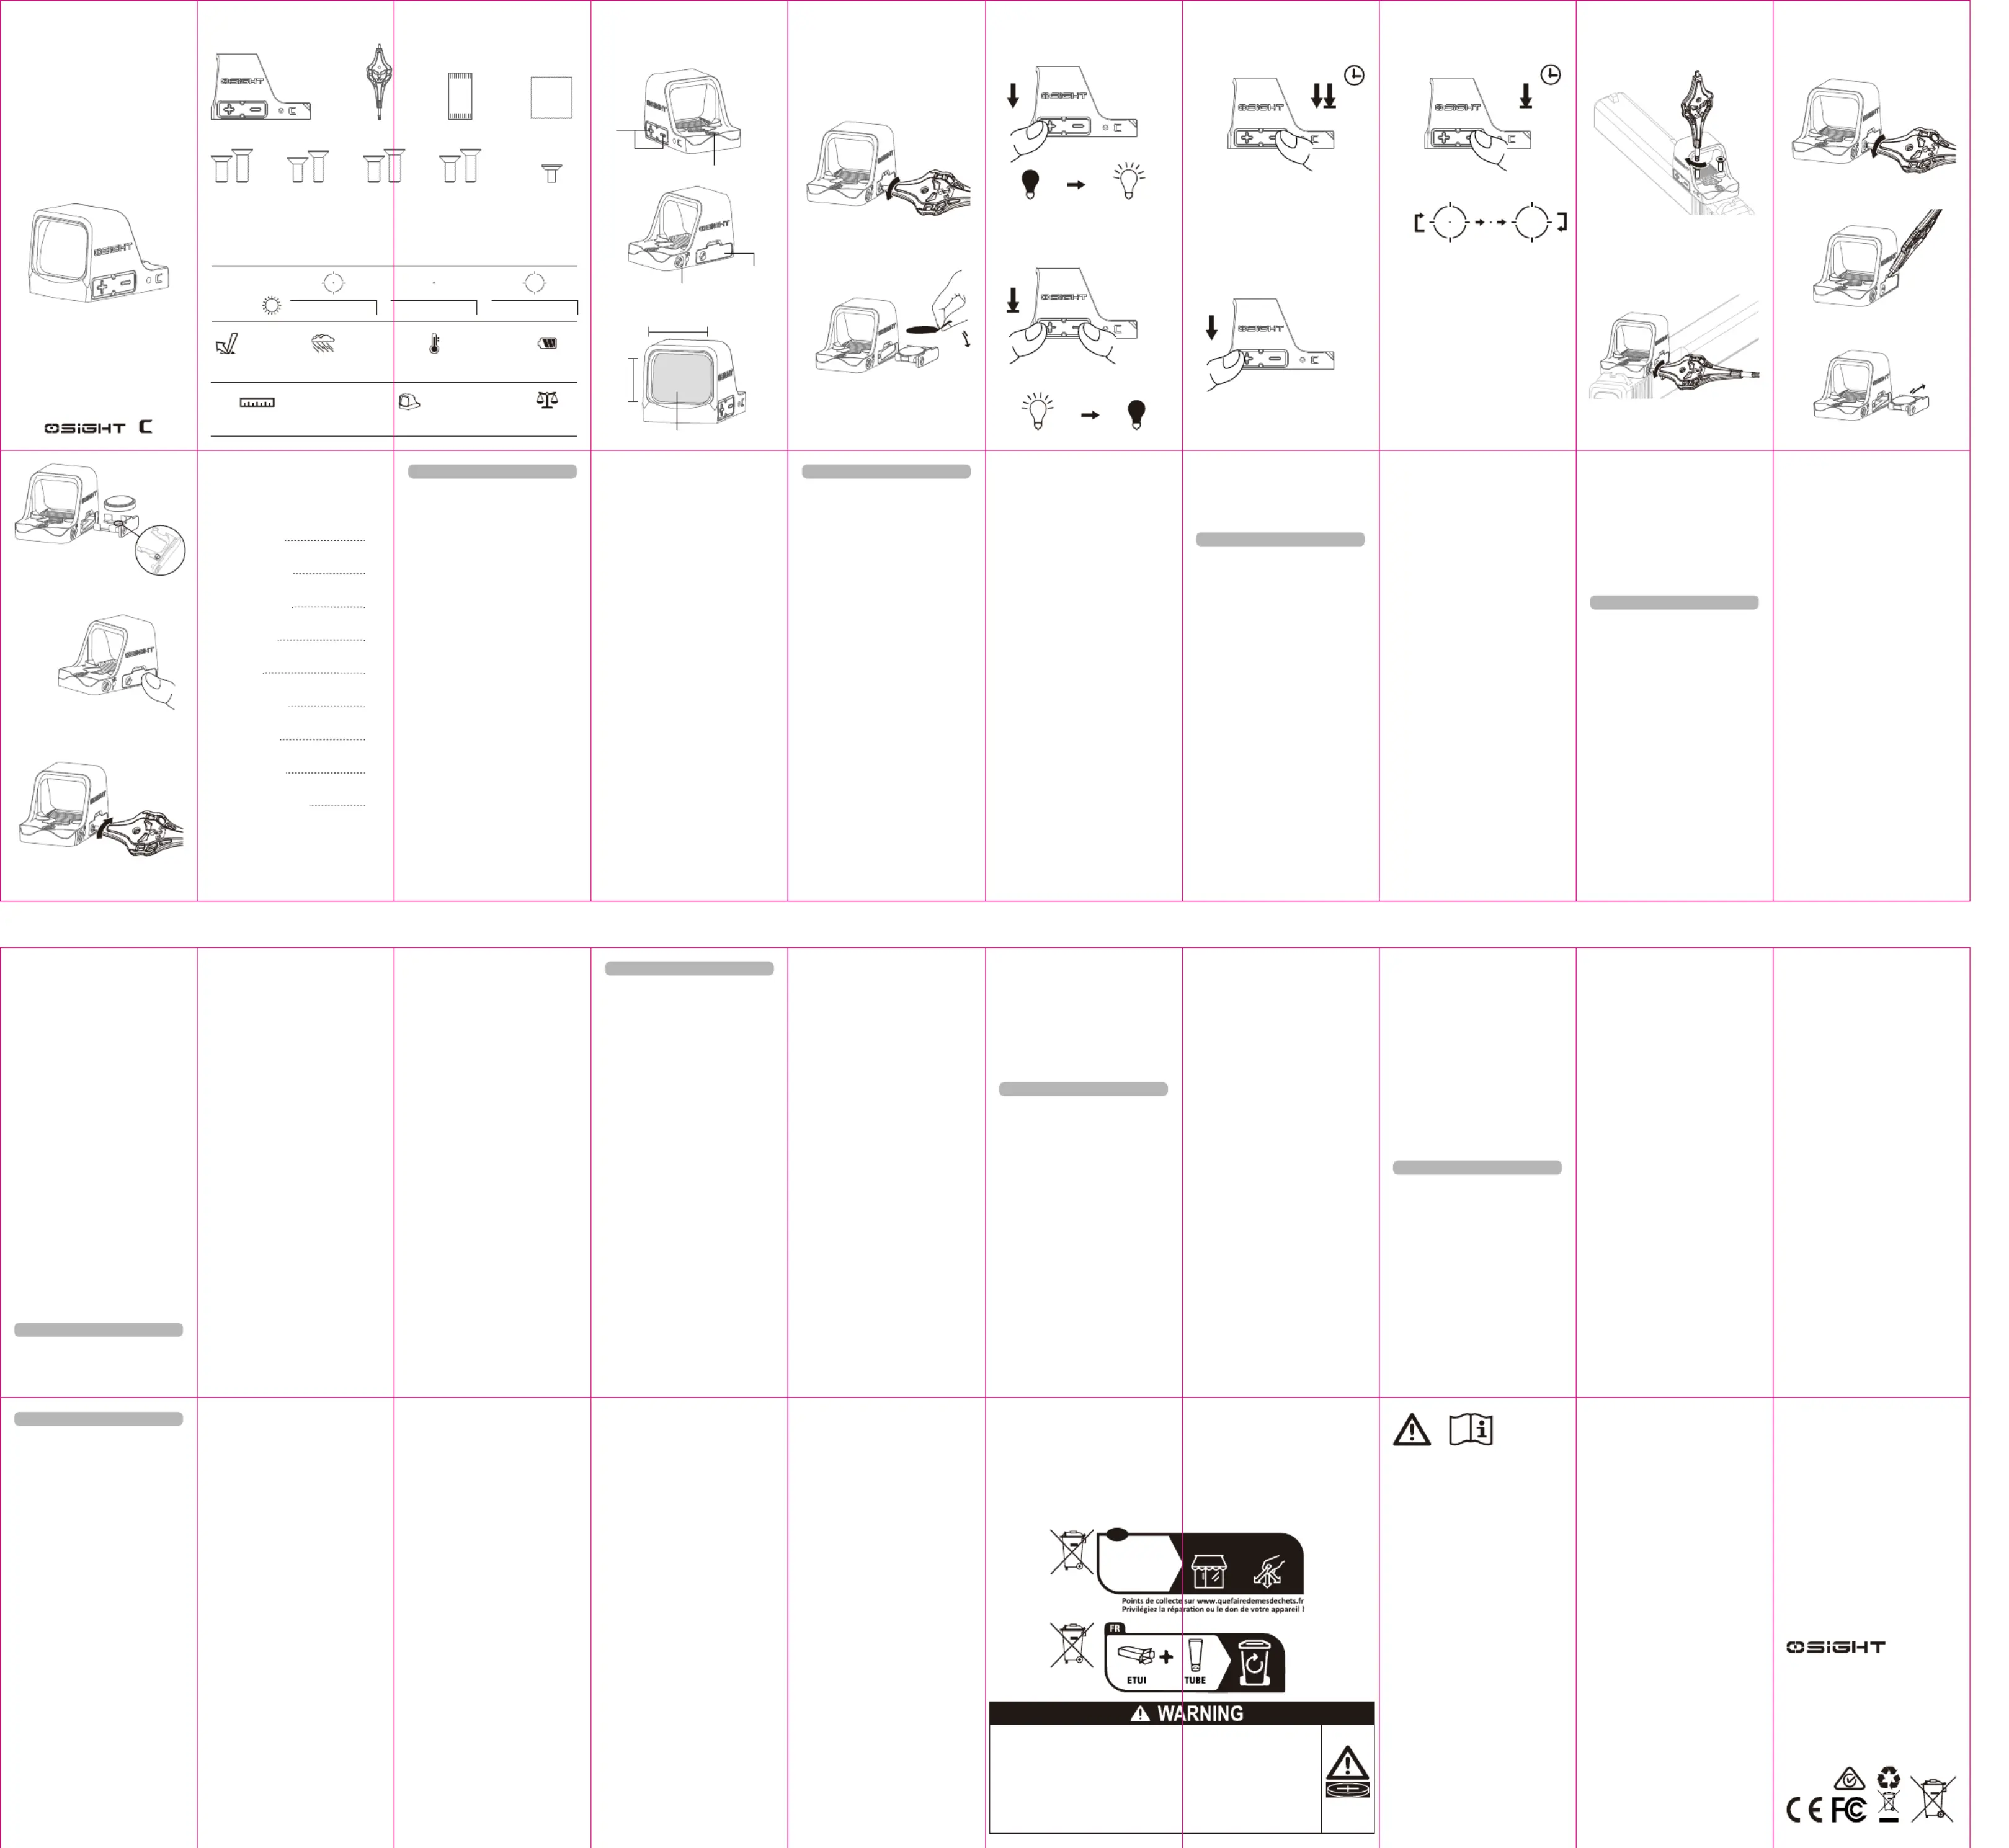
1. Product Specifications: Table 1
2. Product Overview: Figure 1
3. Remove The Insulating Film For Use: Figure 2
4. Operating Instructions:
4.1 On: Figure 3
Manual On:Press any button to turn the optic on.
Auto-On (Default): With Motion Sensing on, Osight
C will automatically activate with movement.
4.2 Off: Figure 4
Manual Off:Press the "+" and "-" buttons
simultaneously for over 0.5 seconds to turn off the
optic.
Auto-Off (Default):With Motion Sensing on, the
optic will automatically turn off if left motionless for
3 minutes.
4.3 Motion Sensing:Figure 5
Motion Sensing is on by default, and is the optimum
setting for battery life and ease of use.
To Toggle Motion Sensing: Ensure Osight C is on,
then double press and hold the "-" button for more
than 3 seconds to toggle Motion Sensing on or off.
When Motion Sensing has been selected, the reticle
will flash once.
When Motion Sensing has been disabled, the reticle
will flash twice.
4.4 Brightness Settings:Figure 6
The optic consists of 10 brightness levels: Levels 1
and 2 are night vision settings, while Levels 3 to 10
are daylight settings. Level 1 is the lowest setting,
and 10 is the brightest.
Press the “+” button to increase brightness and
the “-” button to decrease brightness.
When attempting to select a brightness setting
lower than 1 or higher than 10, the reticle will flash
once to alert the user of reaching minimum or
maximum brightness.
4.5 Reticle Selection:Figure 7
WithOsight C active, press and hold the "-" button
for over 3 seconds to switch between the three
reticle settings: Dot+Circle, Dot,Circle, and
Osight C will cycle between every 2 seconds as
long as the “-”button remains pressed.
Dot+Circle is the default reticle, featuring both the
3 MOA Dot and the 32 MOA Circle.
5. How to Install:Figure 8
6. Zero Setting:Figure 9
Windage (left/right) or elevation (up/down)
adjustment is 1 MOA per click.
7. Battery Replacement: Figure 10
8. Low Power Indication:
When the battery power gets too low, the reticle
flashes three times within one second at
one-minute intervals. Please replace the battery
promptly.
9. Memory Function:
The previously used brightness, motion sensing,
reticle selection, and on/off state will be memorized
after the optics is powered off.
A. 07, 25, 2025
3.4000.1264
CAN ICES-003 (B) / NMB-003 (B)
USA Customer Support
For other countries and regions, please
contact Global Customer Support
WARRANTY
We are proud to offer a lifetime warranty. If your
Osight product ever experiences any issues, we
promise to take care of it. If we are unable to repair
your product, we will promptly replace it with a
product in perfect working condition, which will be of
equal or better value. The warranty covers defects in
material and workmanship under normal use,
excluding loss, theft, deliberate damage, or
cosmetic damage. For complete warranty
information, please visit osight.com.
Designed by OSIGHT INC. in Arizona
4330 W Chandler Blvd, Suite 4 Chandler, AZ 85226
Manufacturer:
4th Floor, Building 4, Kegu Industrial Park, No. 6
Zhongnan Road, Chang'an Town, Dongguan City,
Guangdong, China.
Made in China
• Do not ingest the battery, as there is a Chemical
Burn Hazard.
• This product contains a coin/button cell battery.
• If the coin/button cell battery is swallowed, it can
cause severe internal burns in just 2 hours and
can lead to death.
• Keep new and used batteries away from children.
• If the battery compartment does not close
securely, stop using the product and keep it away
from children.
• If you think batteries might have been swallowed
or placed inside any part of the body, seek
immediate medical attention.
• Do not replace the battery with an incorrect type
that can defeat a safeguard, such as certain
types of lithium batteries.
• Do not dispose of the battery in fire, a hot oven,
or by crushing or cutting it, as it may result in an
explosion.
• Leaving a battery in an extremely high
temperature surrounding environment can result
in an explosion or the leakage of flammable liquid
or gas.
• Battery subjected to extremely low air pressure
may result in an explosion or the leakage of
flammable liquid or gas.
EU Declaration of Conformity
Hereby Dongguan Olight E-Commerce Technology Co,Ltd declares that the products [Osight C] are in compliance with Directive
2014/30/EU and RoHS Directive 2011/65/EU & (EU) 2015/863. The full text of the EU declaration of conformity is available at the
following internet address: https://www.olight.com/download
FCC compliance statement
This device complies with part 15 of the FCC Rules. Operation is subject to the following two conditions:
(1) This device may not cause harmful interference, and (2) this device must accept any interference received, including
interference that may cause undesired operation.
Any changes or modifications not expressly approved by the party responsible for compliance could void the user's authority to
operate the equipment.
Note: This equipment has been tested and found to comply with the limits for a Class B digital device, pursuant to part 15 of the
FCC Rules. These limits are designed to provide reasonable protection against harmful interference in a residential installation. This
equipment generates, uses and can radiate radio frequency energy and, if not installed and used in accordance with the
instructions, may cause harmful interference to radio communications. However, there is no guarantee that interference will not
occur in a particular installation. If this equipment does cause harmful interference to radio or television reception, which can be
determined by turning the equipment off and on, the user is encouraged to try to correct the interference by one or more of the
following measures:
-Reorient or relocate the receiving antenna.
-Increase the separation between the equipment and receiver.
-Connect the equipment into an outlet on a circuit different from that to which the receiver is connected.
-Consult the dealer or an experienced radio/TV technician for help.
ISED Notice
This device complies with Industry Canada’s ICES standard(s). Operation is subject to the following two conditions:
(1) this device may not cause interference, and (2) this device must accept any interference, including interference
that may cause undesired operation of the device.
Cet appareil est conforme aux normes ICES d’industrie Canada. L'exploitation est autorisée aux deux conditions suivantes:
(1) l'appareil nedoit pas produire de brouillage, et (2) l'utilisateur de l'appareil doit accepter tout brouillage
radioélectrique subi, même si le brouillage est susceptible d'en compromettre le fonctionnement.
This Class B digital apparatus complies with Canadian ICES-003.
Cet appareil numérique de la classe B est conforme à la norme NMB-003 du Canada.
WEEE Disposal and Recycling Information
All products bearing this symbol are waste electrical and electronic equipment (WEEE as in
directive 2012/19/EU) which should not be mixed with unsorted household waste. Instead, to
protect human health and the environment, you should dispose of your waste equipment at a
designated collection point for the recycling of WEEE, appointed by the government or local
authorities. Proper disposal and recycling will help prevent potential negative consequences to
the environment and human health. Please contact the installer or local authorities for more
information about the location as well as terms and conditions of such collection points.
Battery Compartment
2
CONTENTS
( EN) English
( DE ) Deutsch
( FR ) Français
( JP ) 日本語
( TH ) ไทย
( ES ) Español
( KR ) 한국어
( IT ) Italiano
( NL ) Nederlands
01
03
05
07
09
12
14
16
19
( EN ) English
( TH ) ไทย
( ES ) Español
( NL ) Nederlands
( KR ) 한국어
( IT ) Italiano
( DE ) Deutsch
( FR ) Français
( JP ) 日本語
0102
09101112131415171816
192021
030405070806
1. Produktspezifikationen, siehe Tabelle 1
2. Produktübersicht: Abbildung 1
3. Isolierfolie vor der Verwendung entfernen,
siehe Abbildung 2;
4. Bedienungsanleitung:
4.1 Einschalten, siehe Abbildung 3
Manuelles Einschalten: Durch einmaliges Drücken
eines beliebigen Schalters wird die Optik
eingeschaltet.
Automatisches Einschalten: Bei aktivierter
Bewegungssensorfunktion schaltet sich die Optik bei
erkannter Bewegung automatisch ein.
4.2 Ausschalten, siehe Abbildung 4
Manuelles Ausschalten: Beide Schalter „+“ und
„–“ gleichzeitig für mehr als 0,5 Sekunden drücken.
Automatisches Ausschalten: Bei aktivierter
Bewegungssensorfunktion schaltet sich die Optik
automatisch nach 3 Minuten ohne Bewegung aus.
4.3 Bewegungssensorfunktion, siehe Abbildung 5
Die Bewegungssensorfunktion ist werkseitig
aktiviert.
Bei eingeschaltetem Gerät kann durch doppeltes
Drücken und anschließendes Halten des Schalters
„−“ für mehr als 3 Sekunden die Funktion aktiviert
oder deaktiviert werden.
Nach der Aktivierung blinkt das Fadenkreuz einmal.
Nach der Deaktivierung blinkt das Fadenkreuz
zweimal.
4.4 Helligkeitseinstellungen, siehe Abbildung 6
Die Optik verfügt über 10 Helligkeitsstufen: Stufe
1 und 2 sind für nachts vorgesehen, Stufe 3 bis 10
für den Tagesgebrauch, wobei Stufe 10 die hellste
ist. Beim Erreichen der maximalen oder minimalen
Stufe blinkt das Fadenkreuz einmal für 200ms.
Mit dem Schalter „+“ wird die Helligkeit erhöht,
mit dem Schalter „−“ wird sie verringert.
Beim Versuch die Helligkeitsstufe unter 1 oder über
10 einzustellen, blinkt das Fadenkreuz kurz auf, um
auf die Erreichung der minimalen bzw. maximalen
Helligkeit hinzuweisen.
4.5 Umschalten des Fadenkreuzsystems, siehe
Abbildung 7
Bei eingeschaltetem Gerät kann durch
Gedrückthalten des Schalters „−“ für über 3
Sekunden zwischen den drei Fadenkreuzarten
Punkt + Kreis, nur Punk und nur Kreis
umgeschaltet werden. Die Umschaltung erfolgt alle
2 Sekunden im Zyklus.
Punkt + Kreis ist das Standardfadenkreuz und
zeigt sowohl den 2 MOA Punkt als auch den 32
MOA Kreis.
5. Montagehinweise, siehe Abbildung 8
6. Nullpunktsetzung, siehe Abbildung 9
Bei der Einstellung von Seiten- (links/rechts) oder
Höhenlage (oben/unten) entspricht jede Rasterung
einer Veränderung um 1 MOA.
7. Batteriewechsel, siehe Abbildung 10
8. Anzeige bei niedrigem Batteriestand
Bei zu niedriger Batteriespannung blinkt das
Fadenkreuz pro Minute innerhalb einer Sekunde
dreimal. Bitte die Batterie rechtzeitig austauschen.
9. Speicherfunktion
Nach dem Ausschalten merkt sich das Gerät den
zuletzt verwendeten Helligkeitswert, den Zustand
des Bewegungssensors, die Fadenkreuzart sowie
den Ein-/Auszustand.
1. Caractéristiques du produit, voir Table 1
2. Aperçu du produit, voir Figure 1 ;
3. Retirer le film isolant, voir Figure 2
4. Instructions d’utilisation :
4.1 Allumage, voir Figure 3;
Allumage manuel : appuyez sur n’importe quel
bouton pour allumer l’optique.
Allumage automatique : lorsque la fonction de
détection de mouvement est activée, l’optique
s’allume automatiquement dès qu’un mouvement
est détecté.
4.2 Extinction, voir Figure 4;
Extinction manuelle : Appuyez simultanément sur
les boutons "+" et "-" pendant plus de 0,5 seconde
pour éteindre l'optique.
Extinction automatique : Lorsque la fonction de
détection de mouvement est activée, l'optique
s'éteindra automatiquement après 3 minutes
d'inaction.
4.3 Fonction de détection de mouvement, voir
Figure 5;
La fonction de détection de mouvement est activée
par défaut.
Lorsque l'optique est allumée, appuyez deux fois
rapidement sur le bouton "-" et maintenez-le
enfoncé pendant plus de 3 secondes pour activer
ou désactiver cette fonction.
Lorsque la détection de mouvement est activée, le
réticule clignote une fois.
Lorsque la détection de mouvement est désactivée,
le réticule clignote deux fois.
4.4 Réglages de la luminosité, voir Figure 6;
Il y a 10 niveaux de luminosité. Les niveaux 1 et 2
sont des réglages adaptés à une utilisation
nocturne, tandis que les niveaux 3 à 10 sont des
réglages pour la lumière du jour, le niveau 10 étant
le plus lumineux. (Lorsque le niveau maximum ou
minimum est atteint, le réticule clignote une fois.)
Appuyez sur le bouton "+" pour augmenter la
luminosité et sur le bouton "-" pour la diminuer.
Lorsque l’utilisateur tente de sélectionner un
niveau de luminosité inférieur à 1 ou supérieur à
10, le réticule clignote une fois pour signaler que la
luminosité minimale ou maximale a été atteinte.
4.5 Changement de réticule, voir Figure 7;
Lorsque l'optique est allumée, maintenez le bouton
"–" enfoncé pendant plus de 3 secondes pour faire
défiler les trois options de réticule : point + cercle,
point seul et cercle seul. Le changement se fait
dans cet ordre toutes les 2 secondes.
Point + Circle est le réticule par défaut, combinant
un point de 2 MOA et un cercle de 32 MOA.
5. Installation, voir Figure 8;
6. Réglage à zéro, voir Figure 9;
Le réglage en dérive (gauche/droite) ou en
élévation (haut/bas) est de 1 MOA par clic.
7. Remplacement de la batterie, voir Figure 10.
8. Affichage du niveau de batterie faible :
Lorsque le niveau de la batterie est trop faible, le
réticule clignote trois fois en une seconde par
intervalles d'une minute. Veuillez remplacer la
batterie dès que possible.
9. Mémorisation en cas de coupure de courant:
Après l'extinction de l'optique, les paramètres
précédemment utilisés, tels que la luminosité, la
détection de mouvement, l'aspect du réticule et le
mode d'allumage/extinction, seront mémorisés.
1. 製品仕様については、Table 1をご参照
ください。
2. 製品概要については、Figure 1をご参
照ください。
3. 絶縁フィルムを取り外すについては、
Figure 2をご参照ください。
4. 操作手順は次のとおりです。
4.1 オンについては、Figure 3をご参照
ください。
手動オン:任意のボタンを押してオンに
します。
自動オン:モーションセンサー機能が有
効になっている場合、動きを検知すると
自動的にオンになります。
4.2 電源オフについては、Figure 4をご
参照ください。
手動電源オフ:「+」ボタンと「-」ボタ
ンを同時に0.5秒以上押し続けると、光学
機器の電源がオフになります。
自動電源オフ:モーションセンサー機能
が有効になっている場合、3分間動きがな
いと光学機器は自動的にオフになりま
す。
4.3 モーションセンサー機能については、
Figure 5をご参照ください。
モーションセンサー機能はデフォルトで
有効になっています。
モーションセンサーを切り替えるには:
Osight C がオンになっていることを確認
してから、「-」ボタンを 3 秒以上 2 回押
し続けて、モーションセンサーのオンと
オフを切り替えます。
機能が有効になっている場合、レチクル
は1回点滅します。
機能が無効になっている場合、レチクル
は2回点滅します。
4.4 明るさ設定については、Figure 6をご
参照ください。
光学機器は10段階の明るさレベルで構成
されています。レベル1と2は夜間視力、
レベル3から10は日中視力です。レベル1
が最も低く、レベル10が最も明るい設定
です。
「+」ボタンを押すと明るさが上がり、
「-」ボタンを押すと明るさが下がります。
1 未満または 10 を超える明るさ設定を選
択しようとすると、レチクルが 1 回点滅
し、最小または最大の明るさに達したこ
とをユーザーに知らせます。
4.5 レチクルの選択については、Figure 7
をご参照ください。
Osight C が有効な状態で、「-」ボタンを
3 秒以上押し続けると、3 つのレチクル設
定(ドット + サークル、ドット、サーク
ル)が切り替わります。「-」ボタンを押
している間、Osight C は 2 秒ごとに切り
替わります。
Dot+Circle は、3 MOA のドットと 32
MOA のサークルの両方を備えたデフォル
トのレチクルです。
5. 取り付け方法については、Figure 8を
ご参照ください。
6. ゼロ設定については、Figure 9をご参
照ください。
風偏(左右)または仰角(上下)の調整
は、1クリックあたり1MOAです。
7. 電池交換については、Figure 10をご参
照ください。
8. 低電力表示:
電池残量が少なくなると、レチクルが1秒
以内に3回点滅し、1分間隔で点滅しま
す。速やかに電池を交換してください。
9. 電源オフ時のメモリ:
光学機器の電源を切った後も、前回使用
した明るさ、モーション、レチクル、お
よび電源のオン/オフ状態が記憶されま
す。
1. ข้อมูลจาเพาะของผลิตภัณฑ์: ดูที่ Table 1
2. ภาพรวมของผลิตภัณฑ์: ดูที่ Figure 1
3. ถอดแผ่นฟิล์มกันไฟฟ้าสถิตก่อนใช้งาน: ดูที่
Figure 2
4. คาแนะนาในการใช้งาน:
4.1 การเปิดเครื่อง: ดูที่ Figure 3
เปิดแบบแมนนวล: กดปุ่มใดก็ได้เพื่อเปิดออปติก
เปิดอัตโนมัติ (ค่าเริ่มต้น): เมื่อเปิดระบบตรวจจับการ
เคลื่อนไหว Osight C จะเปิดอัตโนมัติเมื่อมีการ
เคลื่อนไหว
4.2 การปิดเครื่อง: ดูที่ Figure 4
ปิดแบบแมนนวล: กดปุ่ม "+" และ "-" พร้อมกันค้าง
ไว้นานกว่า 0.5 วินาที
ปิดอัตโนมัติ (ค่าเริ่มต้น): เมื่อเปิดระบบตรวจจับการ
เคลื่อนไหว ออปติกจะปิดเองเมื่อไม่มีการเคลื่อนไหว
เป็นเวลา 3 นาที
4.3 การตรวจจับการเคลื่อนไหว: ดูที่ Figure 5
การตรวจจับการเคลื่อนไหวจะเปิดเป็นค่าดีฟอลต์
และเป็นการตั้งค่าที่เหมาะสมที่สุดสาหรับการประหยัด
แบตเตอรี่และความสะดวกในการใช้งาน
วิธีเปิด/ปิดการตรวจจับการเคลื่อนไหว:
ขณะ Osight C เปิดอยู่ ให้กดปุ่ม "-" สองครั้งแล้วกด
ค้างไว้นานกว่า 3 วินาที
หากเปิดการตรวจจับการเคลื่อนไหวแล้ว เรติเคิลจะ
กระพริบหนึ่งครั้ง
หากปิดการตรวจจับการเคลื่อนไหว เรติเคิลจะกระ
พริบสองครั้ง
4.4 การตั้งค่าความสว่าง: ดูที่ Figure 6
ออปติกมีระดับความสว่างทั้งหมด 10 ระดับ:
ระดับ 1 และ 2 สาหรับใช้งานร่วมกับอุปกรณ์มอง
กลางคืน
ระดับ 3 ถึง 10 สาหรับใช้งานเวลากลางวัน
ระดับ 1 คือความสว่างต่าสุด และระดับ 10 คือความ
สว่างสูงสุด
กดปุ่ม “+” เพื่อเพิ่มความสว่าง และกดปุ่ม “-” เพื่อลด
ความสว่าง
หากพยายามตั้งค่าต่ากว่าระดับ 1 หรือสูงกว่าระดับ
10 เรติเคิลจะกระพริบหนึ่งครั้งเพื่อแจ้งว่าถึงขีดจากัด
แล้ว
4.5 การเลือกเรติเคิล: ดูที่ Figure 7
ขณะ Osight C เปิดอยู่ ให้กดปุ่ม "-" ค้างไว้นานกว่า
3 วินาทีเพื่อสลับระหว่างรูปแบบเรติเคิล 3 แบบ
ได้แก่: จุด+วงกลม, จุด และ วงกลม ระบบจะหมุน
เปลี่ยนทุก 2 วินาที ตราบใดที่ยังค้างปุ่ม “-” ไว้
จุด+วงกลม เป็นค่าเริ่มต้น โดยแสดงทั้งจุด 3 MOA
และวงกลม 32 MOA
5. วิธีติดตั้ง: ดูที่ Figure 8
6. การตั้งค่าศูนย์เล็ง (Zero Setting): ดูที่ Figure
9
การปรับลม (ซ้าย/ขวา) หรือความสูง (ขึ้น/ลง) คือ
1 MOA ต่อคลิก
7. การเปลี่ยนแบตเตอรี่: ดูที่ Figure 10
8. สัญญาณเตือนแบตเตอรี่อ่อน:
เมื่อแบตเตอรี่ใกล้หมด เรติเคิลจะกระพริบสามครั้ง
ภายในหนึ่งวินาที และจะกระพริบซ้าทุก 1 นาที
กรุณาเปลี่ยนแบตเตอรี่โดยเร็ว
9. ฟังก์ชันจดจาการตั้งค่า:
ระบบจะจดจาการตั้งค่าความสว่าง ระบบตรวจจับ
การเคลื่อนไหว รูปแบบเรติเคิล และสถานะการเปิด
/ปิดล่าสุดไว้เมื่อปิดอุปกรณ์
1. Especificaciones del producto, consulte la
Tabla 1
2. Descripción general del producto, consulte la
Figura 1
3. Retire la película aislante para su uso,
consulte la Figura 2
4. Instrucciones de funcionamiento:
4.1 Encendido, consulte la Figura 3
Encendido manual: Presione cualquier botón para
encender la óptica.
Encendido automático (predeterminado): con la
detección de movimiento habilitada, Osight C se
activará automáticamente cuando se detecte
movimiento.
4.2 Apagado, consulte la Figura 4
Apagado manual: Presione los botones "+" y "-"
simultáneamente durante más de 0,5 segundos
para apagar la óptica.
Apagado automático (predeterminado): Con la
detección de movimiento activada, la óptica se
apagará automáticamente si permanece inmóvil
durante 3 minutos.
4.3 Detección de movimiento, consulte la
Figura 5
La detección de movimiento está activada por
defecto y es la configuración óptima para una
mayor duración de la batería y facilidad de uso.
Para activar o desactivar la detección de
movimiento: Asegúrese de que Osight C esté
activado y, a continuación, mantenga pulsado el
botón "-" durante más de 3 segundos para activar
o desactivar la detección de movimiento.
Al seleccionar la detección de movimiento, la
retícula parpadeará una vez.
Al desactivarla, la retícula parpadeará dos veces.
4.4 Ajustes de brillo, consulte laFigura 6
La óptica consta de 10 niveles de brillo: los niveles
1 y 2 corresponden a la visión nocturna, mientras
que los niveles 3 a 10 corresponden a la luz diurna.
El nivel 1 es el más bajo y el 10, el más brillante.
Presione el botón "+" para aumentar el brillo y el
botón "-" para disminuirlo.
Al intentar seleccionar un ajuste de brillo inferior a
1 o superior a 10, la retícula parpadeará una vez
para avisar al usuario que se p1-ha alcanzado el brillo
mínimo o máximo.
4.5 Selección de retícula, consulte la Figura 7
Con Osight C activo, mantenga presionado el botón
"-" durante más de 3 segundos para cambiar entre
las tres configuraciones de retícula: Punto +
Círculo, Punto, Círculo y Osight C alternará entre
cada 2 segundos mientras el botón "-" permanezca
presionado.
Punto+Círculo es la retícula predeterminada, que
incluye tanto el punto de 3 MOA como el círculo de
32 MOA.
5. Cómo instalar, consulte la Figura 8
6. Ajuste a cero, consulte la Figura 9
El ajuste de deriva (izquierda/derecha) o elevación
(arriba/abajo) es de 1 MOA por clic.
7. Reemplazo de la batería, consulte la Figura
10
8. Indicación de batería baja:
Cuando la batería está demasiado baja, la retícula
parpadea tres veces por segundo, con intervalos de
un minuto. Reemplace la batería lo antes posible.
9. Función de memoria:
El brillo, la detección de movimiento, la selección
de retícula y el estado de encendido/apagado
utilizados anteriormente se memorizarán después
de que se apague la óptica.
1. Productspecificaties: Tabel 1
2. Productoverzicht: Figuur 1
3. Verwijder de isolatiefolie voor gebruik:
Afbeelding 2
4. Gebruiksaanwijzing:
4.1 Aan: Afbeelding 3
Handmatig Aan: Druk op een willekeurige knop om
de optiek in te schakelen.
Automatisch aan (standaard): Als
Bewegingsdetectie is ingeschakeld, wordt Osight C
automatisch geactiveerd als er beweging wordt
gedetecteerd.
4.2 Uit: Afbeelding 4
Handmatig Uit: Druk de knoppen "+" en "-"
tegelijkertijd langer dan 0,5 seconden in om de
optic uit te schakelen.
Automatisch uit (standaard): Als
Bewegingsdetectie is ingeschakeld, wordt de optiek
automatisch uitgeschakeld als deze 3 minuten lang
onbeweeglijk blijft.
4.3 Bewegingsdetectie: Afbeelding 5
Bewegingsdetectie is standaard ingeschakeld en is
de optimale instelling voor de levensduur van de
batterij en gebruiksgemak.
Om bewegingsdetectie te schakelen: Zorg ervoor
dat Osight C ingeschakeld is en houd de knop "-"
vervolgens gedurende meer dan 3 seconden
ingedrukt om bewegingsdetectie in of uit te
schakelen.
Wanneer Bewegingsdetectie geselecteerd is,
knippert het dradenkruis eenmaal.
Wanneer Bewegingsdetectie is uitgeschakeld,
knippert het dradenkruis twee keer.
4.4 Helderheidsinstellingen: Afbeelding 6
De optiek bestaat uit 10 helderheidsniveaus:
Niveau 1 en 2 zijn nachtzichtinstellingen, terwijl
niveau 3 tot 10 daglichtinstellingen zijn. Niveau 1 is
de laagste instelling en 10 is de helderste.
Druk op de knop “+” om de helderheid te
verhogen en op de knop “-” om de helderheid te
verlagen.
Als je een helderheidsinstelling lager dan 1 of hoger
dan 10 probeert te selecteren, knippert het
dradenkruis eenmaal om de gebruiker te
waarschuwen dat de minimale of maximale
helderheid is bereikt.
4.5 Dradenkruisselectie: Afbeelding 7
Houd, met Osight C actief, de knop "-" meer dan 3
seconden ingedrukt om te wisselen tussen de drie
dradenkruisinstellingen: Dot+Cirkel, Dot, Cirkel, en
Osight C zal elke 2 seconden wisselen zolang de
“-”knop ingedrukt blijft.
Dot+Circle is het standaard dradenkruis, met
zowel de 3 MOA Dot als de 32 MOA Circle.
5. Hoe te installeren: Afbeelding 8
6. Nulstelling: Afbeelding 9
Windcorrectie (links/rechts) of elevatie
(omhoog/omlaag) aanpassing is 1 MOA per klik.
7. Batterij vervangen: Figuur 10
8. Indicatie laag vermogen:
Wanneer de batterijspanning te laag wordt, knippert
het dradenkruis drie keer binnen een seconde met
tussenpozen van een minuut. Vervang de batterij
onmiddellijk.
9. Geheugenfunctie:
De eerder gebruikte helderheid, bewegingsdetectie,
dradenkruisselectie en aan/uit-status worden
opgeslagen nadat de optiek is uitgeschakeld.
Specifiche del prodotto: Tabella 1
2. Panoramica del prodotto: Figura 1
3. Rimozione della pellicola isolante per l'uso:
Figura 2
4. Istruzioni per l'uso:
4.1 Accensione: Figura 3
Accensione manuale: premere un pulsante
qualsiasi per accendere l'ottica.
Accensione automatica (impostazione predefinita):
con il rilevamento del movimento abilitato, Osight C
si attiva automaticamente quando viene rilevato un
movimento.
4.2 Spegnimento: Figura 4
Spegnimento manuale: premere
contemporaneamente i pulsanti "+" e "-" per oltre
0,5 secondi per spegnere l'ottica.
Spegnimento automatico (impostazione
predefinita): con il rilevamento del movimento
attivato, l'ottica si spegne automaticamente se non
viene utilizzata per 3 minuti.
4.3 Rilevamento del movimento: Figura 5
Il rilevamento del movimento è attivo per
impostazione predefinita ed è l'impostazione
ottimale per la durata della batteria e la facilità
d'uso.
Per attivare o disattivare il rilevamento del
movimento: assicurarsi che Osight C sia acceso,
quindi premere due volte e tenere premuto il
pulsante "-" per più di 3 secondi per attivare o
disattivare il rilevamento del movimento.
Quando è selezionato il rilevamento del movimento,
il reticolo lampeggerà una volta.
Quando il rilevamento del movimento è disattivato,
il reticolo lampeggerà due volte.
4.4 Impostazioni di luminosità: Figura 6
L'ottica è composta da 10 livelli di luminosità: i
livelli 1 e 2 sono impostazioni per la visione
notturna, mentre i livelli da 3 a 10 sono
impostazioni per la visione diurna. Il livello 1 è
l'impostazione più bassa e il 10 è la più luminosa.
Premere il pulsante "+" per aumentare la
luminosità e il pulsante "-" per diminuirla.
Quando si tenta di selezionare un'impostazione di
luminosità inferiore a 1 o superiore a 10, il reticolo
lampeggerà una volta per avvisare l'utente del
raggiungimento della luminosità minima o
massima.
4.5 Selezione del reticolo: Figura 7
Con Osight C attivo, tenere premuto il pulsante "-"
per oltre 3 secondi per passare da un'impostazione
all'altra del reticolo: Punto+Cerchio, Punto,
Cerchio e Osight C si alternano ogni 2 secondi
finché il pulsante "-" rimane premuto.
Dot+Circle è il reticolo predefinito, con sia il punto
da 3 MOA che il cerchio da 32 MOA.
5. Come installare: Figura 8
6. Azzeramento: Figura 9
La regolazione della derivazione (sinistra/destra) o
dell'elevazione (su/giù) è di 1 MOA per clic.
7. Sostituzione della batteria: Figura 10
8. Indicazione di batteria scarica:
Quando la batteria è troppo scarica, il reticolo
lampeggia tre volte in un secondo a intervalli di un
minuto. Si prega di sostituire la batteria al più
presto.
9. Funzione di memoria:
La luminosità, il rilevamento del movimento, la
selezione del reticolo e lo stato di accensione/speg-
nimento utilizzati in precedenza verranno
memorizzati dopo lo spegnimento dell'ottica.
1. 제품 사양: Table 1
2. 제품 개요: Figure 1
3. 절연 필름 제거 후 사용: Figure 2
4. 작동 설명:
4.1 전원 켜기: Figure 3
수동 전원 켜기: 아무 버튼이나 눌러 전원을
켭니다.
자동 전원 켜기 (기본 설정): 모션 감지가
활성화된 상태에서 움직임이 감지되면
Osight C가 자동으로 켜집니다.
4.2 전원 끄기: Figure 4
수동 전원 끄기: "+" 버튼과 "-" 버튼을
동시에 0.5초 이상 길게 눌러 전원을 끕니다.
자동 전원 끄기 (기본 설정): 모션 감지
기능이 켜진 상태에서 3분간 움직임이
없으면 자동으로 꺼집니다.
4.3 모션 감지: Figure 5
모션 감지 기능은 기본적으로 켜져 있으며,
배터리 수명과 사용 편의성 측면에서 최적의
설정으로 되어있습니다.
모션 감지 전환: Osight C의 전원이 켜져
있는 상태에서 "-" 버튼을 두 번 누른 후 3초
이상 길게 누르면 모션 감지 기능을 켜거나 끌
수 있습니다.
모션 감지가 활성화되면 도트 조준점이 한 번
깜빡입니다.
모션 감지가 비활성화되면 도트 조준점이 두
번 깜빡입니다.
4.4 밝기 설정: Figure 6
이 광학장치는 10단계 밝기 레벨로 구성되어
있습니다: 레벨 1과 2는 야간 투시 설정이며,
레벨 3부터 10까지는 주간 설정입니다. 레벨
1이 가장 낮고, 레벨 10이 가장 밝습니다.
“+” 버튼을 눌러 밝기를 높이고, “-” 버튼을
눌러 낮춥니다.
밝기 설정을 1 이하 또는 10 이상을 넘어갈
경우, 도트 조준점이 한 번 깜빡이며 최소값
또는 최대값에 도달했음을 사용자에게
알려줍니다.
4.5 조준선 선택: Figure 7
Osight C 의 전원이 켜진 상태에서 "-"
버튼을 3초 이상 길게 누르면 Dot+Circle,
Dot, Circle의 세 가지 조준선 설정을 전환할
수 있으며, 버튼을 계속 누르고 있는 동안 2
초마다 순차적으로 전환됩니다.
Dot+Circle은 기본 조준선으로, 3 MOA
도트와 32 MOA 원을 모두 표시합니다.
5. 설치 방법: Figure 8
6. 제로 설정: Figure 9
좌우(Windage) 또는 상하(Elevation)
조정은 클릭당 1 MOA입니다.
7. 배터리 교체: Figure 10
8. 배터리 부족 알림:
배터리 전원이 부족하면, 조준선이 1초
이내에 3번 깜빡이며, 이는 1분 간격으로
반복됩니다. 즉시 배터리를 교체해 주세요.
9. 메모리 기능:
이전에 사용한 밝기, 모션 감지, 조준선 설정,
전원 상태는 전원이 꺼진 후에도 유지됩니다.
Produktspezifikationen
| Marke: | Osight |
| Kategorie: | Nicht kategorisiert |
| Modell: | C-RD |
Brauchst du Hilfe?
Wenn Sie Hilfe mit Osight C-RD benötigen, stellen Sie unten eine Frage und andere Benutzer werden Ihnen antworten
Bedienungsanleitung Nicht kategorisiert Osight

26 März 2026
26 März 2026
Bedienungsanleitung Nicht kategorisiert
Neueste Bedienungsanleitung für -Kategorien-
26 März 2026
26 März 2026
26 März 2026
26 März 2026
26 März 2026
26 März 2026
26 März 2026
26 März 2026
26 März 2026
26 März 2026