Premier Mounts MM-AH426 Bedienungsanleitung
Premier Mounts Nicht kategorisiert MM-AH426
Lies die bedienungsanleitung für Premier Mounts MM-AH426 (2 Seiten) kostenlos online; sie gehört zur Kategorie Nicht kategorisiert. Dieses Handbuch wurde von 38 Personen als hilfreich bewertet und erhielt im Schnitt 4.8 Sterne aus 5 Bewertungen. Hast du eine Frage zu Premier Mounts MM-AH426 oder möchtest du andere Nutzer dieses Produkts befragen? Stelle eine Frage
Seite 1/2
Page 1 Installation Instructions
Installation Instructions
9531-000-021-00
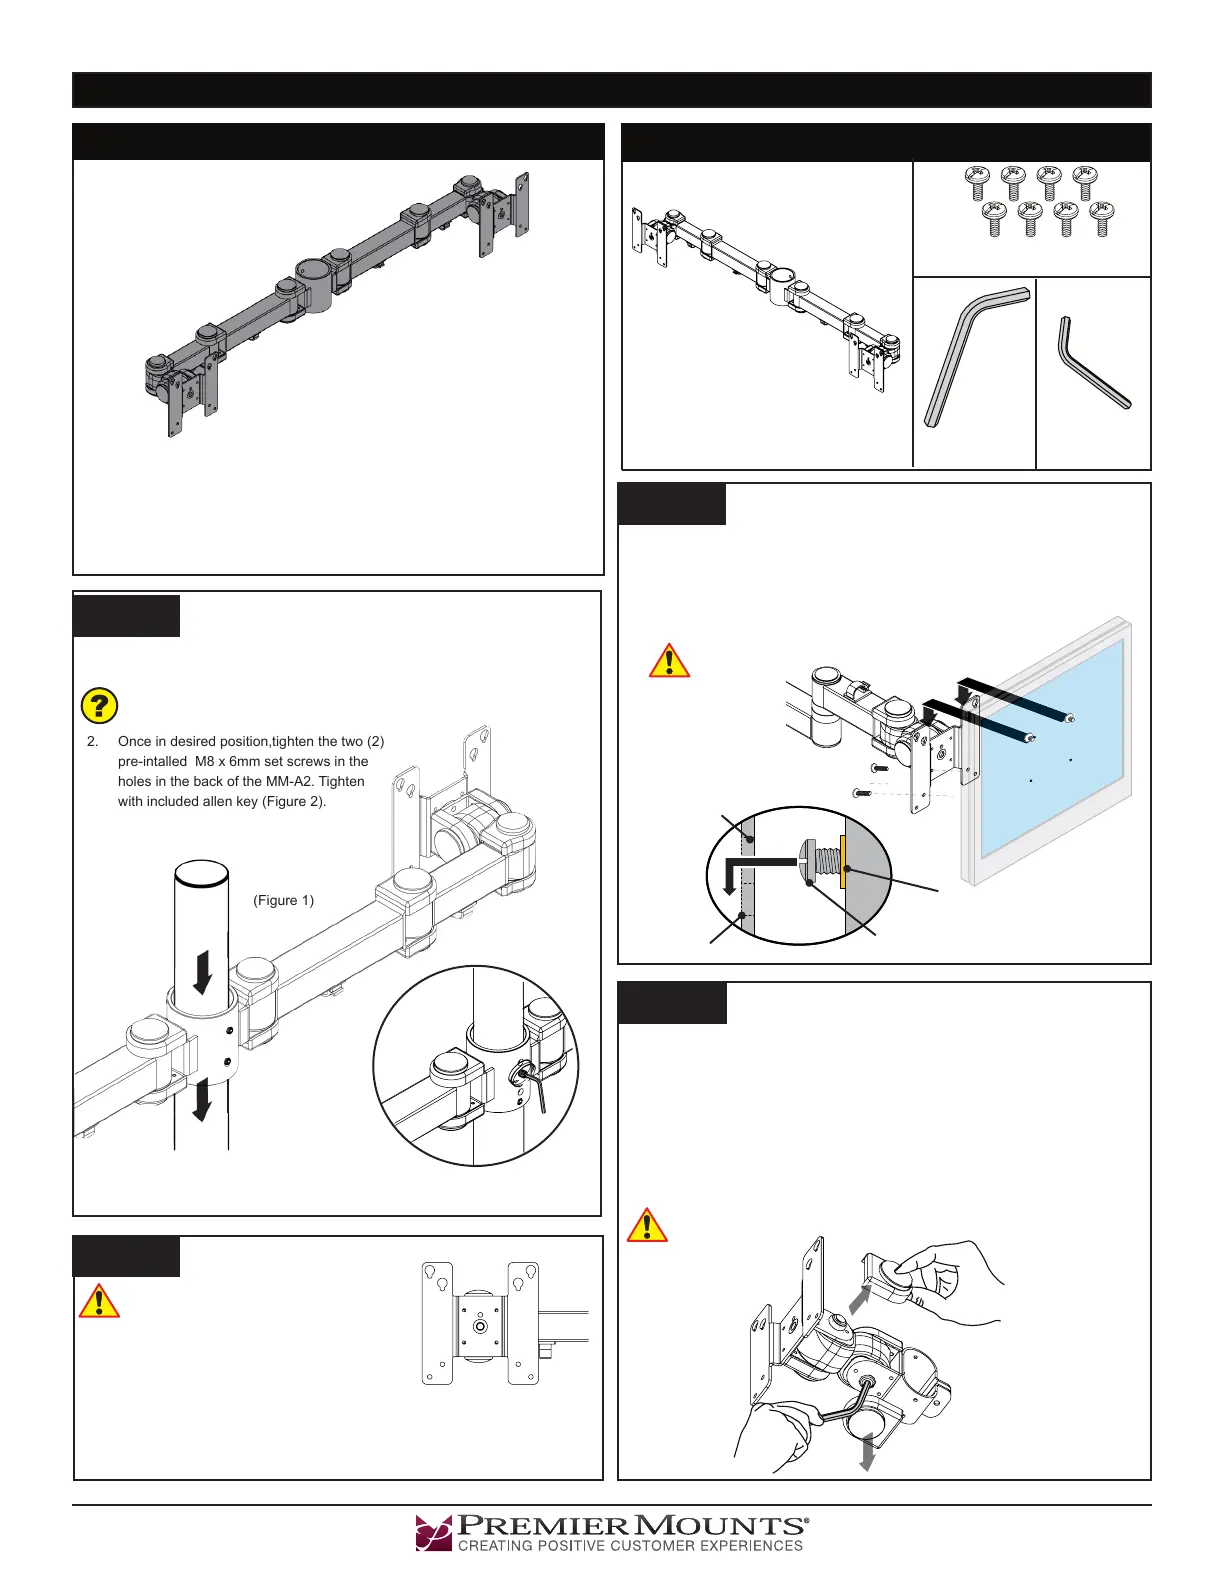
Parts List
MM-A2
Dual Articulating Mounting Arm
(Qty 1)
The MM-A2 is a dual articulating multimonitor mount arm that works
with any 2” tube. Each mounting head provides 90° of omnidirectional
tilt. The mounting heads include both 75x75mm and 100x100mm
VESA mounting patterns. The arm includes integrated cable
management tabs to keep wires and cables protected and organized.
Step 1
1. Slide your mounting arm over the pole and base (Figure 1)
(not included, but should be previously installed).
Determine the position on the pole desired for your mounting arm.
2. Once in desired position,tighten the two (2)
pre-intalled M8 x 6mm set screws in the
holes in the back of the MM-A2. Tighten
with included allen key (Figure 2).
Step 2
M4 x 10mm Combo Screws
(Qty 8)
Introduction
MM-A2
5/32” Allen Key
(Qty 1)
(Figure 1)
(Figure 3)
Are you installing to a 75x75mm or
100x100mm VESA moutning pattern?
For 75x75mm, use mounting points A. For
100x100mm use points B in gure 3.
1) Thread the M4 screws to one-half of their
length into the top two mounting holes on
each display, but do not tighten the M4
screws at this time.
Step 3
(Figure 2)
A
A
A
A
B
B
B B
Thread Insert in Flat
Panel or Adapter Plate
M4 Screw Partially
Threaded Into Flat Panel
Keyhole Slot
MM-A2 Mount
1) Insert the heads of the M4 screws through the keyhole slots on the
mounting head (Figure 5).
2) Insert the remaining two (2) M4x10mm screws, into the bottom mounting
points (Figure 4)
3) Repeat sub-steps 1 & 2 for the second display.
4) Tighten all M4 screws.
Do not overtighten the mounting hardware
Figure 4
Figure 5
6mm Allen Key
(Qty 1)
Step 3
To adjust the tension and/or tilt angle of the mounting head:
1) Adjust the mounting head by utilizing the 90° continuous tilt, until it is in the
desired position.
2) Remove the side and bottom cosmetic caps from the mounting
head (Figure 6)
3) Use the supplied 6mm allen wrench to tighten the allen screws on the
head.
4) The side 6mm screw secures the tilt position (Point A), while the bottom
6mm screw secures the pivot (Point B).
Do not overtighten the mounting hardware
A
B
(Figure 6)
Bottom View
3100 E. Miraloma Avenue, Anaheim, CA 92806 | 800.368.9700 USA | F 800.832.4888 |www.mounts.com
Unit 3, The Moorings Business Park, Channel Way | Longford, Conventry, CV6 6RH, UK |+44 (0) 2476 644105 | F +44 (0) 2476 644165
Produktspezifikationen
| Marke: | Premier Mounts |
| Kategorie: | Nicht kategorisiert |
| Modell: | MM-AH426 |
| Breite: | 508 mm |
| Produktfarbe: | Schwarz |
| Höhe: | 1066.8 mm |
| Befestigungstyp: | Tisch/Bank |
| Höchstgewichtskapazität: | 68 kg |
| Neigungsverstellung: | Ja |
| Paketgewicht: | 5790 g |
| Neigungswinkelbereich: | -90 - 90 ° |
| Maximale Bildschirmgröße: | - " |
| Pivot Winkel: | -90 - 90 ° |
| Drehungswinkel: | 360 ° |
| Anzahl der Display unterstützt: | 6 |
| Minimum Bildschirmgröße: | 10 " |
| Minimale VESA-Halterung: | 75 x 75 mm |
| Maximale VESA-Halterung: | 100 x 100 mm |
| Maximale Gewichtskapazität (pro Monitor): | 11.34 kg |
| Kompatibler Mastdurchmesser (min.): | 50.8 mm |
| Kompatibler Mastdurchmesser (max.): | 50.8 mm |
Brauchst du Hilfe?
Wenn Sie Hilfe mit Premier Mounts MM-AH426 benötigen, stellen Sie unten eine Frage und andere Benutzer werden Ihnen antworten
Bedienungsanleitung Nicht kategorisiert Premier Mounts

21 Juli 2025
20 Juli 2025
5 September 2024
5 September 2024
20 August 2024
20 August 2024
19 August 2024
19 August 2024
18 August 2024
17 August 2024
Bedienungsanleitung Nicht kategorisiert
Neueste Bedienungsanleitung für -Kategorien-
3 April 2026
3 April 2026
3 April 2026
3 April 2026
3 April 2026
3 April 2026
3 April 2026
3 April 2026
3 April 2026
3 April 2026