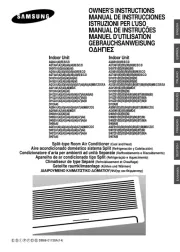
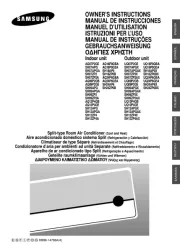
Samsung AR12KCFQCWQ/GA Bedienungsanleitung
Samsung
Nicht kategorisiert
AR12KCFQCWQ/GA
Lies die bedienungsanleitung für Samsung AR12KCFQCWQ/GA (49 Seiten) kostenlos online; sie gehört zur Kategorie Nicht kategorisiert. Dieses Handbuch wurde von 13 Personen als hilfreich bewertet und erhielt im Schnitt 4.9 Sterne aus 7 Bewertungen. Hast du eine Frage zu Samsung AR12KCFQCWQ/GA oder möchtest du andere Nutzer dieses Produkts befragen? Stelle eine Frage
Seite 1/49

Midea ODM GHANA CO IB&IM_EN.indd 1 2016-03-02 오후 2:20:36

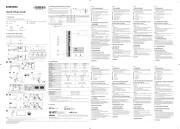
Features of your new air conditioner
Easy Filter
There is no grille to remove before separating the lter from the air conditioner! Therefore, lter can
be cleaned easily, more frequently! Frequent lter cleaning will prevent dust from entering into the
product or accumulating on the lter.
function
function will allow you to have deep, good night’s sleep by adjusting the
temperature, fan speed and air ow direction.
Cool Summer Oer
On those hot sweltering summer days and long restless nights, there is no better escape from the
heat than the cool comforts of home. Your new air conditioner brings an end to exhausting hot
summer days and lets you rest. Beat the heat with your own air conditioner this summer.
Cost Ecient System
Your new air conditioner not only provides maximum cooling power in the summer, but also can
be an ecient heating method in the winter with the advanced “Heat pump” system. “Heat pump”
system is 3 times more ecient compare to the other electrical heating appliance, so you can
further reduce its running cost. Now, meet year-round needs with one air conditioner.
Look for Everywhere
The elegant and harmonious design gives priority to the esthetics of your space and complements
any of your existing interior décor. With its soft color and rounded-edge shape, the new air
conditioner adds class to any room. Enjoy what your air conditioner oers both functionally and
esthetically.
English-2
Midea ODM GHANA CO IB&IM_EN.indd 2 2016-03-02 오후 2:20:36

Contents
Preparation
Safety precautions . . . . . . . . . . . . . . . . . . . . . . . . . . . . . . . . . . . . . . . . . . . . . . . . . . . . . . . . . . . . . . . . . . . . . . . . . . . . . . . . . . . . . . . . . . . . . . . . . . . . . . . . . .4
Checking before use . . . . . . . . . . . . . . . . . . . . . . . . . . . . . . . . . . . . . . . . . . . . . . . . . . . . . . . . . . . . . . . . . . . . . . . . . . . . . . . . . . . . . . . . . . . . . . . . . . . . . . 10
Basic function
Checking the name of the parts . . . . . . . . . . . . . . . . . . . . . . . . . . . . . . . . . . . . . . . . . . . . . . . . . . . . . . . . . . . . . . . . . . . . . . . . . . . . . . . . . . . . . . . . . . . 10
Checking the remote controller . . . . . . . . . . . . . . . . . . . . . . . . . . . . . . . . . . . . . . . . . . . . . . . . . . . . . . . . . . . . . . . . . . . . . . . . . . . . . . . . . . . . . . . . . . . 12
Basic function . . . . . . . . . . . . . . . . . . . . . . . . . . . . . . . . . . . . . . . . . . . . . . . . . . . . . . . . . . . . . . . . . . . . . . . . . . . . . . . . . . . . . . . . . . . . . . . . . . . . . . . . . . . . . 14
Airow direction control . . . . . . . . . . . . . . . . . . . . . . . . . . . . . . . . . . . . . . . . . . . . . . . . . . . . . . . . . . . . . . . . . . . . . . . . . . . . . . . . . . . . . . . . . . . . . . . . . . 16
Timer
Setting the On/O timer . . . . . . . . . . . . . . . . . . . . . . . . . . . . . . . . . . . . . . . . . . . . . . . . . . . . . . . . . . . . . . . . . . . . . . . . . . . . . . . . . . . . . . . . . . . . . . . . . . 17
mode . . . . . . . . . . . . . . . . . . . . . . . . . . . . . . . . . . . . . . . . . . . . . . . . . . . . . . . . . . . . . . . . . . . . . . . . . . . . . . . . . . . . . . . . . . . . . . . . . . . . . . 19
Options
Using the Turbo function . . . . . . . . . . . . . . . . . . . . . . . . . . . . . . . . . . . . . . . . . . . . . . . . . . . . . . . . . . . . . . . . . . . . . . . . . . . . . . . . . . . . . . . . . . . . . . . . . . 20
Settings
Setting the Display option. . . . . . . . . . . . . . . . . . . . . . . . . . . . . . . . . . . . . . . . . . . . . . . . . . . . . . . . . . . . . . . . . . . . . . . . . . . . . . . . . . . . . . . . . . . . . . . . . 21
Using the Auto clean function . . . . . . . . . . . . . . . . . . . . . . . . . . . . . . . . . . . . . . . . . . . . . . . . . . . . . . . . . . . . . . . . . . . . . . . . . . . . . . . . . . . . . . . . . . . . . 21
Others
Cleaning the air conditioner. . . . . . . . . . . . . . . . . . . . . . . . . . . . . . . . . . . . . . . . . . . . . . . . . . . . . . . . . . . . . . . . . . . . . . . . . . . . . . . . . . . . . . . . . . . . . . . 22
Maintaining the air conditioner. . . . . . . . . . . . . . . . . . . . . . . . . . . . . . . . . . . . . . . . . . . . . . . . . . . . . . . . . . . . . . . . . . . . . . . . . . . . . . . . . . . . . . . . . . . . 25
Troubleshooting 26 . . . . . . . . . . . . . . . . . . . . . . . . . . . . . . . . . . . . . . . . . . . . . . . . . . . . . . . . . . . . . . . . . . . . . . . . . . . . . . . . . . . . . . . . . . . . . . . . . . . . . . . . . .
Installation
Safety precautions . . . . . . . . . . . . . . . . . . . . . . . . . . . . . . . . . . . . . . . . . . . . . . . . . . . . . . . . . . . . . . . . . . . . . . . . . . . . . . . . . . . . . . . . . . . . . . . . . . . . . . . . 28
Choosing the installation location . . . . . . . . . . . . . . . . . . . . . . . . . . . . . . . . . . . . . . . . . . . . . . . . . . . . . . . . . . . . . . . . . . . . . . . . . . . . . . . . . . . . . . . . . 29
Accessories 32 . . . . . . . . . . . . . . . . . . . . . . . . . . . . . . . . . . . . . . . . . . . . . . . . . . . . . . . . . . . . . . . . . . . . . . . . . . . . . . . . . . . . . . . . . . . . . . . . . . . . . . . . . . . . . . .
Fixing the installation plate. . . . . . . . . . . . . . . . . . . . . . . . . . . . . . . . . . . . . . . . . . . . . . . . . . . . . . . . . . . . . . . . . . . . . . . . . . . . . . . . . . . . . . . . . . . . . . . . 34
Connecting the assembly cable . . . . . . . . . . . . . . . . . . . . . . . . . . . . . . . . . . . . . . . . . . . . . . . . . . . . . . . . . . . . . . . . . . . . . . . . . . . . . . . . . . . . . . . . . . . 35
Installing and connecting the assembly pipe of the indoor unit . . . . . . . . . . . . . . . . . . . . . . . . . . . . . . . . . . . . . . . . . . . . . . . . . . . . . . . . . . . . 37
Evacuating the indoor unit . . . . . . . . . . . . . . . . . . . . . . . . . . . . . . . . . . . . . . . . . . . . . . . . . . . . . . . . . . . . . . . . . . . . . . . . . . . . . . . . . . . . . . . . . . . . . . . . 38
Cutting or extending the pipe . . . . . . . . . . . . . . . . . . . . . . . . . . . . . . . . . . . . . . . . . . . . . . . . . . . . . . . . . . . . . . . . . . . . . . . . . . . . . . . . . . . . . . . . . . . . . 38
Installing and connecting the drain hose of the indoor unit . . . . . . . . . . . . . . . . . . . . . . . . . . . . . . . . . . . . . . . . . . . . . . . . . . . . . . . . . . . . . . . . 40
Changing direction of the drain hose . . . . . . . . . . . . . . . . . . . . . . . . . . . . . . . . . . . . . . . . . . . . . . . . . . . . . . . . . . . . . . . . . . . . . . . . . . . . . . . . . . . . . . 41
Evacuating the connected pipes. . . . . . . . . . . . . . . . . . . . . . . . . . . . . . . . . . . . . . . . . . . . . . . . . . . . . . . . . . . . . . . . . . . . . . . . . . . . . . . . . . . . . . . . . . . 42
Performing the gas leak tests. . . . . . . . . . . . . . . . . . . . . . . . . . . . . . . . . . . . . . . . . . . . . . . . . . . . . . . . . . . . . . . . . . . . . . . . . . . . . . . . . . . . . . . . . . . . . . 44
Fixing the indoor unit in place. . . . . . . . . . . . . . . . . . . . . . . . . . . . . . . . . . . . . . . . . . . . . . . . . . . . . . . . . . . . . . . . . . . . . . . . . . . . . . . . . . . . . . . . . . . . . 45
Fixing the outdoor unit in place . . . . . . . . . . . . . . . . . . . . . . . . . . . . . . . . . . . . . . . . . . . . . . . . . . . . . . . . . . . . . . . . . . . . . . . . . . . . . . . . . . . . . . . . . . . 45
Final check and trial operation. . . . . . . . . . . . . . . . . . . . . . . . . . . . . . . . . . . . . . . . . . . . . . . . . . . . . . . . . . . . . . . . . . . . . . . . . . . . . . . . . . . . . . . . . . . . . 46
Pump down procedure (when removing the product) . . . . . . . . . . . . . . . . . . . . . . . . . . . . . . . . . . . . . . . . . . . . . . . . . . . . . . . . . . . . . . . . . . . . . 46
How to connect your extended power cables. . . . . . . . . . . . . . . . . . . . . . . . . . . . . . . . . . . . . . . . . . . . . . . . . . . . . . . . . . . . . . . . . . . . . . . . . . . . . . 47
English-3
Midea ODM GHANA CO IB&IM_EN.indd 3 2016-03-02 오후 2:20:37
Produktspezifikationen
| Marke: | Samsung |
| Kategorie: | Nicht kategorisiert |
| Modell: | AR12KCFQCWQ/GA |
Brauchst du Hilfe?
Wenn Sie Hilfe mit Samsung AR12KCFQCWQ/GA benötigen, stellen Sie unten eine Frage und andere Benutzer werden Ihnen antworten
Bedienungsanleitung Nicht kategorisiert Samsung
26 Juli 2025

25 Juli 2025

25 Juli 2025

25 Juli 2025

25 Juli 2025

25 Juli 2025
25 Juli 2025

25 Juli 2025
24 Juli 2025

24 Juli 2025
Bedienungsanleitung Nicht kategorisiert
- Peugeot
- Hanseatic
- Atmos
- BakkerElkhuizen
- Armcross
- Emeril Everyday
- HeadRush
- Promethean
- Topeak
- Primo
- Hinkley Lighting
- Lumel
- BeamZ
- Paulmann
- Elbro
Neueste Bedienungsanleitung für -Kategorien-

30 Juli 2025

30 Juli 2025
30 Juli 2025

30 Juli 2025

30 Juli 2025

30 Juli 2025

30 Juli 2025

30 Juli 2025
30 Juli 2025
30 Juli 2025