Satco S13195 Bedienungsanleitung
Lies die bedienungsanleitung für Satco S13195 (2 Seiten) kostenlos online; sie gehört zur Kategorie Monitor. Dieses Handbuch wurde von 4 Personen als hilfreich bewertet und erhielt im Schnitt 4.2 Sterne aus 5 Bewertungen. Hast du eine Frage zu Satco S13195 oder möchtest du andere Nutzer dieses Produkts befragen? Stelle eine Frage
Seite 1/2
LED FILAMENT HID
REPLACEMENT LAMPS
Satco Products, Inc.
Brentwood, NY 11717
INSTALLATION AND SAFETY INSTRUCTIONS
IMPORTANT: Read before installing xture. Retain for future reference.
© Copyright 2024 Satco Products, Inc. 7/24 v4.0
IMPORTANT:
• Added weight of the device may cause instability of a free-standing
portable luminaire.
• Installers should not disconnect existing wires from lampholder terminals to
make new connections at lampholder terminals. Instead installers should cut
existing lampholder leads away from the lampholder and make new electrical
connections to lampholder lead wires by employing applicable connectors.
INSTALLATION
STEP 1: Turn off the power before
installing.
STEP 2: Remove the diffuser or lens
or reflector of the fixture to have clear
exposer of internal wiring.
STEP 3: Remove the existing lamp.
STEP 4: Bypass the gear including
ballast/capacitor/ignitor and connect
lamp-holder wires directly to 120-277V.
STEP 5: Secure wiring properly by
routing away from all sharp edges.
STEP 6: Choose the Lumen and CCT
Switch according to your requirement.
STEP 7: Install the HiLED lamp into the
lamp holder firmly.
STEP 8: Install back the diffuser or lens
of the fixture.
NOTE: Compatible with post top,
low/high bay, wall pack, shoe
box and LED rated dusk to dawn
xtures.
Please be sure to check the
Minimum Compartment Size chart
above for enclosed luminaries.
Models: S13195, S13196, S13197
WARNING: Risk of Fire or Electric Shock
• Luminaire wiring and electrical parts may be damaged when drilling for
installation of LED retrot. Check for enclosed wiring and components.
• LED Retrot installation requires knowledge of luminaires electrical systems.
If not qualied, do not attempt installation. Contact a qualied electrician.
• Install this lamp only in luminaires that have the construction features and
dimensions shown in the photographs and/or drawings and where the input
rating of the retrot does not exceed the input rating of the luminaire.
• Do not make or alter any open holes in an enclosure of wiring or electrical
components during kit installation.
• To prevent wiring damage or abrasion, do not expose wiring to edges of
sheet metal or other sharp objects.
• Disable all power to the Luminaire. The lamp holder must be disconnected
from the wiring to the ballast, capacitor, or ignitor. Verify that voltage does
not exceed 277V. Please see “Wiring Diagram”.
• Failure to follow instructions can result in a damaged product and will void
warranty. It could also result in an electric shock or re.
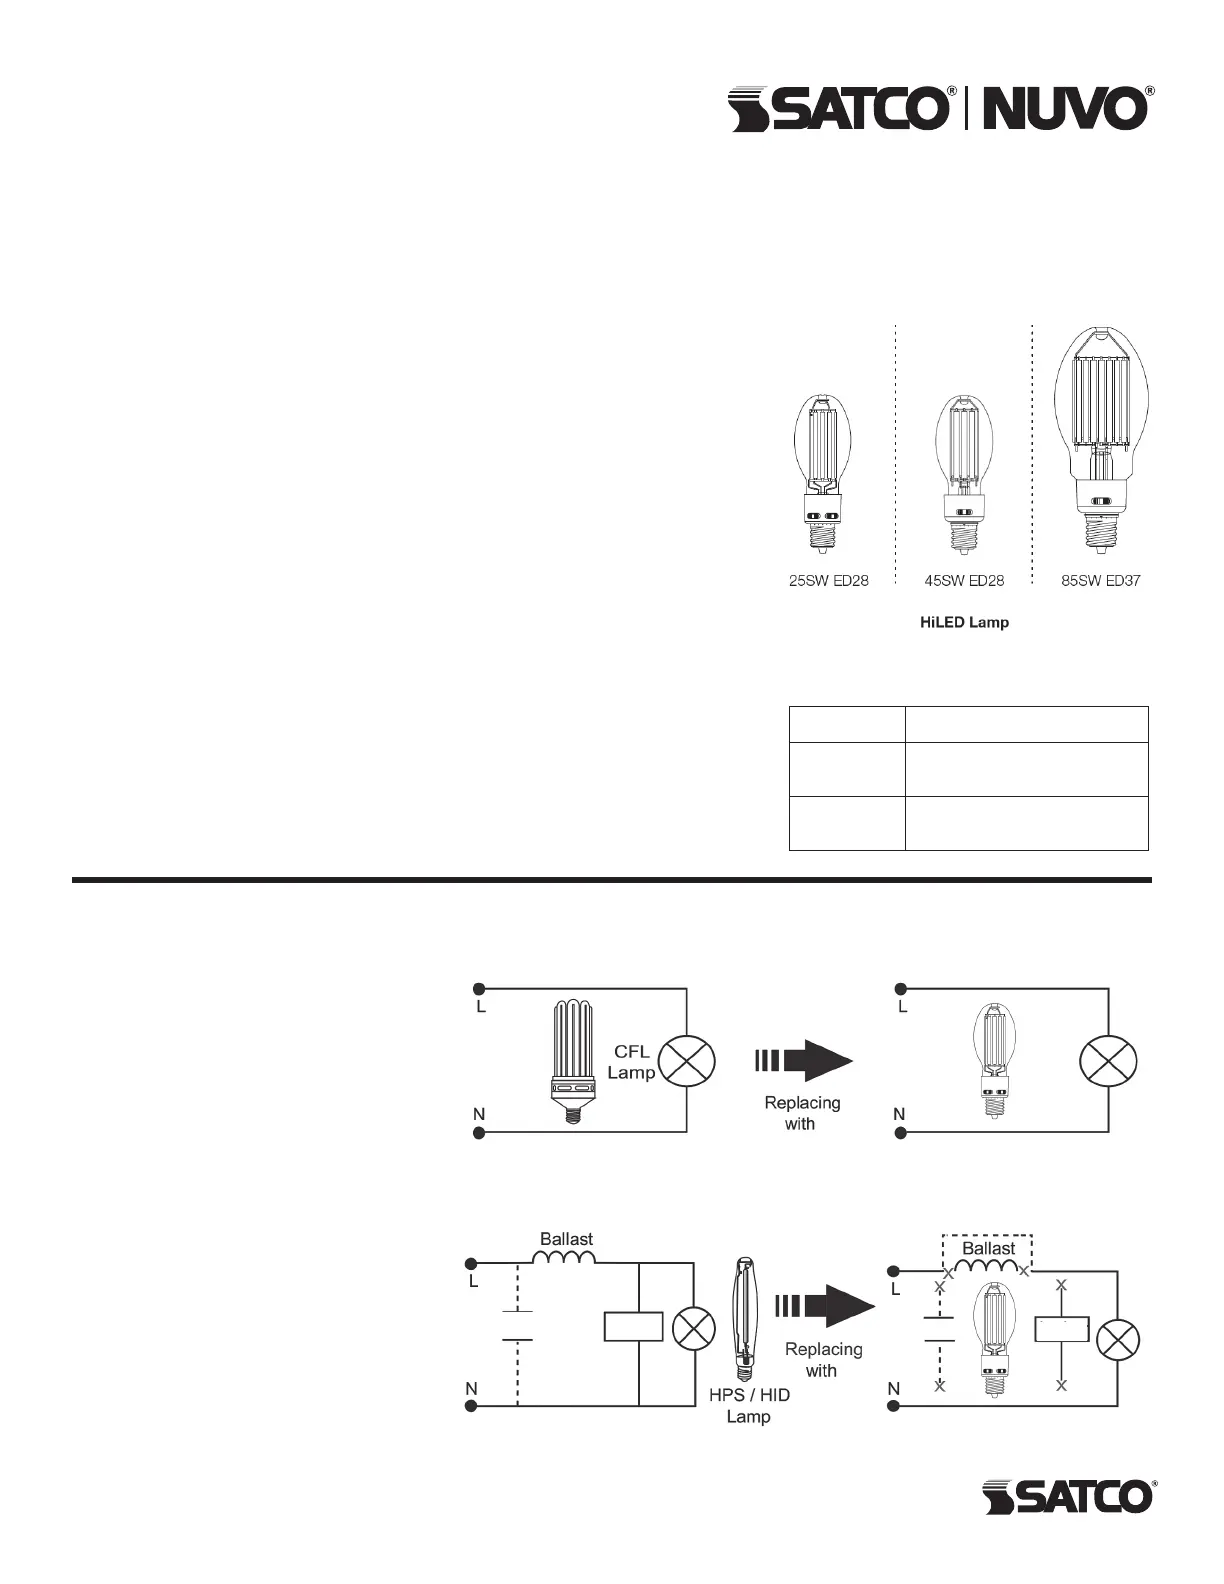
Replacing CFL Lamp
WIRING DIAGRAM
HPS/HID Wiring DiagramHiLED Wiring Diagram
Replacing HPS/HID Lamp
(L1)
(L1)
100-277V
CFL Wiring DiagramHiLED Wiring Diagram
100-277V
(L1)
(L1)
100-277V
Capacitor
Capacitor
Ignitor
Ignitor
100-277V
Minimum Compartment Sizing
Model No.Min. Comp. Size (LxWxH)
ED2814.02 x 8.03 x 8.03 inches
(356 x 204 x 204 mm)
ED37 (85SW)13.74 x 16.97 x 16.97 inches
(349 x 431 x 431 mm)
Produktspezifikationen
| Marke: | Satco |
| Kategorie: | Monitor |
| Modell: | S13195 |
Brauchst du Hilfe?
Wenn Sie Hilfe mit Satco S13195 benötigen, stellen Sie unten eine Frage und andere Benutzer werden Ihnen antworten
Bedienungsanleitung Monitor Satco

2 April 2026
2 April 2026
1 April 2026
1 April 2026
1 April 2026
1 April 2026
1 April 2026
1 April 2026
31 März 2026
23 Februar 2026
Bedienungsanleitung Monitor
Neueste Bedienungsanleitung für -Kategorien-
3 April 2026
3 April 2026
3 April 2026
3 April 2026
3 April 2026
3 April 2026
3 April 2026
1 April 2026
1 April 2026
1 April 2026