Satco S21915 Bedienungsanleitung
Lies die bedienungsanleitung für Satco S21915 (139 Seiten) kostenlos online; sie gehört zur Kategorie Monitor. Dieses Handbuch wurde von 6 Personen als hilfreich bewertet und erhielt im Schnitt 4.1 Sterne aus 2 Bewertungen. Hast du eine Frage zu Satco S21915 oder möchtest du andere Nutzer dieses Produkts befragen? Stelle eine Frage
Seite 1/139
Satco Products, Inc.
Brentwood, NY 11717© Copyright 20224 Satco Products, Inc. 6/24 v1.0
FEATURES
• c-UL-us list and recognized
• Plug-n-Play replacement
• Full glass housing: No aging, yellowing, bending
COLORQUICK
™
LED T8 2', 3', 4'
TYPE A DIRECT REPLACEMENT
Models: S21915, S21916, S21917, S21918, S21919
INSTALLATION AND SAFETY INSTRUCTIONS
IMPORTANT: Read before installing xture. Retain for future reference.
WARNING:Risk of re or electric shock.
Disconnect power before installation.
• Product must be installed in accordance with the national
electrical code or your local electrical code. If you are not
familiar with these codes and requirements, contact a
qualied electrician.
• Check the lamp before installation. If there is any damage
DO NOT INSTALL.
• LED T8 lamp to be operated with qualied electronic ballast,
emergency ballast and dimming ballast. Dimmable only with
compatible dimmable ballasts Check the compatibility list
before installation. Visit www.Satco.com for compatibility list.
• Use only in place of uorescent lamps specied on label.
• Suitable for damp locations.
• DO NOT INSTALL this lamp in a pre-heat luminaire.
• This lamp only operates on electronic ballasts. If lamp does
not light when the luminaire is energized, remove lamp
from luminaire and contract lamp manufacturer or qualied
electrician.
• If the lamp or luminaire exhibits undesirable operation
(buzzing, ickering etc.), immediately turn off power, remove
lamp from luminaire and contact manufacturer.
• To prevent wiring damage or abrasion, do not expose wiring
to edges of sheet metal or other sharp objects.
• Do not make or alter any open holes in an enclosure
of wiring or electrical components during installation.
• Installers should not disconnect the existing wire from lamp
holder terminals to make new connections at lamp holder
terminals. Instead installers should cut existing lamp holder
leads away from the lamp holder and make new electrical
connections to lamp holder lead wires by employing
applicable connectors.
• Check the existing wiring for damage before installing.
DO NOT INSTALL if existing wires are damaged.
• Suitable for use in enclosed luminaries, not vapor tight.
• Disconnect lamp from power supply before any maintenance.
• Clean luminaire with dry cloth.
• Do not clean the lamp with corrosive chemicals.
• To ensure proper lamp performance, temperature of the
Tc point should not exceed ensure 131ºF after a min. of
2 hours of use.
• This product may cause interference to radio equipment and
should not be installed near maritime safety communications
equipment or other critical navigation or communication
equipment operating between 0.45-30 MHz.
• TYPE A LAMP - Intended for direct substitution of a
uorescent lamp and operating from the integral ballast
without any modications to the uorescent luminaire.
The units covered by this report were intended to retrot surface mount, Type IC or non-IC recessed mount Listed uorescent
luminaires that use maximum 4 tubular lamps, the minimum lamp compartment dimensions are tabulated below.
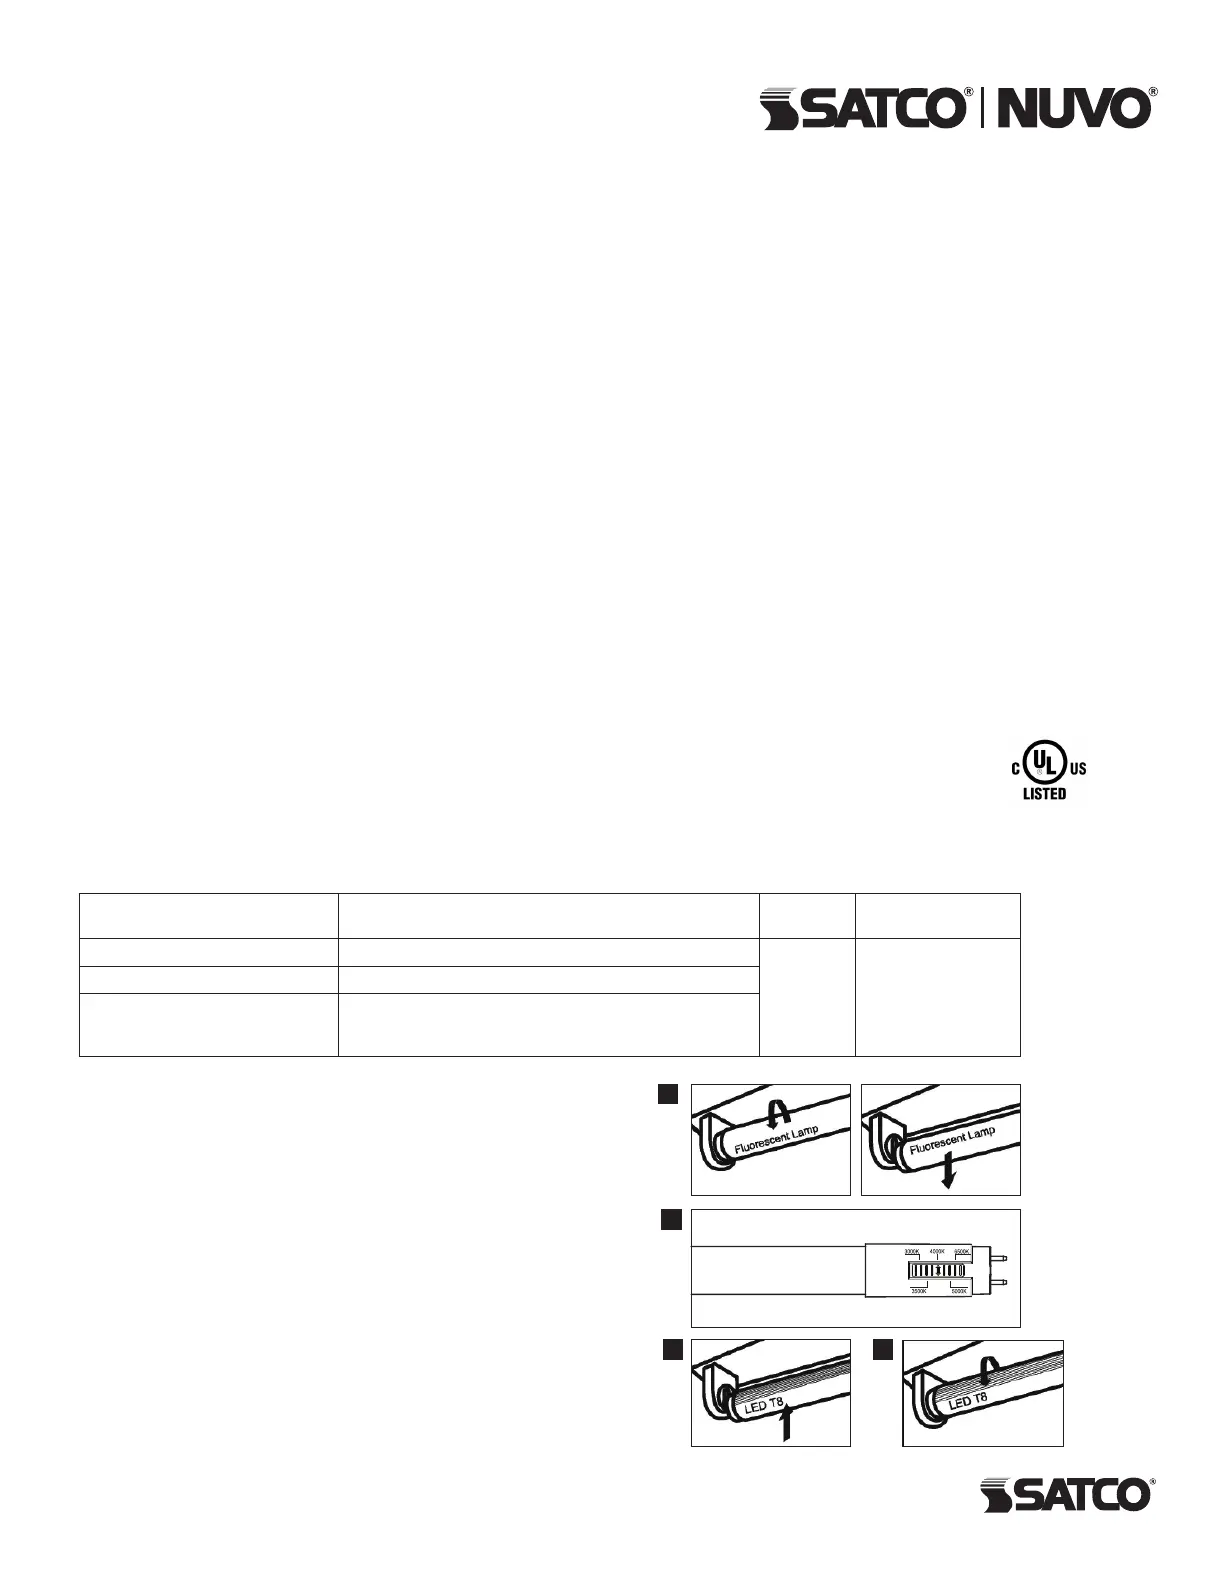
INSTALLATION INSTRUCTIONS
STEP 1:Turn power OFF.
STEP 2:Remove lens or diffuser (if applicable).
STEP 3:Remove existing uorescent lamps from the luminaire.
See Figure A.
STEP 4:Select the color temperature you want using the switch
on the end cap of the lamp. See Figure B.
STEP 5:Bring LED lamp to luminaire and insert lamp pins into
luminaire lamp holders. See Figure C.
STEP 6:Rotate LED lamp until lamp locks in place. Ensure that
the LED lamp front points away from the back of the luminaire.
See Figure D.
NOTE: Install LED T8 replacement lamp one for each uorescent
lamp removed.
STEP 7:Place lens or diffuser back in place (if applicable).
STEP 8:Turn power ON.
A
D
B
C
Item Number–Description
Minimum Lamp Compartment Dimensions
(Length x Width x Height)
Lamp
Quantity
Lamp-to-Lamp
Spacing
S21915 8T8/LED/24/5CCT/DR24.21 x 23.82 x 94 inches (615 x 605 x 100 mm)
4
4.33 inches
(110mm)
S21916 11T8/LED/36/5CCT/DR36.02 x 23.82 x 94 inches (915 x 605 x 100 mm)
S21917 10T8/LED/48/5CCT/DR
S21918 13T8/LED/48/5CCT/DR
S21919 17T8/LED/48/5CCT/DR
47.83 x 23.82 x 94 inches (1215 x 605 x 100 mm)
Produktspezifikationen
| Marke: | Satco |
| Kategorie: | Monitor |
| Modell: | S21915 |
Brauchst du Hilfe?
Wenn Sie Hilfe mit Satco S21915 benötigen, stellen Sie unten eine Frage und andere Benutzer werden Ihnen antworten
Bedienungsanleitung Monitor Satco

2 April 2026
2 April 2026
1 April 2026
1 April 2026
1 April 2026
1 April 2026
1 April 2026
1 April 2026
31 März 2026
23 Februar 2026
Bedienungsanleitung Monitor
Neueste Bedienungsanleitung für -Kategorien-
3 April 2026
3 April 2026
3 April 2026
3 April 2026
3 April 2026
3 April 2026
3 April 2026
1 April 2026
1 April 2026
1 April 2026