SSV Works X3-US10 Bedienungsanleitung
SSV Works Lautsprecher X3-US10
Lies die bedienungsanleitung für SSV Works X3-US10 (5 Seiten) kostenlos online; sie gehört zur Kategorie Lautsprecher. Dieses Handbuch wurde von 40 Personen als hilfreich bewertet und erhielt im Schnitt 4.9 Sterne aus 7 Bewertungen. Hast du eine Frage zu SSV Works X3-US10 oder möchtest du andere Nutzer dieses Produkts befragen? Stelle eine Frage
Seite 1/5
X3-US10
2016+ Can-Am Maverick x3
10” Under Seat Enclosure
SSV WORKS, 201 N. Rice Ave Unit A, Oxnard, CA 93030
www.SSVworks.com | Phone: 818-991-1778 | Fax: 866-293-6751
!
Please read and understand these
instructions completely before
installation to avoid possible injury, or
damage to the accessory or vehicle.
WARRANTY INFORMATION:
All SSV Works enclosures are covered by a limited lifetime warranty against defects
in material or workmanship. All SSV Works Electronics are covered by a limited 1 year
warranty against defects in material or workmanship. All SSV Works Speakers are
covered by a limited 1 year warranty against defects in material or workmanship. Labor
for replacement of defective components is not covered. Contact SSV Works for further
warranty information.
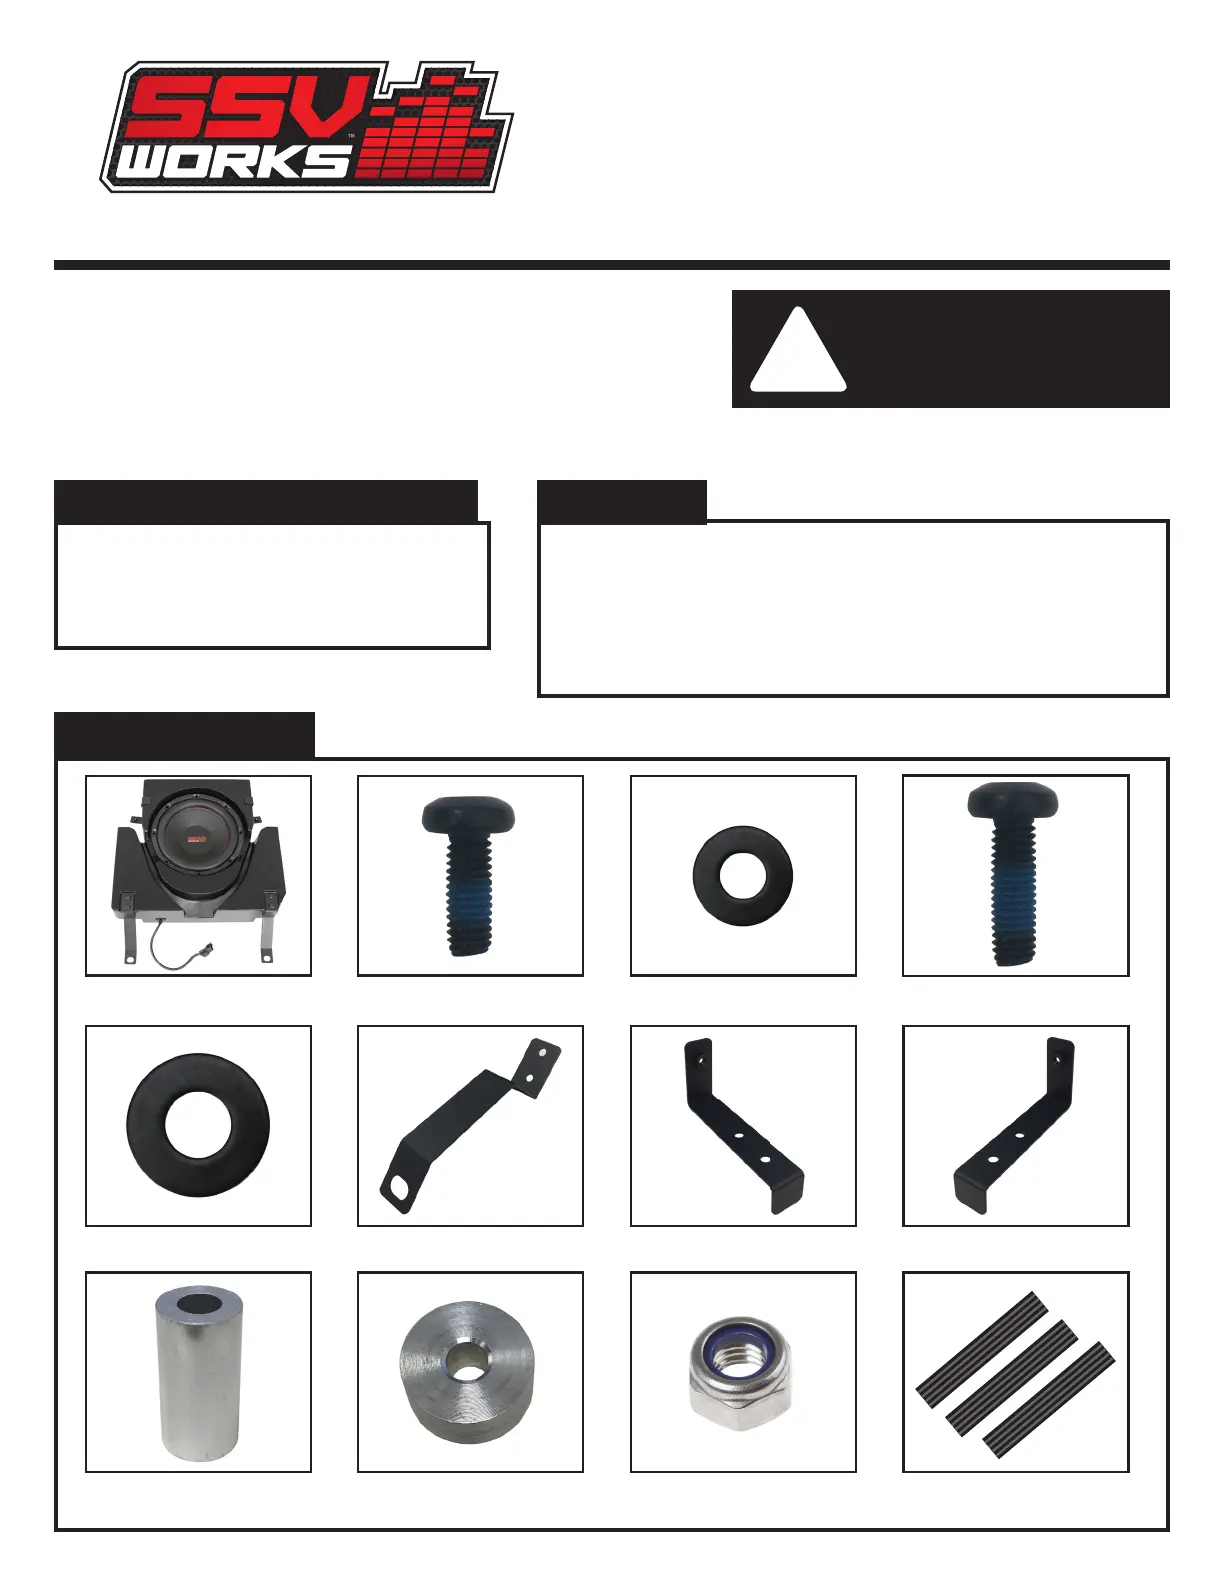
1. X3-US10 Enclosure
2. M6 x 16mm Screws x 10
3. M6 Washers x 10
4. M6 x 25mm Screw x 1
TOOLS NEEDED FOR INSTALLATIONPARTS LIST
PARTS LIST IMAGES
5. Large washers x 2
6. D-Brackets x 2
7. A-Bracket x 1
8. B-Bracket x 1
2. M6 x 16mm Screws x 10
7. A-Bracket x 1
11. M6 Locking Hex Nut
8. B-Bracket x 1
12. Foam Strips x 3
3. M6 Washers x 104. M6 x 25mm Screw x 1
5. Large washers x 2
9. Seat Risers x 2
1. X3-US10 Enclosure
6. D-Brackets x 2
10. Small Spacer x 1
- 10mm Socket or Wrench
- T-30 Torx Driver
- T-40 Torx Driver
9. Seat Risers x 2
10. Small Spacer x 1
11. M6 Locking Hex Nut
12. Foam Strips x 3
0
Produktspezifikationen
| Marke: | SSV Works |
| Kategorie: | Lautsprecher |
| Modell: | X3-US10 |
Brauchst du Hilfe?
Wenn Sie Hilfe mit SSV Works X3-US10 benötigen, stellen Sie unten eine Frage und andere Benutzer werden Ihnen antworten
Bedienungsanleitung Lautsprecher SSV Works

24 August 2024
24 August 2024
24 August 2024
24 August 2024
24 August 2024
24 August 2024
24 August 2024
24 August 2024
24 August 2024
24 August 2024
Bedienungsanleitung Lautsprecher
Neueste Bedienungsanleitung für -Kategorien-
3 April 2026
3 April 2026
3 April 2026
3 April 2026
2 April 2026
2 April 2026
2 April 2026
2 April 2026
2 April 2026
2 April 2026