StarTech.com 21050-PC-SERIAL-CARD Bedienungsanleitung
StarTech.com Schnittstellen-Hub 21050-PC-SERIAL-CARD
Lies die bedienungsanleitung für StarTech.com 21050-PC-SERIAL-CARD (2 Seiten) kostenlos online; sie gehört zur Kategorie Schnittstellen-Hub. Dieses Handbuch wurde von 36 Personen als hilfreich bewertet und erhielt im Schnitt 4.2 Sterne aus 9 Bewertungen. Hast du eine Frage zu StarTech.com 21050-PC-SERIAL-CARD oder möchtest du andere Nutzer dieses Produkts befragen? Stelle eine Frage
Seite 1/2
Quick-Start Guide
To view manuals, FAQs, videos, drivers, downloads, technical drawings, and more, visit www.startech.com/support.
Manual Revision: March 24, 2022
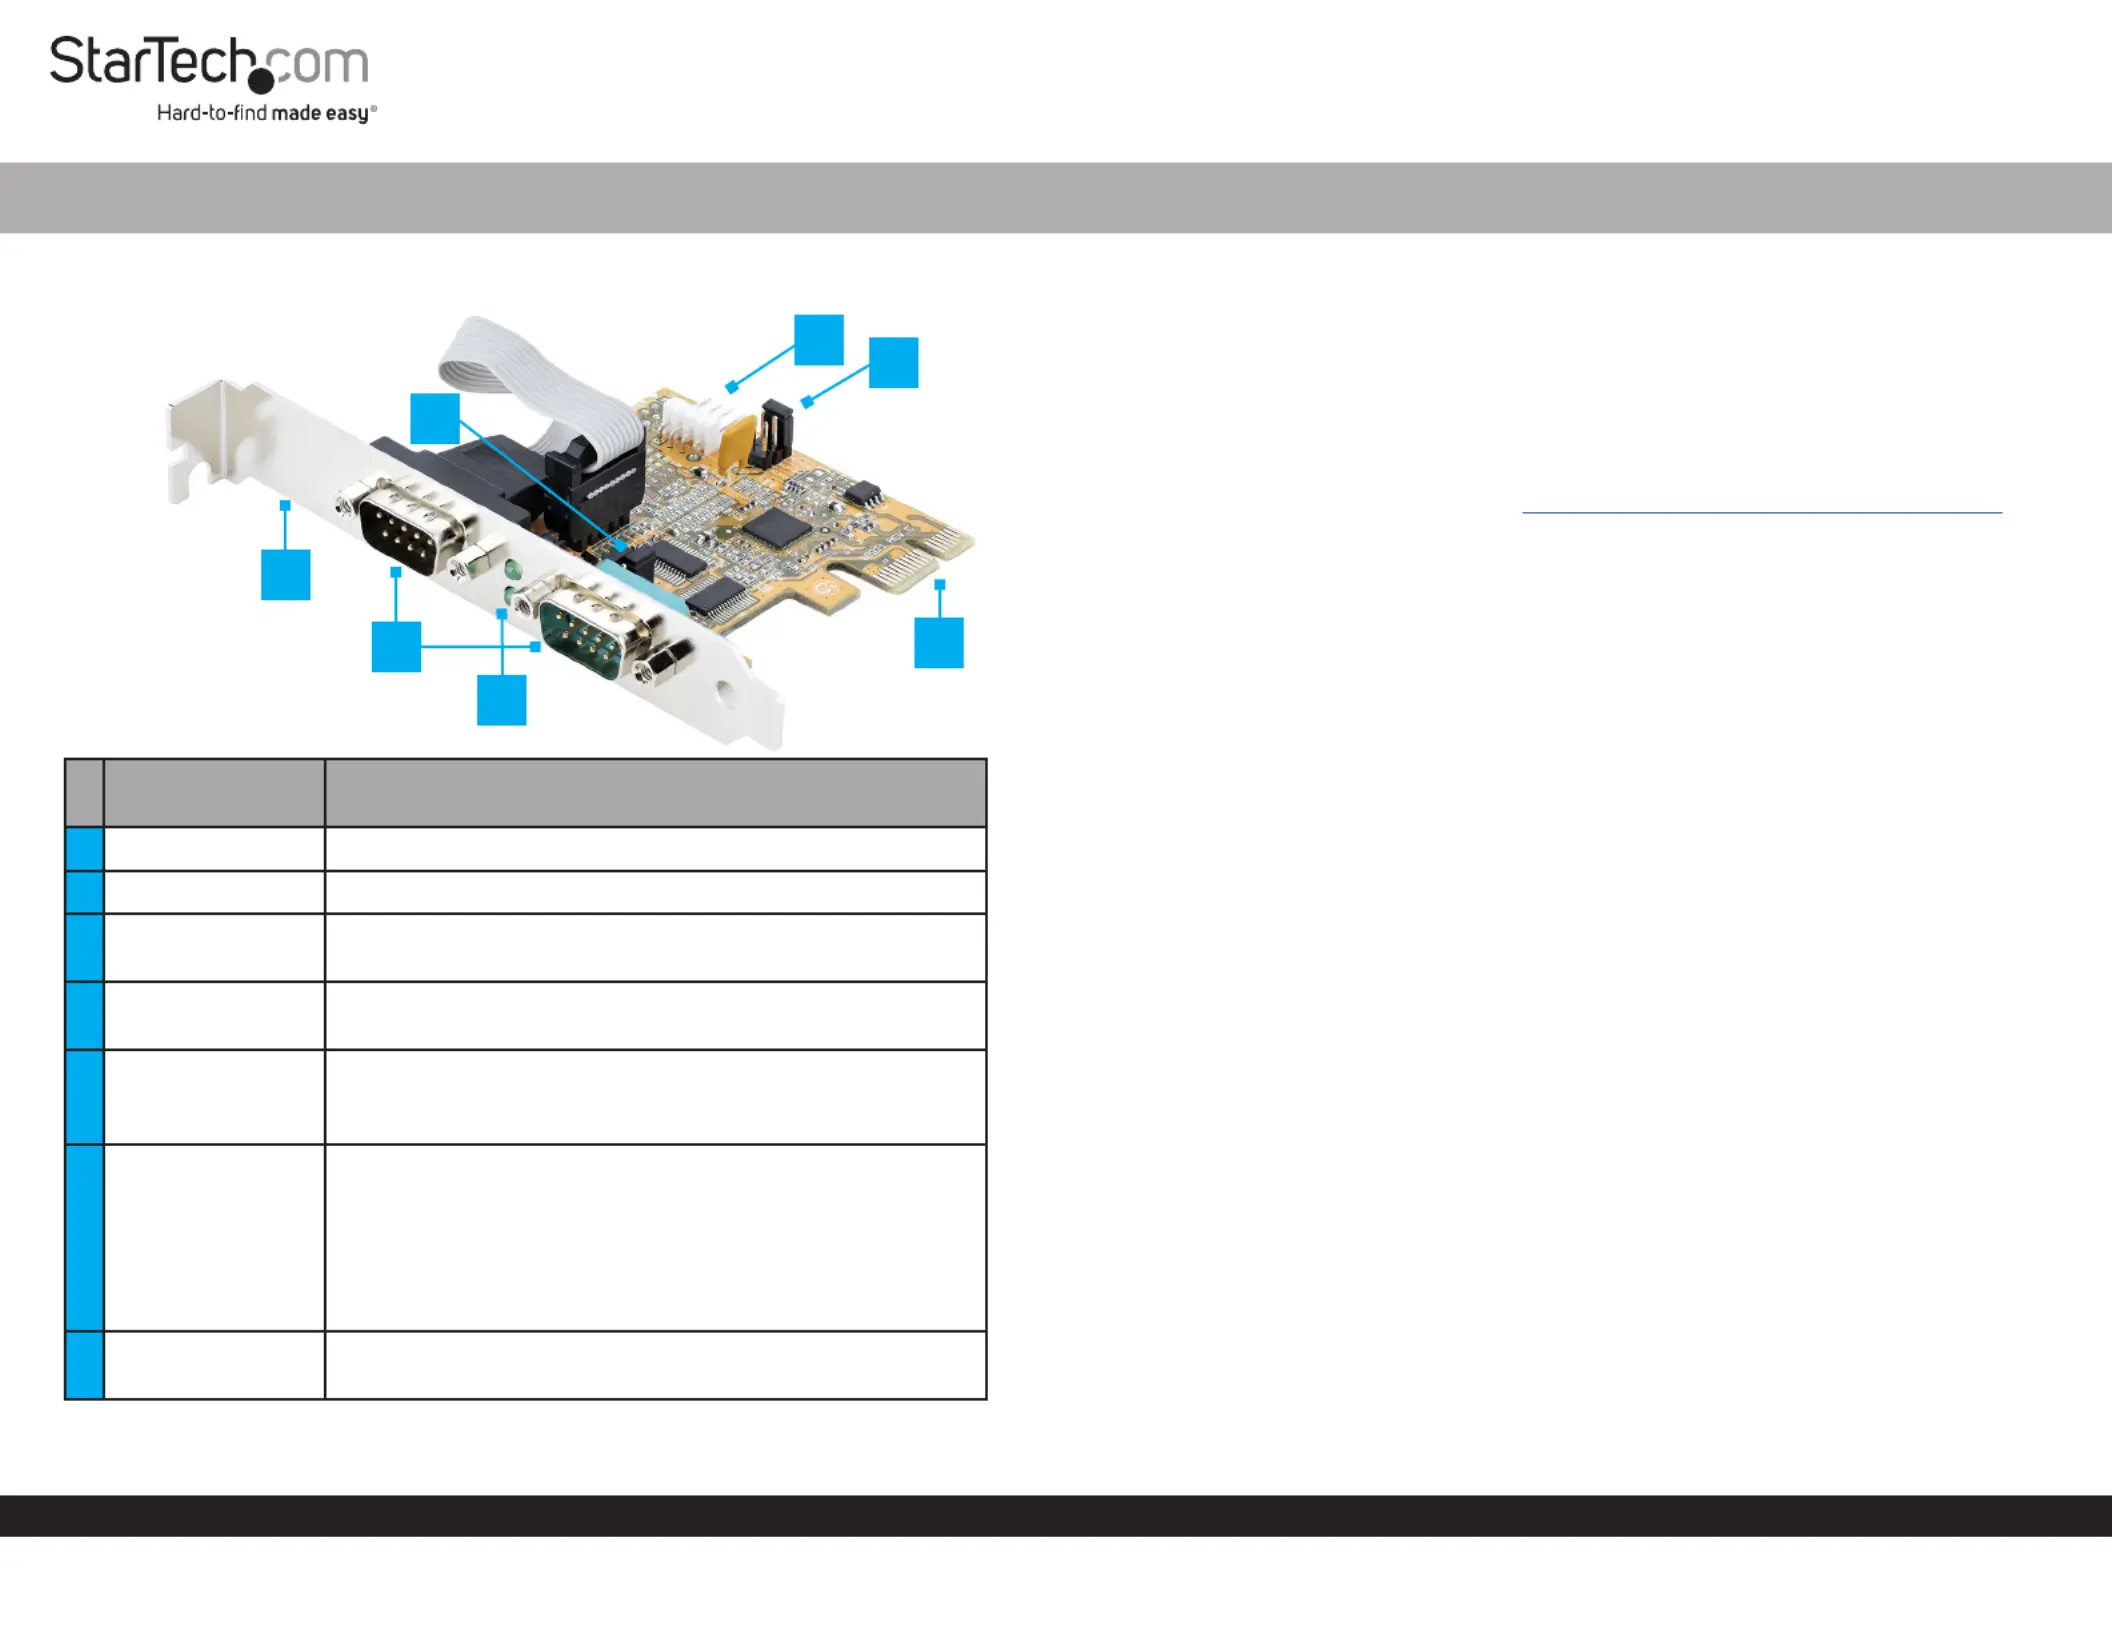
Product Diagram (21050-PC-SERIAL-CARD)
Port/LED/
Connector
Function
1Bracket• Used to secure the card on the Host Computer
2Serial Ports DB-9• Connect Serial Peripheral Devices
3Activity LEDs
• ReceiveTransmitLEDsGreen and illuminate when
there’s activity
4J2 Jumpers
• Used to or power output. The EnableDisablePin 9
default position is Disable
5
J5 Power
Connector
• Optional: connect the Host Computer Power Supply
(4 Pin SP4/Floppy power connector) to Provide Power
over PIN 9
6J3 Jumper
• Optional: used to change the voltage output of Pin 9
• PCI12V12V draws power from the PCIe slot. Outputs
• AUX12V J5 Power Connector. draws power from the
Outputs 12V
• AUX5V J5 Power Connector. draws power from the
Outputs 5V
7
PCIe 2.0 p1-x1
Connector
• Insert into a on thePCI Express Slot Host Computer
2-Port PCI Express Serial Card with COM Port Activity LEDs - 16C1050 UART
Package Contents
• Serial Parallel PCI Express Card x1
• Low-Prole Bracket x2
• Quick-Star Guide x1
Requirements
For the latest requirements, please visit www.startech.com/21050-PC-SERIAL-CARD
• Computer with an available PCI Express Slot (x1, x4, x8, or x16)
Installation
Install the PCI Express Card
WARNING!
PCI Express Cards can be severely damaged by static electricity. Ensure that you
are properly grounded before you open your or touch the Computer CasePCI
Express CardAnti-Static Strap . You should wear an when you install any computer
component. If an isn’t available, discharge any built-up static Anti-Static Strap
electricity by touching a large for several seconds. Only Grounded Metal Surface
handle the by its edges and don’t touch the gold connectors.PCI Express Card
1. Turn o your and any that are connected to it (for Computer Peripheral Devices
example, , , .).PrintersExternal Hard Drivesetc
2. Unplug the from the back of your .Power Cable Computer
3. Disconnect any that are connected to your .Peripheral Devices Computer
4. Remove the from your . Consult the documentation that Cover Computer Case
came with your for details about how to do this safely.Computer
5. Locate an open and remove the corresponding PCI Express SlotSlot Cover Plate
from the back of your . Consult the documentation that came Computer Case
with your for details about how doing this safely. This card works in PCI Computer
Express x1, x4, x8, or p1-x16 slots.
6. Gently insert the into the open and fasten the PCI Express CardPCI Express Slot
BracketComputer Case to the back of the .
Note:
Note:
Note:
Note: Note: If you install the
If you install the
If you install the
If you install the If you install the PCI Express Card
PCI Express Card
PCI Express Card
PCI Express Card PCI Express Card into a
into a
into a
into a into a Small Form Factor
Small Form Factor
Small Form Factor
Small Form Factor Small Form Factor or a
or a
or a
or a or a Low-Prole
Low-Prole
Low-Prole
Low-Prole Low-Prole
Desktop System
Desktop System
Desktop System
Desktop SystemDesktop System, it
, it
, it
, it’
’
’
’s necessary to replace the pre-installed standard
s necessary to replace the pre-installed standard
s necessary to replace the pre-installed standard
s necessary to replace the pre-installed standard , it’s necessary to replace the pre-installed standard Full-
Full-
Full-
Full-Full-Height
Height
Height
Height Height
Bracket
Bracket
Bracket
Bracket Bracket with the included
with the included
with the included
with the included with the included Low-Prole Bracket
Low-Prole Bracket
Low-Prole Bracket
Low-Prole BracketLow-Prole Bracket. The
. The
. The
. The . The Serial Port DB-9
Serial Port DB-9
Serial Port DB-9
Serial Port DB-9Serial Port DB-9
that uses the
that uses the
that uses the
that uses thethat uses the
Ribbon Cable
Ribbon Cable
Ribbon Cable
Ribbon CableRibbon Cable
needs to be installed on a separate
needs to be installed on a separate
needs to be installed on a separate
needs to be installed on a separate needs to be installed on a separate Low-Prole Bracket
Low-Prole Bracket
Low-Prole Bracket
Low-Prole BracketLow-Prole Bracket .
.
.
. .
5
7
1
2
6
4
3
Produktspezifikationen
| Marke: | StarTech.com |
| Kategorie: | Schnittstellen-Hub |
| Modell: | 21050-PC-SERIAL-CARD |
| Breite: | 65 mm |
| Tiefe: | 67 mm |
| Gewicht: | 51 g |
| Produktfarbe: | Gelb |
| Höhe: | 18 mm |
| Betriebstemperatur: | 0 - 55 °C |
| Relative Luftfeuchtigkeit in Betrieb: | 5 - 95 % |
| Verpackungsbreite: | 207 mm |
| Verpackungstiefe: | 144 mm |
| Verpackungshöhe: | 38 mm |
| Paketgewicht: | 200 g |
| Warentarifnummer (HS): | 84733020 |
| Eingebaut: | Ja |
| LED-Anzeigen: | Aktivität |
| Temperaturbereich bei Lagerung: | -40 - 75 °C |
| Anzahl Produkte pro Versandkarton: | 50 Stück(e) |
| Länge des Versandkartons: | 440 mm |
| Breite des Versandkartons: | 530 mm |
| Höhe des Versandkartons: | 340 mm |
| Schnellinstallationsanleitung: | Ja |
| Serielle Schnittstelle: | RS-232 |
| Nachhaltigkeitszertifikate: | CE, RoHS |
| Unterstützte Linux-Betriebssysteme: | Ja |
| Montageblöcke enthalten: | Ja |
| Anzahl serielle Anschlüsse: | 2 |
| Unterstützung Datenflusssteuerung: | Ja |
| Hostschnittstelle: | PCIe |
| Unterstützte Server-Betriebssysteme: | Windows Server 2016, Windows Server 2019 |
| Chipsatz: | ASIX - AX99100, ASIX - ZT3243LFEY |
| Ausgangsschnittstelle: | Seriell |
| Baudrate: | 921.6 Kbit/s |
| Erweiterungskarte Standard: | PCI 2.0 |
| Datenbits: | 5, 6,7, 8,9 |
| FIFO (First In, First Out): | 256 B |
| Parity bit: | Even, Mark, N,Odd, Space |
| Formfaktor der Erweiterungskarte: | Full-height / Low-profile |
Brauchst du Hilfe?
Wenn Sie Hilfe mit StarTech.com 21050-PC-SERIAL-CARD benötigen, stellen Sie unten eine Frage und andere Benutzer werden Ihnen antworten
Bedienungsanleitung Schnittstellen-Hub StarTech.com

18 August 2025
18 August 2024
17 August 2024
28 November 2023
Bedienungsanleitung Schnittstellen-Hub
Neueste Bedienungsanleitung für -Kategorien-
31 März 2026
18 September 2025
3 September 2025
2 September 2025
26 August 2025
22 August 2025
17 August 2025
9 August 2025
8 August 2025
8 August 2025